NiaMurrell.com2024-05-06T19:27:54.802Zhttps://www.niamurrell.com/Nia MurrellHexoThe Most Annoying Port Clashhttps://www.niamurrell.com/code/2024-05-06-the-most-annoying-port-clash/2024-05-06T18:20:51.000Z2024-05-06T19:27:54.802ZFor the past few months I’ve been unable to use my JFM weekly check-in app. The fix turned out to be so obvious that it’s almost painful to document here, but I’m doing so in case future me once again loses the forest due to all the bloody trees 😂
The Setup
The app is a Vue app which accesses a NodeJS API. Sort of…it’s actually a NodeJS app which uses Express to serve the static files of the Vue app. This is important!!!
The Problem
I recently upgraded my laptop and went from using Mac’s Mojave OS to Sonoma (I know…lol). Somewhere in the many releases between these two, Mac started using Port 5000 as an AirPlay receiver. I’ve developed several applications which use this as their development server port, including this one.
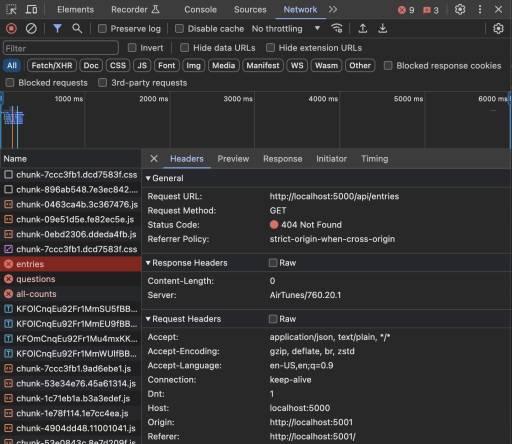
It seemed like an easy fix—change the port to anything but 5000 and everything should work, right? I changed the app to run on Port 5001 and updated the API call URL to match it and tried running the app.
ERROR ALERT
From the Network tab I could see that the app was running on Port 5001 as expected, but for some reason it was still sending the API requests to Port 5000.
WHY 😭
TLDR — The Solution
I didn’t re-build the Vue app and the static files were never updated to call the new port.
It seems so obvious now! I’m so used to the app server automatically resetting itself every time a file is saved. I was working as though this was happening to the edited files in the Vue app too, but alas it was not.
I hope this post will shortcut a lot of troubleshooting if I do it again (don’t see that happening though!).
To Be Clear, The Issue Was Not…
Not a Mac issue, AirPlay was not hijacking localhost and breaking all dev servers
Not a browser cache issue, hard reset did not fix
Not a browser issue, same thing happened in all browsers
Not a Sequelize issue, Sequelize does not cache API URLs
Not a NodeJS issue, NodeJS does not cache API URLs
Not a Vue issue, Vue does not cache API URLs
Not a Vue issue, running the app on a Vue server instead of static files just raised CORS errors from a different port (8080)
Not a CORS issue (well, kind of…), there shouldn’t be a cross-origin error since both are on the same port theoretically
Not a cors or express-rate-limit or express-slow-down package issue, disabling these middlewares had no effect
Not a Mac issue, restarting the machine had no effect
That’s a lot of troubleshooting for something so obvious, and I don’t remember the exact timeline of events but I’m pretty sure I tried fixing it 2-3 times over the past 4 months and giving up before I finally found the solution 🫨
So yeah…if I’m ever running an app or website that serves static pages, don’t forget to rebuild the app when changes are made!! Lesson learned 😅😭🥴
]]>For the past few months I've been unable to use my weekly check-in app. The fix turned out to be so obvious.Thank You nodemon, dotenvhttps://www.niamurrell.com/code/2023-11-04-thank-you-nodemon-dotenv/2023-11-04T19:43:03.000Z2023-11-04T20:04:14.361ZRecently learned of two rather impactful updates in NodeJS that I don’t want to forget! As of recent versions, Node can now natively reference .env files, and restart the server when a file is updated. Before it was common practice to use the dotenv and nodemon packages to do each of these things, respectively. But now it comes out of the box!
How To Not Need dotenv
As of Node version 20.6.0 you can use the --env-file flag when starting the server and Node will access your environment variables directly. This video explains that the flag needs to come right after the node command. So with your .env file in the root directory, you could start your app like this:
$ node --env-file .env app.js
What worked in the video is different from the official documentation, so I’ll also include here instructions from the docs:
You can pass multiple –env-file arguments. Subsequent files override pre-existing variables defined in previous files.
This bypasses the need to import an extra package and removes a few lines of code. Awesome!
How To Not Need nodemon
As of Node version 18.11.0 you can use the --watch flag to replace the need for nodemon—Node will restart the server when any changes are saved in the watched file. Here’s another video demonstration, the docs, and the syntax:
$ node --watch app.js
Yay for needing less code and external packages!
]]>Recently learned of two rather impactful updates in NodeJS that I don't want to forget!Restoring a Postgres Database from a 'pg_dump' Filehttps://www.niamurrell.com/code/2023-04-08-restoring-a-postgres-database-from-a-pg-dump-file/2023-04-08T21:54:43.000Z2023-04-08T22:03:40.964ZI recently closed down a Heroku-hosted database, and wanted to access the data on my own computer using localhost. Here are the steps of how to do it, courtesy ChatGPT:
CPGT Instructions
To restore a PostgreSQL database from a backup file to a local PostgreSQL server on your computer, you can use the pg_restore command. Here’s an example command that you can use to restore the Heroku database backup file to a local PostgreSQL server:
This command assumes that you have already installed PostgreSQL on your local computer and created a new empty database with the name “your_database_name” to restore the data into.
Here’s what each option in the command means:
--verbose: Prints detailed output as the restore operation progresses. --clean: Drops any existing schema and data before restoring the backup file. --no-acl: Disables the restoration of access control lists (ACLs). --no-owner: Disables the restoration of ownership information. -h localhost: Specifies that the PostgreSQL server is running on the local computer. -U postgres: Specifies the username to use when connecting to the PostgreSQL server (in this case, the default username “postgres”). -d your_database_name: Specifies the name of the database to restore the backup file into. /path/to/heroku_database_backup_file.dump: Specifies the path to the backup file that you downloaded from Heroku.
Note that the file extension of the backup file may be different depending on the format of the backup. The file extension “.dump” is used here assuming that it’s in the custom format generated by the pg_dump command. If the backup file has a different format, you’ll need to adjust the file extension accordingly.
Note on File Extension
The Heroku backup dump file doesn’t actually have a file extension at all; this command worked fine with the file not having a file extension.
Also, a reminder that any spaces in the backup file directory path will need to be escaped.
]]>How to us pg_restore to access the data from a previous database backup.SQL/PostgreSQL/MySQL Epic Referencehttps://www.niamurrell.com/code/reference/2022-11-20-sql-postgresql-mysql-epic-reference/2022-11-20T15:20:42.000Z2023-04-08T21:51:08.968Z Here is a reference for the SQL & database commands I’ve learned, in its own post for easy reference. This is a mix of class notes and random notes I’ve kept in different places.
SHOW WARNINGS;: If the most recent insert gives a warning, this is how you see it. But you must do this right when the warning is given; it won’t work later (although app server should have error handling)
NULL / NOT NULL & Default Values
NOT NULL means this column is not allowed to have no value
Unless specified the default value for an INT will be 0
Unless specified the default value for a VARCHAR will be an empty string ''
You can insert data into a table as NULL unless that column is specifically marked NOT NULL
To set a default value, add this when creating the table (can be combined with NOT NULL):
CREATETABLE cats4 ( nameVARCHAR(20) NOTNULLDEFAULT ‘unnamed’, age INTNOTNULLDEFAULT99 );
Primary Key & Auto Increment
Primary key is a unique value assigned to each row for identification
This can be set up as an auto-incrementing column when creating a table:
DISTINCT allows you to see entries in a column without duplicates
Example: SELECT DISTINCT author_lname FROM books;
If there are columns which have relevant data in adjacent columns, you can either concatenate the columns first (1), or use DISTINCT to evaluate data within all of the relevant columns (2)
1: SELECT DISTINCT CONCAT(author_fname,' ', author_lname) FROM books;
2: SELECT DISTINCT author_fname, author_lname FROM books;
ORDER BY
Sort the data, default is ascending order ASC.
Basic usage: SELECT author_lname FROM books ORDER BY author_lname;
To sort by descending order, add DESC to the end of the command
You can use index shorthand to define which column to order by : SELECT title, author_fname, author_lname FROM books ORDER BY 2; (Sorts by author_fname)
You can sort by one column, and then a second with two arguments: SELECT author_fname, author_lname FROM books ORDER BY author_lname, author_fname;
LIMIT
Limit the results you’re querying to a specific number of results
Example: SELECT title FROM books LIMIT 10;
Often used in combination with ORDER BY: SELECT title, released_year FROM books ORDER BY released_year DESC LIMIT 5;
You can use two numbers to specify a starting row (from index 0) and a number of rows: SELECT title, released_year FROM books ORDER BY released_year DESC LIMIT 10,1;
To select through the end of the table, you can put any giant number: SELECT title FROM books LIMIT 5, 123219476457;
LIKE With Wildcards
Allows you to search for similar items, fuzzy search
Uses % % wildcards to indicate where fuzzy data is allowed. Examples:
SELECT title, author_fname FROM books WHERE author_fname LIKE '%da%';. This would return Dave, David, Cressida, etc.
SELECT title, author_fname FROM books WHERE author_fname LIKE '%da';. This would only return Cressida.
Wildcard search is case-insensitive: %da% would return David or DANIEL or dArReN
Using LIKE without wildcards looks for exactly the search term: SELECT title FROM books WHERE title LIKE 'the'; is likely to return nothing (unless you have a book titled ‘The’)
Underscore _ is used as a wildcard to denote one character place.
So _ looks for a field with one character while __ looks for a field with 2 characters, and so on.
Example: (235)234-0987 LIKE '(___)___-____'
To search for data with these special characters, escape them with \: SELECT title FROM books WHERE title LIKE '%\%%'
SELECT COUNT(*) FROM books;: Count the number of entries in the database
SELECT COUNT(author_fname) FROM books;: Counts the number of first_name entries in the database, including duplicates.
SELECT COUNT(DISTINCT author_fname) FROM books;: Returns count of unique entries
Counted columns can be combined if more than one field is necessary: SELECT COUNT(DISTINCT author_lname, author_fname) FROM books;
To search for number of fields containing fuzzy match: SELECT COUNT(*) FROM books WHERE title LIKE '%the%';
GROUP BY
GROUP BY summarizes or aggregates identical data into single rows
Can’t be used on its own, will always be combined with other things. For example: group films by genre and tell me how many films are in each genre; or group teas by color and tell me the average sales price of green tea vs red tea, etc.
SELECT author_lname, COUNT(*) FROM books GROUP BY author_lname;: Counts the number of books per author and prints their name and the count. Result:
Multiple columns can be included in a row if needed: SELECT author_fname, author_lname, COUNT(*) FROM books GROUP BY author_lname, author_fname;. Notice Harris is now split as it should be:
+--------------+----------------+----------+ | author_fname | author_lname | COUNT(*) | +--------------+----------------+----------+ | Raymond | Carver | 2 | | Michael | Chabon | 1 | | Don | DeLillo | 1 | | Dave | Eggers | 3 | | David | Foster Wallace | 2 | | Neil | Gaiman | 3 | | Dan | Harris | 1 | | Freida | Harris | 1 | | Jhumpa | Lahiri | 2 | | George | Saunders | 1 | | Patti | Smith | 1 | | John | Steinbeck | 1 | +--------------+----------------+----------+
Counts can be concatenated with their values: SELECT CONCAT('In ', released_year, ' ', COUNT(*), ' book(s) released') AS year FROM books GROUP BY released_year ORDER BY COUNT(*) DESC LIMIT 5;:
+----------------------------+ | year | +----------------------------+ | In 2001 3 book(s) released | | In 2003 2 book(s) released | | In 1981 1 book(s) released | | In 2016 1 book(s) released | | In 1989 1 book(s) released | +----------------------------+
MIN and MAX
Used to find minimum and maximum values in the data. Can be combined with GROUP BY.
SELECT MIN(released_year) FROM books; returns the smallest year of all the books.
THIS IS WRONG: SELECT MAX(pages), title FROM books;. It will result in the highest page number with the first title.
Instead you could use a sub-query: SELECT * FROM books WHERE pages = (SELECT Min(pages) FROM books); Inside the parens is evaluated first, then applied to the outer part.
Faster search solution since there’s only one query: SELECT title, pages FROM books ORDER BY pages ASC LIMIT 1;
Combine with GROUP BY to return the min/max of a field for that author:
SELECT author_fname, author_lname, Min(released_year) FROM books GROUPBY author_lname, author_fname LIMIT5;
RESULT: +--------------+----------------+--------------------+ | author_fname | author_lname | Min(released_year) | +--------------+----------------+--------------------+ | Raymond | Carver | 1981 | | Michael | Chabon | 2000 | | Don | DeLillo | 1985 | | Dave | Eggers | 2001 | | David | Foster Wallace | 2004 | +--------------+----------------+--------------------+
SUM
Add all of the values of a field together: SELECT SUM(pages) FROM books;
Can be used in combination with GROUP BY to provide useful data, like the total number of pages written by each author:
SELECT author_fname, author_lname, Sum(pages) FROM books GROUPBY author_lname, author_fname;
AVG
Find average of data from multiple rows: SELECT AVG(pages) FROM books;
AVG by default returns 4 decimal places
Like previous functions, it can be combined with GROUP BY for more utility
CHAR is fixed to the length you declare when you create the column.
VARCHAR is variable length, up to the length you declare when you create the column.
Length value can be from 0 to 255.
For CHAR, spaces are added to the right side and then removed when you display. A value with the pre-determined length is always stored in the database though.
CHAR is faster when you’re certain lengths will be fixed like US state abbreviations, Y/N flags, etc.
UUIDs
Universally Unique Identifiers (UUID) are generated by an algorithm chosen to make it very unlikely that the same identifier will be generated by anyone else in the known universe using the same algorithm. Therefore, for distributed systems, these identifiers provide a better uniqueness guarantee than sequence generators, which are only unique within a single database.
By default Postgres uses UUID v4
INTEGER
A whole number
INTEGER, 4 bytes, Range -2147483648 to +2147483647
SMALLINT, 2 bytes, Range -32768 to +32767
BIGINT, 8 bytes, Range -9223372036854775808 to +9223372036854775807
SERIAL
Auto-incrementing integers, always used for primary keys.
SMALLSERIAL : 1 to 32,767
SERIAL : 1 to 2147483647
BIGSERIAL : 1 to 9223372036854775807
DECIMAL
Takes two arguments: DECIMAL(total_number_of_digits, max_number_of_digits_after_decimal_point)
Example: DECIMAL(5,2) can accept 382.34, 11.00, 23.87, etc.
If you have a whole number it will add .00 to include the trailing decimals
If you add a number bigger than the maximum constraint, it will give you the highest max number; for example 235498 will only be able to insert 999.99 as the highest within the constraints given
Numbers will be rounded if they are entered with more decimal places than allowed.
Calculations are exact
FLOAT and DOUBLE
With these you can use larger numbers and they will take up less space in memory.
BUT calculations are not exact: you start to see imprecision around 7 digit-long numbers for FLOAT and around 15 digits for DOUBLE.
Number Types: which to use?
If precision is really important, like in calculating money, use DECIMAL
If you can get away with less precision use DOUBLE as a first choice, since you get more precision.
Or if you’re certain you don’t need precision and numbers will never be longer than 7 characters, use FLOAT to use less memory
Booleans
TRUE - True, 1, t, Y, yes, on
FALSE - False, 0, f, N, no, off
NULL
Dates & Times
DATE stores only a date in the format YYYY-MM-DD
TIME stores only a time in the format HH:MM:SS
TIMEWITHOUTTIMEZONE is a Postgres-specific date format
DATETIME stores a date and time together in the format YYYY-MM-DD HH:MM:SS
CURDATE() gives the current date
CURTIME() gives the current time
NOW() gives the current datetime
Formatting Dates
Helper functions (see docs) can be applied to columns to display more meaningful information about dates.
Example, if you have a date in the column birthday as 2012-03-22:
DAY(birthday) returns 22
DAYNAME(birthday) returns Thursday
DAYOFWEEK(birthday) returns 5 (5th day of the week with Sunday being 1)
DAYOFYEAR(birthday) returns 81
MONTH(birthday) returns 3
MONTHNAME(birthday) returns March
To format dates nicely you can put these methods together and concatenate a nice display: SELECT CONCAT(MONTHNAME(birthdate), ' ', DAY(birthdate), ' ', YEAR(birthdate)) FROM people; would give March 22 2012
OR you can use DATE_FORMAT with specifiers to do this more cleanly (see docs):
SELECT DATE_FORMAT(birthdt, '%m/%d/%Y at %h:%i') FROM people; returns 03/22/2012 at 07:16
Note that the days using DATE_FORMAT may be different, i.e. Sunday is 0 instead of 1
Date Math
DATEDIFF(date1, date2) takes two dates and tells you the number of days between them
DATE_ADD and DATE_SUB use INTERVAL to add/subtract a determinate amount of time to the date or datetime.
NOT LIKE looks for the opposite of a LIKE statement with wildcards
Greater than (or equal to) > (>=) and less than (or equal to) < (<=) work as expected
Note when comparing letters: MySQL is case-insensitive: 'A' = 'a'
Other letter comparisons work as expected: 'h' < 'p'
For dual conditions where both must be true, use AND or &&:
SELECT * FROM books WHERE author_lname='Eggers' AND released_year > 2010 && title LIKE'%novel%';
For dual conditions where either must be true, use OR or ||:
SELECT title, author_lname, released_year, stock_quantity FROM books WHERE author_lname = 'Eggers' || released_year > 2010 OR stock_quantity > 100;
BETWEEN...AND looks for values within a range: SELECT title, released_year FROM books WHERE released_year BETWEEN 2004 AND 2015;
NOT BETWEEN...AND does the opposite: SELECT title, released_year FROM books WHERE released_year NOT BETWEEN 2004 AND 2015;
BETWEEN and NOT BETWEEN are inclusive, i.e. equivalent to >= ... <=
To compare dates, it’s best to CAST them all to be the same type before comparison:
SELECTname, birthdt FROM people WHERE birthdt BETWEENCAST('1980-01-01'AS DATETIME) ANDCAST('2000-01-01'AS DATETIME);
More Search Refiners
IN and NOT IN let you provide a list of things to look for in a column. For example:
-- Long way, without IN SELECT title, author_lname FROM books WHERE author_lname='Carver'OR author_lname='Lahiri'OR author_lname='Smith';
-- Shorter way, with IN SELECT title, author_lname FROM books WHERE author_lname IN ('Carver', 'Lahiri', 'Smith');
Case Statements
Case statements allow you to add logic when working with the data.
For example to add a ‘GENRE’ based on the year of release:
SELECT title, released_year, CASE WHEN released_year >= 2000THEN'Modern Lit' ELSE'20th Century Lit' ENDAS GENRE FROM books;
Case statements start with the CASE keyword, followed by WHEN to initiate a case and THEN to define the result. ELSE captures all other possibilities, and the statement must end with END. Also best to name it with AS for better display.
Case statements can be chained with many conditions:
SELECT title, stock_quantity, CASE WHEN stock_quantity BETWEEN0AND50THEN'*' WHEN stock_quantity BETWEEN51AND100THEN'**' WHEN stock_quantity BETWEEN101AND150THEN'***' ELSE'****' ENDAS STOCK FROM books LIMIT5;
-- Returns: +----------------------------------+----------------+-------+ | title | stock_quantity | STOCK | +----------------------------------+----------------+-------+ | The Namesake | 32 | * | | Norse Mythology | 43 | * | | American Gods | 12 | * | | Interpreter of Maladies | 97 | ** | | A Hologram for the King: A Novel | 154 | **** | +----------------------------------+----------------+-------+
Note that case statements cannot have commas , between cases
One to many relationships connect tables of data together.
Each table has a primary key, which is used to reference the relationship. In the related table, the primary key is referenced as a foreign key. Example:
Note the convention for naming foreign keys is tableName_columnName
Once a foreign key is set and correctly references another table, it will be impossible to add data if that id does not exist in the foreign table.
Selecting Data From Tables - Inner Joins
Without joins, finding orders placed by Boy George would either be a 2-step process, or you would use a subquery:
-- 2-Step Process: SELECTidFROM customers WHERE last_name='George'; SELECT * FROM orders WHERE customer_id = 1;
-- Subquery: SELECT * FROM orders WHERE customer_id = ( SELECTidFROM customers WHERE last_name='George' );
Cross joins are useless, and print out all of the data in a non-meaningful way: SELECT * FROM customers, orders;
To narrow down the data and show meaningful information, use WHERE with an implicit inner join:
SELECT first_name, last_name, order_date, amount FROM customers, orders WHERE customers.id = orders.customer_id;
Inner joins only display data where there is overlap for both tables
Best practice is to use an explicit inner join instead with the JOIN keyword:
SELECT first_name, last_name, order_date, amount FROM customers JOIN orders ON customers.id = orders.customer_id;
The order you list the tables determines the display order.
Joined tables can be manipulated any way an individual table can. Example:
SELECT first_name, last_name, SUM(amount) AS total_spent FROM customers JOIN orders ON customers.id = orders.customer_id GROUPBY orders.customer_id ORDERBY total_spent DESC;
-- Result: +------------+-----------+-------------+ | first_name | last_name | total_spent | +------------+-----------+-------------+ | George | Michael | 813.17 | | Bette | Davis | 450.25 | | Boy | George | 135.49 | +------------+-----------+-------------+
Selecting Data From Tables - Left & Right Joins
Left joins take all of the data from one table (on the left) and append data from another table to the right (where there is data). If there’s no matching data for a particular row, it will print NULL
Example:
SELECT * FROM customers LEFTJOIN orders ON customers.id = orders.customer_id;
When joining tables it may not be ideal to display NULL. You can use IFNULL to handle these instances: IFNULL(what_field_may_be_null, what_you_want_to_put_instead). Example:
SELECT first_name, last_name, IFNULL(SUM(amount), 0) AS total_spent FROM customers LEFTJOIN orders ON customers.id = orders.customer_id GROUPBY customers.id ORDERBY total_spent;
-- Result: +------------+-----------+-------------+ | first_name | last_name | total_spent | +------------+-----------+-------------+ | Blue | Steele | 0.00 | | David | Bowie | 0.00 | | Boy | George | 135.49 | | Bette | Davis | 450.25 | | George | Michael | 813.17 | +------------+-----------+-------------+
Right joins work the same as left joins, just on the other side. They can be useful to check your data, and see whether data in the right table are missing any associations, where you would expect to find them on the left.
Right and left joins are the same and can be used in either direction by flipping which table you list first.
On Delete Cascade
If you delete data from one table, this is how you can automatically delete any data from other tables that depend on what you’re deleting.
Example: if Amazon deletes a book from its database, this would also automatically delete all of that book’s customer reviews
To use this, add ON DELETE CASCADE as part of the foreign key definition. This says delete data in this table when the foreign key is deleted from its table:
Many-to-many relationships exist when data can be linked in both ways to multiple other pieces of data; examples: tags & posts, books & authors, students & classes.
Each piece of data that exists on its own is in its own table; they are connected with a join or union table, which will contain its own data, and references to both of the original data tables.
References are built the same way they are for one-to-main joins:
When grouping data, best to GROUP BY their reference to primary key (rather than other content like title, name, etc.): it’s not guaranteed the content will be forced unique while ids should always be unique.
To join more than one table, add additional JOIN statements:
SELECT title, rating, CONCAT(first_name, " ", last_name) AS reviewer FROM series JOIN reviews ON series.id = reviews.series_id JOIN reviewers ON reviews.reviewer_id = reviewers.id ORDERBY title;
Displaying Data
ROUND() can be used to limit the number of decimal places printed: ROUND(AVG(scores), 2) AS avg_score. This would round the averages to two decimal places.
IF statements: IF(condition, result_if_true, result_if_else): IF(Count(rating) > 0, 'ACTIVE', 'INACTIVE') AS STATUS
If you’re not going to reference data from somewhere else, you do not need to give that data an id.
For example: likes in an Instagram clone
Two columns can be set to primary key and the result is that the combination of the two becomes the primary key. This is useful if you want to limit the number of times data can be associated with each other.
For example: one like per user, per photo in an Instagram clone
Database triggers are events that happen automatically when a specific table is changed.
Usage examples:
Validating data (although you can and should do this on the app side as well)
Manipulating other tables based on what happens in this table…useful for logging history
Syntax:
CREATETRIGGER trigger_name trigger_time trigger_event ON table_name FOREACHROW BEGIN -- do something END;
Components:
trigger_time: BEFORE or AFTER
trigger_event: INSERT, UPDATE, or DELETE
Between BEGIN and END there will be an IF…THEN…END IF statement.
Within this statement, the NEW and OLD keywords serve as placeholders for the data that need to be validated.
Since the conditional statement requires semi-colons ; to close each line, temporarily change the DELIMITER to $$ (this can be any symbols that won’t be used in the trigger statement). At the end, change the delimiter back to ;.
MySQL Errors & SQLSTATE: Errors have numeric codes and are MySQL-specific. SQLSTATE codes are standardized across SQL databases. The message is preset and available in the docs. ExceptSQLSTATE '45000' which is a generic catch-all for user-defined errors; in this case you set the error message with SET MESSAGE_TEXT.
Example: don’t allow users under age 18 to register / add to database:
DELIMITER $$
CREATETRIGGER must_be_adult BEFOREINSERTONusersFOREACHROW BEGIN IF NEW.age < 18 THEN SIGNAL SQLSTATE'45000' SET MESSAGE_TEXT = 'Must be an adult!'; ENDIF; END; $$
DELIMITER ;
How & When To Use Triggers
To view the triggers that already exist in the database run SHOW TRIGGERS;
To delete a trigger run DROP TRIGGER trigger_name;
Note that triggers can cause problems during debugging: if there is unexpected behavior, if it’s caused by a trigger, you won’t see it in the normal application or database code.
]]>A reference for the SQL & database commands I've learned, in its own post for easy reference.Backing Up A Local Postgres Database to AWS S3https://www.niamurrell.com/code/tutorials/2022-11-19-backing-up-a-local-postgres-database-to-aws-s3/2022-11-19T22:14:54.000Z2022-11-19T23:35:02.091ZSince I decided to move my Heroku-hosted Postgres database to work locally, I wanted to make sure I’m backing it up regularly, in case something should happen to my computer. To make this as simple as possible, I created a script to do this on demand with one command.
Resources
The following posts & pages were useful references while putting this together:
I saved the script as a function since I plan to run it manually. This could be set up as a cron job instead, but since I’m pretty irregular when it comes to adding data to this database, it’s simple enough for me to just back it up when I need to. With this script, I can manually run dbs3 for the backup to take place.
pg_dump is a backup utility that comes installed with Postgres. -Fc formats the archive to be suitable for input into pg_restore in the most flexible way. --no-acl and --no-owner remove all access privileges, meaning the data will be accessible in a new database where my local database user/owner do not exist. -h localhost is where the database is being backed up from. -U user is the database user that has access to perform operations on this database (set up when the db was created). dbname is the name of the database that’s to be backed up. > $filename tells pg_dump to create the backup as the filename, which was set with the variables above.
This operation will create the backup file in whatever the present working directory is at the moment. You could change this if you want, but since I’m removing the local file later on, I don’t bother with this.
gzip --best $filename
Compresses the backup file into a smaller format. This probably isn’t necessary since the -Fc command in pg_dump means the dump is already compressed, but I did notice a difference of a few kb between the zipped and not-zipped files, so I kept this step in.
The --best flag is has the slowest compression time & highest compression…fine for these tiny files.
I already have the aws-cli set up and authorized in my terminal, so could skip a lot of steps in the tutorials above.
I chose to mv the file instead of cp so that I don’t have to take an extra step of deleting the backup file afterwards. I also chose to use a cheaper storage class since I don’t really anticipate ever needing this 🤞
Note the added .gz to the $filename variable…this is the extension that gzip will add to the filename.
Wrap Up / What’s Missing
And that’s it! Job done, now I just run that simple command every time I close down the app, which is also run locally from the command line. Easy peasy.
One thing that’s missing that I might do in the future, is add to the script so that it deletes any backups older than n days at the same time as backing up the new file. I don’t really need these to pile up indefinitely, so it makes sense. Might do that in the future.
I could also theoretically automate this to back itself up at regular intervals so it’s not a manual process. I will implement this if I decide to stop using the command line to run the app, but for now it really doesn’t make a difference.
]]>Since I decided to move my Heroku-hosted Postgres database to work locally, I wanted to make sure I'm backing it up regularly, in case something should happen to my computer. To make this as simple as possible, I created a script to do this on demand with one command.Upgrading Postgres With Homebrewhttps://www.niamurrell.com/code/reference/2022-11-13-upgrading-postgres-with-homebrew/2022-11-13T20:43:22.000Z2023-10-22T22:06:01.522ZI’ve battled with this before and thought I’d learned my lesson. Apparently not! Today I faced some issues upgrading PostgreSQL on my laptop again.
What I was trying to do
I downloaded a dump of a heroku postgres database to my local machine (thanks Render docs). No problem!
$ pg_restore --verbose --no-acl --no-owner -d postgresql://USER:PASS@containers-us-east-9999.railway.app:5432/railway latest.dump pg_restore: [archiver] unsupported version (1.14) in file header $ postgres -v dyld: Library not loaded: /usr/local/opt/icu4c/lib/libicui18n.64.dylib Referenced from: /usr/local/bin/postgres Reason: image not found Abort trap: 6
How I fixed it
Some StackOverflowing indicated that pg_restore might be outdated. What the heck version was I even on?
$ which pg_restore /usr/local/bin/pg_restore $ ls -l /usr/local/bin/pg_restore lrwxr-xr-x 1 user role 40 date /usr/local/bin/pg_restore -> ../Cellar/postgresql/11.5/bin/pg_restore $ pg_restore -V pg_restore (PostgreSQL) 11.5
A clue! I’ve used the pg_restore tools with Postgres version 11 to capture & download the database dump, but the Heroku database I’ve backed up from is running version 12, and railway is using version 13. The latest is version 14. What a mess.
My next step was to upgrade my local Postgres version to 12, to at least be compatible with the heroku source:
$ brew install postgresql@12
This took about 25 minutes to run all of the updates 🙀 Eventually it finished and I added the new version to PATH in my bash profile:
If you need to have postgresql@12 first in your PATH, run: echo'export PATH="/usr/local/opt/postgresql@12/bin:$PATH"' >> /Users/user/.bash_profile
Then I tried restoring the db dump to Railway again…and it worked!:
$ pg_restore --verbose --no-acl --no-owner -d postgresql://USER:PASS@containers-us-east-9999.railway.app:5432/railway latest.dump pg_restore: connecting to database for restore ...
BUT THEN I noticed that you can’t download your data from Railway. What the heck! Well you probably can—hopefully you can by installing their CLI and doing a dump that way. They’ve also created a plugin that you can run on your own server to automatically send backups to an AWS S3 bucket. This is supposed to be low maintenance though…
Since this particular app isn’t public facing at all, I decided to just run it entirely locally going forward. Make it as simple as possible.
Omg even localhost isn’t working 😭
Of course it’s not that easy! If I’m going to run it locally I need to get my local PG up & running. But I’m getting a big fat connection error connecting to localhost in Postico. Ugh.
If I’m basically starting from the beginning I may as well get completely up to date, so I install postgres 14 first…
$ brew install postgresql@14
…and update PATH again to get the correct version (may as well keep all versions in case needs be…):
So I should be able to open the postgres server command line, right? Nope…!
$ psql psql: error: connection to server on socket "/tmp/.s.PGSQL.5432" failed: No such file or directory Is the server running locally and accepting connections on that socket? $ brew services Name Status User File postgresql@10 none postgresql@12 none postgresql@14 none
Ok so no postgres service is actually running. So I start a service, but to no avail:
$ brew services start postgresql Warning: Use postgresql@14 instead of deprecated postgresql ==> Successfully started `postgresql@14` (label: homebrew.mxcl.postgresql@14) $ psql psql: error: connection to server on socket "/tmp/.s.PGSQL.5432" failed: No such file or directory Is the server running locally and accepting connections on that socket?
I took it’s warning and tried again:
$ brew services start postgresql@14 /Users/user/Library/LaunchAgents/homebrew.mxcl.postgresql@14.plist: service already loaded Error: Failure while executing; `/bin/launchctl bootstrap gui/501 /Users/user/Library/LaunchAgents/homebrew.mxcl.postgresql@14.plist` exited with 133.
So the service is running, it’s just not working! Lovely! I stopped it (brew services stop postgresql) and looked around the /usr/local/var directory to see what might be causing conflict. There were a few postgres versions and support files there:
drwx------ 25 user role 800B May 31 2020 postgres drwx------ 25 user role 800B Mar 14 2019 postgres.old drwx------ 24 user role 768B Mar 14 2019 postgresql@10 drwx------ 24 user role 768B Nov 13 18:37 postgresql@12
Then I tried restarting the postgres service, but it still didn’t launch successfully:
$ brew services restart -vvv postgresql Warning: Use postgresql@14 instead of deprecated postgresql /bin/launchctl enable gui/501/homebrew.mxcl.postgresql@14 /bin/launchctl bootstrap gui/501 /Users/user/Library/LaunchAgents/homebrew.mxcl.postgresql@14.plist ==> Successfully started `postgresql@14` (label: homebrew.mxcl.postgresql@14 $ brew services list Name Status User File postgresql@10 none postgresql@12 none postgresql@14 error 256 niabia ~/Library/LaunchAgents/homebrew.mxcl.postgresql@14.plist
I googled this error and tried running brew postgresql-upgrade-database, thinking this felt vaguely familiar, and might get v14 into the state it needs to be. But this gave an error as well:
$ brew postgresql-upgrade-database Warning: Use postgresql@14 instead of deprecated postgresql Error: /usr/local/var/postgres.old already exists! Remove it if you want to upgrade data automatically.
So then I googled this error and lo and behold! if my own post about this very issue didn’t come up as the 2nd result. Thanks old me! I took the advice of my risky former self and deleted the postgres.old directory and tried running it again:
$ rm -rf /usr/local/var/postgres.old $ brew postgresql-upgrade-database ... $ brew services list Name Status User File postgresql@10 none postgresql@11 none postgresql@12 none postgresql@14 error 256 user ~/Library/LaunchAgents/homebrew.mxcl.postgresql@14.plist $ psql psql (14.6 (Homebrew)) Type "help"forhelp.
user=#
Update October 2023: On encountering the same error again, the magic command was rm /usr/local/var/postgres/postmaster.pid as described in this StackOverflow post
OMG I’M IN!
It worked! I can access the postgres server command line, and connect in Postico. Turns out there wasn’t even any data in the old versions…I could have just scrapped it all and reinstalled from the beginning to save myself the time. Oh well, better safe than sorry!
Now to learn local Postgres again…
]]>I've battled with this before and thought I'd learned my lesson. Apparently not! Today I faced some issues upgrading PostgreSQL on my laptop again.Farewell Herokuhttps://www.niamurrell.com/code/2022-11-13-farewell-heroku/2022-11-13T19:34:04.000Z2022-11-13T21:38:31.066ZBack in August Heroku announced that they’re ending free services completely. Sad news! The transition takes place in a few weeks, so today I spent time shutting down, moving, or upgrading my dynos and databases.
When the announcement was originally made, I thought that I’d have to go onto the lowest pricing tier in order to keep my apps—at the time, $7/month for app servers and an additional $9/month for each database server. It was great to see that some new plans were announced in the interim…most notably an ‘eco’ subscription that lets you keep multiple apps running (up to a limit) for $5/month. That’s much better! It’s basically paying for the service that already was in place (for me and my tiny apps, at least)—a server that spins up & down depending on demand.
So that’s great…but for these apps, free would be better! They are baby projects I use very infrequently, but still get some use out of. But does it make sense to pay for a constantly-running server? Or even a spin-up-spin-down-$5 server when there are likely other options? Don’t think so. So I researched some options, and reviewed a bunch of commentary on the matter:
This list doesn’t include my long foray into the serverless option (which I ultimately decided would be great if on-demand database services were better documented, sturdier, and more wallet-friendly…and not so reliant on the opaque world of AWS).
Speaking of AWS, I also considered using their services since they are very well-priced for a low volume of compute time. In the end I decided against this because 1) DB servers are always up/always costing money, 2) my 12-month free tier access ended aaaages ago, and 3) there’s always the risk of running a bill up astronomically with no recourse (have I mentioned I don’t really like to pay attention to these apps?) 😅
All of this research led me to try Render, which looked great and straightforward. It was pretty simple to spin up! And then I saw that database servers are automatically deleted after 90 days. Next.
On to: Railway. Again, really simple to set up and their free tier includes $5 or 500 uptime hours per month, whichever comes first. I got a database moved over from Heroku pretty easily actually! I’m still not clear how it treats database servers…are they always up even if they have no connections? I connect to these apps maybe 10 hours/month at most, so if that’s the case perhaps this is the winner! However since a month has 750 hours in it, if they do consider all time uptime, then I’ll be back to the drawing board.
In any case, as of now I’m not sure there is a good replacement for the service Heroku has provided for free for all of these years. It’s disappointing, but lots of gratitude is in order for having it for so long!
Farewell Heroku!
…ok not completely, since I already have paid apps on the service which now cost more than they used to 👍
]]>Back in August Heroku announced that they're ending free services completely. Sad news! Today I spent time shutting down, moving, or upgrading my dynos and databases.Updating Dev Environment After A Long Breakhttps://www.niamurrell.com/code/2022-07-23-updating-dev-environment-after-a-long-break/2022-07-23T09:11:15.000Z2022-07-23T18:35:35.629ZA while back I created a few apps that have been pleasantly working away for a few years now. Every once in a while I updated the dependencies to keep things up to date, but when major versions were released that would require a lot of refactoring, I pretty much just let them sit at the old versions…they’re still working after all! Well now I want to make some updates and changes to the apps and am finding that I have to get them completely up to date in order to do so. Oh no, here we go…
First up is updating my local installation of MongoDB 😱 I’m running version 3 while the latest is v6, and the major dependency mongoose won’t run anymore. Aaaaaaaaages ago I installed MongoDB manually by downloading the binaries. I remember it being an absolute mission, and a miracle that I’d gotten it to work. To update in the same way, their website said that you’d have to upgrade progressively through each version (4 then 5 then 6) to get it working properly. By comparison, now you can install it pretty simply using homebrew which sounds a LOT easier. So I guess I’ll try that? Following the MongoDB installation guide, v6 should still be compatible with my (old) OS, so Homebrew it is.
First Stop, Python
Unfortunately though, part-way through this process Python did not install correctly. I got the following error:
Error: An unexpected error occurred during the `brew link` step The formula built, but is not symlinked into /usr/local Permission denied @ dir_s_mkdir - /usr/local/Frameworks Error: Permission denied @ dir_s_mkdir - /usr/local/Frameworks
This is a known issue going back ages; I had to manually create the Frameworks/ directory within local:
sudo mkdir Frameworks
Then change the ownership to make it match the other Homebrew directories:
sudo chown -R username:admin Frameworks/
This resulted in the folder being created, but without the right permissions:
Now I should be able to complete the Python installation:
brew link python
…And done!
Well, not quite. Python was fully installed and linked, but the next problem was installing Node 16.x.
(Re-) Installing Node
MongoDB also required Node 16 as a dependency, and because I’m using Homebrew it doesn’t see that Node is already installed (I use nvm).
But Homebrew couldn’t install node…apparently I need to install the Gnu compiler since my command lines tools are out of date:
brew install gcc
I wish I was kidding!
==> Installing gcc ==> ../configure --prefix=/usr/local/opt/gcc --libdir=/usr/local/opt/gcc/lib/gcc/11 --disable-nls --enable-checking=release --wit ==> make ==> make install-strip DESTDIR=/private/tmp/gcc-20220723-76523-2srzew/gcc-11.3.0/build/../instdir 🍺 /usr/local/Cellar/gcc/11.3.0_2: 2,150 files, 326.9MB, built in 108 minutes 8 seconds
108 MINUTES!!
I also ran into an error while running brew cleanup because I had uninstalled Docker a while back to free up hard drive space. Thanks to this Flavio Copes article for helping solve it.
After all that, even with an updated gcc, Homebrew still couldn’t install Node because the command line tools remain out of date. The command line tools can’t be updated because I don’t have enough space on my hard drive to download the installation package. And Homebrew can’t install MongoDB without Node.
So, no MongoDB update!
Also, I kept getting a bunch of red warnings that the installations may not work anyway, because Homebrew and Apple no longer support MacOS 10.14. But I can’t update to a newer OS without breaking the 32-bit programs on my computer or losing Apple’s now-retired dashboard, which I still actually use!
TL;DR
I need a new computer to update my old code 🤣 😭 🙈
]]>A while back I created a few apps that have been pleasantly working away for a few years now. Well now I want to make some updates and changes to the apps and am finding that I have to update them in order to do so. Here we go...Grab Bag - Sequelize, Jest, and JSON Validationhttps://www.niamurrell.com/code/2021-11-21-grab-bag/2021-11-21T22:24:16.000Z2021-11-21T22:27:02.677ZI’ve been working on a project from a different computer, and have been taking notes for this blog as I go. Forgot to add them though! Here is a grab bag of topics from the past couple of months.
Using the New Sequelize CLI
In the new project I’m using the latest version of sequelize-cli for the first time. Not surprisingly, some updates have been made to keep up with the changes that were made for the latest version of sequelize.
A notable difference is that the cli now prefers extending the Model class instead of using sequelize.define to generate a new model. The syntax isn’t too different, but it’s hardly documented at all. I found this issue which discusses the new syntax and contains an example showing how to include associations. There are other examples showing ways to include getters and setters which may be useful in the future. Let’s not talk about the fact that these examples are 5 years old and still not documented…
A Case For Not Using Sequelize ORM
Every time I start a new project I go through the labor of “is this the best way to do X” where “this” is whatever I did on a previous project. I often come to the conclusion of no—there is probably a better way to do X—but then I do X anyway because I know I can do it faster 😆
Well this time, “this” was using Sequelize as ORM to handle all my database code. I do want to get more practice with raw SQL to develop that skill, but in the interest of time I went with old faithful for this project.
Not so faithful! There have been a lot of breaking changes since I last used sequelize and I keep running into changes that haven’t been documented. One tiny change is the use of the underscored option on a model.
You used to be able to add underscored: true to a model definition, and it would ensure all table names and column names are underscored instead of camel case (i.e. created_at instead of createdAt). For a not very strong reason, I prefer this.
In the new version, underscored seems to have been combined with another option underscoredAll (never heard of it, but that’s beside the point!), and the behavior totally changed. A lot of people have run into the same issue and the most useful explanation seems never to have made it into any documentation.
This small change had some weird side effects:
Database table name was uncapitalized (users instead of Users)
Model instances were created with both a created_at and CreatedAt field
Model instance wouldn’t get created at all if allowNull was set to false on the underscored fields, even with a defaultValue set
In the end I just decided to use the default camelCase column names to not have to figure this out, but it was a really annoying 30 minutes or so looking into where the issues were coming from.
Is that enough of a reason not to use ORMs to interact with a database. It definitely adds to the case against Sequelize at least, since the documentation makes a huge difference.
Testing App Controllers with Jest
I want to include tests with this app and do it properly. It would be much better than manually testing each route as I have been doing, and probably more of a fail safe. I’ve found a lot of resources to try and learn how to do this:
I ran into an issue where I was copying some text from a PowerPoint deck into a JSON object. I kept getting Unexpected token in JSON at position X errors, where X was a pretty high number like 247 or 468. I have no desire to count characters in this text! My quick but painful solution was to re-type all of the text, and the error went away.
Then I came across this JSON validator tool and found a much better solution for this! I copy/pasted the offending text into the validator and sure enough, there were two whitespace characters in the text, wreaking havoc. Now I know for next time.
]]>I've been working on a project from a different computer, and have been taking notes for this blog as I go. Forgot to add them though! Here is a grab bag of topics from the past couple of months.JWT Againhttps://www.niamurrell.com/code/2021-09-18-jwt-again/2021-09-18T18:31:18.000Z2021-09-18T18:51:25.980ZI’ve been learning about JWTs! Again, apparently. This time I’m implementing it in a new project so maybe I’ll get a bit farther. Not planning to do a deep-dive here (yet), but want to remember a few references in case I need them later:
The Net Ninja’s Node.js Auth Tutorial (JWT)(3 hrs): This one is also an intro but demonstrates putting JWTs in a cookie instead of just local storage. This makes it possible to reset the JWT and makes logging out possible. Arguably this is not good practice.
HTML5 Video Player
Putting a pin in this as well—I will also (possibly) need to create a video player for the new project. This playlist on HTML5 video programming has been a good intro using the Video JS library. More on this later.
]]>I've been learning about JWTs! Not planning to do a deep-dive here (yet), but want to remember a few references in case I need them later.Replacing Postmanhttps://www.niamurrell.com/code/2021-08-12-replacing-postman/2021-08-12T21:35:40.000Z2021-08-12T21:53:54.215ZLong break from coding, but I’m back! I’ve picked up two projects—one for work and the other I started back in January.
In working on these, I came across a great improvement that seems to have been birthed while I was gone! Now there are some great VS Code extensions which let you test API endpoints without needing to use an external client like Postman:
I came across this magic in this video. This extension lets you create a .rest or .http file in your root directory and run REST requests directly from that file. The result will open in a new tab in the editor.
I started using this one and it’s really great because the .rest file basically becomes a forever test file for each route. I guess I could also write tests… 😅🙈
This is another good-looking one that got a mention in this video. This extension seems to be an experience closer to using Postman, and might be a good option if you like the Postman GUI.
I decided to try REST Client first because I liked the option to save all endpoints in one file…not sure you can do that in Thunder Client.
It will be interesting to see what else I missed during my coding hiatus!
]]>Now there are some great VS Code extensions which let you test API endpoints without needing to use an external client like Postman.JFM 2.0https://www.niamurrell.com/code/2021-01-23-jfm-2-0/2021-01-23T19:30:28.000Z2021-02-04T23:00:32.043ZToday I have finally started JFM 2.0! A bit late considering I set a deadline to finish by December 1 last year when I first had the idea last summer but hey ho. And to be fair I’ve started it before but now I intend to actually finish it.
JFM was a project I made last year which I use just about every week, but only run locally on my computer. Version 2.0 is to add some security around it and make it available for public use. I don’t know if anyone will actually want to use it, but at least I’ll be able to use it myself without having my laptop. 😄
Some Modifications
The app is a Vue front end and the API is a Node + Express app. And I thought rather than doing that for the public version, I’d try making some modifications to a) learn and b) set it up more economically. The solution I thought I’d try was to use serverless functions instead of an always-on Node server for the API. So today I learned a bit about what that would entail. Without knowing too much about this, seems I would need to:
Set up a database on AWS since current DB has to be tied to a Heroku app
Add authentication
Modify the client to send an auth token with each API request
So—the API part looks fairly approachable, but when I started to think about the database I wasn’t so sure. A database server (the ones I’ve been working at least) is also always-on, so how would this work with a serverless API? And is serverless even the right choice for an app like this?
Reading a guide about how to choose the right database for a serverless application shows that as expected, it’s complicated. I’m not really sure I want to go through the “steep learning curve” of learning DynamoDB (the article’s recommendation) just to get a basic version of this app up. Doing so would mean not only learning DynamoDB, but also re-structuring all of my data and models from relational tables to NoSQL. Plus diving back into managing a number of AWS services which might just be too much for this little app!
Back To Basics
So, in the interest of getting an MVP online in as little time as possible, I’m going to scale back the modifications. Instead I’m just going to:
Add authentication
😂 😂 😂 Ok it’s not that simple, I’ll need to do a few other things to get it deployed and I’m sure there will be unexpected problems. But for now I’ll keep it as simple as possible. Onwards!
]]>Today I have finally started JFM 2.0! JFM was a project I made last year which I use just about every week, but only run locally on my computer. Version 2.0 is to make it available for public use.Dependency Licenseshttps://www.niamurrell.com/code/2020-11-24-dependency-licenses/2020-11-24T18:48:10.000Z2021-02-04T22:47:27.602ZToday I learned of a quick & easy way to find out what licenses all of a project’s dependencies use:
This article goes into a bit more detail about the parameters you can use on this command to get more or less detail.
This is really useful because some licenses like GPL require you to open source your entire project if you use any dependency that uses the GPL license. So good to know I’m not using that!
]]>Today I learned of a quick & easy way to find out what licenses all dependencies in a project use.pg, Postgres, and Node 14 Connection Errorshttps://www.niamurrell.com/code/2020-11-13-pg-postgres-and-node-14/2020-11-13T23:43:06.000Z2020-11-14T00:12:20.129ZSince updating to Node 14, none of my apps with a Postgres database will not connect anymore. I’ve run into this issue twice now…shame on me for not documenting the first time around! So I will troubleshoot again…
Why
Some sleuthing reveals a database connection error…not sure why but my database error handling isn’t throwing errors. This issue suggests the issue is with pg rather than Postgres or Sequelize.
The Fix
Update pg to latest version. Minimal requirement is 8.0.3 but as of now, the latest is 8.5.1 👀
Now at least a connection error throws: Unable to connect to the database: ConnectionError [SequelizeConnectionError]: self signed certificate
This issue confirms an issue with pg and provides some additional settings to add to the database config:
]]>Since updating to Node 14, none of my apps with a Postgres database will not connect anymore. So I will troubleshoot...Homebrew and opensslhttps://www.niamurrell.com/code/2020-08-12-homebrew-and-openssl/2020-08-12T20:18:20.000Z2020-08-12T20:27:00.939ZAs a follow up to my previous post dealing with different openssl versions, I’ve now learned that Homebrew deletes deprecated packages and the solution I found last time may not end up working.
If that happens again, here is how to install the 1.0 version:
Then check which version letter has been installed:
$ brew list --versions ... openssl 1.0.2t openssl@1.1 1.1.1g ...
Then switch to the 1.0 version:
$ brew switch openssl 1.0.2t
Why
Here are the things I’ve now found to not work with openssl 1.1.x:
Heroku Potgres CLI
nmap
]]>As a follow up to a previous post dealing with different openssl versions, I've now learned that the Homebrew solution I found last time may not end up working. If that happens again, here is how to install the 1.0 version.Vue Modalshttps://www.niamurrell.com/code/2020-07-25-vue-modals/2020-07-25T10:52:29.000Z2020-07-26T19:46:08.863ZQuick tip! I wanted to make some modals in a Vue app—here are the resources I found that helped or could help in future.
vue-js-modal
This library is what I ended up using and it was pretty painless to implement. It was introduced in this YouTube video, which specifically focuses on making the modal accessible. Win.
Vue Docs Example
The Vue docs provide and example and CodeSandbox of how to create a modal without using a library.
This was uses the Vue transition element, which I can’t say I remember learning about before—it looks pretty useful!
Update after using vue-js-modal more…
The vue-js-modal props for sizing and responsiveness were a bit finicky so I opted to adapt the Vue docs example for a modal that contained more content and needed to take up more of the screen.
The only thing that needed a bit of extra help was closing the modal…I added a click event to the modal-mask element, and also temporarily added a window event listener so that the modal would close when someone hits the Esc key. The final methods for the modal looked like this:
]]>Quick tip! I wanted to make some modals in a Vue app—here are the resources I found that helped.How To Fix Heroku Postgres CLIhttps://www.niamurrell.com/code/2020-07-14-how-to-fix-heroku-postgres-cli/2020-07-13T23:05:22.000Z2020-07-13T23:13:38.466ZI was trying to use the Postgres CLI for a Heroku Postgres database and got an error:
$ heroku pg:psql --app app-name --> Connecting to postgresql-orbital-02130 dyld: Library not loaded: /usr/local/opt/openssl/lib/libssl.1.0.0.dylib Referenced from: /usr/local/lib/libpq.5.dylib Reason: image not found
It turned out to be because there were multiple versions of openssl:
$ brew list --versions ... openssl 1.0.2s openssl@1.1 1.1.1g
$ heroku pg:psql --app app-name --> Connecting to postgresql-orbital-02130 tfv::DATABASE=>
]]>I was trying to use the Postgres CLI for a Heroku Postgres database and got openssl an error. This is how I fixed it.Authentication Options - Realtime Thought Processhttps://www.niamurrell.com/code/2020-07-08-authentication-revisited-jwt-trial/2020-07-08T13:24:36.000Z2020-08-26T11:30:22.277ZSomehow I find myself in the world of authentication again! I thought I’d struggled through it enough in the past that surely I’d be able to add auth to a new app I’m working on without much trouble. WRONG. 😂
I’m making a private website that needs to be password protected. It used to be a Wordpress site, and apparently this is a little more straightforward on apache servers with an .htaccess file? (That might be wrong, but it’s what I understand now, and a rabbit hold I decided not to go down!) But this new site is on a Node server so I would need to find another way to implement auth.
How to approach it this time?
Just copy what I did before—this was my first instinct. I’ve been through auth on a number of projects and got it to work several ways, so this should work, right? Well…
Passport could work with the passport-local strategy. But must I associate a username with the password (yes)? And so I really need to create a new database User model to store it (yes)? And wait, now I need a session store (not technically but it’s best practice and we can’t avoid those!)? And OMG look at the Passport documentation, it explains nothing. Even the helpful articles are tomes! 😩
Still I tried this anyway, and found that the best documented way to implement passport-local seems to be combining a MongoDB data store and passport-local-mongoose. Well my app already has a Postgres data store. So then I look at previous projects where I implemented passport-local-sequelize, check the docs, and see that it hasn’t been kept up to date with the latest releases of sequelize.
And isn’t all of this overkill anyway? I think so, so I look for a simpler approach!
I could go the roll your own route, and looked at a few ways to do this. This article and repo used a similar method to what I used in the value app where you store a hashed password and send cookies to the client. I also looked at a new-to-me package express-basic-auth which seemed to do the trick with the benefit of being bare-bones, only it’s not extendable to authenticating the user on specific routes, which for me is the whole purpose of this…another dead end.
Honestly going through all of these options was a lot! So then I thought I could go back to the old faithful Auth0…that is, until I re-read some of my old posts detailing all of the nitpicky issues I had on previous projects. Knowing I will deploy this app on Heroku (and we know how that turned out), I decided it wasn’t worth the trouble or cost again.
JWT Try Out
All of the above led me to try a new method I’ve not used before: JSON Web Tokens! This article and repo gave a relatively simple walk-through of how to implement JWTs using the jsonwebtoken package to encrypt the tokens, and argon2 to hash the passwords.
I adapted the code from this walk-through successfully and was able to register a user and give them a JWT. That user was also able to log in with a valid JWT.
Then I got to the part of protecting routes…roadblock. This method will work for the API where I can attach headers to each request, but to protect routes on a normal GET or POST app-level route, I’d still need to implement some kind of session store. There were also some gotchas around invalidating a token, for example if you want the user to be able to log out (as opposed to just letting their token expire).
Lesson learned!
Back to the Tried & True Method
I’m tired of working on this and want to actually work on the app now. I can see why people default to a tool like Auth0 or Okta!
So I decided to use a separate database for the user & session store following this step-by-step which uses Passport, MongoDB and passport-local-mongoose, and it worked great in the end.
The only issue was getting Express to serve the file directory of the Vue app’s static files…
Update 6 Weeks Later!
About a week after finishing this I got an email from Heroku saying that their mLab add-on was being discontinued 😵 In order to keep using MongoDB & passport-local-mongoose I would need to migrate that database to a new MongoDB Atlas cluster (and make it first!). This is definitely overkill for a database with 1 document in 1 collection, so I decided to figure out how to make Passport work with Postgres after all.
In the end I went ahead with passport-local-sequelize even though it’s not using an up-to-date version of Sequelize. It works, and that’s good enough for now.
There was one difference for registering users which I’ll save for future reference (I run this once from app.js and then delete the code, so it won’t be maintained in version control):
db.User.register('username', 'password', function (err, usr) { if (err) console.log(err); if (usr) console.log(usr); });
The passport-local-sequelize package has no documentation for the register() method but these are the parameters it expects.
Serving Protected Static Files
I could serve the login page (and Express EJS template) and the Vue app by setting up two static file locations:
The problem was that the Vue app would render whether or not the user was logged in, even if the client/dist/index.html file was only served from a protected route.
I learned how to layer in the authentication by stacking my loggedIn middleware instead:
Same exact line of code, but called this way it only rendered the client/dist/index.html file, but ignores all of the other static files. The JavaScript file of a Vue app is kind of important 😑
The solution was to update the root path of the Vue app—with this setup, it was looking for JavaScript like this:
localhost:5000/js/bundlepack.js
…when it’s actually now located here:
localhost:5000/home/js/bundlepack.js
So adding some Vue config to the client’s package.json file did the trick:
... "vue": { "publicPath": "/home/" }, ...
Note: depending on how your Vue app was originally set up, you might need to add this setting to the vue.config.js file instead. See docs for all settings.
And that’s it!
I now have auth running successfully, and the static pages can only be accessed if the user is logged in. 🎉🎉🎉
]]>My trial & error thought process of deciding how to implement authorization to password-protect a Vue application.The Forever Bash Cheat Sheethttps://www.niamurrell.com/code/reference/2020-07-04-the-forever-bash-cheat-sheet/2020-07-04T01:33:20.000Z2020-07-04T02:41:00.148ZFor reference here are the bash commands I always have to look up.
Secure Copy From Raspberry Pi to Present Directory
$ cd /path/files/should/end/up $ scp -rp pi@192.168.0.97:/home/pi/Desktop/path/to/files .
Check Disk Space
$ df -H
Check Size of Current Directory
$ du -sh .
See All Running Processes
$ top
# Or install the more robust htop $ brew install htop $ htop
Ctrl + C to exit
Create Multiple Numbered Directories At Once
for i in {1..8}; do mkdir episode-0"$i" done
Or simplified:
mkdir episode-0{1..50}
$
]]>For reference here are the bash commands I always have to look up.How I Built This Websitehttps://www.niamurrell.com/code/2020-06-30-how-i-built-this-website/2020-06-30T08:04:20.000Z2020-07-02T01:26:05.767Z41 days ago on May 20 I set a deadline for myself to finish the redesign of this website by the end of June. Today being the last day of the month, I’m so excited to say…I did it! 🎉🎉🎉
It goes to show that setting a deadline really works: I had started the project back in October, did some bits and bobs, and then pretty much let it sit untouched from November to the beginning of May.
But it wasn’t something I wanted to be working on forever (there are other projects to make!), so I gave myself about 6 weeks before I must move on. And since I don’t like leaving things unfinished, this was exactly the push I needed to get it done.
The purpose of this project was to combine two sites into one:
niamurrell.com, which I’d hand-coded page by page 4+ years ago, before I knew anything about modern web development
and dev.niamurrell.com, the coding blog I use a lot. I really liked the workflow of updating this site, but I hadn’t designed it from scratch.
It didn’t really make sense to me to have two separate personal sites after a while, but because of the atrocious code of the first site, blending the two was a big undertaking.
It’s also important to note that both sites had been adapted from themes I’d found on the web…Fekra and Project Pages respectively. Project Pages is in itself a fork from the Clean Blog theme, so needless to say there was a lot of code bloat in my site’s repo.
And I’m a developer now! In the time since I made both sites, I’d learned a lot about how to build a site from scratch, so of course I should do this for my own website.
The First Site Was Really Really Bad!
Can I just take a moment to highlight all of the things I didn’t know when I made niamurrell.com. 😆 The list below is a glimpse at why I so desperately needed to re-do the site:
The images were all .png files (“for the best quality” according to my ignorant logic 😂), some as big as 10MB!!!!
While the site was responsive, I’d edited the images in a way that they weren’t even visible on small devices
Each page was written in vanilla HTML. That nav bar? I copied & pasted it into each file…don’t even ask about the sidebar with the “latest” posts… 🤦🏾♀️🤦🏾♀️🤦🏾♀️
There was no way to add new content without coding a whole new HTML document from scratch. Even doing that, then I’d need to update all the other pages to incorporate it 😭
To my credit, when I made this site it was a step in the right direction; the previous site was a Wordpress installation which had been irreversibly hacked, and at least this one was unhackable static pages being cached by CDN. Baby steps!
Project Goals
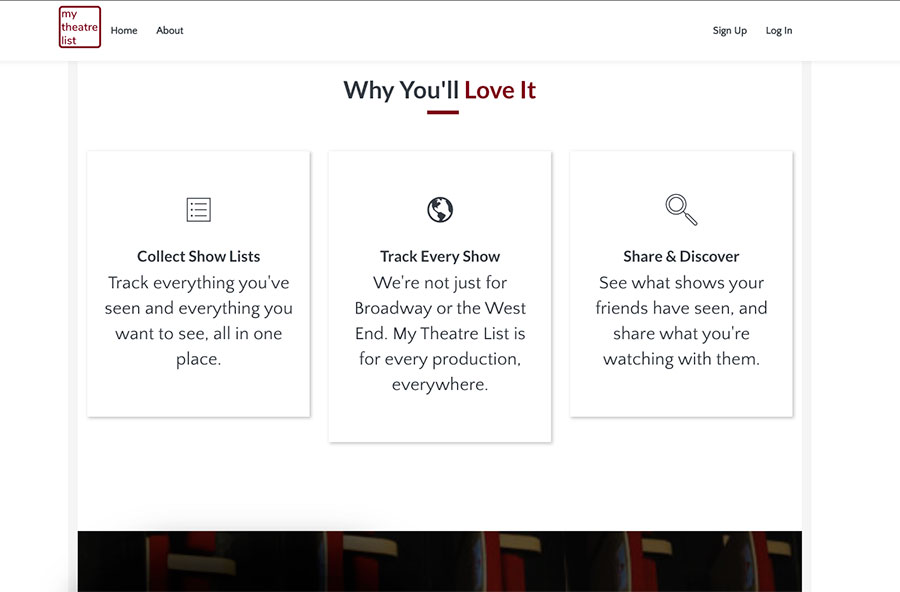
So all of this in mind, I set some goals & guidelines for the new project:
Incorporates all my writing into one place, but still allows for different verticals (travel, coding, etc.)
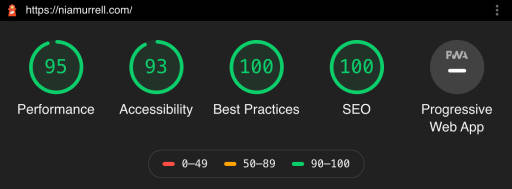
Super-performant page loading and no code bloat
No themes or templates—my own design (to be fair, I use that word lightly…I’m far from a designer! 😆)
Totally responsive & makes the best use of space on any device
Follows best practices for accessibility
Flexible for future growth i.e. adding new types of content, or whatever
Minimal JavaScript
As little as possible (ideally zero) 3rd party code…no Google Analytics
Dead easy to add content and maintain
How I Did It
Those are some big goals! Probably why I dragged my heels a bit in the beginning. 😊 But let’s get into the actual implementation…
Static Site Generator - Hexo
Hexo is a Node.js-powered static site generator that lets me write page templates and components in EJS, and then compiles all of my content into the hundreds of vanilla HTML pages that make up the site. Because I write the templates, a change in one component will be updated everywhere automatically, rather than changing every file. New content can be written in Markdown, and it gets fed into the templates.
I prefer to serve the files this way because it’s super fast, the output is standard across all browsers (with or without JS turned on), and it doesn’t require me to manage a database or write an API. And while the Hexo documentation leaves something to be desired (it’s a B- at best!), I’ve used it before and am comfortable with its quirks.
Design
Design is a skill I’m still developing, but I’m happy with how it turned out on this site. While I didn’t use any design software, I did take the time to sketch out my pages on paper before coding them which really helped provide some direction as I went along.
I designed each page mobile-first and incorporated everything I know about semantic HTML elements and page order. I used CSS Grid to move elements around as the viewport gets bigger. I tried to minimize distractions from the content with a simple side bar…and you can hide it if you really don’t like it!
One topic that was fun to explore was typography. I limited the text to what I hope is a comfortable line length and made adjustments to the line height & letter spacing in my text and headlines. I also finally got the chance to incorporate fluid font sizing thanks to the Utopia fluid type scale CSS generator. This was really interesting to learn about.
I also tried my hand at creating my own color palette which I had just started learning about when when I first started the site:
Lastly, I used some great tools like favicon.io to make my custom favicon, Undraw for some infrequently used illustrations, and this SVG generator to create the little wave elements I have scattered around the site.
Syntax Highlighting
This is relevant to design, but I think deserves its own section. Hexo supposedly uses highlight.js for its syntax highlighting, but I think the docs are missing some configuration step which I had never figured out in my old blog, and couldn’t figure out in this one. It gives all the necessary classes in the HTML output, but for whatever reason they were never being styled correctly, even with hljs turned on.
So I made my own syntax highlighter! I borrowed the default Hexo theme’s Stylus code and updated it with the colors from Atom One Dark to emulate my VS Code theme. Then I added and tweaked the code in my own highlight playground to see how it would look on code snippets from old blog posts. CodePen will compile the Stylus code for me, so I didn’t need to add an extra build step into my code base.
CSS Modules (speaking of the build…)
I wrote my CSS in small modules to simplify things, and used Grunt to generate a minified CSS file. I’ve already written about this in detail.
Responsive Images
A huge contributor to the download size of pages on my old blog was not having optimized images.
My solution was to serve different image files depending on the size of the device by using a mix of picture elements and the image srcset attribute. I had never done this before, so it was another great thing to learn about.
I briefly considered editing the images myself and storing all of the image versions with my own codebase but blahhhhh who wants to do that. It would definitely break the “dead easy to add content” rule!
So I opted to use Cloudinary to host my photos instead. (If you sign up using this link, I’ll get some free credits!) With Cloudinary I can just upload one high res image in any file format, and it will create down-scaled images on the fly, right-sized for the device requesting the image. It serves them from a CDN so load time has never been an issue either.
Custom Code Snippets
One useful feature Hexo doesn’t support is the use of _includes (aka components) in markdown, so I had to make my own in a way. The travel posts in my old blog included clickable photo modals as a way to share images that are descriptive but perhaps less impactful than a post’s main images (like this! ). I also sometimes include YouTube videos; I prefer to use YouTube’s nocookie URLs but the default Hexo plugin for YouTube doesn’t generate these.
So for these bits, it was necessary to include HTML in my markdown files. But to make it as easy-to-use as possible, I added these HTML blocks to my VS Code User Snippets…now I can just type hvid + Tab and the code is generated for me (just need to replace the VIDEOCODE):
The tab settings in the code snippet make this simple to use—after expanding this snippet I paste the Cloudinary image path and it will replace all instances of VERSION PATH in one go. The different URLs are how you instruct Cloudinary what size image to respond with.
Analytics
I really wanted to drop Google Analytics from my site. I’m not a big fan of how much data Google collects about people in general, so why should I contribute to it? Not to mention, I have a feeling a good number of the people who come to this site for dev posts will have it blocked anyway.
While we’re on the topic, I chose not to include things like my Twitter timeline for the same reason. I want the site to be as tracker-free as I can make it.
That said I really do like seeing which pages get the most visitors, purely for my own entertainment 😁 I looked into a few privacy-conscious analytics providers but they were all either paid or required me to host them on my own server…fair enough for a useful product but not really worth it for personal entertainment. What happened to the simple web counters of yore!?
I was nearly set on hosting the site with Netlify because they rolled out server analytics relatively recently, meaning I could see which pages got the most hits without adding any JavaScript trackers to my site. A bit of a downer to see the pricing had gone up from $5/month to $9/month in the short time since they launched it though! And this review highlighted some of its not-so-great aspects.
I started looking into my existing set up on AWS to see how I would even move the site over and lo and behold! 🤯 CloudFront already gives me this data and I didn’t even realize it 🥳🥳🥳 The light bulb came from this article, where I learned that CloudFront Analytics will tell me:
The 50 most popular objects requested
The top 25 traffic referrers
Which devices, browsers, and countries are making requests
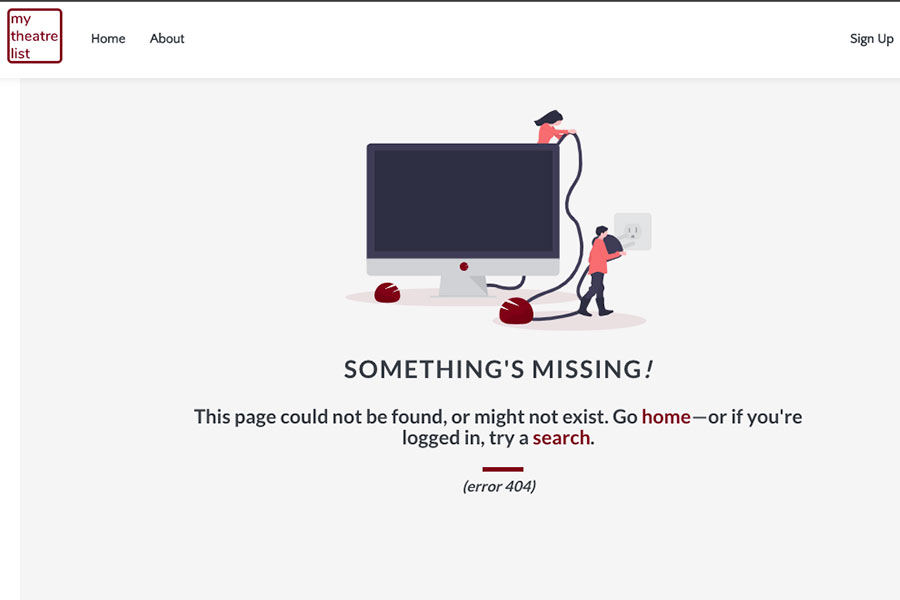
All of which has cost me no more than $0.20/month in the 2+ years I’ve had both sites being delivered through CloudFront.
It also tells me the pages people are requesting but getting 404 errors from…it’s mostly bots looking for hackable wp-admin.php entries, but I did uncover some pages I’d messed up. So it’s also useful!
Come to think of it, all of the features I get with CloudFront are exactly what Netlify offers—which makes sense, as I’m pretty sure Netlify is a friendly wrapper around AWS services that you could configure yourself if you don’t mind headaches. But in this case it worked out in my favor!
Deployment
Last but not least, the final step!
I host the files in an AWS S3 bucket which is configured as a static website. To serve the files over HTTPS, AWS requires a CloudFront distribution, which gives the added benefit of their global CDN. So I’m serving really small files, really quickly.
I had this setup for the old niamurrell.com, so didn’t have to go through the process of setting my my DNS records again, just had to add the new files…great!
For ongoing ease, I wrote a script which deploys the site when I write a new post:
# add today's blog post & deploy to site function atp { npm run grunt git add -A git commit -m "Add today's post" git push hexo g aws s3 sync /Users/me/niamurrell.com/public s3://niamurrell.com-website --exclude ".DS_Store" --delete aws cloudfront create-invalidation --distribution-id UDV02B3N97S14 --paths "/*" }
This script is in my bash prompt and accessible from any Terminal window, including my code editor’s. Let’s break this down:
npm run grunt: Minimize the CSS
git add -A: Stage all changes
git commit -m "Add today's post": Commit…I don’t have to write a commit message
git push: Push entire site to GitHub
hexo g: Generate the static directory
aws s3 sync ...: Update any changed pages in the S3 bucket
aws cloudfront ...: Invalidate all cached files so changes are immediately available
Admittedly this invalidation may not be the best solution (as I wrote about last week) but I’m still going with it for now.
🥵 Job Done!
And that’s it! 6 weeks coding, learning, and optimizing and the site is now live.
Should be good for a few years at least, until I realize how much I don’t know right now, and “need” to fix it again in the future! 🤣
The Results - HUGE Improvements!
I barely even have words for this…still gobsmacked! Let’s just go to the before-and-afters…
Load Times
Home Page BEFOREHome Page AFTERThat's the same number of requests, but over 80% smaller!
But wait, there’s more…
Travel Post BEFORE. Yes, that's a single image over 10MB!! 😵Travel Post AFTER. Images will be even smaller on mobile devices!96% smaller and 95% faster than the original site. I can't 😝
Lighthouse Scores
But it’s not just file size that’s important. I also ran Lighthouse reports on the old sites compared to the new to check things like accessibility, SEO, and best practices.
niamurrell.com Home Page BEFOREniamurrell.com Home Page AFTER
The dev site scores were surprisingly not much better:
Code Home Page BEFORECode Home Page AFTER
The travel posts also improved, even with a lot of images:
Travel Post Example BEFORETravel Post Example AFTER
Posts improved compared to dev.niamurrell.com too, especially for mobile devices:
Code Post Example For Mobile Devices BEFORECode Post Example For Mobile Devices AFTER
Even the books page with all its images and external JavaScript improved:
Books Page BEFOREBooks Page AFTER
From top to bottom, all of the efforts really seem to have paid off!
🥳💃🏾🥳💃🏾🥳💃🏾🥳💃🏾🥳
Future Work
As always, there are still some things I’d like to fix/change/add in the near future, but with less urgency:
BUG:Search has become unwieldy with the amount of posts I have, so much so that the page is blocked from loading while the index builds. I’ll either replace Lunr, update it, or find another search solution
I might try my hand at PWAs and make the site available offline
I want to add a way to easily share my content on social from the post pages, but without adding trackers to my site
I want to start adding my reading notes about books, and maybe add a vertical for my theatre reviews
Maybe add comments—I’d be interested to hear if people have feedback about what I’ve written. This is possible with git (the method I prefer) but I haven’t figured out moderation yet.
Dark mode?
So we’ll see what the future holds!
]]>How I combined two outdated blogs into one super-performant, accessible, modern personal website.AWS CLI Quick Reference for S3https://www.niamurrell.com/code/reference/2020-06-28-aws-cli-quick-reference-for-s3/2020-06-28T08:54:13.000Z2020-06-28T15:27:01.650ZI finally got myself up and running with the AWS CLI! For easy reference here are the commands I think I will use:
For My Machine
Dry run everything. For all of the commands below, add a --dryrun flag to view what will happen before actually doing it.
Sync current directory to specific place in S3 bucket. This will be recursive and directories will be created where they don’t exist. Existing files won’t be deleted unless you add the --delete flag.
Copy all photos for the designated months to the remote path. Set --exclude to everything, and only transfer the desired directories. Probably ok to use glacier instead of infrequent access for this.
To be bold about it, use mv instead of sync. It avoids the step of manually deleting, but doesn’t give the opportunity to verify the transfer before deleting.
]]>Easy reference commands to use the AWS CLI to transfer files to S3.AWS CLI CloudFront Invalidation For An S3 Static Sitehttps://www.niamurrell.com/code/tutorials/2020-06-25-aws-cloudfront-invalidation-for-an-s3-static-site/2020-06-25T22:21:25.000Z2020-07-01T10:58:14.562ZI recently deployed the new version of this site; it’s being hosted from an AWS S3 bucket with CloudFront sitting in front as a CDN. By default objects are cached by CloudFront for up to 24 hours…I wanted to invalidate that cache when I publish a new post so that the site is up to date immediately.
I used to host this blog using GitHub Pages which does this for you and is a lot easier to set up compared to AWS. Word to the wise! The only reason I decided not to do the same this time was to avoid having my site on two domains (my own + sitename.github.io) which I found confusing. GitHub Pages is a great solution though if you want to avoid the AWS faff.
I did come across some reasons not to invalidate the cache, and it’s worth noting there is a cost implication to these invalidations if you’re doing more than 1000 per month. This doesn’t apply to my use case though, so I went with invalidations.
There are some more considerations/warnings at the bottom of this post!
The Goal
I have a command line script which commits a new post, pushes the repo to GitHub, generates updated static files, and updates the static site repo*; in turn AWS CodePipeline watches for changes to the static repo and updates the S3 bucket, which is then shipped out (potentially) to CloudFront’s edge locations.
To view the updates immediately, now I need to add a command to invalidate the CloudFront cache (i.e. remove old versions of the files). The final result should be something like this:
# add today's blog post & deploy to site function atp { git add -A git commit -m "Add today's post" git push hexo generate -deploy aws invalidateThatCache }
I don’t have the AWS CLI though and have no idea how to do this, so let’s figure it out…!
Install AWS CLI
I’m on a Mac so I chose Homebrew (see docs for other methods):
In AWS you create different users who each have different permissions. So I’ll create a new user which is authorized to use CloudFront from my command line. This guide helped me with these steps.
Open the IAM service in the AWS web console
Click the ‘Add user’ button and give the user a name like nia-cli
For ‘Access type’ check Programmatic access then click Next
On the next screen you set this user’s permissions. I already had ad ‘admin’ user group set up and used this, but this is where you could restrict the user to specific services if you want. Click Next
Skip the Tags section and click Next: Review
Click Create user. Download the credentials CSV if you want to save it, otherwise just keep this tab open to reference this new Access key ID and Secret access key
Go to the command line and enter aws configure
Copy/paste the access key ID and secret access key when prompted
For Default region name I chose us-east-1 because this is where most of my AWS resources are. If you don’t already use a lot of services choose the location nearest you, here’s a list
For Default output format I chose json
Done! AWS CLI is now set up. I can confirm this worked by checking my CloudFront distributions (for verbose results remove the --query and filter):
NOTE: Later I removed this new user from the ‘admin’ group and created a new group which only has permission to interact with CloudFront and S3. Feels safer!
Set Up The Invalidation
This article is a good reference for a lot of the below. The final command I need for my particular use case is:
This is where the --distribution-id comes from. The arguments after the --paths tag are each of the paths that I want to be invalidated, separated by spaces.
The article linked above discusses how you can list the paths in a separate file if you have a lot. You could also set the path as "/*" to invalidate the whole directory. AWS charges per invalidation path so it might be more cost-effective to invalidate the whole directory each time if a lot of paths need to be invalidated.
And that’s it! I added the invalidation command to my deploy script and job done.
Did It Work?
I happened to have the CloudFront web console open and indeed, a new invalidation popped up on the website as soon as I ran the command. It’s also possible to confirm programmatically if you’re so inclined.
Considerations
Timing
Although each of the invalidations I’ve run (all 4 of them!) have completed within a few seconds, there is no way to control the time it will take to invalidate the cache. There is also an unknown time factor with CodePipeline updating S3 from GitHub. But my script deploys the site and starts the invalidation in one go.
All that to say, it’s possible the invalidation could finish really fast and the code is pushed afterwards, and then you’ve invalidated for nothing! For this reason, the article recommends setting up this invalidation as its own Lambda function, and adding it as a pipeline stage in CodePipeline.
I’ll give that a shot if I run into problems with the way I’ve set it up.
Cost
I mentioned this above but just to reiterate—S3 updates, CodePipeline pipelines, and CloudFront invalidations all have the potential to be not-insignificantly chargeable at scale. My site is really small but anyone using these tools on bigger sites should consider the costs to avoid surprising bills 😄
On that note, protect the AWS credentials too!
* Update 5 days later: Once I got CloudFront working with the AWS CLI, it was pretty easy to get acclimated with S3 commands as well. I deleted the static site repo and took CodePipeline out of this workflow…now I aws s3 sync the generated files directly with the S3 bucket instead.
]]>My step-by-step guide to installing the AWS CLI and setting up CloudFront invalidations.Can't Connect to Raspberry Pi...AGAIN!https://www.niamurrell.com/code/2020-06-24-can-t-connect-to-raspberry-pi-again/2020-06-24T20:51:49.000Z2020-06-24T21:25:44.405ZI ran into an issue again where I wasn’t able to SSH into my Raspberry Pi…this is how I fixed it this time.
The Lead-Up
I was connected to pi and could see that the disk space was 100% full…apparently it’s been a bit too long since I last checked in on my time lapse project! I started clearing space by copying the files to my laptop via scp.
Then I started uploading the files to an S3 bucket using the AWS console. Well I soon ran low on disk space on my laptop, and simultaneously ran out of memory on my laptop and everything ground to a halt. I tried closing programs, deleting applications, etc. hoping to just finish the uploads but it wasn’t going to make it. The browser stopped responding all together, and the only way out was to force restart the whole machine.
Unfortunately the SSH connection was still open to pi which I learned is a problem…!
The Problem
When I restarted my computer this was the state of things:
Finished the uploads and deleted all the files…disk space and memory issues are now gone—fine.
Try to connect to pi via SSH again (ssh pi@192.168.0.188) and it stalls for a long while before timing out:
ssh: connect to host 192.168.0.188 port 22: Operation timed out
Run nmap to see if the IP address has changed (this fixed the problem the last time I couldn’t connect)…but it doesn’t show that Pi exists on the network at all:
$ nmap -sn 192.168.0.0/24 Starting Nmap 7.80 ( https://nmap.org ) at 2020-06-20 00:50 BST Nmap scan report for hyperwifi.mynet (192.168.0.1) Host is up (0.0026s latency). Nmap scan report for nias-awesome-mbp-machine.mynet (192.168.0.231) Host is up (0.00076s latency). Nmap done: 256 IP addresses (2 hosts up) scanned in 9.54 seconds
Restart my computer (turn it off and turn it on again!) and try connecting…nope.
Run nmap from a different laptop on the same network…nope.
Try all of the above a few more times hoping something will magically change 😑
Log in to the admin dashboard for my Wifi network to check what devices are connected and confirm that it does show Pi with on its IP address.
Because of this last one, the only thing I didn’t try was restarting Pi or connecting it to its own screen for me to troubleshoot on it directly. If there was any chance it was still connected and taking photos I didn’t want to stop it, or physically move it from the position it’s been in for months.
The Solution
Turned out to be a simple fix! I rebooted my wifi router and ran nmap again to find that Pi could be found again—on a different IP address granted, but I could connect to it!
Once connected I found that it indeed had been taking photos still while it was “offline,” so glad I didn’t dismantle the whole set up to get this fixed.
Now everything’s back up and running normally…yay!
]]>I ran into an issue where I wasn't able to SSH into my Raspberry Pi...this is how I fixed it this time.New Site Is Deployed! 🎉https://www.niamurrell.com/code/2020-06-21-new-site-is-deployed/2020-06-21T11:38:07.000Z2020-06-21T11:51:48.304ZNew site is deployed!! I will write about it later, and this post commemorates the success 😄 and tests my deployment pipeline 🤓.]]><p>New site is deployed!! I will write about it later, and this post commemorates the success 😄 and tests my deployment pipelineGrab Bag - Flexbox Somersaults and Debounce vs Throttle and Photoshop Batch Edithttps://www.niamurrell.com/code/2020-05-24-grab-bag-flexbox-debounce-throttle/2020-05-24T22:59:37.000Z2020-06-20T20:32:46.145ZSo many things I’ve learned while working on a project!
Flexbox doesn’t have justify-self
You can align items any way you want to as a group, but you can’t control them individually on the justify axis, in the same way you can the align axis. For example, I had a column of 5 items and wanted the first 4 to be at the top together (justify-content: flex-start;), but with the 5th at the bottom. With the default flex properties, the only way to get the 5th to the bottom is to set justify-content: space-between;, but then the 2nd-4th items have too much space between them.
I’m sure there’s (probably?) a good reason why justify-self doesn’t exist….
Throttling vs. Debouncing in Vue
I learned about debouncing a little while ago while learning React, and came across this video which discusses how it applies in Vue. It also compares it against another lodash method, throttle…each can be used for different reasons. Debounce will wait until the interaction is completed before firing the event, while throttle will keep firing the event during the interaction, but at a set interval.
This page also shows a visual demonstration…very cool and useful to understand!
JavaScript Progress Bar!
I added a progress bar to my blog! It shows you how far you have progressed in the content as you scroll down the page. This great article explained a way to do it using the <progress> HTML element, contrary to using a <div> as you see in many tutorials even though there is a semantic element available for this!
I did have to make some tweaks:
Because my progress bar is attached to an existing element rather than the top of the page, mine got position: fixed; instead of position: sticky; top: 0;.
I want the progress bar to feel natural, so it couldn’t be strictly based on when the post enters & leaves the viewport. To fix this I set the maximum value to 80 instead of 100 so that it looks like it’s 100% full when you’re nearing the bottom of the post with your eyes.
Because mine is attached to a fixed element (the nav above it) which changes in size depending on the size of the window (thanks to my subtly fluid font sizing), I had to do some tricky nudging of the top margin, which looks like horrible code! Done again, I’d try to find a way to improve this:
Lastly, there’s probably some improvement to be had with the progress calculation…it’s still not quite right when posts are either really short or really long. But since my posts are almost always perfectly in the middle of length perfection (😂) I left it for now.
Really Cool CSS Image Background
I just want to make sure not to forget where to find this video from Brad Traversy showing a pretty cool layout using CSS grid and background images. I didn’t know about the CSS property background-attachment: fixed; which makes a background image span across multiple items. It looks really cool!
Accessing Hexo Categories
I wanted to access the categories of a post in a Hexo blog, but they weren’t showing up. This is something others have also faced. I didn’t end up using this, but here is a code snippet that I got to work, accessing the categories with a workaround:
I learned how to batch edit folders full of images using Photoshop actions!! This is amazing because I am updating a bunch of photo files to be jpgs, as for some reason I thought it was a good idea to deliver only .png images on the previous version of my website.
I’m also using Cloudinary to serve them all…will write more about that later, as it’s awesome.
]]><p>So many things I’ve learned while working on a project!</p>
<h3 id="Flexbox-doesn’t-have-justify-self"><aExpress Rate Limitinghttps://www.niamurrell.com/code/2020-05-16-express-rate-limiting/2020-05-16T09:58:47.000Z2020-06-20T20:32:45.624ZToday I learned how to limit requests to an API in an Express app, and it turned out to be pretty simple with two npm packages:
express-rate-limit stops the API from responding to requests after a certain number of requests is reached.
express-slow-down incrementally slows down responses from the API after a certain number of requests is reached. For example if you set the limit to 10 requests and the delay time to 500 milliseconds, the 11th request will be held for 500ms, the 12th for 1 second, the 13th for 1.5 seconds, and so on.
These middlewares can be implemented into an app by creating new modules out of them, or adding them directly into the API’s app.js file:
To test it, you can make the limits really low and then make requests to the API either in Postman or from the app that consumes the API. When testing in the browser, errors will display in the console, so you can see which ones may need to be handled differently.
This is a really simple implementation thanks to these packages, but you can also do this from scratch. There are also different types of rate limiting which I read about in this article, which may be of interest for further reading.
]]><p>Today I learned how to limit requests to an API in an Express app, and it turned out to be pretty simple with two npmTIL - Kuberneteshttps://www.niamurrell.com/code/2020-05-08-til-kubernetes/2020-05-08T14:15:39.000Z2020-06-20T20:32:46.469Z
What follows are notes from a class. Incomplete thoughts & code that probably will only make sense to me. Given enough time, even that may be a stretch! Reference at your own risk 😂
kubectl is the Kubernetes command line interface. It has a GUI you can open on a local proxy. It tells you the kubectl commands as you go in the GUI, so you can learn. To create it as a service:
Here are the docs on how to do this. It’s a bit complicated because Kubernetes will need the Docker daemon secret in order to pull from the registry. So, create registry credentials:
1 is a container for 0, 2 is a container for 1, and so on.
A pod is also referred to as a “Kubernetes object”…it’s an environment for containers
Different pods do different things (app server, db, etc.)
When you kill a pod you can’t bring it back
More info on all of this is in the three diagrams post above, and in the class slides.
A deployment is the magic of K8. You configure your “desired state”, and the deployment controller attempts to achieve that state on its own by switching out old containers/pods/replica sets for new ones, with the aim of reaching that desired state. This makes it possible to do rolling updates, scaling, auto-scaling, rollbacks, etc. with zero downtime.
For the most part K8 spins things up and down in no order…it does what it needs to do to achieve the desired state. But if you have something like interdependent database servers that need to be spun up in order, a StatefulSet creates the pods in order for example if you need to create databases reliant on each other.
Secrets
Don’t use yaml for secrets. Here are some best practices for working with secrets (auth keys, API credentials, etc.).
Random facts that are useful in the context of different slides
Persistent volume claim is what you need to access the persistent volume. It can limit how much of the persistent volume you have permission to use. Usually issued by a K8 manager.
A label can be referred to across the cluster. name:id // label:class // K8 config:html.
When you create a deployment it creates the pod, replica set, nodes all in one go.
After create you port-forward to make the contents accessible from the outside container world
There are options for health checking…for example, if failureThreshold is met, K8 will just trash the container and make a new one
You can see logs: kubectl logs [--follow] <entity>
Be careful of mistakes on cloud servers…if you accidentally create a loop of endless creating/destroying you’re getting charged for each occurence. Read Managing Resources for Containers. Set resource limits to the limits of your ec2 instance for example.
All Kubernetes Instructions Are Made in YAML
$ kubectl create -f <something>.yaml # create some structure (pod, deployment, etc.) # If you create a deployment then add --save-config if you may want to update later
$ kubectl apply -f <something>.yaml # apply updates / changes made in config files # add --dry-run to test it
$ kubectl rollout undo deployment.v1.apps/basic-server $ kubectl rollout history deployment.v1.apps/basic-server # see history $ kubectl rollout undo deployment.v1.apps/basic-server --to-revision=2 # roll back to version $ kubectl scale deployment.v1.apps/nginx-deployment --replicas=10 # scaling $ kubectl autoscale deployment.v1.apps/nginx-deployment --min=10 --max=15 --cpu-percent=80 # auto-scaling
If you want K8 to store more than the default 10 historical replica sets you can change it in the yaml with spec.revisionHistoryLimit.
]]><blockquote>
<p>What follows are notes from a class. Incomplete thoughts & code that probably will only make sense to me. Given enoughSVG Sizing Once And For Allhttps://www.niamurrell.com/code/reference/2020-05-08-svg-sizing-once-and-for-all/2020-05-08T06:59:49.000Z2021-06-19T22:25:32.380ZToday I want to get a grip on sizing SVGs once and for all. I’ve learned about SVGs before but every time I actually use them in code, what I think I know doesn’t have the outcome I expect. So in the next hour I will learn this with the following assumptions & requirements:
I can edit the SVG element
I will use the SVG markup inline rather than placed as an img
I can still style with colors, animations, etc no matter what size it is
The SVG is accessible
*Reads her own blog*
Ok turns out I already wrote this! 😂😂😂 So I’ll just make this a simple reference instead for future me…
SVG Checklist
✔ Keep Viewbox, Remove Height & Width
This sets the default size to 0 x 0 pixels, so you’ll always have to size them independently.
Alternative: Keep height and width, but set them to 100%. Then you MUST always define size in the parent element.
This isn’t a good solution for SVGs with inline text.
Ignore the temptation to change the viewbox dimensions. Viewbox handles the height/width ratio of the SVG, not the dimensions of the SVG output on a page. If you change it you’ll just mess up the image, since all of the SVG’s internal elements are drawn in relation to the viewbox.
✔ Add important SVG global styles
svg { fill: currentColor; pointer-events: none; }
The currentColor Fill will give all SVGs the color of their parent containers by default. No pointer events will disable the default tooltip which will otherwise show up on hover.
✔ Use ems for inline text
psvg { height: 1em; width: 1em; }
This will usually keep the SVG in line with text, but it really depends on the font & SVG design. See demo.
✔ Include these attributes on the SVG element for accessibility
role="img" or role="text" or role="presentation" depending on the context
This ensures screen readers include or ignore the element as intended
It also ensures they skip over all of the svg child elements
aria-labelledby="title-id description-id"
✔ Always have a <title> as the first child within an <svg> element (plus optional description)
]]>Today I want to get a grip on sizing SVGs once and for all. So in the next hour I will learn this with the following assumptions & requirements...Cloning JS Objects & Form Handling With Vuexhttps://www.niamurrell.com/code/2020-05-01-cloning-js-objects/2020-05-01T11:39:36.000Z2020-06-20T20:32:45.624ZCloning JS Objects
Today I was reminded of a 101 rule about JavaScript objects: if you try to copy an object by creating a new variable and setting it equal to the original object, it only creates a reference to the original object, rather than actually copying it. This article Deep Cloning Objects In JavaScript (And How It Works) explains it way better than I’ll aim to do here. But long story short, if you need to create an actual copy of an object, const objCopy = obj isn’t going to cut it!
The article above recommends using the lodash library’s cloneDeep method to ensure you get an actual copy, no matter what’s in your original object. I opted to do this in my project, and only imported the single function: import { cloneDeep } from 'lodash';.
Another option mentioned in this article is to use Object.assign(), and in most cases (in fact, in the use case I was working with) this will work, even when there are nested objects. It won’t work though if there are functions within any part of the original object, so this way of cloning an object needs to be used with care.
Form Handling With Cancel/Save Buttons & Vuex Store
All of the above came in handy trying to figure out how to work with edit forms in Vue when the questions come from a Vuex store. Rather than setting v-model to the object itself directly from state, I created a local-to-the-component copy of the state object first, and set v-model on the copy. This way the user can make edits, hit a cancel button, and everything reverts back to the original state. To save the user’s changes, I send the edited, copied object to the API update route.
These are the resources that helped me figure out how to do this:
Also I didn’t do this, but it might be interesting to store unsaved form data in local storage so that it’s still there if the user accidentally leaves the page…this article walks through a way to do it.
]]><h3 id="Cloning-JS-Objects"><a href="#Cloning-JS-Objects" class="headerlink" title="Cloning JS Objects"></a>Cloning JS Objects</h3><p>TodayParsing Markdown in Vuehttps://www.niamurrell.com/code/2020-04-26-parsing-markdown-in-vue/2020-04-26T22:15:18.000Z2020-06-23T23:22:17.200ZToday I learned how to use marked.js to parse markdown an render html in a Vue app. Long story short, I tried a few ways to use it directly in a component using the library’s marked() method, but this didn’t work exactly as expected.
I found the method in this video tutorial to be just the ticket. Instead of repeating the marked() function each time I had some markdown to render (which didn’t work consistently anyway), I created a markdown-parsing component.
]]><p>Today I learned how to use <a href="https://marked.js.org/"><code>marked.js</code></a> to parse markdown an render html in a Vue app.TIL - GraphQLhttps://www.niamurrell.com/code/2020-04-21-til-graphql/2020-04-21T18:00:00.000Z2020-06-23T23:22:51.408Z
What follows are notes from a class. Incomplete thoughts & code that probably will only make sense to me. Given enough time, even that may be a stretch! Reference at your own risk 😂
mutation createFruit($data: FruitCreateInput!){ createFruit(data: $data) { id name growthMethod whereFrom } }
# The data to send { "data": { "name": "Orange", "growthMethod": "tree", "whereFrom": "Sub-tropical" } }
CodePen Demo for basic querying as API with fetch.
GraphQL and local state management isn’t really that great because you’re required to include extra fields (like type, type description, etc.).
To create a GraphQL server you have to define all of the types. You also have to write all of the resolvers to tell the server what to send back in response to queries. Apollo Server is a common tool to do this with. This GitHub repo is an example of a fullstack app.
Apollo has dev tools which you can add on to the browser.
Apollo Boost is a thing.
Re: usage: it’s a good way to save bandwidth for users, but it can be costly using it because there’s only one endpoint and it has to figure out what to do each time.
]]><blockquote>
<p>What follows are notes from a class. Incomplete thoughts & code that probably will only make sense to me. Given enoughMy Singular Vue Referencehttps://www.niamurrell.com/code/reference/2020-04-19-my-singular-vue-reference/2020-04-19T17:05:36.000Z2021-06-19T22:25:32.563ZThe deeper I get into learning Vue, the more notes I have to take 😄 I’m getting a bit annoyed with combing through my separate Vue posts to find information, so I’ll condense everything here instead. This post will be a straight copy-paste job from some of my previous posts, and I’ll add new information in the future as I learn it.
The main tutorial I’m doing this with showed a cool demo of Vue UI so I thought I’d try it out. So next step to create the actual Vue app is to invoke it:
…and then create a new project. This walks you through a bunch of steps; I did:
named the client app ‘client’ making sure I’m in the app’s parent folder
selected npm as my package manager (it’s the default I later learned…not necessary to change)
unticked the option to create a git repo…it’s already in a git repo
chose a manual preset in order to be able to add TypeScript
added TypeScript as an enabled feature
unticked the option to use class-style component syntax
chose which ESLint option to install (‘error prevention only’ to go the minimal style, but whatever option is comfortable is fine)
Create Project!
It took a while to install, but created the app in the end. Then you can run it from the UI in the Tasks tab, and clicking serve then Run task. Otherwise run npm run serve (assuming npm) from the command line in the client directory.
For the first time it will take a little while for the build to complete, but when it does you can visit the app at localhost:8080 (or just click the **Open app button in the CLI). Also not a bad idea to git commit the installation here before making any customizations.
A few initial things I noticed using the UI tool…
To see the console output (including any runtime errors), open Tasks –> Output
Plugins and utilities like Vuetify, Vue Router, and Vuex can be added from the Vue GUI:
Go to the Plugins tab
Click ‘add plugin’
Search for *vuetify (or whatever plugin) and then click vue-cli-plugin-vuetify when it comes up, and install it
Leave the default preset and the click Finish installation and let it do its installation magic
Creating A Project via CLI
$ cd to/parent/directory/of/vue/app $ vue create directory-name
Go through the options as prompted.
Basic Component Structure
Every Vue component is made up of three basic building blocks:
<template></template> — Vue-ified HTML of how the component should actually be structured
<script></script> — import utilities and export data, methods, etc. for each component
<style></style> — style the bad boy
One important thing to note about the style element: adding the scoped attribute limits CSS to this component only:
<stylescoped> h3 { margin: 40px00; } </style>
Passing Props
The simple way to register props that have been passed down to a component is to list them in an array:
This is acceptable, but best practice says it’s better to be more specific about prop types, defaults, and requirements to reduce bugs, errors, omitted props, etc. You can also add validators to further defend against human error.
<script> exportdefault { props: { length: { type: [Number, String], // allows for either type to be accepted required: true, }, image: { type: String, default: '/images/placeholder.png', // required isn't necessary since there's a default validator: propValue => { // require image to be in a specific directory const hasImagesDirectory = propValue.indexOf('/images/') > -1; // require file to be valid file type const isPNG = propValue.endsWith('.png'); const isJPEG = propValue.endsWith('.jpeg') || propValue.endsWith('.jpg'); const hasValidExtension = isPNG || isJPEG; return hasImagesDirectory && hasValidExtension; } } } }
The accepted prop types are the basic JavaScript data types: String, Number, Boolean, Array, Object, Date, Function, and Symbol.
Form Input Binding
One important thing to know: v-model overwrites the value attribute on text elements, so it’s not necessary to include.
Note: This is not true for checkboxes or radios, you still need the value there.
I was used to doing this out of habit, and also Emmet auto-complete…must remember to remove this attribute when creating forms!
The same is true for adding the checked or selected attributes to checkboxes and selects. See docs.
By the way, I guess you don’t need the name element either? Since it’s used to organize data going to the serve, but with Vue the data model handles that instead.
.lazy Modifier is Great! Replaces Debouncing
In React (from what I know) it’s a complicated process to debounce user input, i.e. stop the form from acting on the input with every key press. Vue has this cool .lazy modifier which means it won’t react to the input data until focus changes away from the input. Example:
Normally when a URL has a slash in it, or a path, it sends a request to the server:
www.imdb.com/movies
Vue by default allows for routing in “hash mode”…the hash is used to prevent the browser from making a new server request:
www.imdb.com/#/movies
But this is lame! So instead vue-router needs to be set up in history mode so that no matter the path, the index.html file will be loaded. See docs.
One important thing to note—history-mode routing works by default in development mode when running npm run serve, but in production there is some extra configuration to do depending on the production setup.
Vuex
Vuex is a state manager that sits across an entire application (similar to Redux in React world). I watched the NetNinja’s Vuex tutorial playlist to get acquainted with it.
This article is a good example of using Vuex to implement a global flash alert, aka snackbar.
Vuetify
Vuetify is a component library which implements the Material Design principles for Vue apps. One thing I saw that I might like to try is implementing a dark theme toggle. You can do this by adding a button control in App.vue which calls a method:
Here are the docs to see which properties can be customized in a theme.
Vetur & Formatting
Vetur is a VS Code plugin that takes care of syntax highlighting and formatting in Vue files. It did one really annoying thing that always bothered me and I finally figured out how to fix it.
Vetur uses prettier-html as the default formatter for the <template> sections of Vue files, and this formatter by default wraps element attributes so they look like this:
<p class="red white--text" >Lorem ipsum dolor sit amet consectetur adipisicing elit. Eaque totam corrupti sint veritatis. Voluptas, reprehenderit culpa porro, molestias perspiciatis possimus recusandae!</p> <p class="pink lighten-4 red--text text--darken-4" >Lorem ipsum dolor sit amet consectetur adipisicing elit. Eaque totam corrupti sint veritatis. Voluptas, reprehenderit culpa porro, molestias perspiciatis possimus recusandae!</p>
I hate this.
It took a while to figure out what was actually doing this (Vuetify? ESLint? Some other VS Code setting?) but finally this article illuminated everything. Long story short the solution was to change the Vetur formatter for HTML from prettier-html to js-beautify-html and then to tell it not to wrap attributes.
In learning that Vetur was injecting Prettier formatting into the files, I was also able to adjust some other things that had been niggling, though not so strongly. The final settings I added to my VS Code settings.json were:
]]><p>The deeper I get into learning Vue, the more notes I have to take 😄 I’m getting a bit annoyed with combing through my separate VueTIL - Serverlesshttps://www.niamurrell.com/code/2020-04-16-til-serverless/2020-04-16T17:48:55.000Z2020-06-23T23:24:30.308Z
What follows is notes from a class. Incomplete thoughts & code that probably will only make sense to me. Given enough time, even that may be a stretch! Reference at your own risk 😂
]]><blockquote>
<p>What follows is notes from a class. Incomplete thoughts & code that probably will only make sense to me. Given enoughTIL - Offlinehttps://www.niamurrell.com/code/2020-04-14-til-offline/2020-04-14T17:37:10.000Z2020-06-20T21:03:42.522Z
What follows is notes from a class. Incomplete thoughts & code that probably will only make sense to me. Given enough time, even that may be a stretch! Reference at your own risk 😂
A service worker is a type of worker which works with the Cache API to fetch and cache assets like HTML, images, CSS, JS, etc.
This site as well as CanIUse each give an overview of which parts of the API are available and which browsers they’re compatible with.
Service worker scripts need to be in the root directory and most often won’t work if they’re within project folders.
To test these you have to be running a server, even localhost.
Every change to a service worker file makes it recognized as a new service worker, which will be queued.
skipWaiting used to be problematic apparently but now it’s not so much…it’s probably fine to use.
claimClients is a way to add a service worker to already-open tabs if they’re old, on the same domain, and don’t have the service worker installed or registered.
IndexedDB
This can be like a backup database for when the app is offline.
Its native API isn’t great (see Codepen demo) but there are wrappers which make it easier to use:
Apparently there is a performance API to let you test a site’s performance!
Workbox
Because all of this above can be a bit convoluted to figure out the best approach, Google created Workbox. The idea is to combine it with Webpack so that you have less to manage manually in your service workers.
It uses human language method names that make working with service workers more accessible.
Questions To Follow Up
Can you do this with big media files?
Different browsers have different size limits for how much you can store in cache. Of course it also depends on the capacity of the user’s computer. Here’s another walkthrough of the limits.
Can you put some bits online and leave media files for download on demand?
Do I have to have all of my assets in my app to do this or can I use a 3rd party service like Cloudinary for images?
Yes, a.
More Follow Up
Here is a course to learn about PWAs from beginning to end, in more detail. Or it also might be fun to learn it by playing a game instead.
]]><blockquote>
<p>What follows is notes from a class. Incomplete thoughts & code that probably will only make sense to me. Given enoughVue & Veturhttps://www.niamurrell.com/code/2020-04-13-vue-vetur/2020-04-13T10:08:45.000Z2020-06-23T23:23:05.009ZDid some work on the JFM project and discovered some things along the way.
Distractions
Somehow the second I sit down to code my screen always looks really dirty and needs to be cleaned immediately. Weird 🤔
Vetur Formatting
Vetur is a VS Code plugin that takes care of syntax highlighting and formatting in Vue files. It did one really annoying thing that always bothered me and I finally figured out how to fix it.
Vetur uses prettier-html as the default formatter for the <template> sections of Vue files, and this formatter by default wraps element attributes so they look like this:
<p class="red white--text" >Lorem ipsum dolor sit amet consectetur adipisicing elit. Eaque totam corrupti sint veritatis. Voluptas, reprehenderit culpa porro, molestias perspiciatis possimus recusandae!</p> <p class="pink lighten-4 red--text text--darken-4" >Lorem ipsum dolor sit amet consectetur adipisicing elit. Eaque totam corrupti sint veritatis. Voluptas, reprehenderit culpa porro, molestias perspiciatis possimus recusandae!</p>
I hate this.
It took a while to figure out what was actually doing this (Vuetify? ESLint? Some other VS Code setting?) but finally this article illuminated everything. Long story short the solution was to change the Vetur formatter for HTML from prettier-html to js-beautify-html and then to tell it not to wrap attributes.
In learning that Vetur was injecting Prettier formatting into the files, I was also able to adjust some other things that had been niggling, though not so strongly. The final settings I added to my VS Code settings.json were:
]]><p>Did some work on the <a href="/search/#JFM">JFM project</a> and discovered some things along the way.</p>
<h3 id="Distractions"><aTIL — Dockerhttps://www.niamurrell.com/code/reference/2020-04-12-til-docker/2020-04-12T13:07:11.000Z2021-06-19T22:25:32.495ZToday in class I got an overview of Docker. Here are the slides from class (note: they are a few years old and some links are outdated.). Here is the Docker documentation.
The Basics of Docker-izing An App
Add a Dockerfile file to your project root
Add a .dockerignore file to ignore things like node_modules
docker build creates an image of the application
docker run creates a container from your app image and spins it up
You can stop a single container normally with Ctrl + C
Alternatively, docker-compose up create multiple containers if you have a docker-compose.yml file
docker-compose down will stop all running containers gracefully
Dockerfile
The Dockerfile is instructions for how to set up the container (see docs):
Start with an image that you’re building FROM (like Node, PHP), etc.
You can COPY or ADD application code into the container
WORKDIR is the working directory where the application code will run from and be copied to. /usr/src/app is a common convention apparently but it can be anything…best to avoid the root though.
RUN any commands that need to go before your app will run (for example npm install)
CMD must be the last command which tells the container how to start the app (i.e. npm start). Only the last CMD instruction will be carried out.
Here are some examples to run simple apps:
# Java Application FROM openjdk:8 # base image COPY . /usr/src/app # local location to container location WORKDIR /usr/src/app RUN apt-get update \ && apt-get install -y --no-install-recommends maven RUN mvn clean package CMD ["java", "-jar", "./target/test-artifact-0.0.1-SNAPSHOT.jar"]
# Node Application FROM node:12 WORKDIR /usr/src/app COPY . . RUN npm install EXPOSE 3333 CMD ["npm", "start"]
docker build
The command order is:
docker build -t <app-name>:<version tag (optional, default: 'latest' )> <src dir path>
For example if I have navigation to my myApp application folder in the command line, I can run docker build -t myApp:0.0.1 .
-t will make the build logs show in your terminal
You can make up your app name and version tag
Don’t forget the . at the end which is in reference to the present directory, where your app and Dockerfile are sitting
If it has built correctly, you’ll see the myApp image on the list when you run docker images.
docker run
Example: docker run -it -p 3333:3333 node-mongo:0.0.1
-it gives you an interactive terminal for your app
-p 3333:3333 is port mapping, in case you need to avoid port conflicts on your local machine without changing the application code. It publishes to your localhost from the app: -p 127.0.0.1:4000:3333 where the app runs on port 3333.
In this example node-mongo:0.0.1 is the app name and version tag, as seen in the docker images list.
You can run a container in detached mode (i.e. in the background) with docker run -d and you won’t have access to its interactive terminal. See docs.
You can also run docker exec -ti <CONTAINER_ID> bash to inspect with the command line. exit to leave.
Docker Compose
A docker-compose.yml file gives instructions when you need to spin up more than one container to run your app, for example if you need your app server and database server running simultaneously. Here is the docker-compose v3 documentation.
Very important! If you docker-compose down a server that contains data (like a database server) then all the data will be trashed. The solution is to use VOLUMES to write the data to disk (see docs). Here’s an example of an app which requires a MongoDB server:
version:"3"
# Each service is a copy of the container services: app: container_name:docker_mongo restart:always build:. ports: -"3333:3333" links: -mongo mongo: container_name:mongo image:mongo volumes: # default Mongo location to (:) where the volume should be created on the volume -"./data/db:/data/db" ports: -"27017:27017"
More Docker Commands
docker images shows you what images you have
docker image rm <image-name>:<version-tag> deletes the image from your Docker daemon
docker ps -a shows what containers are running
Best Practices
Be careful when writing the Dockerfile and be as specific and detailed as possible to ensure the app runs consistently over time.
Be specific when pulling an image to create a container. For example docker pull node:12.16 is better than docker pull node:lts because over time, the lts version will change, and your docker container will be updated on its own. Read: things might break! This article explains this in depth.
Didn’t learn this, but multi-stage builds are a way to get smaller containers. For example you can build from a slim version of a language or runtime and then pull in dependencies as they are needed. This article explains this in depth; see also Docker docs on the topic.
The Best Bit
Since I don’t really develop with others, I don’t have much use case yet for Docker-izing my apps. BUT using Docker will allow me to learn new things which might require different languages more easily, because I won’t need to go through a massive local installation every time. I can just create a container with the image of whatever language and off we go!
]]><p>Today in class I got an overview of <a href="https://www.docker.com/">Docker</a>. Here are the <aVue Basics (Continued...Again) — Vuex & Vuetifyhttps://www.niamurrell.com/code/2020-04-11-vue-basics-continued-again/2020-04-11T15:27:08.000Z2020-06-23T23:23:24.981Z
I’ve continued on with some Vue tutorials today, finishing the Vue Basics and then closing out with series on Vuex and Vuetify.
Vuex
Vuex is a state manager that sits across an entire application (similar to Redux in React world). I watched the NetNinja’s Vuex tutorial playlist to get acquainted with it and found it to be surprisingly straightforward? I guess it’s easier said than done (I didn’t code along this time), but I don’t have any hesitations about trying it out on a bigger application when I have the need for it.
I also started a code-along with the NetNinja’s Vuetify Tutorial playlist but only got a few videos in before I realized there were a lot of changes between Vuetify v1 (which was in the video series) and v2, the current version. It’s still a good overview—I watched it all the way through—but the best resource for this will be the docs going forward.
Get Building!
After all that, I’m tutorial’d out. Time to start building my application!
I picked up with forms and input binding. One important thing to know: v-model overwrites the value attribute on text elements, so it’s not necessary to include.
Note: This is not true for checkboxes or radios, you still need the value there.
I was used to doing this out of habit, and also Emmet auto-complete…must remember to remove this attribute when creating forms!
The same is true for adding the checked or selected attributes to checkboxes and selects. See docs.
By the way, I guess you don’t need the name element either? Since it’s used to organize data going to the serve, but with Vue the data model handles that instead.
.lazy Modifier is Great! Replaces Debouncing
In React (from what I know) it’s a complicated process to debounce user input, i.e. stop the form from acting on the input with every key press. Vue has this cool .lazy modifier which means it won’t react to the input data until focus changes away from the input. Example:
Normally when a URL has a slash in it, or a path, it sends a request to the server:
www.imdb.com/movies
Vue by default allows for routing in “hash mode”…the hash is used to prevent the browser from making a new server request:
www.imdb.com/#/movies
But this is lame! So instead vue-router needs to be set up in history mode so that no matter the path, the index.html file will be loaded. See docs.
One important thing to note—history-mode routing works by default in development mode when running npm run serve, but in production there is some extra configuration to do depending on the production setup.
What follows is notes from a class. Incomplete thoughts & code that probably will only make sense to me. Given enough time, even that may be a stretch! Reference at your own risk 😂
Jest will automatically look for files with .test in the name (for example, component.test.js), and will find test files in directories called __tests__ (in this directory, they don’t need .test in the file name).
Jest can do snapshot testing which allows you to take a snapshot (hence the name) of the HTML produced from a component, and then lets you compare that snapshot when future changes are made. Leigh Halliday wrote a post Introduction to the React Testing Library which explains the concept and shows some demos.
Questions to Follow Up On
In component testing, what would I actually test?
How do you test controllers? How do you mock database queries?
]]><blockquote>
<p>What follows is notes from a class. Incomplete thoughts & code that probably will only make sense to me. Given enoughTIL - React Hookshttps://www.niamurrell.com/code/2020-04-07-til-react-hooks/2020-04-07T19:16:13.000Z2020-06-23T23:23:41.085Z
What follows is notes from a class. Incomplete thoughts & code that probably will only make sense to me. Given enough time, even that may be a stretch! Reference at your own risk 😂
The useEffect hook is a side effect, separate to the normal process you have going on in your functions. This can replace the lifecycle methods componentDidMount & componentDidUpdate & componentWillUnmount. componentWillUnmount only comes into play if your useEffect function returns a function: unmount
useEffect( // Callback () => { // Do something on mounting/updating const handler = setTimeout(() => { // just using a timeout as an example because it needs cleanup }, delay);
// [optionally] Clean up when done (componentWillUnmount) return() => { clearTimeout(handler); }; }, // Dependencies: [value, delay] // Only re-run effect if these values change );
]]><blockquote>
<p>What follows is notes from a class. Incomplete thoughts & code that probably will only make sense to me. Given enoughVue Basicshttps://www.niamurrell.com/code/2020-04-04-vue-basics/2020-04-04T20:53:21.000Z2020-06-23T23:23:44.715Z
So last time I wrote about a project I’m working on and how I was following a crash course to learn the setup for Vue. Not that that wasn’t working, but I figured I may as well start at the beginning and learn the basics. So I have been going through The Net Ninja’s Vue Course and it’s great!
For future reference, here are the repos from following the course:
And lastly, I found this video (and accompanying repo) useful—it shows “7 Secret Patterns Vue Consultants Don’t Want You to Know.”
]]><blockquote>
<p><strong>My Vue Learning Demo Repos</strong></p>
<ul>
<li><a href="https://github.com/niamurrell/learning-vue-cdn">AbsoluteNew Project! Getting Started With Vuehttps://www.niamurrell.com/code/2020-03-29-new-project-getting-started-with-vue/2020-03-29T20:28:46.000Z2020-06-23T23:23:54.047ZI’ve started a new project! Technically I started it a month ago, but today I’m introducing it to this blog 😄.
For a little over a year now I’ve been doing weekly check-ins with myself to reflect on things I want to work on on a week-by-week basis, and to keep myself accountable to making progress. It’s a way to keep reminding myself of long-term goals, and a way to break big goals down into actionable steps so that I actually do them. Since I started this, I’ve written the check-ins as comments on a Trello card, and a year in I wanted a better way to do this.
Why? Sometimes I want to look back on older check-ins to compare, and at a certain point it just gets to be a lot of scrolling. Also if I want to review the same question from multiple weeks, it’s just annoying to find them. I thought I could make an app which stores my answers to the check-in questions in a more organized way, which would make reviewing them a lot easier.
I also thought it would be a good opportunity to get some practice building an API and SPA—most of the apps I’ve worked on a lot up until now have either been shallow demo SPA projects that I don’t really care about that much, or full-blown server-rendered monoliths. This project would give me a chance to build ‘just an API’ and ‘just a front end’ which seems to be the way a lot of the world builds the internet these days!
I’ve been calling it project JFM, an acronym for “just for me” as a reminder to keep the scope small and only focus on the bare minimum I need for my own use of the app.
Getting Started With Vue
I also thought this project would be a good opportunity to try my hand at Vue since all of the front-end demo projects I’ve done until now have been with React. I know React is super cool (or at least that’s what the cool kids say 😂) but actually working with it, I haven’t really been convinced by all the hype. Maybe I’m missing something…only one way to find out! I’ve now finished a REST API for all of the things I’ll need in this app, so time to get started on the front end.
I also thought this app could be a good way to get some practice with TypeScript, which I got an intro to a few weeks ago:
Here’s a video intro’ing TypeScript particularly with Vue (note: it demos using Classes in Vue, which has been phased out).
This series is a tutorial similar to Traversy’s above, but implementing TypeScript
This video demonstrates a basic Vue app, comparing the vanilla JS way, the Class way, and the TypeScript way
Installation
To install Vue:
npm install -g @vue/cli
The main tutorial I’m doing this with showed a cool demo of Vue UI so I thought I’d try it out. So next step to create the actual Vue app is to invoke it:
vue ui
…and then create a new project. This walks you through a bunch of steps; I did:
named the client app ‘client’ making sure I’m in the app’s parent folder
selected npm as my package manager (it’s the default I later learned…not necessary to change)
unticked the option to create a git repo…it’s already in a git repo
chose a manual preset in order to be able to add TypeScript
added TypeScript as an enabled feature
unticked the option to use class-style component syntax
chose which ESLint option to install (‘error prevention only’ to go the minimal style, but whatever option is comfortable is fine)
Create Project!
It took a while to install, but created the app in the end. Then you can run it from the UI in the Tasks tab, and clicking serve then Run task. Otherwise run npm run serve (assuming npm) from the command line in the client directory.
For the first time it will take a little while for the build to complete, but when it does you can visit the app at localhost:8080 (or just click the **Open app button in the CLI). Also not a bad idea to git commit the installation here before making any customizations.
A few initial things I noticed using the UI tool…
To see the console output (including any runtime errors), open Tasks –> Output
Without doing anything to the default app, the initial bundle size is over 2MB!? This should be addressed. Hopefully it’s just the size of the codebase, not the output app bundle.
Vuetify
To speed up the fruition of this app I’m using the CSS framework & component library Vuetify which is a Vue implementation of Material Design. This can be added from the Vue GUI:
Go to the Plugins tab
Click ‘add plugin’
Search for *vuetify and then click vue-cli-plugin-vuetify when it comes up, and install it
Leave the default preset and the click Finish installation and let it do its installation magic
Vue Basics
Every Vue component is made up of three basic building blocks:
<template></template> — Vue-ified HTML of how the component should actually be structured
<script></script> — import and export each component
<style></style> — style the bad boy
One important thing to note about the style element: adding the scoped attribute limits CSS to this component only:
]]><p>I’ve started a new project! Technically I started it a month ago, but today I’m introducing it to this blog 😄. </p>
<p>For a littleCreating Multiple Directorieshttps://www.niamurrell.com/code/2020-03-16-creating-multiple-directories/2020-03-16T22:18:23.000Z2020-06-23T23:24:02.193ZI learned how to make multiple folders at once using the command line when I needed to organize some TV episodic photography for work. I don’t want to forget how to do this, so for reference:
for i in {1..8}; do mkdir episode-0"$i" done
Or simplified:
mkdir episode-0{1..50}
]]><p>I learned <a href="https://unix.stackexchange.com/questions/48750/creating-numerous-directories-using-mkdir">how to make multipleRaspberry Pi - Stalled Camera Process and Out of Disk Spacehttps://www.niamurrell.com/code/2020-03-13-raspberry-pi-stalled-camera-process-and-out-of-disk-space/2020-03-13T01:27:50.000Z2020-06-23T23:24:45.028ZProcrastination fail! The day before yesterday my raspberry pi finally ran out of disk space in the middle of taking the day’s time lapse photos. I never got around to automating the transfer of raw files off of the pi itself. Here’s how I got it working again.
/dev/root is the main file system to pay attention to, and it’s clearly 100% full.
Remove Files
For an immediate quick fix I did this manually to start. I went back to my old notes and used the scp command to copy files to my laptop. Then I manually uploaded them to AWS S3 buckets, confirmed the transfer, and then deleted the files off of the pi.
With a lot of files, this was a long process, and I still need to set it up to move the files from the pi to AWS without needing my laptop in the middle.
Test Camera
With more space available, I tested the camera to make sure it would be ready to go for the next day’s photo taking:
$ raspistill -o Desktop/image.jpg mmal: mmal_vc_component_enable: failed to enable component: ENOSPC mmal: camera component could not be enabled mmal: main: Failed to create camera component mmal: Failed to run camera app. Please check for firmware updates
Yikes, problem!
Some googling hinted that this error may come up if another process is using raspistill in the background.
Another hint: in the latest folder of time lapse photos, there was an empty file container (file name was along the lines of timelapse-2020-03-11-0090.jpg~) which must have been created just as the disk ran out of space. I deleted this non-file, but it indicated that the script may still be running in the background if it was interrupted like this.
I tried resetting the camera unit via sudo raspi-config but this did not make it work.
This Q&A suggested some other troubleshooting methods, but updating the firmware or reinstalling Raspbian from scratch seemed like overkill.
It did give one hint though, a command to see what raspistill was doing in the background:
The second process was referenced in the Q&A as the normal output. This first process though (21373) is clearly my time lapse command…one which should have ended at the end of the day on the 11th, but was clearly still hung up!
So I killed the process:
$ sudo kill 21373
And tested the camera again:
$ raspistill -o Desktop/image.jpg $ cd Desktop/ && ls image.jpg scripts timelapses
SUCCESS!
]]><p>Procrastination fail! The day before yesterday my <a href="/tags/raspberry-pi">raspberry pi</a> finally ran out of disk space in theTIL - Testing Noteshttps://www.niamurrell.com/code/2020-03-02-til-testing-notes/2020-03-02T21:06:57.000Z2020-06-23T23:24:36.079Z
What follows is notes from a class. Incomplete thoughts & code that probably will only make sense to me. Given enough time, even that may be a stretch! Reference at your own risk 😂
]]><blockquote>
<p>What follows is notes from a class. Incomplete thoughts & code that probably will only make sense to me. Given enoughOptimizing Video for Raspberry Pi Timelapseshttps://www.niamurrell.com/code/2020-02-23-optimizing-video-for-raspberry-pi-timelapses/2020-02-23T12:37:08.000Z2020-06-23T23:24:51.365ZI want to put my Raspberry Pi timelapses together, so I started reading about a good way to do it. No solutions here, but some ideas about where to pick this up again…
Try improving video quality
I think I will need to re-stitch the photos to create new videos to try & get rid of some of the pixelation. This thread gives some tips on what might be successful…namely removing the scale=1920x1080 flag from my script and adjusting the bitrate. This article has another option. And yet another thread suggests something else.
Add date to videos
Watching the videos back to back, it was useful to see the date as the timelapse progressed, and likewise, watching it without the dates is tricky because you can’t really get a sense of how much time is passing. So I want to add the date to the videos, programmatically of course. This thread shows how to do it with ffmpeg which might be similar to mencoder. Note this is different from adding subtitles, for which you need a subtitles file.
]]><p>I want to put my Raspberry Pi timelapses together, so I started reading about a good way to do it. No solutions here, but some ideasTIL - Code Qualityhttps://www.niamurrell.com/code/2020-02-18-til-code-quality/2020-02-18T18:51:20.000Z2020-06-20T20:32:46.146Z
What follows is notes from a class. Incomplete thoughts & code that probably will only make sense to me. Given enough time, even that may be a stretch! Reference at your own risk 😂
Instead of tsc --watch VS Code can run a build task: cmd + shift + P then type “tasks” and select ‘Tasks: Configure Default Build Step’, ‘tsc:watch - tsconfig.json’ which this will produce a .vscode folder with tasks.json
Terminal –> Run Build Task
Tuples
Tuples are like arrays where you specify the type of some of the items, though it can have items which don’t have types. Only the defined indexes will be type-checked.
// this won't be run, it's a type declaration for the function // use the type keyword: type numericFn = (num:number) => number;
// how do we check that this function matches the pattern and returns a number? // with the type definition `numericFn` that we just created! let squareFn: numericFn = (n) => n*n;
type numericFn = (num: number) => number; // note that this type definition will not appear in the compiled javascript
const squareFn: numericFn = (num) => num * num; // Ok const squareFn: numericFn = (num) => num.toString(); // Error
External Code Types
If you want to use TypeScript with 3rd party code you can import types into your project. For example search them on Type Search…here’s an example for lodash (npm i @types/lodash). Definitely Typed is another resource for commonly used type definitions.
TypeScript in Bigger Projects
Run this to see an example of TS and the file structure in a bigger code project:
Not related to the above but exciting nonetheless! This turned out to tbe the fix to make the bash shell work correctly in VS Code. For whatever reason it was not putting the correct node version into my path with nvm, but this made it work properly.
We also got eslint working properly by deleting a duplicate installation of node. We compared which versions were being picked up by running which node in the different shell windows, finding an old version 8 installation of node in usr/local/bin and then deleting it. Hoping this won’t cause issues with yarn working, since crew installed this Node version when installing yarn.
]]><blockquote>
<p>What follows is notes from a class. Incomplete thoughts & code that probably will only make sense to me. Given enoughBye bye body-parserhttps://www.niamurrell.com/code/2020-02-17-bye-bye-body-parser/2020-02-17T22:29:23.000Z2020-06-23T23:24:59.899ZToday I learned that you don’t need to use body-parser in Express applications anymore, completely by chance!
I was watching this MERN stack intro video randomly to see if it made a bit more sense now that I have some more experience with React. And in this part of the video he makes an off-handed comment that body-parser isn’t needed anymore. I ignored this.
Now the Vue tutorials were made in October 2018 and the MERN tutorial is from June 2019. And I’ve definitely been using body-parser in Express apps since both of these, so what did I miss?
The body-parser package is still maintained as middleware for Express but it doesn’t seem to get any reference in the Express docs anymore.
Well apparentlybody-parser was added back into Express in 2017 and hasn’t been needed all this time! It’s still using body-parser under the hood so in a way it doesn’t really make much difference, but yay for finding out there’s one less dependency to worry about in my Express apps!
]]><p>Today I learned that you don’t need to use <code>body-parser</code> in Express applications anymore, completely by chance!</p>
<p>I wasTIL - Drawing And Web Socketshttps://www.niamurrell.com/code/2020-02-16-til-drawing-and-web-sockets/2020-02-16T15:16:19.000Z2020-06-20T20:32:46.449Z
What follows is notes from a class. Incomplete thoughts & code that probably will only make sense to me. Given enough time, even that may be a stretch! Reference at your own risk 😂
D3 (based on three.js) is a library which uses JS to do really robust things with drawings and data visualization, built on top of the canvas API.
There is a steep learning curve for D3 though. nvd3 is further built on top of D3…it’s commonly used D3 charts so you don’t have to reinvent the wheel.
There are some other charting libraries out there:
We learned about web sockets which are a two-way web protocol which listens for changes without a page refresh (unlike the HTTP protocol). A quick chat app demo shows how easy it is to set up a basic example using the socket.io npm package.
Firebase services are built on top of web sockets so that you can build apps with real-time data. To learn more about this check out the Firecasts YouTube channel (here’s the intro on Firebase with web apps)
Other Stuff
There is a thing called splunk that you can use to get application info from your servers.
JavaScript Animation
I couldn’t go to this class but here are the slides and some highlights for reference:
Greensock is the tool of the day. It animates SVG elements. Inkscape is one of many places to get SVGs. Here’s and article with lots more information about SVGs.
Unlike the slides, do gsap.to() instead of TweenLite.to(), etc.
]]><blockquote>
<p>What follows is notes from a class. Incomplete thoughts & code that probably will only make sense to me. Given enoughTIL - State Management In React & Reduxhttps://www.niamurrell.com/code/2020-02-06-til-state-management-in-react-and-redux/2020-02-06T18:50:19.000Z2020-06-20T20:32:46.146Z
What follows is notes from a class. Incomplete thoughts & code that probably will only make sense to me. Given enough time, even that may be a stretch! Reference at your own risk 😂
Another way to manage state: unstated. It’s more robust than the Context API but less guns-blazing than Redux. There are lots of ways people have managed state over time.
]]><blockquote>
<p>What follows is notes from a class. Incomplete thoughts & code that probably will only make sense to me. Given enoughTIL - React Forms and Morehttps://www.niamurrell.com/code/2020-02-04-til-react-forms-and-more/2020-02-04T20:21:57.000Z2020-06-23T23:25:06.171Z
What follows is notes from a class. Incomplete thoughts & code that probably will only make sense to me. Given enough time, even that may be a stretch! Reference at your own risk 😂
Later we updated this to handle the form elements the React way, seen in the current pen.
Formik
Because handling forms this way can be cumbersome there are React libraries to do a lot of this work for you. We looked at Formik and implemented it into a demo app.
]]><blockquote>
<p>What follows is notes from a class. Incomplete thoughts & code that probably will only make sense to me. Given enoughAngular Introhttps://www.niamurrell.com/code/2020-01-29-angular-intro/2020-01-29T22:09:42.000Z2020-06-23T23:25:14.731ZToday I got my first intro to the Angular framework! It was great timing, having just gone through the React intro materials in detail…it was a fresh-in-mind comparison of each’s hello world tutorials.
I’ll caveat this by saying that reading through the React docs at my own pace can’t really compare to the shotgun intro I got at a meetup tonight. But I think I (surprisingly!) prefer React. There were some really cool things I liked about the Angular way of doing things too.
Not planning to go into detail but I did want to save some links for future reference…
It’s worth checking the release candidates in case a new major version is imminent…if it is the new documentation will be on next.angular.io
Stackblitz is a web environment to write Angular projects…it’s pretty solid! A great way to get the full experience without doing a full local installation of Angular and all its dependencies
]]><p>Today I got my first intro to the <a href="https://angular.io/">Angular</a> framework! It was great timing, having just gone through theTIL About React Routerhttps://www.niamurrell.com/code/2020-01-28-til-about-react-router/2020-01-28T23:29:34.000Z2020-06-20T20:32:46.380Z
What follows is notes from a class. Incomplete thoughts & code that probably will only make sense to me. Given enough time, even that may be a stretch! Reference at your own risk 😂
There was a new way to do routing compared to a previous project I did where we used a switch statement for routing. Instead you can load a component into a Route:
This solves problems if you have a lot of routes, especially if there are sub-routes like the above, because the switch statement will stop when it hits the first matching segment, regardless of what comes after it; this means you don’t have to keep track of which routes need exact path vs. just path.
The React router training is put together really well to learn the basics and not-so-basics.
Otherwise
I didn’t know there is a way to do routing in React without using React Router. But apparently it’s possible in the HTML5 spec! You can use [`history.pushState()](https://developer.mozilla.org/en-US/docs/Web/API/History/pushState) to update what’s in the browser’s URL bar and history.
]]><blockquote>
<p>What follows is notes from a class. Incomplete thoughts & code that probably will only make sense to me. Given enoughTIL - Styling and Handling Events in React Componentshttps://www.niamurrell.com/code/2020-01-25-til-styling-and-handling-events-in-react-components/2020-01-25T12:11:46.000Z2020-06-23T23:25:20.447Z
What follows is notes from a class. Incomplete thoughts & code that probably will only make sense to me. Given enough time, even that may be a stretch! Reference at your own risk 😂
Events in React components are synthetic events and may not always act the way they would in normal JS. Notably, they are asynchronous.
React is always trying to free up memory; one way it does this is to nullify events when they happen. To avoid this you need to call event.persist() if you need to use data that comes from the event.
handler(event){ event.persist(); // MUST INCLUDE THIS! this.setState(() => { searchTerm: event.target.value }); setTimeout(function(){ console.log('event', event); console.log('event.target', event.target); }, 500) }
You also need to bind event handlers to the class, or they won’t work!
I’m also reading through the React docs to generally familiarize myself…here are some things I learned that I found interesting/surprising/worth trying extra hard to remember:
React treats components starting with lowercase letters as DOM tags. For example, <div /> represents an HTML div tag, but <Welcome /> represents a component and requires Welcome to be in scope.
In events you must always explicitly call preventDefault to prevent default responses.
Binding component methods is super important! Generally, if you refer to a method without () after it, such as onClick={this.handleClick}, you should bind that method.
You can build collections of React elements with looping functions! Demo here
In React, a <textarea> uses a value attribute instead of having the text between tags.
You can make placeholders in React components using {props.children} (see example).
You can also pass props straight through a component to its children using the spread operator (see example)…this is called prop drilling.
Binding methods to components in their constructors
Adding a key where they’re necessary and not using the index as a key (“A good rule of thumb is that elements inside the map() call need keys.”) You can use the cuid() browser method to set unique keys, or UUID in Node apps.
]]><blockquote>
<p>What follows is notes from a class. Incomplete thoughts & code that probably will only make sense to me. Given enoughTIL - Classes & React Componentshttps://www.niamurrell.com/code/2020-01-21-til-classes-react-components/2020-01-21T18:56:01.000Z2020-06-20T20:32:45.746Z
What follows is notes from a class. Incomplete thoughts & code that probably will only make sense to me. Given enough time, even that may be a stretch! Reference at your own risk 😂
An object is an instance of a class
Classes can be extended
For React to work in Codepen, add react, react-dom, and Babel as the preprocessor in Codepen settings
// ReactDOM render takes two arguments: what to render and where to render it ReactDOM.render(<FirstComponentname='Nia' />, mountNode);
React Fragments no longer require the Fragment keyword
Empty angle brackets do the same job. This is because the render method can only take one element to render, so if you need to render multiple components, they need to be wrapped in a single fragment.
// ReactDOM render takes two arguments: what to render and where to render it ReactDOM.render( <> <FirstComponent name="Nia" age='87' /> <FirstComponent name="Shelly" age={11 * 9 - 12} /> <FirstComponent name="Barry" age={barryAge} /> </>, mountNode );
Output:
Hiya Nia. You are 87.
Hiya Shelly. You are 87.
Hiya Barry. You are 87.
React Context API
This seems pretty useful—check it out!
Two Adjacent Counter Components
When components need state they are set up as a class instead of a function.
classCounterextendsReact.Component{ constructor(props){ super(props); this.state = { count: 0 }; // you have to bind 'this' to new methods when you create them because React this.increment = this.increment.bind(this); } increment(){ // wrap the arrow function in parentheses to make sure it returns an object instead of running this as a function this.setState((prevState) => ({ count: prevState.count + 1 })) } render() { return( <div> <h1>Current count is {this.state.count}</h1> <button onClick={this.increment}>+</button> </div> ) } };
There are some methods in React.Component by default: construction –> pre-render –> render –> post-render (aka birth, life, and death methods). Read about them in the React docs.
When a React component is extended, your own methods will overwrite the defaults. This is called method overload. Example:
classTimerextendsReact.Component{ // extend a basic React component and get all its props and methods by running super constructor(props) { super(props); // set state to an object (it doesn't have to be but that's convention) this.state = { secondsElapsed: 0 }; }
tick() { // setState needs to be an object or return an object. It's the ONLY method of updating state in the component. Wrap the arrow function in parentheses to make sure it returns an object instead of running this as a function. this.setState((prevState) => ({ secondsElapsed: prevState.secondsElapsed + 1 })); // It's not possible to set state as an object (you can only do this in the constructor)...the above is best practice. Example: // this.state = { // status: active // } }
render() { // Render is the only required method in a React component return<div>Seconds Elapsed: {this.state.secondsElapsed}</div> } }
Key Takeaways:
componentDidMount() is the go-to method for doing things with your component knowing it’s loaded & ready on the page
componentWillUnmount() is the go-to method for scrapping anything you’ve set up in the component which will take memory. React scraps the component when it’s no longer needed but it doesn’t automatically scrap things the component did so this must be done manually with componentWillUnmount. In the above example the timer would just keep running forever otherwise.
]]><blockquote>
<p>What follows is notes from a class. Incomplete thoughts & code that probably will only make sense to me. Given enoughCropping With The Cloudinary Upload Widgethttps://www.niamurrell.com/code/2019-12-29-cropping-with-cloudinary-upload-widget/2019-12-29T09:22:15.000Z2020-06-23T23:25:32.303ZI came across a weird (?) setting in the Cloudinary universe while working with the upload widget. You can set it so that the user can crop their image upload before sending the photo up to Cloudinary. But when the image came through, I was getting the full version instead of the cropped version.
Turns out there is a further setting that needs to be added to the upload preset based on this Cloudinary stub: you have to set mode to crop and set gravity to custom.
This produced the desired result in that it cropped the image, but the resulting image still seems to be cropping with the wrong coordinates. I’ll need to figure that out later and will add the result here if I do.
For now I’m just cropping the photos on my phone before uploading.
]]><p>I came across a weird (?) setting in the Cloudinary universe while working with the upload widget. You can set it so that the user canMy 100 Days Of Code & Product Challengehttps://www.niamurrell.com/code/2019-12-23-100-days/2019-12-23T20:38:16.000Z2020-07-04T02:41:45.219ZOver the past few months I did the #100DaysOfCode challenge and combined it with my own addition, #100DaysOfProduct. I started on 11 August 2019 and wrapped it up yesterday, 133 days later. So now it’s time to reflect! Here are all the things I learned in doing it, as well as all of the check-in/accountability tweets for longevity’s sake 😄
I got a lot done.
I don’t think it’s any big surprise, but if you code regularly, turns out you get a lot of work done! Here are the major pieces of work I got done during the challenge:
Learned how to set up and use my first Raspberry Pi
Learned how to make cron jobs and used them to create a bunch of timelapse videos
Coded & launched a Jekyll blog & Instagram to host said videos…later cancelled the whole project 😂
Launched My Theatre List for public sign up (invite-only, but still)
Introduced My Theatre List to a lot of strangers, including one group that had at least 100 people 😱
Planned out a social media calendar and wrote dozens of post ideas for when the time comes to launch My Theatre List properly
Added an activity feed to the home page of My Theatre List, based on feedback I got in talking to users
Made a lot of UI improvements to My Theatre List including pagination, better search, homepage illustrations, and more
Learned a lot about Cloudinary’s API, upload widget, and Node.js SDK
Learned about copywriting and made several attempts at using the new skills in the projects I worked on
Wrote an app I can run locally to scrape HTML pages, and used it to list out a bunch of my blog posts
Start & finished a demo app of something that will be useful at work, and figured out a way to make it an actual work project
Started the project of updating my personal website & combining it with this dev site
Very productive if I do say so!
It’s most useful when there’s a goal in mind.
When I started the challenge, I was working on two projects—My Theatre List and a now-defunct local neighborhood blog which had a Raspberry Pi element. While I definitely made progress on both, I also experienced some distractions along the way (see list above!) and think I could have approached this differently. Particularly with the theatre project, which I really want to get in front of more strangers so that I can get feedback & make it better. If I do a challenge like this again, I’ll think a bit more about where I’d like to be at the end, and set some more concrete goals to make sure I get there.
On the other hand, I’m really excited about the work project because having worked on it is opening up some extra training opportunities at work that I may not have had otherwise. And I’m also really excited to soon have a new website!
Flexibility with the “rules” is key.
100 days is a long time, and some days I just didn’t want to work on code, even for 30 minutes. Whether it was due to an after-work event I was going to, or work travel, or just nice weather(!), giving myself the flexibility to sometimes skip a day or few made this challenge a lot more palatable.
I know, I know…the whole point is not to break the streak, right? I think that works for some things, particularly smaller commitments, but to add 30+ daily minutes of any activity is a big ask (in my life at least!). I made the decision early on to not be super rigid with completing the challenge within 100 days, and I think it made the whole thing much much more enjoyable. The important thing was seeing it through to the end.
Twitter is mostly not a nice place.
My least favorite thing about this challenge was that in doing it, I got sucked into Twitter. I generally avoid social media and try to only use it in ways that are useful (like this challenge!), but if you have to post every day, the Twitter feed is pretty unavoidable. I didn’t really like getting sucked into so many rants and injustices and displays of righteous indignation ¯\_(ツ)_/¯
…Except when it’s great!
On the other hand, I got a lot of encouragement using the #100DaysOfCode hashtag, and a good amount of unexpected help too! I’d post about trouble I was having with some service or other, and on multiple occasions someone from that company or service wrote back to me to help troubleshoot. And if it wasn’t someone at the company directly, there are just a lot of friendly, helpful developers out there! It’s not like I have a lot of followers or any particular influence, so this was a totally unexpected and very welcome surprise benefit of doing the challenge.
I might or might not do it again.
I’m on the fence about this one. I don’t really feel a strong need to do another timed challenge because I code & work on these projects regularly regardless…do I really need to tweet about it and announce what I do every day? Not sure.
On the other hand, I can see in writing this post that it’s actually pretty cool to see how much I accomplished within a set amount of time. And (per the previous point) it can be very fun & beneficial to get input from the general dev community as I work on different things. Will that continue if I just post normally without the #100DaysOfCode hashtag? Again, not sure.
So this one is to be seen!
Without Further Ado, ALL THE TWEETS…
11 August
Started a new project today! This is the hopeful beginning of #100DaysOfCode #100DaysOfProduct. Some recent podcasts & blogs have reminded me how productive it is to learn in public and I experienced this when I did a podcast for over a year…
..well that finished over a year ago so it’s time to get back to it 😄 Why now: I have 2 projects which I’ve put a lot of hours into but they haven’t seen the light of day because they’re not ‘ready’ yet. I now realize my brain interprets ‘ready’ as ‘perfect’ 😅 Not helpful!
My rules:
30+ min/day on code or product
Code = actual app code or devops stuff
Product = content, marketing, research, or business development
Deadline for success is 11/30 (planned work travel)
The tweets, plus important highlights on dev blog So here we go!
Day 1: Wrote a mini @nodejs app to upload photos to @Cloudinary, separate from the main project repo. Learned how easy it is to implement their upload widget! I also used @Auth0 so that randos can’t upload to my account.
12 August
Day 2: Tweaked the styles of the Cloudinary app I made yesterday, and updated it to accept multiple image uploads at once. Came up with 12 new ideas for content marketing.
13 August
Day 3: Wrote & deployed a landing page for my web design “company” (not sure when I’ll feel comfortable removing the quotes 😅). Also Raspberry Pi arrived! I got started setting it up and blogged about it.
14 August
Day 4: Got remote desktop working on Raspberry Pi…turns out I didn’t need a wired mouse or keyboard after all! Still getting acquainted, but feeling ready to start coding the actual project.
15 August
Day 5: Fixed some bugs that were stopping database associations from updating/deleting properly. The reasons were misnamed form elements and unnecessary if statements. Also fixed a looping redirect. Love squashing those bugs! 🐞
16 August
Day 6: Did a quick Python tutorial in prep for writing the camera time lapse program. Learned about the exponentiation operator (**). All this time and I didn’t know it exists!
17 August
Day 7: Worked on configuring camera time lapse images with bash scripts. Learned how to compile them into a video in the command line too, and will try it out tomorrow.
18 August
Day 8: Worked on some styling and structure updates to the homepage of project #1, & trialed the first timelapse for project #2. Learned Photoshop can also compile a timelapse! Great because avconv doesn’t seem to be compatible with #RaspberryPi anymore..?
19 August
Day 9: Added a welcome screen that new users will see until they start interacting with the site. Also added a feedback form so that I can collect info from people as they’re playing around with the website. Getting closer to opening the site up to users!
20 August
Day 10: Still no success operating #RaspberryPi from itself, but learned about the scp command to copy files with my laptop from Pi and got it to work! Also worked on user being able to change their profile pic in the other app.
21 August
Day 11: Did small adjustments to project 1’s home & welcome pages. Also learned how to use screen for project 2 so that #RaspberryPi can keep going without my laptop (wrote about it).
22 August
Day 12: Participated in @startupschool group call to practice talking about project 1. Good to meet some other founders working on great projects! Also improved sign-up flow.
23 August
Day 13: Finished up the opt-in flow and updated some views.
24 August
Day 14: Learned a bit more about @Cloudinary while setting it up for users to be able to edit their profile pic. Using both their upload widget and Admin API…both pretty straightforward to work with!
25 August
Day 15: Working on project 1 today…made it so users can update their username and it syncs between my app and @auth0. A bit more complicated than it seems it should be? Maybe that’s just learning 😋
26 August
Day 16: Enabled private registration on project 1 (😄 huge win!!) then got hung up doing some form validations. It was the regex (it’s always the regex), which I learned today is blocking when formatted incorrectly 😒
28 August
Day 17: Got some feedback after doing a mini-pitch (😱) at the @LNUGorg meetup tonight, and already caught & fixed one CSS bug! Otherwise working on some content updates and adding feedback into planning for what to work on next.
29 August
Day 18: Another great @startupschool call…these are really helping narrow down how to explain the app. An hour+ thinking and talking about the app on a big picture scale is a completely different exercise from bug fixes and feature improvements.
30 August
Day 19: Worked on some error handling and UI improvements.
31 August
Day 20: Fixed a major issue I hadn’t noticed before, to do with auto-generated html forms on a page. Basically they were all invalidating each other due to non-unique ‘name’ attributes. Created 1 controller to rule them all.
1 September
Day 21: Decided to stop playing it fast and loose storing prices as strings and converted everything over to numbers with a currency code.
2 September
Day 22: Research day…planning an approach for better navigation: pagination, infinite scroll, filtering? A combination? Lots to learn not only in terms of best practices, but also how to code the thing once I decide 🤷
3 September
Day 23: Biz dev day ⛵️ 🌬
4 September
Day 24: Adding content. One of the best things about building something because you need it is that you actually get to use it 😄 Slowly back-adding all the shows I’ve seen onto @mytheatrelist…today I crossed into 2013!
5 September
Day 25: Another great @startupschool meeting—got some helpful suggestions for connecting with people who would like to use @mytheatrelist. Also worked on some small bug fixes.
7 September
Days 26/27: Closer to the finish line with my #RaspberryPi timelapse videos! They’re now being created 100% programmatically 🥳🎉🎉 Updated my step-by-step for future me and anyone else who wants to try it.
8 September
Day 28: Making the backend more robust so that I can let users add new productions & shows on @mytheatrelist. Will be great when more people can participate and make sure the site works for them.
9 September
Day 29: Making what I did yesterday visible for users in the front end. It’s more than just showing the forms, also writing the copy that goes along with it and trying to make the process simple and inviting!
10 September
Day 30: Worked on the timelapses a bit more. Seems the scripts I set up over the weekend weren’t actually working.
11 September
Day 31: Continued working on letting non-admins add shows. Having to undo all of the blocks I put in place to keep non-admins from the views & actions…I was very thorough 😂
12 September
Day 32: More work on letting non-admins contribute content to the site. Refactored the checkAdmin function to be a promise and added a visual flag for unpublished content in the front end.
14 September
Day 33: Adding more categories for non-admins to work with in the app. Almost done with this bit of work!
15 September
D34: Finished setting up non-admin ability to add to the site yay! 🥳 Contacted some virtual assistants to do data entry so all I’ll need to do is approve going fwd. Now I can focus on more valuable tasks like engaging users & improving usability.
16 September
Day 35: Snuck in some research time on a busy day. Read an interesting article about the stagnation of a comparable site (different industry) and a lot of opinion about what’s gone wrong there. Very insightful.
17 September
Day 36: Spent a while researching pagination because every time I attempted coding it I realized I don’t know what I’m doing 👩💻 Sidetracked by figuring out how to ignore the ‘the’s ‘a’s and ‘an’s in the sort. Too little progress for my liking 😐
18 September
Day 37: ….and we have pagination! Getting there slowly but surely 🤗 Almost finished setting up the previous/next buttons then will add in the alphabetical filter.
19 September
Day 38: Another valuable @startupschool call. Finished the simple pagination stuff & pushed it live. Made a new temp logo. Loaded some new shows into the site.
20 September
Day 39: Added pagination to search results…this time with page numbers instead of next/prev pagers. Discovered Bootstrap has styling classes I could have used from the beginning 🤦♀️ Oh well I like mine better anyway 😂
21 September
Day 40: Worked on copywriting, but finding the task hard b/c I haven’t really narrowed down a “voice” for the product. Is it my voice? Some elusive ‘we?’ Forcing this work into a commute helps get something on the page, but I’ll need to refine it later.
Also attended @startupschool‘s London meetup which was fantastic. It’s great to chat with people working on some incredibly interesting projects and learn from other people. A bit intimidating being reminded of how much I still have ahead of me but also exciting!
22 September
Day 41: Mostly worked on content updates today, and did a bit of research.
23 September
Day 42: Discovered my wifi apparently went down 5 days ago and thought I’d lost access to the Raspberry Pi 😟 Turned out it just moved IP address. Worked on time lapses once reconnected
24 September
Day 43: A bit more content work, and started planning a ‘latest activity’ feed. Not sure of the best way to query & format different models and keep the look fairly consistent.
25 September
Day 44: Started working on implementing the ‘latest activity’ feed. Pretty basic for now but I have the data coming through so it’s a start!
26 September
Day 45: Worked on site content
28 September
Day 46: Worked on site content again. Tedious work but it’s fun remembering all the shows I’ve seen over the years 🎭🤓
29 September
Day 47: Wrote a little scraper program to help archive an old project I’m closing out. That cheerioJS is a handy little tool! Also added more content & reviews…I’m now up to date through 2013 🙀
1 October:
Day 48: Continuing work on the activity feed and having trouble figuring out the best way to query a join table using the Sequelize ORM. Came across this very unhelpful article trying to figure it out 😂
2 October:
Day 49: Still trying to figure out the best way to query a join table in Sequelize ordered by the join table. I don’t understand how no one else has ever had this question. So obviously I’m not asking the right question 🤔
3 October:
Day 50(!!): More work on the newsfeed and made some progress?? It kind of looks like progress now but really only time will tell 😂 Or, it’s all progress.
4 October:
Day 51: I don’t know where I got the idea about “best practices” for querying a join table using sequelize. I did what I was trying to avoid doing and got the newsfeed working in about 5 minutes 😂 Still have some things to learn but 👍 for now 😁
7 October:
Days 52-53: Took a day off then added a bunch of content into the site. Today…🥁🥁🥁…we have a news feed! The info is coming in, next up—styling it. Super ready to move on from this feature though 😆
25 October:
Work trip is done, back to #100DaysOfCode #100DaysOfProduct Day 54: Started on a project to combine a number of websites into one…planned the structure & basic requirements for blending some very different sites. Worth it to take the time to plan!
26 October:
Day 55: Continuing on from yesterday…built the framework of the site with @hexojs & imported the content from all the other sites. Some posts were already markdown, quite a few were not 🥴 Finished though, next up styling!
27 October:
Day 56: Started prepping styles for the site…customized some CSS resets. Also settled on a color palette I’m happy with by combining @akveo_inc’s color tool with @adevade’s for the grays 👍
28 October:
Day 57: More coding on the project, just setting up the basics now so nothing major to report, but getting some work done on a very busy, long day is an accomplishment anyway!
29 October:
Day 58: Learned how to compile & minify CSS files using @gruntjs for the custom @hexojs theme I’m making. Wrote about it.
30 October:
Day 59: Loooots of content updates to make on @mytheatrelist after being away 😬 Only got 1/2 way through what’s new in London since Sept. Need to improve doing this automatically, or find a different way to QC what comes in from the API
31 October:
Day 60: Finished content updates to @mytheatrelist after being pulled away from the project for a few weeks by work. Also met a founder who is working on a theatre-related tool too—very encouraging to see more people engaging with this space! 🎭
1 November:
Day 61: It’s been long enough 😅 Got back to work on the activity feed, working on filtering out similar items to cut down on clutter. Also got back to feeling like I have no idea what I’m doing 😂
2 November:
Day 62: 🙀🙀🙀 Activity feed is done! Good-enough done at least 😅 On to the next. PS if this looks interesting to you check out @mytheatrelist where the wait list is now being processed 😁 🎭👍
3 November:
Day 63: Back to adding in some of my old reviews…nearly done backfilling through 2014. Also tried to get my raspberry pi working again after some wifi issues. I may have wiped it clean
4 November:
Day 64: Refactored a bit to make updating from the API a bit less manual. Also got set up with a new API so I can add another source of shows. Thinking about the best way to manage & compare data coming from multiple sources.
5 November:
Day 65: Added & styled responsive nav for the big combo project.
6 November:
Day 66: Scaffolded the home page & footer of the big combo project. I decided to build out the design mobile-first which is a first for me. Also focusing on best practices for semantic markup & accessibility.
7 November:
Day 67: Scaffolded a few more main pages in the big combo project. Now all the site content is available, linked, and clickable even if it’s UGGGGGGG-LY 😂 Next will be styling the mobile views. Also got #raspberrypi working again!
8 November:
Day 68: Mostly added content and some of my own reviews into project #1.
9 November:
Day 69: Spent the day learning Ruby on Rails at #RailsGirlsLDN 🥳 Learned A LOT thanks to our awesome coaches 🤟 Coded a bunch, learned just as much from chatting w/people 😄 Also can I re-do my old projects in Rails now? Time machine?! 😅👩💻
10 November:
Day 70: Added content & did some work to improve the marketing workflows I set up a while back. Actually spent most of the time figuring out what I set up a while back
12 November:
Day 71: Researched progressive web apps & service workers for a web app that will need to be available offline. It looks like the storage limits will be too small in this case. Not sure of next steps/options.
13 November:
Day 72: Added a bunch more of my reviews into my theatre site…now up to date on every play, musical, and ballet I’ve seen through 2014! 🥳🥳🥳 Only 5 more years and I’m all caught up 😅
14 November:
Day 73: Played around on @codepen a bit, trying out some things separate from the big combo project, which I’m kind of stuck on design wise.
15 November:
Day 74 (yesterday): Starting to flesh out the styles on the big combo site. Spent way too long updating the mobile nav menu and in the end it looks pretty much the same as when I started 😭
16 November:
Day 75: Added fonts to the site and styled headings & navigation with letter spacing that’s just right (at least for now). Found a great tool that lets you preview @GoogleFonts side by side http://www.ourownthing.co.uk/fontpairing/
17 November:
Day 76: Added content. Didn’t quite get to 30 minutes but I really wanted to take a walk outside while nothing was falling from the sky 🤷♀️
18 November:
Day 77: Pro of combining old projects: get to re-use code. Con: sometimes old code sucks 😂 Today I refactored a responsive nav menu from media queries to work mobile first and be more accessible.
20 November:
Day 78: Great event with @codingblackfems! (as usual). Also found a weird bug which I’ve narrowed down is due to some async issues (my favorite topic) and am nearly there getting it fixed.
21 November:
Day 79: Fixed yesterday’s async issue thanks to….ME!! Apparently I wrote it down last time I had the same issue 🥳🥳 Still not entirely sure how it works though 😅 How can I learn this?
22 November:
Day 80: Found & fixed a bug in an old site I’m archiving.
23 November:
Day 81: Did a bunch of research and tests on APIs to narrow down the next one to integrate into the app.
24 November:
Day 82: Added a bunch of content and also backfilled some of my own reviews on @mytheatrelist
25 November:
Day 83: Worked on some styles & inevitably copy for the big combo project, and also added some more productions and a review on the theatre site.
26 November:
Day 84: Added some more content & reviews to the theatre site.
6 December:
Back from Thanksgiving & illness for the home stretch!
Day 85: Updated dependencies including a major version upgrade requiring changes to dozens of files. But for the better going forward!
7 December:
Day 86: Got distracted by a new app idea/prototype I want to try to complete this weekend, so worked on that. These things never go as fast as I think they will 😅
8 December:
Day 87: Continued working on the distraction project and made good progress! Haven’t finished it but not too far away.
9 December:
Day 88: Started on the 3rd & final model & routes for the “distraction app” so nearly finished. Looking forward to deploying this one & testing it out, I think it will be really useful.
11 December:
Day 89: Working on the new app, getting a bit hung up on reference documents in mongoose. Haven’t figured out yet why the exact thing I did in a previous project is throwing errors in this one
Hint: one works, the other causes hours of agony 😭😆
13 December:
Day 91: Worked on cascading deletes for mongoose instances & their subdocuments. It’s not working yet.
14 December:
Day 92: Added some content & review to the theatre project. Also learned that Heroku updates dependencies during the build process which turned out to break the app…I hadn’t pushed the updates since the ejs update which broke include processor directives. The app has probably been done for a week+. So locked the package.json versions!
15 December:
Day 93: Worked on finalizing the distraction app…left some things as WIP to try and get to a finishing point. Deadline is tomorrow evening
16 December:
Day 94: The project isn’t finished and my brain is hurting! 😭 Haven’t yet figured out how to convert a long & complicated array of objects into a different, single object. It’s the crux of this application. In writing this tweet, I think I don’t even need to do this 😭😭😭
Later…
OMG I got it working in the 16 minutes since writing this tweet, after the last few hours trying to do it a different way 😭😂🥳 Why why why
Turned out to be much simpler to implement in the view template than in the route controller.
17 December:
Because it’s well after midnight I’m counting this as… Day 95: Finished & deployed the app WOOO!!! 🥳🥳🥳🥳🥳
18 December:
Day 96: Added some more reviews & content to the theatre site.
19 December:
Day 97: Same as yesterday, updated a few more archive shows and added some more of my reviews to the theatre site. I’ll be really glad when my viewing history is 100% up to date 😄
20 December:
Day 98: More content updates! I decided I want to finish adding all of my old reviews by the end of the year. Today I crossed into 2016 and still have ~100 shows & reviews to enter over the next 11 days.
21 December:
Day 99: Added a bunch more content to the theatre site, aiming to finish the backlog by the end of the year. Also added the @Cloudinary upload widget to a few pages in the app which is long overdue!
22 December:
Day 100 🥳🥳🥳
Added a bunch more content, and finished all the shows & productions in my old spreadsheet. All that’s left to do is add images and my reviews and I’ll be up to date!
23 December:
That’s a wrap! Wrote about my #100DaysOfCode #100DaysOfProduct challenge. Not sure I’ll continue or do it again (that’s to be seen!) but in the meantime, a big thanks to the many who gave encouragement, help, ideas, likes & retweets along the way 😁❤️🙌🙌
]]><p><a name="top"></a>Over the past few months I did the <a href="https://www.100daysofcode.com/">#100DaysOfCode</a> challenge and combinedHTML Forms With Dynamic Input Groupshttps://www.niamurrell.com/code/2019-12-08-html-forms-with-dynamic-input-groups/2019-12-08T23:01:53.000Z2020-06-23T23:25:44.004ZToday I was working on a project that has a form where at the beginning, there is an unknown number of field groups, and the field groups have to be tied to each other. The resulting data object needs to look like this:
Sure I could have a form with a loooooot of input fields, but that would look bad, would be inefficient, and would result in empty results I’d need to filter out.
Thanks goodness for the article I found, A little trick for grouping fields in an HTML form, which spells out very clearly how you can use brackets [] in HTML form names to structure the resulting form body data. In this case:
Even more handy, the article also gave some tips on how to make the form dynamic, so that you can add additional field groups if you need more, which I implemented:
let container = document.getElementById('character-container'); let div = document.createElement('div'); div.innerHTML = template; container.appendChild(div);
i++; } </script>
I also found a very easy way to get the whole array in one go, without needing any loops or map, etc. by using the Object.values() method. As a result I can create the model from the form data to enter into the database as simple as:
let newSeries = { name: req.body.seriesTitle, characters: Object.values(req.body.characters), };
All of these are good reference for future!
]]><p>Today I was working on a project that has a form where at the beginning, there is an unknown number of field groups, and the fieldIn-Page Links With A Fixed Navbarhttps://www.niamurrell.com/code/2019-11-25-in-page-links-with-a-fixed-navbar/2019-11-25T23:25:51.000Z2020-06-23T23:25:50.324ZI’m styling a page which has a fixed-height, fixed navbar at the top. Some of the pages also have in-page links (#section-link). When you click on one of these links to the section, the top is not visible because of the navbar.
Here are some fixes I found and will soon implement:
]]><p>I’m styling a page which has a fixed-height, fixed navbar at the top. Some of the pages also have in-page links (#section-link). WhenUsing Postman for cURL Requestshttps://www.niamurrell.com/code/2019-11-23-using-postman-for-curl-requests/2019-11-23T21:12:55.000Z2020-06-20T21:43:55.274ZToday I’ve been researching APIs to add into project GFT and spent a lot of time looking at the Ingresso API. In their documentation, they have cURL examples and Python examples, but the JavaScript examples aren’t fully fleshed out. So to test the API I was using Postman, and had to figure out how to do it using the cURL examples.
In Postman click on the Import button, then the Paste Raw Text tab
Paste the cURL command and then press Import
…and Postman magically puts the auth, params, and body where they need to be!
Added bonus, I learned there’s an Auth tab! I’d never used it before since the other APIs I have used in Postman have required the authorization parameters to be sent in the header. Learn something new every day, as they say. 😄
Also
I love the test events they have in this API demo…”Toy Story The Opera”…”The Unremarkable Incident of the Cat at Lunchtime” 😂 😂
]]><p>Today I’ve been researching APIs to add into <a href="/tags/gft/">project GFT</a> and spent a lot of time looking at the <aGoogle Font Toolhttps://www.niamurrell.com/code/2019-11-16-google-font-tool/2019-11-16T22:38:29.000Z2020-06-23T23:26:08.058ZGoogle Fonts is a pretty great resource for free fonts to use on different websites. It’s even (seemingly) free of most of the tracking Google is known for.
The site is very good at helping you narrow down fonts from the hundreds, with filters for serif/sans-serif, letter width, letter thickness, and much more. When you open an individual font, you can even see the font paired with other Google fonts.
However, you can’t choose which fonts to see the pairings in, which is even more useful when trying to narrow down fonts for a website. I found this font pairing tool which lets you do just that…and actually, looks like they made an even better one which will be useful in the future!
Good find!
]]><p><a href="https://fonts.google.com/">Google Fonts</a> is a pretty great resource for free fonts to use on different websites. It’s evenMy Introduction to Ruby on Railshttps://www.niamurrell.com/code/2019-11-12-my-introduction-to-ruby-on-rails/2019-11-12T08:35:29.000Z2020-06-23T23:26:15.541ZOver the weekend I participated in Rails Girls London’s annual Ruby on Rails workshop. It was super cool! I was able to learn the basics of how Rails works from absolute zero in one day.
We were given a tutorial to create a basic app, and with the help of some great coaches, I had it up and running with all of the basic CRUD operations and authentication by the end of the workshop.
My approach to the workshop was not only to learn the basics, but also to understand what Rails does for you as compared to what I’d need to do from scratch using Node/Express and a number of packages. It was a joy to learn—Rails really does a lot! I could appreciate just how much, having done a lot of similar work from scratch on other projects.
In the end it was a really solid event that I’m glad I was able to join. Here are some more resources and local events I was tipped off to if/when I want to pursue building more apps on Rails, or join the local Ruby & Rails communities:
]]><p>Over the weekend I participated in <a href="https://railsgirls.london/">Rails Girls London’s</a> annual Ruby on Rails workshop. It wasCompile & Minify CSS in a Hexo Project Using Grunthttps://www.niamurrell.com/code/2019-10-29-compile-minify-css-in-a-hexo-project-using-grunt/2019-10-29T18:31:17.000Z2020-06-23T23:26:25.473ZToday I learned how to use the Grunt task runner to compile multiple CSS files into one, and minify everything. I did this for a project which uses the Hexo static site generator.
Why Do This?
In previous projects, I’ve pretty much always written one master CSS file for the whole project. It would be insanely long and also pretty cumbersome to work with as the project grew bigger & bigger. Let’s not even think about performance (I didn’t 😅).
Working in some other projects I saw just how self- / user-friendly it is to break code into much smaller pieces, and got into the habit of working with small components across multiple files.
The one area I hadn’t done this yet though was in my CSS. Frameworks like React make it easier for this to be the default way of writing CSS, but otherwise I didn’t know how I could do it. So I looked into some options and settled on using Grunt for the job.
Why Grunt?
I’m actually not 100% positive I made the “right” choice here, but at the end of the day, it does exactly what I need it to do, and I didn’t want to quadruple my research time in order to optimize the decision. Grunt is a task runner that has a well-supported and well-documented module for minifying CSS.
Some other options I considered:
Gulp, didn’t choose it after reading this comparison which concludes Grunt is better for simple projects like mine
Webpack, seems like absolute overkill for what I need, and I already have a lot of experience with not being able to figure out how to get webpack to work 🥴
Manual tools as discussed here, which would have been fine given I don’t need to minify all that often, but it wouldn’t really let me work in multiple files as easily. Plus, why go manual when you can automate?
How To Do It
It turned out to be a really simple setup to add Grunt to my existing Hexo project:
Add Grunt and some Grunt plugins to my project as dev dependencies:
This article does a great job breaking down these tasks, and specifically what is happening in the gruntfile.js file. I especially like that they include the matchdep package, which will make it easier to expand this if/when I want to use additional Grunt plugins.
One note though—the article shows how you can insert a banner at the top of your minified CSS…this functionality was removed from Grunt a while ago in case you follow the article and wonder why it doesn’t work!
In the above I had two source files compile into the minified CSS file. I tested everything worked correctly by setting a color for everything in each file:
/* File 1 - styles.css */ * { color: teal; }
/* File 2 - test.css */ * { color: orangered; }
On the page, everything should be the color orangered if the styles are cascading properly. Initially it wasn’t working as expected, until I realized I had the files ordered opposite to what I intended 😂 Order matters!
Some May-Be-Betters
I added the Grunt config file and grunt script at the project’s root level, but if I had any intention of publishing the theme as a standalone, it probably would have been better to add them just to the theme. The scripts would need to be different though.
For now, I also only added grunt as its own script, so I’ll need to manually run it to minify my CSS files each time I change them. In the future I’ll probably just want to amend the Hexo build, generate, and/or deploy scripts so that they run the Grunt tasks before carrying out these commands. Haven’t gotten there yet though.
Old School?
Last thing to note—I have it in my head that Grunt is super old school (well at least in web dev terms 😂) and people have generally moved on to other bundling tools. This could be a completely invalid impression, or I could be right and I’m using something that’s on its way out of fashion.
Regardless, it gets the job done efficiently so it works for me. It actually took less time to set it up than it did to write this how-to recap! So until my needs outgrow this tool, I think I’ll stick with it 🤓
]]><p>Today I learned how to use the <a href="https://gruntjs.com/">Grunt task runner</a> to compile multiple CSS files into one, and minifyOK SRSLY UNDRAW IS AWESOMEhttps://www.niamurrell.com/code/2019-09-01-ok-srsly-undraw-is-awesome/2019-09-01T21:40:47.000Z2020-06-23T23:27:30.695ZA bit earlier I wrote about discovering unDraw and wanting to try it. Now I actually have and WOW it is great!
UnDraw is an open-source repository of illustrations created by Katerina Limpitsouni, and as they come in SVG format they’re 100% customizable. Or, without touching any code you can even change the colors straight from the unDraw website. It’s great!
I brought some of the illustrations into the site and love the result:
404 Page — Before
404 Page — After
Site Features — Before
Site Features — After
Welcome Screen — Before
Welcome Screen — After
TOP STUFF!
]]><p>A bit <a href="/code/2019-09-01-working-with-currency-better/" title="earlier">earlier</a> I wrote about discovering <aWorking With Currency, Betterhttps://www.niamurrell.com/code/2019-09-01-working-with-currency-better/2019-09-01T17:02:50.000Z2020-06-20T21:43:54.610ZI’ve still been working on project GFT (surprise!) and most recently worked on improving how I handle currency in the app.
Strings - NO
Initially I did the quick and dirty way: just have the user input be a string, and the user can add in whatever currency symbol they want, or omit it all together. This is not ideal because:
No consistency between users
Can’t perform calculations on the amounts, which is on the roadmap
But I finally fixed it.
Two columns instead of one
First it required setting up two new fields in the table where the prices would be stored: one for the price in cents, and the other for the currency.
The ideal scenario would be to reference the currency codes from another table of allowed currencies. This would also let me loop through the currency options on the front end more simply. I opted not to do this for now—I don’t want a crazy-long list of mostly irrelevant currencies in the app right now, and it was also faster just to use strings. However, now I’m generating the strings for the user so there will be consistency at least.
Why in cents?
JavaScript does some weird things when calculating decimal numbers, so it’s best instead to store in cents, and then do the calculation to dollars/euros/etc just for the views. In fact it can be managed by a tidy little helper function:
Not to be forgotten: the price_in_cents field in the database has validation to only allow an integer.
Not Perfect
One thing I didn’t like is that if you have an edit form, you can’t always properly display an existing price in an editable input field: if the price is £32.50, it will drop the trailing zero and display 32.5. I did find one way potentially to make it display in the way you’d expect using JavaScript. Maybe I’ll address this one day, for now I’ve decided to leave it.
Overall, Not Too Bad
Overall, this implementation took about 90 minutes to switch over from strings to numbers, and most of that was spent fuddling around in the views and making sure all of the relevant files got the updates they needed. I probably should have set it up like this in the first place!
Other Stuff
Discovered unDraw, a source for rights-cleared sketches…cool! Will be adding these to the project. Here’s a relevant example of what they look like:
Up Next
Adding pagination or lazy loading, now that I’m up to displaying 903 cards on a primary page in the site 😬
]]><p>I’ve still been working on <a href="/tags/gft/">project GFT</a> (surprise!) and most recently worked on improving how I handle currencyAuth0 Change Password Emailshttps://www.niamurrell.com/code/2019-08-30-auth0-change-password-emails/2019-08-30T19:31:20.000Z2020-06-23T23:27:46.793ZI’ve been having some trouble with Auth0 not sending ‘change password’ emails when they’re requested. I can’t replicate the issue enough to properly fix it, so here are some clue paths I can pick up if it starts happening again.
This is an ongoing problem since at least 2017
Password reset email not received: several users have had this issue using different email providers. No solution found on forum post.
Maybe external image domains in the email template are problematic
Alternate solution: generate a change password link directly
Possible via Management API but you’ll need to figure out how to verify identity in doing so…otherwise you could allow someone other than the account holder to reset the account holder’s password.
Or you could manually re-enable the template before each request
Requires v1 of the Management API since the toggle doesn’t currently exist for this template in the Auth0 dashboard. This sounds like a horrible workaround.
]]><p>I’ve been having some trouble with Auth0 not sending ‘change password’ emails when they’re requested. I can’t replicate the issue enoughAuth0 Management APIhttps://www.niamurrell.com/code/2019-08-25-auth0-management-api/2019-08-25T14:39:26.000Z2020-06-20T20:32:46.468ZToday I finally dug into the Auth0 management API. There’s a lot you can do with Auth0 without having to do this, and up until now I gladly used their ‘getting started’ tools to do everything I wanted/needed to do. BUT, in order to do some simple things like change a username, you have to use their management API.
Set Up
I went for the simplest set up. This means I’m making an HTTP request every time I request an authorization token, and for every interaction with the API. There’s a way to streamline this using the node-auth0 npm package…this article shows an example of implementing it.
But for the time being given I only want to make two changes, I went for the simple setup. I added a new set of helper functions to the ap, each of which uses a getToken() function to do what it says on the tin. Then I use the token for each of the API endpoints.
In the end I got it to work! There were some bumps along the way:
Forgetting to include “Bearer” with the token (authorization: \Bearer ${token}``)
Seeing the result, which is long, and caused a Converting circular structure to JSON error when trying to view the result in the browser via res.send(result). However I couldconsole.log the result, and in doing so found that the information I actually needed was in result.data. That successfully rendered in the browser.
Seeing errors if there were any—initially I could only see something generic like 400 Bad Request…not helpful at all since Auth0 gives a 400 error for over a dozen things that can go wrong. Eventually I found that a useful error message can be found within error.response.data.
Other Stuff
Auth0 has a weird thing about how they set up usernames. When you create one, it only allows the alphanumeric characters and -, _, +, and .. But when I tried some usernames using the API it seems the list of allowable characters is longer, based on the error:
{ statusCode: 400, error: 'Bad Request', message: 'Username can only contain alphanumeric characters and the following characters: \'_\', \'+\', \'-\', \'.\', \'!\', \'#\', \'$\', \'\'\', \'^\', \'`\', \'~\' and \'@\'.', errorCode: 'auth0_idp_error' }
Or more legible: underscore _, plus sign +, hyphen -, dot ., exclamation point !, octothorpe #, dollar sign $, backslash \, caret ^, backtick `, tilde ~, and at sign @.
Up Next
Next step is to (hopefully) use what I learned to set up a secret registration page. I found a couple of resources that I’m hoping will help: best walk-through, another article
]]><p>Today I finally dug into the Auth0 management API. There’s a lot you can do with Auth0 without having to do this, and up until now IUsing Screen With Raspberry Pihttps://www.niamurrell.com/code/reference/2019-08-21-using-screen-with-raspberry-pi/2019-08-21T21:47:49.000Z2021-06-19T22:25:32.380ZToday I got acquainted with screen, a process manager (?) for Linux that is very useful with Raspberry Pi
Before today, I could only run programs on Pi if my computer is also up and running—I don’t have any reliable peripherals so my only way of operating Pi is via SSH, and an optional remote desktop server for the GUI. I’m using Pi mostly to take photos for a time lapse which means there’s a script running pretty much around the clock. In order for it to keep going, that meant I couldn’t shut down my laptop…ever!
Screen To The Rescue
…Until screen. This library lets you open a new session in Pi and run commands & scripts from there. However there’s a huge difference between the screen session and your normal SSH session, because you can detach it and it will keep running! And thus my laptop has become a portable machine again.
>>> you’re in ascreensession. start whatever scripts <<<
ctrl + a(release, then)d → detaches you from the session
>>> go about your business. shut down computer, turn off wifi, etc. <<<
Connect to Pi via SSH
screen -ls
>>> currentscreensessions will be listed <<<
screen -r
>>> you’ll be reconnected to the session you left earlier <<<
ctrl + d → disconnects the session & all running processes
There are some more options available which can be found in the docs and posts linked above. You can operate multiple sessions, customize them, and more.
]]><p>Today I got acquainted with <a href="https://www.gnu.org/software/screen/"><code>screen</code></a>, a process manager (?) for Linux thatLearning More Command Line With Raspberry Pihttps://www.niamurrell.com/code/reference/2019-08-18-raspberry-pi-command-line/2019-08-18T09:44:14.000Z2021-06-19T22:25:32.380ZWorking on my Raspberry Pi project. I’m doing a lot in its OS directly on the command line, since it’s easier and faster than using the Raspbian GUI (kind of a slow connection using remote desktop). In addition to working with bash shortcuts, I’ve learned some other things about bash scripting. Here are some of the things I’ve learned, as well as a general reference for useful commands working with a Raspberry Pi.
Open Raspbian terminal
~$ ssh pi@raspberrypi.local
Close Raspbian terminal
Ctrl + C
Open Raspberry Pi Raspbian config menu
pi:~ $ sudo raspi-config
List VNC Server Commands
pi:~ $ vncserver -help
Open VNC server to remote into Pi
pi:~ $ vncserver :1 -geometry 1920x1080 -depth 24
## alternative resolution if this is too janky: pi:~ $ vncserver :1 -geometry 1280x720 -depth 24
Close the same VNC server
pi:~ $ vncserver -kill :1
Close the standard Raspbian GUI while on remote desktop
The remote desktop operates like a second screen, even if the Pi is not plugged in to make use of a first screen. So you may as well turn the first screen off—this saves memory and you’re not using it anyway.
pi:~ $ sudo service lightdm stop # or restart: pi:~ $ sudo service lightdm start
See and Manage Running Processes
This article gives a pretty good overview of how to figure out what processes are running (or hanging up) so that you can kill them if needed. The main useful things I learned are:
The default way to see all running processes:
$ top
There is also a more robust option available called htop which can be installed on Mac with:
$ brew install htop $ htop
For either one, press ctrl + C to exit.
Copy files from a remote server to my local machine
This article is a comprehensive rundown of using the ssh and scp commands to work with remote servers. ssh lets you connect and manage a remote server, while scp let’s you copy files or directories from the remote server. I was focusing on scp:
-r flag means recursive: all files in the selected directory will be copied. Alternative is to use an asterisk * at the end of the path
p flag means to preserve file information
pi@192.168.0.97 is the user & server location. IP address should be changed to whatever server you’re accessing
path needs to be from the server user root and must exist!
. at the end means copy the files to your present local directory, so make sure you’re in the place you want to copy the files to before running the command
Install AWS CLI For Easy File Transfers
sudo apt-get install awscli
Caveat from raspberry-projects.com: Amazon recommends using the pip package manager to install its awscli. However we prefer to keep things simple and have all our packages installed with one package manager APT. AWS states the awscli package is available in repositories for other package managers such as APT and yum, but it is not guaranteed to be the latest version unless you get it from pip or use the bundled installer. So use pip if you want the absolute latest, but APT is fine otherwise.
More things coming I’m sure, I’ll add them here later!
]]><p>Working on my Raspberry Pi project. I’m doing a lot in its OS directly on the command line, since it’s easier and faster than using theSetting Up Raspbian Bash Shortcutshttps://www.niamurrell.com/code/tutorials/2019-08-16-setting-up-raspbian-bash-shortcuts/2019-08-16T18:18:47.000Z2020-06-23T23:28:03.832ZAs I've written before I'm a big fan of bash shortcuts, aka aliases (I also wrote about it a second time). When I got a new [Raspberry Pi](/tags/raspberry-pi) I really missed using them. So I learned how to set them up.
It’s Pretty Simple
The docs explain pretty clearly how to do this, and how the existing .bashrc is set up. You can see these hidden files by running ls -a on the Raspbian command line:
pi@raspberrypi:~ $ pwd /home/pi
pi@raspberrypi:~ $ ls Desktop Documents Downloads MagPi Music Pictures Public Templates Videos
pi@raspberrypi:~ $ ls -a . .bash_aliases .bash_logout .cache Desktop Downloads .local Music .pki Public .thumbnails .vnc .xsession-errors .. .bash_history .bashrc .config Documents .gnupg MagPi Pictures .profile Templates Videos .Xauthority .xsession-errors.old
On a fresh Raspbian install, this .bash_aliases file won’t be there, so you need to create it:
pi@raspberrypi:~ $ touch .bash_aliases
Then open the file:
pi@raspberrypi:~ $ nano .bash_aliases
Then add your commands. In my case, I wanted to start & stop my remote desktop server more easily, and create a shortcut to take a photo:
alias vncstart='vncserver :1 -geometry 1280x720 -depth 24' alias vncstop='vncserver -kill :1' alias cam='raspistill -o'
Press ctrl + x to begin exiting Nano, y to save, and Enter (or Return) to save it to the same filename.
Once back on the command line, run source .bashrc to bring the new aliases into effect.
Voila!
]]><p>
<a href="/code/tutorials/2017-07-06-terminal-shortcuts/" title="As I've written before">As I've written before</a> I'm a bigNew Raspberry Pi! Step-By-Step, From Zero To Time-Lapse Videoshttps://www.niamurrell.com/code/tutorials/2019-08-14-new-raspberry-pi/2019-08-14T19:23:21.000Z2020-07-04T02:35:39.974ZI got a new Raspberry Pi! It’s a Zero W model and I’m using it for a new project to create time lapse videos. Here’s my step-by-step for getting it to work.
I decided to name my Raspberry Pi. Its name is Pi (and will be referred to as such in this post 😄).
Current Status: This tutorial is a work-in-progress. Currently, I’ve gotten as far as creating the videos 100% programmatically. Still to come: storing the images remotely and creating the API. Watch this space!(last updated 7 September 2019)
Project Description
Ultimate goal: Pi will take photos at a regular interval and periodically assemble the images into time-lapse videos. Separately, Pi will send the images to an AWS S3 bucket for storage, and run a web server which hosts an API for delivering the images to a static website.
Note: all of these steps are based on MacOS with a pre-existing dev setup (i.e. Homebrew, etc.)
Why a case? Pi will be in the window, so I went for some extra heat/sun protection. Not sure this is entirely necessary but it’s also pretty 😋
There are other Raspberry Pi vendors out there, including Amazon(affiliate link), and vendors based in other countries if you’re not in the UK. Shop around for prices.
I wanted a bigger SD card to store a lot of images so I bought one on Amazon as the pricing was better:
Before plugging in the power or software, assemble the camera & case.
Camera goes first while there’s still easy access to the camera port. This YouTube video demonstrates inserting the camera cable.
Then follow the case instructions and use a mini screwdriver to lock Pi into the case. Once done, the camera kind of flops around a bit. It does have an adhesive backing, but I’m pretty non-committal and want this to still be sticky later if I use the camera with a different Pi. So I opted to use Blu Tack to adhere the camera to the case.
Finished product:
Install Raspbian Operating System
Pi needs an operating system…it’s a computer after all. There are a number of options, but the most popular is Raspbian. The most popular for newbies is NOOBS (New Out Of Box Software), which includes Raspbian via a friendly GUI which also lets you easily install a new OS if you manage to break the first one.
Initially I wanted to install NOOBS, but you need a keyboard & mouse for this—wired ones, so you’d need a mini USB adapter or devices that are wired with mini USB cables. Call me impatient! I chose to install Raspbian instead to avoid waiting…Raspbian can be installed and configured without these.
You can also buy an SD card which is Pi-compatible and pre-loaded with an OS. I opted to buy a blank (and bigger) SD card which means I have to format it to work with Pi first.
The docs explain why you’d need to format it: any card larger than 64GB will be formatted with the exFAT filesystem by default…but Pi isn’t compatible with this, it requires FAT16 or FAT32.
Steps for formatting a micro SD card on a MacBook Pro:
Put the micro SD card in its adapter, then in your laptop
Open the Disk Utility application
SUPER IMPORTANT! Click on the micro SD card from the list of drives
Click ‘Erase’
Select MS-DOS (FAT) for format and give it a new name if you want
Unzip the file…inside you’ll find an image of the Raspbian operating system
Download Etcher which you’ll use to add the OS image to the formatted micro SD card
Open Etcher and follow its simple point & click process, making sure to add the image to the correct drive—don’t overwrite a different drive on your laptop by mistake!! I came way too close to overwriting my whole music library 😅
When Etcher has finished, you’ll find the micro SD is now a volume called BOOT…this is the operating system, and it will be installed when you plug the SD card into Pi.
But not so fast! By default, the Raspbian OS won’t be configured to allow an SSH connection, and it won’t be connected to your wifi network (obviously). These can both be set up on your laptop before ejecting the SD card.
Enable SSH on Raspbian image:
SSH (Secure Shell) is a way to control a computer remotely, from another computer. This is how you can control Pi from your normal laptop or desktop, and forgo the need to buy a wired mouse & keyboard.
To enable this for Pi, create a file ssh in the root folder of BOOT using the command line:
cd /Volumes/boot touch ssh
Configure Raspbian with your wifi network:
Create a file called wpa_supplicant.conf in the root of BOOT. Add the code below, replacing the <VARIABLES> in brackets with your own details. There’s more than 1 way to do this, but I used the nano command line text editor:
Connect Pi to monitor with HDMI cable, then plug Pi into its power source
It will take some time for Pi to boot up on this first install. Having a monitor helps with impatience, because you can see when it’s finished and ready for the next steps.
Connect to Pi via SSH
First try running the following on the command line; if you get one IP address as a result, skip to #4 below.
$ ping raspberrypi # you can also try raspberrypi.local
Download nmap, a tool that lets you scan your local network. Homebrew makes this easy: brew install nmap
Get your IP address. My way: click the menu bar wifi symbol and Open Network Preferences… In the Wifi tab, under status, your IP address will be there. Use this in place of the IP address in the next step.
In the command line run nmap -sn 192.168.0.2/24 to get a list of all IPs in range. Look for the one that mentions Pi:
... Nmap scan report for 192.168.0.93 (192.168.0.93) Host is up (0.0032s latency). Nmap scan report for 192.168.0.94 (192.168.0.94) Host is up (0.0031s latency). Nmap scan report for 192.168.0.95 (192.168.0.95) Host is up (0.0031s latency). Nmap scan report for 192.168.0.96 (192.168.0.96) Host is up (0.0030s latency). Nmap scan report for raspberrypi.mynet (192.168.0.97) # BINGO! Host is up (0.0029s latency). Nmap scan report for 192.168.0.98 (192.168.0.98) Host is up (0.0028s latency). Nmap scan report for 192.168.0.99 (192.168.0.99) Host is up (0.0027s latency). Nmap scan report for nia-7.mynet (192.168.0.100) Host is up (0.0027s latency).
Use Pi’s IP address to connect to Pi via SSH using the default username pi:
$ ssh pi@192.168.0.97
You will be prompted for a password; the default is raspberry. Now you’re connected! You can update some settings using the config menu (for example, it’s recommended to change the password from the default):
pi@raspbberrypi:~ $ sudo raspi-config
Set Up Remote Desktop
Final hurdle to easily control Pi: set up a remote desktop server. This allows you to use Raspbian’s GUI instead of just the command line. Click here for the full article I used to get the steps below:
In the Raspbian terminal run sudo apt-get update
Then run sudo apt-get install tightvncserver(this will uninstall the default VNC server) Ignore the tutorial’s instructions to halt or reboot pi. It seems unnecessary, and also had negative consequences for me (i.e. I had to re-image the SD card and re-add ssh & wifi settings 🙄).
Then start the server: vncserver :1 -geometry 1920x1080 -depth 24
The first time only, you will be asked to set a password. It can have maximum 8 characters. Type n when asked if you want to enter a view-only password. **Remember the password!**—you’ll need it in future every time you want to reconnect.
Open a new Finder on your Mac window and hit Cmd + K to connect to a server
Type in Pi’s remote desktop server address: vnc://192.168.0.97:5901 (just append 5901 to your Pi’s IP address). GUI should open.
Don’t do this yet, but when you’re ready the command to stop the VNC server is vncserver -kill :1
NOTE: I found the 1920x1080 screen resolution to be a bit too high…using Pi’s desktop remotely was slow and janky. Later I switched the resolution to 1280x720, which ran a lot better.
Test the Camera
Open Pi’s command line: either continue to use the shell that’s open via SSH, or open Raspbian’s terminal from the top left corder of the desktop:
Save an image to your Raspbian desktop:
raspistill -o Desktop/image.jpg
After a few seconds, you should see the file appear on the desktop. Open it and take a look! You’ll see the best way to orient the camera for a landscape or portrait photo. If necessary you can vertically or horizontally flip the image by appending this command with -vf and/or -hf respectively.
For a full list of raspistill commands, visit the docs. Here are some common adjustments to play with:
Image parameter commands
-q, --quality: Set jpeg quality <0 to 100> -e, --encoding: Encoding to use for output file (jpg, bmp, gif, png) -tl, --timelapse: Timelapse mode. Takes a picture every <t>ms. %d == frame number (Try: -o img_%04d.jpg) -k, --keypress: Wait between captures for a ENTER, X then ENTER to exit
Common Settings commands
-?, --help: This help information -w, --width: Set image width <size> -h, --height: Set image height <size> -o, --output: Output filename <filename> (to write to stdout, use '-o -'). If not specified, no file is saved -v, --verbose: Output verbose information during run
Image parameter commands
-sh, --sharpness: Set image sharpness (-100 to 100) -co, --contrast: Set image contrast (-100 to 100) -br, --brightness: Set image brightness (0 to 100) -sa, --saturation: Set image saturation (-100 to 100) -rot, --rotation: Set image rotation (0-359) -hf, --hflip: Set horizontal flip -vf, --vflip: Set vertical flip
Don’t forget to change the file name each time you take a test picture. Otherwise, the pre-existing image will be overwritten.
Make A Plan For The Time Lapse
To see what’s going on when the image is taken, I used the -v tag, which gave the following output:
Camera Name ov5647 Width 2592, Height 1944, filename Desktop/test images/2019-08-16-17.59.jpg Using camera 0, sensor mode 0
GPS output Disabled
Quality 85, Raw no Thumbnail enabled Yes, width 64, height 48, quality 35 Time delay 5000, Timelapse 0 Link to latest frame enabled no Full resolution preview No Capture method : Single capture
Preview Yes, Full screen Yes Preview window 0,0,1024,768 Opacity 255 Sharpness 0, Contrast 0, Brightness 50 Saturation 0, ISO 0, Video Stabilisation No, Exposure compensation 0 Exposure Mode 'auto', AWB Mode 'auto', Image Effect 'none' Flicker Avoid Mode 'off' Metering Mode 'average', Colour Effect Enabled No with U = 128, V = 128 Rotation 0, hflip No, vflip No ROI x 0.000000, y 0.000000, w 1.000000 h 1.000000 Camera component done Encoder component done Starting component connection stage Connecting camera preview port to video render. Connecting camera stills port to encoder input port Opening output file Desktop/test images/2019-08-16-17.59.jpg Enabling encoder output port Starting capture -1 Finished capture -1 Closing down Close down completed, all components disconnected, disabled and destroyed
I used this as a basis to play around with image size and quality to start. For example, the default .jpg quality is 85, but several sources agree 60-70 is usually suitable for web use. Also the default image size for Pi is 2592 x 1944 and around 2.7 MB in my tests. You can play around with smaller dimensions for a smaller image size (250 kb in this case):
This results in timestamped file names with resolution and descriptive information about the photo settings. The files are all in one folder. An important part of the filename to point out is the %04d tag, which adds a 4-digit sequenced number. If you don’t include this, each photo will just overwrite the previous interval photo. You can adjust the number of digits based on how long the timelapse will be running, i.e. %08d for an 8-digit sequence, etc.
Make The First Video
To make a video from the images, I used mencoder, which needs to be installed:
$ sudo apt-get install mencoder
After the installation, you can create your first timelapse. mencoder requires the photos to be listed in one file, then you can encode a video:
You’ll see mencoder create the video frame by frame, so if you have a lot of source images it may take a while. In one of my initial tests, it took 2.5 minutes to create a 4-second video from 100 photos. When it finishes, you should see the timelapse.avi file in the current directory.
Some notes about mencoder:
avi is not my first choice video format, but mencoder is optimized to this format. I decided not to mess with that. See more info in the docs if you’re curious (section 6.1).
As it’s creating the video, you will see some warnings about format, height, and width not being set. This is a known issue which does not appear to be problematic.
Preview The Test Video
Since we’re using Pi via SSH, the quickest/easiest way to view video will be to transfer it to your local machine. I wrote in a bit more detail about how to do this but the short version:
Open a new Terminal tab, or exit the existing SSH session
cd to the place where you’d like to copy the video file to
run scp -rp pi@192.168.0.97:/home/pi/Desktop/test\ images/timelapse-test-2/timelapse.avi ., updating with your own IP address and file locations
When prompted enter Pi’s password
As soon as it finishes you can open the video file and play it!
VLC can play .avi files if your default media player can’t.
Automate Everything
Now we’re getting to the fun part! You know everything’s working as it should, so it’s time to set everything up so you can set it and forget it.
Separate Pi From Your Machine
Currently, Pi will only run scripts if you have an open ssh session. If you want to capture an all-day timelapse, your computer will need to be on all day, and connected to the wifi network Pi is on. This pretty much makes a laptop non-portable, so something needs to be done differently! Enter Screen.
I wrote about this separately, but basically you can use screen to open an ssh session which will remain open without needing your laptop. Here’s the summary for setting it up:
Connect to Pi via SSH
sudo apt-get install screen
>>> it installs. reboot if necessary <<<
screen
space or return
>>> you’re in ascreensession. start your timelapse scripts <<<
ctrl + a(release, then)d → detaches you from the session
>>> go about your business. shut down computer, turn off wifi, etc. <<<
Create A Script To Capture The Images & Create A Daily Time Lapse
From the Pi command line, open a new file using the nano editor to write your script:
I wanted my timelapse to capture about 10 hours per weekday, i.e. the time frame activity will be going on in the photos. So my script would create a dated directory to store that day’s photos, run the timelapse with raspistill, create the .txt. file for mencoder, and then run mencoder at the end of the day to create the day’s timelapse:
Notice all of the videos are being stored in a central videos folder, not with each day’s photos. You’ll need to create this videos/ directory before running this script, otherwise the mencoder command will fail.
I saved this file in a new scripts directory on my desktop: /home/pi/Desktop/scripts/one-week-day-every-6-min.sh. Reminder of the steps to save file & exit nano:
Press ctrl + O to write the text to the file
Press Enter to save the file.
Press ctrl + X to exit nano
Lastly, modify the file so that I can be run as an executable:
Crontab is a Linux utility which lets you schedule jobs to be run at certain times. I set it up to run my timelapse script each day.
Note: make sure you’re in a screen session when setting this up.
From Pi command line, open crontab: crontab -e
For me, being the first time using crontab on this machine, there were some instructions commented out in the file (you may or may not see this). I added my cron job below the comments:
# collect photo for 10-hr work day 45 7 * * 1-5 /home/pi/Desktop/scripts/one-week-day-every-6-min.sh
This means that on days 1 - 5 (Monday through Friday) at 45 minutes past the 7th hour (7.45 am), crontab will run my script. Remember that the script itself sets the interval for taking photos, so cron only has one simple job to do.
Well, I added a second script for Saturdays where it’s not a full 10-hour capture, so I gave mine two jobs:
# collect photo for 5-hr work day 45 7 * * 6 /home/pi/Desktop/scripts/one-weekend-day-every-6-min.sh
Assemble The Timelapse Videos Into One
Voila! You now have your photos being taken automatically, and a daily timelapse video being created & deposited into a single folder. All that’s left to do now is assemble the videos into a longer timelapse.
Since all of the videos have the same encoding, this is a very simple process with mencoder:
This will take the two dated videos and concatenate them into one output file, ouput.avi. You can also string more than two videos together with the same command:
Job done! Copy the file to your non-Pi computer (reminder of how, above) and check out your assembled timelapse.
Next Steps For Automation
I plan to add a cron job to concatenate all of the videos periodically, but I haven’t yet decided what interval to do that in. When I do that I’ll add it here!
Things That Didn’t Work
This step-by-step looks nice, easy, and tidy right? Well of course it wasn’t so simple 😆 It’s worth mentioning a number of things I tried that didn’t work. I dove into each with varying levels of depth so your mileage may vary.
NOOBS
I alluded to this above, but it’s worth mentioning again. All of the beginner Raspberry Pi tutorials recommend using NOOBS to get started, and I’d probably agree—the rigamarole above to create an image of the Operating System and set ssh and wifi settings and remote desktops is probably overkill for a beginner!! I had to erase/replace the OS twice during this process, and I’m not certain but I think I ran into some other unexplored buggy things in the initial setup because I couldn’t see Rasbian’s real first-login GUI.
All of this could have been avoided if I had the patience or foresight to get the wired keyboard & mouse (or adapters) when I first ordered all of the kit. A smarter person would learn from my mistakes and do this instead of what I did 😝
Photoshop Assembly
Ok this actually did work, but I really wanted to make the timelapses programmatically, so I scrapped this option.
But did you know Photoshop also has video capabilities!? Even my super-old version of the software 😂. This tutorial gives an excellent walk-through on how to do this…especially useful if you want to alter the images manually or in bulk before assembling, like adding dates:
The official Raspberry Pi timelapse documentation instructs you to install libav-tools to use the avconv software, which is meant to stitch the jpg images into a video timelapse. This software is no longer supported on the latest version of Raspbian and errored out before finishing the installation:
Package libav-tools is not available, but is referred to by another package. This may mean that the package is missing, has been obsoleted, or is only available from another source However the following packages replace it: ffmpeg
E: Package 'libav-tools' has no installation candidate
If you want to jump down a rabbit hole, you can read all about the somewhat fractious history of avconv. The gist of it: two warring factions felt differently about this encoding software and now ffmpeg is the go-to, modern choice (apparently….I’m probably exaggerating 😂). I got started installing ffmpeg, and then realized it was already installed by default with Raspbian. And it seems for most of the commands, you can use avconv and ffmpeg interchangeably. Great!
But not so fast…
ffmpeg
ffmpeg uses a software h264 encoder, unlike other options out there which use hardware acceleration instead. Based on the numerous tutorials that suggest using ffmpeg, I think it is fine if you have a Raspberry Pi 3 or 4, which has more processing power.
The Raspberry Pi Zero W does not have enough CPU capacity to use ffmpeg to encode video from jpg files using the often-recommended encoder, libx264. It’s possible this can be done using the h264_omx encoder instead. I went down a different path, but here are some resources that may be useful if you want to try it:
Old forum post detailing another omx encoder…from 2014 though, Pi hardware seems to have improved since this post
YouTube video with ffmpeg tutorial, though he transferred the jpg files to a Mac first and didn’t run it on the Pi (it’s actually not a Pi-related tutorial at all)
This walk-through is one approach to making timelapses with a Raspberry Pi Zero W, born from a lot of trial & error. And there are definitely other ways to accomplish the same thing if you’re so inclined! Here are some other things to consider or play around with for your own project:
Interval of Photos
My original intention was to create monthly videos so I set my interval pretty wide at 6 minutes in order to capture roughly 4 seconds of timelapse video per day. But a month is a long time to wait for a fun project like this 😊 And six minutes is a bit choppy if you want to stretch it out to longer than 4 seconds. I experimented with 3-minute intervals for one day, and the timelapse looked a lot better. And if you have the disk space, there’s no harm in planning for more than 25 frames per second.
All this to say, carefully consider & experiment with the number of photos you capture—you really can get significantly different results depending on this choice.
Frame Rate For Video
This may seem like a duplication of the previous point, but I think it’s work mentioning frame rate separately. You can have a lot of fun with this! Some tutorials I came across suggested as low as 10 frames per second to create really cool-looking stop-motion videos. Or you could go the other end and cram each second with dozens of frames, and end up with super high resolution or even slow motion videos. There’s a lot of room to be creative here.
]]>My trial & error step-by-step guide for setting up a new Raspberry Pi Zero W and camera to capture timelapse videos.New Raspberry Pi! Setup Attempt No. 1https://www.niamurrell.com/code/tutorials/2019-08-13-new-raspberry-pi-attempt-1/2019-08-13T21:20:21.000Z2020-06-20T20:46:16.228Z
NOTE: This is a dead end article! I went down one path and then realized I needed to backtrack and go down a different one. Click here for the version that goes all the way through to completion.
I got a new Raspberry Pi! I’m using it for a new project to create time lapse videos. Here’s my step-by-step for getting it to work.
I decided to name my Raspberry Pi. Its name is Pi.
Project Description
Ultimate goal: Pi will take photos at a regular interval, send the images to an AWS S3 bucket, and periodically assemble the images into time-lapse videos. Separately, Pi will run a web server which hosts an API for delivering the images to a static website.
Why a case? Pi will be in the window, so I went for some extra heat/sun protection. Not sure this is entirely necessary but it’s also pretty 😋
There are other Raspberry Pi vendors out there, including Amazon(affiliate link), and vendors based in other countries if you’re not in the UK. Shop around for prices.
I wanted a bigger SD card to store a lot of images so I bought one on Amazon as the pricing was better:
Lesson learned: for the initial setup you either need a wired keyboard & mouse, or you need to forgo these peripherals all together and use a different installation method. That’s what I ended up doing in the updated version of this post
Assembly
Before plugging in the power or software, I assembled the camera & case.
Camera goes first while there’s still easy access to the camera port. This YouTube video demonstrates inserting the camera cable.
Then follow the case instructions and use a mini screwdriver to lock Pi into the case. Once done, the camera kind of flops around a bit. It does have an adhesive backing, but I’m pretty non-committal and want this to still be sticky later if I use the camera with a different Pi. So I opted to use Blu Tack to adhere the camera to the case.
Finished product:
Install NOOBS Operating System
Pi needs an operating system…it’s a computer after all. There are a number of options, but the most popular is Raspbian. The most popular for newbies is NOOBS (New Out Of Box Software), which includes Raspbian via a friendly GUI which also lets you easily install a new OS if you manage to break the first one. I think I’ll go with that one.
You can buy an SD card which is Pi-compatible and pre-loaded with an OS. I opted to buy a blank (and bigger) SD card which means I have to format it to work with Pi first.
The docs explain why I need to format it: any card larger than 64GB will be formatted with the exFAT filesystem by default…but Pi isn’t compatible with this, it requires FAT16 or FAT32.
Steps for formatting a micro SD card on my MacBook Pro:
Put the micro SD card in its adapter, then in my laptop
Open the Disk Utility application
SUPER IMPORTANT! Click on the micro SD card from the list of drives
Click ‘Erase’
Select MS-DOS (FAT) for format and give it a new name if you want
Copy the contents of the extracted .zip onto the SD card drive (not the folder containing the extracted files)
Eject the SD card from the Mac, remove it from the adapter, and put it into Pi
Connect Pi to a power source
DOH! While Pi can connect to a bluetooth keyboard and mouse, you do need a wired USB device for the initial NOOBS setup. I didn’t want to wait to buy one and have it delivered, so I opted for a different installation method and wrote about it here.
]]><blockquote>
<p><strong>NOTE:</strong> This is a dead end article! I went down one path and then realized I needed to backtrack and go downI DON'T GET PROMISEShttps://www.niamurrell.com/code/2019-08-08-i-don-t-get-promises/2019-08-08T21:32:06.000Z2020-06-23T23:28:15.551ZThis is a placeholder post to get help on the next time I have someone to ask. Hopefully soon there will be an answer at the bottom of this post in my own words, and I will understand it!
Addition 3 months later: this article gives a pretty clear-to-understand explanation of promises.
I. DON’T. GET. THIS!!!
I have been trying to make a function work. It contained a forEach loop, and within each loop there would be a database lookup which returns a Promise.
However I never got a value out of this function—the server logs would show that the empty newEpisodes array would print and return before any of the database queries:
AXIOS GET: https://api.tvseriesapi.com/Events RESPONSE: { timestamp: 'Thu, 08 Aug 2019 21:16:30 GMT', status: 200, statusText: 'OK' } ******NEW EPISODES ARRAY: [] Executing: SELECT "director_id", "api_id" FROM "Directors" WHERE "Director"."api_id" = 150 LIMIT 1; Executing: SELECT "director_id", "api_id" FROM "Directors" WHERE "Director"."api_id" = 17 LIMIT 1; Executing: SELECT "director_id", "api_id" FROM "Directors" WHERE "Director"."api_id" = 32 LIMIT 1; Executing: SELECT "director_id", "api_id" FROM "Directors" WHERE "Director"."api_id" = 19 LIMIT 1; ...
I tried a lot of things to get this to work. Finally one StackOverflow answer said I have to use Array.map() instead of Array.forEach() (…well more like 7-8 said it, but this was the first one I could get to work!…) to ensure the promises all resolve before returning the newEpisodes array:
if (oldSeason.Episodes.length === 0 || !hasApiEpisode) { let director = await db.Director.findOne({ where: { api_id: apiMatch.directorId } }); let newEpisode = transform.apiEpisode(apiMatch, oldSeason, director.director_id);
newEpisodes.push(newEpisode); } }));
return newEpisodes; };
This had the desired outcome.
WHY!? 🧐
]]><p>This is a placeholder post to get help on the next time I have someone to ask. Hopefully soon there will be an answer at the bottom ofSending Transactional Email From Auth0 with AWS SEShttps://www.niamurrell.com/code/tutorials/2019-08-06-sending-transactional-email-with-aws-ses/2019-08-06T07:18:05.000Z2020-07-04T02:55:45.528ZAs I’ve written ad nauseum, I’m working on a web application that uses Auth0 to manage user authentication. It’s a fantastic service that’s relatively easy to try out. They even manage all of the emails one of your users would need to get, like confirming their email address, resetting a password, etc.
While an app is in development the Auth0 email service can be used, but to put an app into production, they require you to use your own email provider. I recently set this up with AWS SES, so for future reference here are the steps I took.
You can also use SMTP credentials to send from any other service or email provider that allows this. This includes free providers like Gmail or Yahoo!Mail, but there are a few reasons I discovered why using free email isn’t likely to be very successful:
You may have to change your email account settings to allow less secure apps to access it. Not a great solution—what’s to stop an app other than Auth0 from doing this?
If you do choose to change this setting, the email provider may still block Auth0 from sending emails on your behalf until you confirm that it wasn’t a fraudulent action. I changed the setting, confirmed it wasn’t fraud and successfully sent emails from my Gmail account one day…two days later it flagged the emails again, even so. Going in to verify that Auth0’s emails are legit every few days isn’t a good permanent solution!
So that leaves the paid services, which—for a tiny-for-now app like mine—makes SES the obvious choice. Each has a free trial tier, but once you hit a certain level of sending, the pricing jumps dramatically (starting from $15/month) for all of the providers except SES. By contrast, SES lets you send more emails for pennies, and scales up or down depending on your sending volume. So while all of these providers are built with the ability to scale (as in tens of thousands of emails being sent per day), AWS is the only option on this list with a simple, non-committal, entry-level option.
Now, I use the word ‘simple’ with a grain of salt! As with most things in AWS land, there is a learning curve.
How To Set It Up
The Auth0 docs lay out a step-by-step guide for doing this. I’ll go through each of their steps with some added info about what you actually have to do to connect SES through SMTP:
1. Sign up for an Amazon AWS account, or login.
Actually this is pretty straightforward. Here is a pretty easy guide to follow.
2. Verify your domain.
This step requires some familiarity with your DNS provider. In the SES dashboard, click the ‘Verify new domain’ button at the top, and then enter the domain name. It will then generate a Domain Verification Record which needs to be added as a record in your DNS settings.
The Amazon docs include some instruction on this, and for understanding DKIM records I found the Protonmail docs to be useful.
3. Request production access - THE WRENCH!
New SES accounts can only send email to verified email addresses…not very useful for sending emails to newly signed up users (how will you pre-verify them!?). So you need to get production access granted in SES, which allows you to send emails to any email address.
While the instructions are quite clear, the form you have to fill out to request this access is not! What should I ask for my limit to be? And what constitutes a ‘good’ process to handle bounces and complaints? What is a complaint anyway?? This really felt like overkill given all I wanted to do what let Auth0 send account setup emails to people who requested it.
Well whatever I answered, I got it wrong—my request was rejected after a 36-hour wait:
Thank you for contacting the Amazon SES team. Unfortunately, we cannot grant you a sending limit increase because it does not seem like you have a process in place to handle bounces and complaints. …
Some research showed that this happens to other people too, and for seemingly harmless requests. In any case, I tried to address their concern which led down another rabbit hole…
Long story short, I roped in another AWS service—Simple Notification Service (SNS)—to email me if there are any email bounces or complaints. Their docs helped when setting this up. Then I wrote back to AWS to say I’d done this:
Thank you for explaining how I can gain production access for the SES service. At your suggestion I have added notifications via SNS for bounces and complaints. On receipt these email addresses will be removed and no future emails will be sent to them. To confirm this service is in use for transactional application emails (sign-up confirmation, reset password) which require a voluntary double opt-in. An unsubscribe link is included in the footer of each email as required by law.
After another 36-hour wait, they finally approved!
Thank you for submitting your request to increase your sending limits. Your new sending quota is 50,000 messages per day. Your maximum send rate is now 14 messages per second. We have also moved your account out of the Amazon SES sandbox. …
So several days later, I could finally move on to the next steps…
4. Get Your SMTP Credentials.
You can actually do this before getting production access granted, but there’s little point if the emails won’t go through. Thankfully it’s much simpler than the previous step.
After the wait, back in the SES dashboard, navigate to SMTP settings then click Create My SMTP Settings. Copy the server from the dashboard page, and take note of the username and password that get generated.
5. Share these credentials with Auth0
Back in the Auth0 dashboard, copy and paste these details into the SMTP Provider Settings fields. Some tips:
To get emails to show up from a name instead of just the email address, include a name before the email in angle brackets in the From field: My Company Name <hello@mycompany.com>
Port: I picked 587
Save it and send a test email. Hopefully it works!
Why not AWS API credentials?
I started down this route initially and it led to setting up new IAM users and permission policies and key generation. No thanks.
A Note On Email Hosting
An assumption I’ve made in writing this is that you already have email hosting set up on your domain. I didn’t actually have that before I started this process, so here are some things I learned about this:
You do need email hosting.
Many domain providers will allow you to set up email forwarding for ‘aname@mycooldomain.com’ so that you can receive emails without having full-blown email hosting, but this isn’t actually enough. There are a lot of email hosts out there with costs that vary quite a bit. In the end I decided to use ProtonMail because:
I already use it for my personal email.
They prioritize privacy and security, which I appreciate.
It’s less expensive on an annual basis than most of the other email hosts I researched.
That said, I view this as a temporary solution…ProtonMail may not actually be the best choice in the long run for a few reasons:
Currently, you can only add a domain to one ProtonMail account—if you ever want someone else to manage an account on the same domain, you’ll need to grant them access to your account.
The daily sending limit for the most basic paid account is not very high.
For comparison, other popular email hosting choices include G Suite, Zoho Mail, AWS WorkMail, RackSpace, and AtMail. Do with this information what you will when selecting your host!
…And It Means More DNS Configuration
This may be an extra annoyance if you prefer not to spend time doing devops stuff. ProtonMail has some very good step-by-step documentation for verifying the domain and setting up SPF and DKIM records. As a result I didn’t find it too painful…this may be something to research when making a choice alongside service & pricing.
Conclusion (with 25 days’ hindsight)
This ended up being a much more arduous process than felt necessary, and the “simplicity” of setting up SES probably contributes to why the other email service providers are able to charge as much as they do. As often turns out to be the case with AWS, if time is short and money is not an object it’s probably easier to get started with one of the other email providers instead of SES.
That said, since initially setting this up, I’ve started looking into marketing email providers to send email updates, and that’s yet another cost to add onto the pile, once your volume gets big enough. In the end—partially due to the fact that I’ve already gone through this whole SES process— I was able to choose Email Octopus (that’s a referral link!), a reputable and well-reviewed service that charges lower rates since they sit on top of your own SES account. So…in the end, it’s a win!
]]><p>As I’ve written <a href="/tags/gft/">ad nauseum</a>, I’m working on a web application that uses <a href="https://auth0.com/">Auth0</a>Moving Server Requests to Front End Via APIhttps://www.niamurrell.com/code/2019-07-27-moving-server-requests-to-front-end-via-api/2019-07-27T11:37:46.000Z2020-06-20T21:43:55.331ZStill working away at project GFT. Most recently I updated some code to move some backend logic into the front end.
I have some buttons on the site which manage some pretty important functionality. Until now, when you press the button, a form is submitted to the server and the page needed to reload in order for the action to be carried out. I wanted to carry out the action without reloading the page.
To do this, I needed to essentially add an API to the backend of my app, and then write event handlers to make HTTP requests in the front end.
Adding an API
Writing an API (or rather, avoiding doing so) was the reason I used forms in the first place. But I guess for some things it really can’t be avoided.
Thankfully, the logic for an API endpoint is pretty much the same as the code for handling the form submission, only instead of responding with a new page, I send some JSON back as the response, which the frontend event listeners handle:
At this stage my app is already using body-parser to parse form data on the body object. But that’s not enough once we start working with JSON being sent over HTTP requests! In the main server file (app.js in my case), another line must be added:
It took me a while to figure out why nothing was coming through on the request body…save yourself the trouble 😂
And voila!
Up Next
Now that it’s working I think I need to add some kind of indication that ‘something’ is happening when you press the button. Most of the time the response is pretty quick, but if it takes the server a bit longer to carry out the action and respond, it looks like you’ve clicked the button and nothing happens. So I will add some kind of progress or waiting animation to make this clearer for the user.
]]><p>Still working away at <a href="/tags/gft/">project GFT</a>. Most recently I updated some code to move some backend logic into the frontSome Cloudinary Thingshttps://www.niamurrell.com/code/2019-07-14-some-cloudinary-things/2019-07-14T19:28:33.000Z2020-06-23T23:28:32.102ZImage Manipulation With Cloudinary
I’ve been using Cloudinary to manage images in project GFT. There are some things that are great about it, and others that don’t actually work very well. That said, I’m still learning the tool, so it’s likely I still have a lot more to learn.
Today I’ve been learning about how to do some useful things like:
]]><h3 id="Image-Manipulation-With-Cloudinary"><a href="#Image-Manipulation-With-Cloudinary" class="headerlink" title="Image Manipulation WithDevTools, Fetch API w/FormData, Design, And Other Updateshttps://www.niamurrell.com/code/2019-06-28-dev-tools-fetch-api-design-and-other-updates/2019-06-28T15:50:23.000Z2020-06-20T20:32:46.467ZI started writing this post 13 days ago, so here’s another mishmash of things I’ve been working on or discovered recently.
DevTools Hot Tips
Came across some stellar tips for using the browser’s dev tools, particularly the biggest one which is awesome!:
Up/Down arrow keys increment/decrement by 1
ALT (or OPTION) + Up/Down arrow keys increment/decrement by 0.1
SHIFT + Up/Down arrow keys increment/decrement by 10
CTRL + Up/Down arrow keys increment/decrement by 100
I also found out today that just like you can toggle pseudo-selectors (like :hover, :active and so on), you can toggle a class on/off an html element in dev tools too!
🤯
Fetch API Resources
A while back I wrote about different ways of doing HTTP requests. Well I'm working on implementing this in the app now and in Codebar the other day, I learned about a few more resources to keep on the shelf:
Did you know you can send a whole form’s data as part of an HTTP request? I didn’t! Turns out there is a native FormData() Constructor which will grab all of the data from a form. Then you can select the form using a query selector and give the whole thing an event handler, avoiding the need to trigger a server request to submit the form data. There’s a bit about this in the David Walsh post (above) too.
Design Resources
Today I had another mentoring session, this one all about what to think about to improve and/or work with someone to work on the design of the site. I got looooaaaadds of information (including a couple of books I already had my eye on!) including these tidbits & resources:
User Testing
Get as much user feedback as possible (ideally with testing) so that you have a clear idea on how people use the site, what elements are important, improvements that can be made, etc, before engaging a designer on a project.
Another exercise worth doing: card sorting, to determine which features/elements are most important on a page. This can be done solo, or with users if you have them.
When doing user testing, give them specific tasks to complete and see if they can accomplish them.
It’s better to get in situ tests where you get feedback & reactions immediately, rather than doing general after-the-fact surveys.
Look for online communities where your target demo hangs out to get free testing (Facebook groups, forums, etc.), otherwise there are paid options like:
Empty states - design inspiration for when you don’t have something to show
BeamBox.com - great example of illustration in design
One way to frame what you want out of a design is to look at sites you like and say what you like about them…then reverse it for your site and say how it’s not accomplishing what you want. Likewise, look at sites you don’t like and explain what you don’t like about them.
Sharing the website in 2 days! FINALLY!!! (even though I don’t think it’s ready and feel like I’m putting a baby into a pool of great whites 😅)
Up Next
Finishing touches & tweaks on the site this weekend for soft launch on Monday.
* This is an affiliate link so if you use it then buy something on Amazon, I get a cut. Yay! This is the only affiliate link on this site until I decide to maybe add more.
]]><p>I started writing this post 13 days ago, so here’s another mishmash of things I’ve been working on or discovered recently.</p>
<h3Adding A Custom Domain to A Heroku Free Dyno App with HTTPS, Cloudflare, and Auth0https://www.niamurrell.com/code/tutorials/2019-06-10-adding-a-custom-domain-to-a-heroku-free-dyno-app-with-https-cloudflare-and-auth0/2019-06-10T19:48:59.000Z2020-06-21T10:37:58.640ZI spent a few days solving this problem: given a Node application being hosted on a free Heroku dyno, how do you make it available on your own domain and have it served over HTTPS?
For additional context, my domain is managed by Google Domains and uses Auth0 for user authentication. To add even more complication, until now the domain was serving a static Hugo site over on Netlify.
This step-by-step is several days of research and headaches condensed into one (hopefully) easy guide.
TL;DR:
You can’t. I got 97% of the way there (as described below) before running into the final paywall. To summarize the solution: pay for a Hobby dyno on Heroku and let them set up SSL.
Easier Solutions
Before diving into the below, here are some easier solutions I can share with the benefit of hindsight:
Pay Heroku $9/month: all of the benefits below are included, and you don’t need to introduce yet another 3rd party into your app environment. (update in hindsight: maybe not true since Cloudflare—the 3rd party—still seems to be the only free DNS with CNAME flattening)
Start with a fresh domain: expect the process to go on longer than you might hope if the domain has already been in use, especially if it was via a different host server.
Be ok with HTTP: especially for smaller demo projects, consider whether you actually need the app served over HTTPS. If you can live with that, you can accomplish this without Cloudflare via Heroku, or paying Heroku.
Step 0 - Get A Domain
You can use a service like Google Domains, AWS Route 53, Namecheap, or one of the hundreds of domain providers out there. Or you can use a domain you already have access to.
The main thing is you need to be able to access the domain management settings, and particularly to change the name servers.
If you’re repurposing an existing domain, do what you need to do to tell that service to stop pointing traffic to the domain.
Step 1 - Set Up Cloudflare
Cloudflare will be the DNS provider because:
Domain registrar (Google Domains for me) doesn’t allow A or ANAME records on a domain root (i.e. example.com), which is required for setting up a custom domain on a Heroku app.
Other standalone DNS providers charge quite a bit by comparison
Cloudflare offers DNS services, SSL certificates, and CNAME flattening (works instead of ANAME records) for free.
Here are the steps to get started:
Visit cloudflare.com and create an account if you don’t already have one.
Add a site to your account—provide the domain name (the free plan works just fine). Cloudflare will look up the existing DNS records.
If you are re-using an existing domain, remove any DNS records that will point your site anywhere other than Heroku. You can see what these are by copy/pasting the IP addresses into a web browser…you’ll likely get an error that references your current name servers. In my case I (took a screenshot first in case I needed to add them back later and then…) deleted all of the records listed in Cloudflare.
Continue on to the Cloudflare Overview page and follow the instructions there…
Go to your domain registrar settings and remove the name servers Cloudflare listed.
Add the two name servers Cloudflare provides…save all changes.
Continue on to the following steps to keep things moving, but for now in Cloudflare…
Wait. It took just over 53 hours for all of these changes to propagate for me. In a command line window you can run curl -I www.example.com to see who is serving your domain; when you see ‘cloudflare’ or ‘cf’ referenced in the result, the wait is over. Examples:
Back in the Heroku dashboard, open the Settings tab and scroll down to Domains and certificates.
Click Add domain and add two: your root domain (example.com) and a www subdomain (www.example.com). Heroku will display two different DNS targets (xxxxx.herokudns.com). Keep these handy, you’ll need them.
Step 3 - Configure Cloudflare
Back in the Cloudflare dashboard, open the DNS section. Add two CNAME records:
CNAME — www — DNS target on www from Heroku (step 2) — Automatic TTL
CNAME — @ — DNS target on root from Heroku (step 2) — Automatic TTL
Scroll down to CNAME Flattening and confirm that Flatten CNAME at root is selected.
In the Cloudflare dashboard, open the Crypto section. The first section is SSL; once your certificate has been issued (may take 24+ hours on a free account) it will say Universal SSL • Status Active Certificate. Select Flexible in the dropdown menu. This page explains the different modes. (Hindsight addendum: when you pay Heroku and SSL is included, select ‘full’ instead of flexible)
Note, if you want full encryption from end-to-end, more steps are required.
Scroll down to Always Use HTTPS and ensure that it’s in On mode.
Once again, some waiting might be required while these changes propagate across the globe.
Step 4 - Update Auth0
Now that the domain for your site has changed, you’ll need to make some small adjustments for Auth0 to continue working:
In the Auth0 dashboard, open the Applications tab and click the settings gear icon for the relevant app.
Under Allowed Callback URLs, add the root and subdomain versions of your URL including https: so https://www.example.com/callback, https://example.com/callback
Add these URLs without the /callback path to Allowed Web Origins and Allowed Logout URLs.
ARRRGGGHHHH THE FINAL ROAD BLOCK!!!
All looked well and good until I tried logging in to the app, and I was hit with the TOO MANY REDIRECTSissue again. Last time I solved this by telling Express to trust the proxy. This time there’s an additional party involved, and it’s not guaranteeing the cookie is served securely.
While step 3 above says to set the SSL to ‘Flexible,’ this article suggested why there’s an issue here. Here are some more things I used to try & fix this:
I think it’s worth it to encrypt the traffic between Heroku and Cloudflare so that you can use ‘Full’ instead of ‘Flexible’ SSL protection. This article is helpful in understanding why. (Hindsight addendum: this is MANDATORY if Auth0 is in the picture!!! It won’t work without doing this, hence the need to pay)
Instead of creating two DNS targets, maybe it’s possible to create one for the www subdomain, and forward all requests from the root domain to www. I didn’t try this.
Resources
When things went wrong here and there throughout this process, bits and pieces from several resources helped:
Rather than completing this post with information that didn’t ultimately work, here’s what happened:
I got as far as the site working on an HTTPS url with flexible SSL except any pages that required an Auth0 login. That means Cloudflare could successfully serve the site, and all the traffic between Cloudflare and the client was being encrypted; however since the traffic between Heroku and Cloudflare wasn’t encrypted, Auth0 threw a fit and stopped the user from logging in successfully.
I went through the post above about adding my own certificate to encrypt the traffic between Heroku and Cloudflare, but this is a paid Heroku feature. The posts don’t explicitly say this.
I upgraded my Heroku dyno to paid and had fully encrypted SSL in about 20 seconds for the cost of $7/month.
Lesson learned!
]]>How I figured out how you can (or can't!) serve a Heroku app over HTTPS on a custom domain.DevOps Day(s), Input Sanitization & Validationhttps://www.niamurrell.com/code/2019-06-08-devops-day/2019-06-08T11:13:41.000Z2020-06-20T20:32:46.468ZFinally deploying the app!
Setting Up Domain
Heroku lets you add a custom domain to any Heroku app, but if you want it served over HTTPS you have to pay them. I’m trying to avoid that for now so looked at other ways of doing this.
Note & warning: compared to how much hassle it turned out to be to get this to work, I actually don’t think the monthly charge is prohibitive. With the benefit of hindsight if I had to start over I’d just pay for it and skip all of the below!
2nd More Important Note & Warning: all of this is hogwash! You have to pay. The pain I endured to figure this out can be read here.
First I came across this article which walks through setting up a Heroku app on a custom domain from Google Domains (my setup) using your own SSL certificate from Let’s Encrypt. Hilariously, the author’s own site isn’t currently served over HTTPS so I’m not sure that really worked out too well for him 😅
So then I decided to try Cloudflare. After setting up a new account, it checks the existing domain behavior and then asks you to change your name servers to cloudflare servers. This was an easy change to make in Google Domains. Then you have to wait up to 24 hours for the change to propogate…but actually it took about 1 minute.
These are the tutorials I was working off of to set this up.
…but I should back up: before this process I was serving a static Hugo site via Netlify. In following the tutorial above, even though Cloudflare said that the changes had propogated, I could see that it wasn’t really complete:
$ curl -I www.mytheatrelist.com HTTP/1.1 404 Not Found Cache-Control: max-age=300, public Content-Length: 0 Content-Type: text/html; charset=utf-8 Date: Sat, 08 Jun 2019 11:50:27 GMT X-Content-Type-Options: nosniff X-Frame-Options: ALLOWALL X-Request-Id: 15h57e10-5b3d-4eo9-ac89-18c10d751679 X-Runtime: 0.009814 Age: 0 Connection: keep-alive Server: Netlify X-NF-Request-ID: 48y242b7-f798-417d-9318-8n7i29150e34-115247
I also had to delete a number of DNS entries manually from the Cloudflare dashboard. So now I’m giving it some time and will come back to this step-by-step later to fill in the remaining process.
…It turned out to be 48 hours waiting for Netlify to stop being listed as serving the site. Finally it worked!
Since this post is already a bit of a jumble, I’m going to write a clear step-by-step which skips over all of the kerfuffling. Link is here.
More Resources Related To Deploying the Heroku - Google Domains - Cloudflare Combination
Another thing I worked on was implementing express-validator to sanitize inputs and validate them before persisting the data. I found this article about the validation aspect, and this one about the sanitization aspect, both on the same site. The express-validator documentation is also quite thorough.
After learning a bit about this, I decided to put a pin in it for the time being. The app is not open to the public, and I really want to focus on finishing the front end so I can start getting some feedback from trusted individuals. That said, it will be important to return to when opening to a broad audience; this article about SQL injection around ORMs gives a good overview why.
Other Stuff
This is a good tool to use with npm audit: the Snyk vulnerability database explains known vulnerabilities for software packages. It’s a bit easier to read than similar tools I’ve used via npm and GitHub.
Another cool tool: AdminBro. I had started implementing my own admin dashboard for the app when I came across this; it has some good inspiration for some additions I can make to mine.
]]><p>Finally deploying the app!</p>
<h3 id="Setting-Up-Domain"><a href="#Setting-Up-Domain" class="headerlink" title="Setting UpResetting Primary Key Sequence In Heroku Postgres Tables After Migrationhttps://www.niamurrell.com/code/tutorials/2019-06-04-resetting-postgres-sequence-in-heroku/2019-06-04T22:09:37.000Z2020-06-20T20:46:16.238ZI recently deployed an application on Heroku and in doing so, migrated all of the app’s data from my local machine to the Heroku Postgres server. I did this by exporting/importing csv files, however I quickly noticed that this method doesn’t update the sequence for any serially incremented primary keys. As a result, whenever I tried to insert new rows into a table with an auto-incrementing primary key, I would get an error: duplicate key value violates unique constraint. This was because Postgres was generating a primary key value that already existed.
Solution
This can be fixed from the Postgres command line. For a Heroku app, this needs to be installed first:
Open Heroku command line: heroku login …then log in
Take note of the single and double quotes around the table name. The table name always needs to have double quotes around it. It’s then surrounded by single quotes for the nextval() query.
You may have more than one table that uses an auto-incremented id, and will need to do the above more than once. You can use the \d command to see a list of all of your tables and sequences to make sure you don’t miss any:
DATABASE=> \d List of relations Schema | Name | Type | Owner --------+--------------------------------+----------+---------------- public | TableName | table | herokupgdbowner public | TableName_id_seq | sequence | herokupgdbowner public | TableNameTwo | table | herokupgdbowner public | TableNameTwo_id_seq | sequence | herokupgdbowner public | TableNameThree | table | herokupgdbowner public | TableNameThree_id_seq | sequence | herokupgdbowner public | SequelizeMeta | table | herokupgdbowner public | Sessions | table | herokupgdbowner (8 rows)
Finally…
Try inserting data again to make sure everything’s working properly.
]]><p>I <a href="/code/tutorials/2019-05-27-deploying-another-heroku-app/" title="recently deployed">recently deployed</a> an application onDeploying Another Heroku App (With Heroku Postgres)https://www.niamurrell.com/code/tutorials/2019-05-27-deploying-another-heroku-app/2019-05-27T17:26:31.000Z2021-06-19T22:44:29.671ZThe time has come! I’m deploying project GFT. Great opportunity to document the process of a Heroku deployment for a Node.js app with a Postgres database.
Heroku Postgres
In addition to using a Heroku dyno to host the app, I’m also using Heroku Postgres to host the database server. I’ve never used this before, and went back and forth between this option, hosting my own (i.e. Digital Ocean droplet), or using AWS RDS. My thinking was as follows:
Service
Pros
Cons
Heroku Postgres
Easy to set up. Easy integration with Postgres deployment.
With scale, it’s expensive compared to other options.
DO Droplet
Fixed pricing of $5/month for the foreseeable future (sweetened by $100 credit I have).
Have to self-manage the server, updates, backups, security, rollback, etc.
AWS RDS
Managed like Heroku Postgres but pricing is a lot lower.
Pricing is dependent on usage & could blow up unexpectedly (think bad actors). Also AWS is a deep web of confusion and time vacuums.
In the end I decided to go with Heroku Postgres for the time being: they offer a free hobby version of the service which should be fine for this proof of concept. And if the need arises, I can take the time to learn about RDS and then migrate there.
But First…Create The Heroku Dyno
Turns out you can’t set up Heroku Postgres without having a dyno to link it to, so need to do that first:
Sign up for Heroku if you don’t already have an account
From the dashboard click ‘New’ and then ‘Create new app’
Give the app a name and choose the region closest to you. The name will be the subdomain for the app on heroku, i.e. myappname.herokuapp.com
Click ‘Create app’
The dyno is created and you’re spit out onto the ‘Deploy’ settings page. Since I’m deploying from a GitHub repo, I followed the steps to add the repo and trigger automatic deploys. You can also use the Heroku command line or a Docker container if you prefer.
Set Up The Database
I’m assuming we already have an app that’s been in dev mode locally until now, and we’ll just deploy the existing app but link it to the new Heroku Postgres database instead of using a local localhost database. For my own app, there are some config files mentioned below which are referenced when I wrote about Sequelize CLI. My app also uses Auth0 for user authentication so that will need to be configured as well.
Open the ‘Resources’ settings tab. Under Add-ons start typing ‘postgres’ and the Heroku Postgres option will come up. Select it, and then a popup will pop up. With ‘Hobby Dev - Free’ selected in the dropdown menu, click the Provision button. Now you’ll see the database is there under Add-ons. You can click it to open the Heroku Postgres dashboard and explore, but otherwise setup is done.
Back in the app’s regular Heroku dashboard (not Heroku Postgres) click on the ‘Settings’ tab, then click the ‘Reveal Config Vars’ button. You’ll see that a DATABASE_URL variable has been created with your new Heroku Postgres database URI. This needs to be added into the application code so that it can connect to the new database in production. So…
Back in the app, add the new environment variable to the db production settings:
Update from the future: This post was written a while ago!…in Node 14+ the config above no longer works. I wrote about the fix here and it still works with Heroku as of June 2021.
Viewing The Data
Once everything is all linked, you can add the remote database to a local program to interact with the data outside of the application…I use Postico:
In the Postico program, open the ‘Window’ menu and then ‘Favorites Window’ (or press ⌘ + N).
Click the ‘New Favorite’ button and give it a nickname. I also recommend changing the color so that you’ll be able to easily know which database you’re working in.
Copy & paste the database credentials from the Heroku Postgres dashboard (under ‘Settings’ then ‘Database Credentials’ then the ‘View credentials…’ button). Click ‘Connect’
Voila! If the app has been run, the database tables should have been created and you should see them there.
Final Configurations
Back in the Heroku dashboard, add whatever environment variables the app uses…copy/paste them from the .env file, though you can skip anything Heroku will configure, like the PORT or NODE_ENV.
Check package.json to ensure the start script is one that Heroku will be able to run. For example if it includes nodemon, make sure the package is installed in the app’s dependencies and not globally on your computer. Same for tools like forever, pm2, etc.
…Except For Some Adjustments
The first time around I got an error because the app didn’t connect to a database. The solution was setting the production database configuration as written above, but here’s what the error looked like (timecodes removed) for reference. If it seems like your app hasn’t connected properly, look for an error like this and then troubleshoot it:
Unable to connect to the database: { SequelizeConnectionRefusedError: connect ECONNREFUSED 127.0.0.1:5432 at connection.connect.err (/app/node_modules/sequelize/lib/dialects/postgres/connection-manager.js:116:24) at Connection.connectingErrorHandler (/app/node_modules/pg/lib/client.js:163:14) at Connection.emit (events.js:189:13) at Socket.reportStreamError (/app/node_modules/pg/lib/connection.js:71:10) at Socket.emit (events.js:189:13) at emitErrorNT (internal/streams/destroy.js:82:8) at emitErrorAndCloseNT (internal/streams/destroy.js:50:3) at process._tickCallback (internal/process/next_tick.js:63:19) name: 'SequelizeConnectionRefusedError', parent: { Error: connect ECONNREFUSED 127.0.0.1:5432 at TCPConnectWrap.afterConnect [as oncomplete] (net.js:1104:14) errno: 'ECONNREFUSED', code: 'ECONNREFUSED', syscall: 'connect', address: '127.0.0.1', port: 5432 }, original: { Error: connect ECONNREFUSED 127.0.0.1:5432 at TCPConnectWrap.afterConnect [as oncomplete] (net.js:1104:14) errno: 'ECONNREFUSED', code: 'ECONNREFUSED', syscall: 'connect', address: '127.0.0.1', port: 5432 } }
Another error I got reminded me that I never installed a session store, which is required in a production environment. The step-by-step is below, but the error looked like this:
Warning: connect.session() MemoryStore is not designed for a production environment, as it will leak memory, and will not scale past a single process.
Finally, because my app uses Auth0, I also needed to change some of the configurations in the Auth0 dashboard so that it will allow users to log in from the live production environment. More on that below.
Express Session Store
The package express-session requires a session store for cookies and temporary application data. I wrote previously about using the session to store app data temporarily in addition to cookies. For development purposes you can get away with storing data in memory (express-session can do this on its own), but it’s not set up for production, hence a session store is required.
One thing to note: following these docs will require cookies to be set securely, as they should. And though Heroku apps are served over HTTPS, on a shared dyno it seems that Heroku actually terminates SSL before it reaches the individual application, and if the cookie can’t be set, Auth0 will not succeed in logging in. Actually technically it does succeed, but the app rejects the session and redirects back to /login, which redirects back to the app, and back and forth until the browser shuts the whole thing down with ‘too many redirects’!! The solution I found was to include app.enable('trust proxy') in the main app.js file. Another option is to allow unsecure cookies…probably not a good idea though.
Auth0 Configuration
Log into Auth0 to get to your dashboard.
Click on ‘Applications’ in the sidebar and then click the gear icon (‘Settings’) for the relevant app.
Scroll down to ‘Allowed Callback URLs’ and add your Heroku app URL with a /callback route, i.e. https://myappname.herokuapp.com/callback. Note this list is comma separated.
Scroll down to ‘Allowed Web Origins’ and add the Heroku app URL.
Scroll down to ‘Allowed Logout URLs’ and add the Heroku app URL.
For all of these, I added both the http and https versions of the domain to cover all bases.
Click ‘Save Changes’ at the bottom of the page.
In the application code, update the /logout route to reflect the new URL. In my case, I changed this to an environment variable, added the variable to my .env and .env.default files, and added the new environment variable to my Heroku app settings. This way I can easily change the logout redirect URL again without updating application code. Another thing that turned out to be necessary in production was including the client ID in the redirect URL. Here’s what my logout controller looks like now:
logoutAndRedirect(req, res) { if (process.env.NODE_ENV === 'development') { var auth0RedirectTarget = 'http%3A%2F%2Flocalhost%3A4000'; } else { var auth0RedirectTarget = process.env.AUTH0_LOGOUT_URL; }
In the application code (in my case, in app.js), you can also see that the authentication strategy uses an environment variable for a callback URL; this is what Auth0 uses to complete authentication. In the Heroku app settings, add this AUTH0_CALLBACK_URL variable with the valuehttps://myappname.herokuapp.com/callback and save.
Note: for all of these URLs that go in Heroku environment variables, they need to be added without quotes.
Deploy!
In the Heroku dashboard, open the ‘Deploy’ tab, and at the bottom under ‘Manual Deploy’ choose the branch you want to deploy from and click ‘Deploy Branch’. You’ll see the build logs come up and can watch it go.
The deploy logs will go away when the build finishes, but you should check them for any errors. To do this, click ‘More’ in the top right corner of the Heroku dashboard and then click ‘View logs’.
To see the app, click ‘Open app’ and if you see your app running and you can log in and out successfully, then celebrate! 💃💃💃
]]>Documenting the process of a Heroku deployment for a Node.js app with a Postgres database.Auth0 Is Not My Friendhttps://www.niamurrell.com/code/2019-05-27-auth0-is-not-my-friend/2019-05-27T15:57:11.000Z2020-06-20T21:43:54.609ZI’m using Auth0 to handle user accounts and authentication in project GFT. With the absolute basic setup, it’s been working great. However I keep some user data locally in the application, and getting the two to play nicely has been a headache today.
Can I Just Get The Username Please?
When a user logs in to the application, Auth0 sends a userProfile back to the app along with the security token, and the profile (with the implementation of passport-auth0) is added onto req.user. This means I can access Auth0’s basic user information from any route by calling req.user.user_id or req.user.name, etc. I save some of this data to my local users table when the user logs in for the first time, so that it can be easily accessible within the app.
But unfortunately (and very strangely if you ask me!), Auth0 doesn’t send the user’s username in the content of the userProfile. Don’t ask me why. So I explored several options for accomplishing this. In the end, I decided to make do with a duct-tape-fix for now, in the interest of getting the app deployed. But I’ll need to go back to this for a more permanent fix, so here’s where I left off in researching the topic:
Is it possible to add the username to the userProfile that is already being sent to the app?
Might use instead of sending HTTP requests to interact with the API: node-auth0 on npm or GitHub
Is the Auth0 username guaranteed to be unique? Since I have a UNIQUE constraint on the username field in my local users table, is there a risk that my app will throw errors if users change their username with Auth0?
How will users even be able to update their details like username, photo, etc?
This widget can be implemented to let users update their info (metadata only though!)
]]><p>I’m using <a href="https://auth0.com/">Auth0</a> to handle user accounts and authentication in <a href="/tags/gft/">project GFT</a>.Adding A NOT NULL Field With Sequelize Migrationshttps://www.niamurrell.com/code/reference/2019-05-27-adding-a-not-null-field-with-sequelize-migrations/2019-05-27T11:38:56.000Z2021-07-20T16:27:15.963ZI use the Sequelize CLI to create, change, and delete tables in a Node.js app that has a Postgres database. I wrote at lengths short and long about why I do this if you’re curious. But I recently ran into an issue when adding a column to an existing table: how can I add a column with UNIQUE and NOT NULL restraints when there are already rows in the table?
Note: I set up a sqlz bash alias which is used in the examples below (read about it here). Your command will be different unless you set up the alias first.
The standard way to add a column is to use the sqlz migration:generate command to create a new migration, and then use the addColumn QueryInterface method with all of the fields as you need them:
But since the existing rows won’t have any data (i.e. they will be null) when the migration happens, it will error out and the migration won’t be completed:
One way to fix this could be to change the function to insert data during this migration. This question & answer provide a hint at how to do this, and it’s likely the best option when the existing table already has a lot of rows in it.
In my case though, I only had two rows to worry about, so why bother coming up with a function to generate unique values 😂
Option 2: Make It A Two-Step Process
Instead I decided to do this with two migrations. In the first migration, I added the column without any constraints:
Then I went directly to my database (can be accessed via the psql command line, but I prefer to use Postico) and added a unique value to each of the two rows’ new columns. Then I created a second migration to add the constraints as needed:
As a final step, don’t forget to also update the model file with the new column, since sequelize-cli doesn’t update it automatically. And voila! New column exists and everyone’s happy.
]]>How I add a new column with `UNIQUE` and `NOT NULL` restraints using Sequelize when there are already rows in the table.Seeing Stars, CSS Inputs, JS Table Filtering, and Postgres Exportshttps://www.niamurrell.com/code/2019-05-26-seeing-stars/2019-05-26T17:21:23.000Z2020-06-20T20:32:45.624ZAnother hodge-podge of reports for what’s been keeping me busy the past few days.
Star Ratings
Who knew making a set of 5 interactive rating stars would be so complicated!I found a series of articles (1234) and an accompanying repo which gives a pretty comprehensive approach of one way of doing it. Of course my implementation isn’t exactly like-for-like so quite a bit of fiddling around with this over the past day or so. At the moment it’s been left a bit buggy but good enough to move on in the interest of going LIVE.
Styling CSS Inputs
Related, I also have been learning about styling CSS checkbox and radio inputs. They are generally ugly by default, but they can’t be styled with CSS. A way to get around this is to hide the actual inputs and design their labels instead.
One hot tip on hiding the inputs is to do the following instead of setting display: none:
This helps with accessibility, as the inputs remain tab-able for keyboard use.
W3 Schools For The Win? Table Filter & Sort
I also worked on some filterable/sortable tables and was very surprised to find the W3 Schools had some decent articles to help with this. This one covers sorting a table and this one was helpful for setting up some filter buttons. The code is a bit obtuse and verbose but it was a good starting point to plan out what I would actually write.
Side note: This library list.js can be used to do all of these things and more…might be worth looking into if a greater need arises.
PostgreSQL Exports
Found a very handy and thorough article about exporting Postgres data to a csv file through the command line. I heard about this from the Scaling Postgres Podcast which I think tops the list of nerd podcasts I listen to 🤓 😂
]]><p>Another hodge-podge of reports for what’s been keeping me busy the past few days.</p>
<h3 id="Star-Ratings"><a href="#Star-Ratings"Special Characters in HTML vs CSS and Responsive Tableshttps://www.niamurrell.com/code/2019-05-23-special-characters-in-html-vs-css/2019-05-23T22:28:44.000Z2020-06-20T21:43:55.274ZLots more frontend work on GFT. Through the process I learned some things.
Special Characters in HTML vs CSS
I’m trying to use as many free things as possible, one example being the special character of stars (★ ★ ★) instead of images. This site is a fantastic resource for finding the HTML code, unicode, and hex code versions of many characters.
I also came across a few helpful spacing units of different widths which could be helpful spacing out those special characters in CSS content, since this method wouldn’t allow them to be styled directly with padding/margin.
Responsive Tables
I also came across a great method for making tables responsive. Though my site uses Bootstrap, the Bootstrap solution to making a table responsive is to put a horizontal scroll on it when the screen width gets too narrow…yuck!
Instead, I wanted a way for table rows to wrap in a way that still allows the table to be easily read and understood. This article provides a few methods (as well as relevant pens) for doing so. I went for the semantic route for accessibility’s sake and styled my table, tr & td‘s instead of divs as the article suggests. And in the end, I only applied the flexbox solution to the mobile view…Bootstrap actually handles tables pretty well at greater widths.
In the end I’m happy with this solution!
Other Stuff
I RAN A HALF MARATHON ON SUNDAY!!! And I could still walk afterwards! 😆 I had a lot of fun and finished more than 5 minutes under the max time I’d hoped for. All the hard work paid off!
Up Next
]]><p>Lots more frontend work on <a href="/tags/gft/">GFT</a>. Through the process I learned some things.</p>
<h3Responsive Font Size & CSS Tooltips & Sequelize Virtual Typeshttps://www.niamurrell.com/code/2019-05-16-responsive-font-size-tooltips-virtual-types/2019-05-16T22:29:19.000Z2020-06-20T20:32:46.468ZHodge-podge of things I’ve been working on over the past few days! Mostly UI based since that’s what I’m (finally) currently working on.
Responsive Font Sizing
I like the idea of responsive font sizing a lot, where the text size is exactly appropriate for the size of the window/device. I’ve seen this done in a number of ways, but never remember exactly how to do it. Hence a new round of googling. This article was one of the few modern approaches I found which explained how to do it concisely.
CSS Tooltips
I very briefly looked into creating tooltips to indicate that a user must be logged in to click a certain button. Though I decided not to do this in the end, this article and related Codepen pen would be a good starting point if needed in the future. Just need to make sure to address accessibility in the implementation, as the article doesn’t address it and I do remember reading something about tooltips not being very accessible.
Sequelize Virtual Types
Another thing I looked into briefly but decided against doing was implementing a virtual type using Sequelize for one of my database models. The documentation is not very clear on how to do this, but this article provided a somewhat clearer review of how to do it.
In the end I decided to add a getter method to the model instead, meaning I’d get the desired value by calling a function rather than referencing a specially-created column. The benefit of using virtual types is that you can add validation to the field, but this wasn’t needed in my case so a getter worked just fine.
Up Next
Need to implement a star rating element so some fun CSS to come.
]]><p>Hodge-podge of things I’ve been working on over the past few days! Mostly UI based since that’s what I’m (finally) currently workingGFT UI Beginningshttps://www.niamurrell.com/code/2019-05-11-gft-ui-beginnings/2019-05-11T22:55:46.000Z2020-06-20T20:32:45.624ZToday I got started on the UI—yay!
Testing With Cypress Continued
Well actually, first I tried to wrap up the testing stuff I started the other day. We did the basic installation of Cypress, but there’s some config to do to authenticate a user specifically for testing when using Auth0.
I spent a few hours trying to get it to work. I’m 85% convinced it’s not actually supported in the way my app has been configured with Express & Passport. Maybe I’m wrong, but I”ll leave it for another day to figure out. For now, I have the tool installed and ready to take on integration tests for a logged out user only.
UI Beginnings
Once I started working on the UI, I got overwhelmed with the number of directions to go in. I was leaning towards trying out Foundation, but did I really want to dive into something new right now? Should I just use Bootstrap? And can I make the site different enough that it doesn’t look generic if so? …Actually what am I even going for with this temp/placeholder UI? AGGGHHH!
So I just decided to start with the same theme I used for the landing page that’s been up for a few months. I know I like it, I know it works as far as responsiveness, and I have some experience using it even. The only thing was that I used Hugo to make the landing page, so had to strip all of the Hugo syntax and re-organize things a bit. I also copied most of the landing page content, so now I have a nice intro page when a user isn’t logged in. Progress!
express-ejs-layouts & Footer Forcing
I also implemented express-ejs-layouts. This gives the EJS templating engine the extra feature of using a single layout.ejs file to determine what to put on each page. As a result I no longer have to write header and footer includes on each .ejs file. This article filled in some of the blanks about implementation that were missing from the tool’s repo.
This also allowed me to reorganize the layout in order to force the footer to the bottom of the page: I could add a content wrapper in a way that’s more easy to follow in one file, vs. split across a few files the way I would have had to do it before. This article explains quite well how doing so will force the footer to the bottom.
Other Stuff
Been thinking quite a bit about changing the name. That was another distraction today…how can I create a UI when I don’t even know what it’s called!? Aggh, decided to keep the working name in order to keep things moving.
Up Next
Now that I have the design scaffolded, I need to implement it on the actual site pages.
]]><p>Today I got started on the UI—yay!</p>
<h3 id="Testing-With-Cypress-Continued"><a href="#Testing-With-Cypress-Continued"Promises, Promiseshttps://www.niamurrell.com/code/2019-05-09-promises-promises/2019-05-08T23:54:40.000Z2020-06-20T20:32:45.547ZThe thing that has caught me up most recently is asynchronous JavaScript. From the sounds of it, it’s a story as old as JavaScript itself, but wow it really got me! Long story short, I spent about 10 hours banging my head against a wall trying to get a few functions to work together. They really didn’t want to.
Promises, Promises
The issue came down to working with a mix of callback functions and promises. Sequelize (which I’m using to interface with the app’s database) works with promises, so every time data is requested, by default the function will return a promise rather than the actual data.
I’ve become used to how it works and have been getting along fine but truth be told, I never really learned how promises work any deeper than on a superficial level, and definitely hadn’t really understood how they can/don’t work the way you think they might alongside other non-promisey functions.
For this particular problem I ran into, I’d written some code which contained a couple of callbacks and relied on some helper functions, and deep in the middle was one database call that was being called several times in a loop. (Which by the way, don’t even get me started on that…I want to write that part better still!) The page was meant to be rendered with the resulting data, but since the data hadn’t arrived yet, it was just rendering a basically blank page.
I had tried somanyways to make the page wait for the data before loading. But ultimately not being able to make it work came down to a too-shallow understanding of promises.
Well code mentoring session to the rescue! We went through the basics and did a few examples which helped…then applied the examples to the project and got it to work! I am so so glad I can move on from this issue now 😁
For Future Reference
The sandbox functions below helped understand how this all works. Learned about the console.time() and console.timeEnd() methods to see it in action–>these show you how much time it’s taking for each function to run, and you see what order they’re returning in.
const delayCallback = function (cb) { setTimeout(() => { cb(null, `THIS IS A CB FUNCTION`) }, 300) }
When we first started the timers were coming back in the wrong order (exactly how my app was incorrectly functioning), but by wrapping the first & second timers in a new promise, we got the order right. This is how I fixed it in my project too.
Other Stuff
Got another look at the Cypress testing suite and saw how easy it is to use for end to end testing. Still need to play around with it a bit (and there is some work to do to get it to play nicely with Auth0) but this might answer some of the questions I had about how to implement tests in this app.
Also heard about Postgraphile which is a way to expose a GraphQL API from a Postgres database. It sounds really interesting and potentially useful in the future!
Up Next
UI time!
]]><p>The thing that has caught me up most recently is asynchronous JavaScript. From the sounds of it, it’s a story as old as JavaScriptGraphQL Workshop Dayhttps://www.niamurrell.com/code/2019-05-02-graphql-workshop-day/2019-05-02T21:53:29.000Z2020-06-20T20:32:46.380ZToday I went to a GraphQL workshop as part of the ReactJS Girls Conf. I’ll paste my notes here for reference…these are more random jottings than considered review of what we covered, but maybe still useful in future!
Querying
If you want to write a query on the same variable twice, you must set an alias:
query ($category: PetCategory){ allPets(category:$category) { name category } }
# QUERY VARIABLES { "category": "CAT" }
To have multiple queries in your query document playground, you have to name each query:
query CustomersQuery { allCustomers { name currentPets { name } } }
query PetByIdQuery { petById(id: "C-1") { name inCareOf { name username } } }
To query all fields on a schema, you do have to write all of the field names…or you can do it once in a GraphQL fragment and then use the spread operator to access it:
fragment AllFields on Lift { id name status capacity night elevationGain }
query { allLifts { ...AllFields } }
There is also such a thing as an inline fragment.
Mutations / Updating Data
Example:
query allLiftsWithTrails { allLifts { name elevationGain status trailAccess { name } } }
mutation setStatus{ setLiftStatus( id: "panorama" status: OPEN ) { name status } }
query getPan { Lift(id: "panorama") { name status night } }
Subscriptions
These work with web sockets and listen for changes
The schema is required for setting up the sandbox…this is where all of the auto-completes come from. Basic schema setup uses GraphQL schema definition language:
Exclamation makes the field non-nullable. Multiple exclamations make it so that the query can’t return null, nor can a single result be null. If there are no results for the query, it will return an empty array:
allPhotos: [Photo!]!
Another way to make a field non-nullable is to set a default where no input is provided:
type Lift { status: LiftStatus=CLOSED }
enum LiftStatus { OPEN CLOSED HOLD }
Queries for a single result return an object, while queries for a list of results will return an array.
To add multiple fields to a query:
type Query { photo(id: ID! location: String): Photo! }
Interfaces
Interfaces can be used to make models extendable, for example a Pet model will have basic fields that will apply to models, and then subsequent models can add additional fields. For example, a Cat model could get calico: Boolean!.
In the query this would be accessed by __typename.
Setting Up Mutations
Add the fields that will be part of the mutation, then return it:
To do this you also have to import gql with Apollo Server.
GraphQL Conventions
ENUM names are typically in all CAPS
Query names are usually CasedLikeThis
Queries themselves are usually casedLikeThis
Comments used to be identified with an octothorpe (# this is a comment) but the new way is to use quotes ("this is a comment"). You can also put comment blocks between triple quotes ("""This is a really long comment blah blah blah""")
Further Reading
Here are some links and resources which may also be helpful:
Schema Workshop — Several examples of different elements of schemas
Last night at codebar I made some progress on writing tests for GFT. Got it up and running, now having a serious think about what to prioritize for writing tests. Also still haven't completely figured out mocking, still working some things out then.
Up Next
The full conference happening tomorrow after today’s workshops!
]]><p>Today I went to a GraphQL workshop as part of the <a href="https://reactjsgirls.com/">ReactJS Girls Conf</a>. I’ll paste my notes hereTesting Future Referencehttps://www.niamurrell.com/code/2019-05-01-testing-future-reference/2019-05-01T22:24:52.000Z2020-07-04T02:46:40.771ZGot my tests implemented (sort of)! Thought there are still some unturned stones which I may need to turn later. So here are some references I found helpful this time around as a jumping off point.
Testing Express Node App with Mocha & Chai Hot Tips
If I decide later to keep tests in the same folder with what they’re testing, I can change my npm test script to check all folders for files ending .test.js:
Node jSTL’s meetup video Testing, Mocha, Chai, and you! goes a bit more in-depth and explains the different between using assert, expect, and should. Also explains a bit about mocking and suggests a couple npm packages to help with this.
This repo has some fairly decent examples of tests in a Sequelize/Express app. The awful video that goes with the repo is here and the same person’s slightly better video (when the audio works) is here.
]]><p>Got my tests implemented (sort of)! Thought there are still some unturned stones which I may need to turn later. So here are someHTTP Codeshttps://www.niamurrell.com/code/2019-04-28-http-codes/2019-04-28T21:24:36.000Z2020-06-20T20:32:45.745ZFinished up setting up all the controllers today, they are now individual testable units with testable helper functions inside.
Part of making them testable included adding status codes to the results, so I got acquainted with those.
HTTP Status Codes
These are the standard codes that are included with a server response to let the client know something about the data it’s getting. The common ones I already wrote about include:
200 - OK
404 - not found
500 - internal sever error
But I learned about some additional codes that come in handle when building RESTful routing on this handy list, such as:
201 - Created
204 - No Content
400 - Bad Request
The first two are the standard stati for CREATE and DESTROY CRUD operations respectively. 400 is a good catch-all for catching Promise errors.
Other Stuff
Long training run today…100 minutes!
Up Next
Still didn’t get to writing any test yet though 😂 So that’s next up!
]]><p>Finished up setting up all the controllers today, they are now individual testable units with testable helper functionsControllers Lightbulbhttps://www.niamurrell.com/code/2019-04-27-controllers-lightbulb/2019-04-27T21:18:27.000Z2020-06-20T21:43:54.610ZYesterday I had a mentoring session and got to walk through my GFT code with someone who knows a lot more than me…it helped a lot!
The biggest thing was helping me get closer to writing tests for the app. It gave me a lightbulb about using controllers, and now I understand why they are helpful!
Controllers
Controllers are the C in the MVC design pattern. Some languages and frameworks follow a pretty strict MVC architecture so you don’t really have a choice about how to set up a project. In Express on the other hand, you can do pretty much whatever you want with the structure. One thing that can be a bit annoying about this is when there are a lot of files…you find yourself going from one folder to the next to the next looking for a specific file, because oftentimes (with good reason) the filenames tend to be the same.
Because of this, I always thought it was better to put all the routing logic in my routes files…less clicking around to do when coding and troubleshooting.
But then when I started to think about how to write tests for the app as a whole, it’s like where should I start? Because of how it’s written with the views routers and routing logic all bundled together, I’d basically need to write integration tests to make sure everything’s covered. But since I haven’t even started working on the front end yet that doesn’t may any sense—all the tests would need to be re-written as soon as a new front end is in place. It kind of defeats the point of tests!
So it’s controllers to the rescue. When just the logic is on its own away from the route and away from the view, then you can write a test just for the logic, and that test won’t change if the routing or views change later on down the line. Which they inevitably will.
So now I have been working out on breaking the code out into these smaller pieces so that I can get these tests written!
Refactoring In General
I also got some good tips in the session about refactoring. I did a lot of unnecessary error handling, and some roundabout logic that I’ll be able to clear up while I’m separating the controllers.
Other Stuff
Not sure if I wrote it here before but I signed up for a half marathon! So been training for that, loooooooooots of running for the next few weeks.
Up Next
Finish tests.
]]><p>Yesterday I had a mentoring session and got to walk through my <a href="/tags/gft/">GFT</a> code with someone who knows a lot more thanGFT Milestone Progresshttps://www.niamurrell.com/code/2019-04-21-gft-milestone-progress/2019-04-21T22:14:44.000Z2020-06-20T21:43:55.093ZSoooooo much progress this week on GFT! I have been putting in looong days due to the milestone date (due today) I set last week; the intent was to complete:
2 feature functionalities completed
a basic UI
an admin dashboard
sending a live URL of the alpha version out for some feedback
Soooo…yeah a bit ambitious for one week, even with a holiday weekend. I learned my lesson! So now I am just focusing on point number one to complete before going back to work on Tuesday. I think I’ll get there!
This is what massively slowed things down. I already ran into some long ‘learning sessions’ (shall we call it) on some of my model associations and I thought I’d gained a pretty good understanding of how Sequelize needs you to establish and access relationships between models. And I had, for hasOne, belongsTo, and hasMany relationships.
It turns out belongsToMany associations are a different ballgame all together. The documentation is sparse, and open issues, blog posts, etc show that other people have run into similar problems without including a very good resolution or solution. I can’t say I fully understand it still myself, but here are some things I did learn to be true:
Learning 1
Always include an as alias definition when association models with belongsToMany:
The docs specify that a through definition is required, but I found that the as definition also seems to be required. The reason is that Sequelize auto-generates an alias for the join table, and you have to include that alias when querying either model if you want to reference the other:
Strangely, whatever the auto-generated alias is, it’s not easily accessible (or at least, I couldn’t find it). I tried so many things (so, so many) but the association wouldn’t work without an alias, and no logical guess of the auto-generated alias worked, nor could I figure out how to display the alias anywhere. So the best way to get around this was to set the alias, and then call it everywhere.
Learning 2
The Sequelize CLI migration tool is awesome. Though it could use better documentation (and for that matter should really be update to ES6, among other necessary updates), it saved a lot of effort and time when I decided to rename some tables and reconfigure my database structure a little bit. I definitely recommend using it if you’re going to use Sequelize.
Planning FTW
Another thing I learned/reconfirmed that’s not related to Sequelize is the value of planning. When working on one of the new features, I got a bit lost. So I needed to step back and look at the big picture to elucidate what actually needed working on. This led to the aforementioned db structure reconfiguration, and I think it will be better for the app design in the long run.
That said, it took a couple hours of literally just sitting and thinking to get to this point, and to map everything out. So let’s just say I’m really grateful for these days off work!
Other Stuff
I’m looking at Tailwind CSS as I look ahead to implementing a UI for the site. It seems like a bit of a learning curve there, and would definitely lock me into using it if I do, so still exploring this.
Also I have a mentor session later this week about implementing tests into the app…finally! Gotta prep for that.
Oh yeah, and happy Easter!
Up Next
Finish my milestone target before the week is up!
]]><p>Soooooo much progress this week on <a href="/tags/gft/">GFT</a>! I have been putting in looong days due to the milestone date (dueNPM Tidbits, Time Trackinghttps://www.niamurrell.com/code/2019-04-17-npm-tidbits/2019-04-17T22:04:59.000Z2020-06-20T21:43:55.093ZMaking progress on GFT! I set a deadline to have an alpha completed by this Sunday the 21st so it’s full speed ahead. That said there were a couple of sidetrack-y things…
npm Tidbits
I came across this article which has some good npm tips, like npm dedupe to remove duplicate package from projects.
Time Tracking
I also decided to commit to a minimum number of hours per week working on GFT. That means keeping track of how much focused work I’m actually doing each time I sit down to work on it. I created a daily survey where I’ll note down how many minutes I’ve spent on 4 key areas that day—app development, business development, marketing, and research. Now that I think of it, I’ll need to add product development to that list pretty soon!
Anyway for now I’m mostly working on the app dev piece, and getting into the habit of time tracking (as of day 3) isn’t going so well! I always forget to take note of when I start working. So I went back to an old post and figured out how to add the time to my bash shell prompt. I added a new color:
!X! Dim="\e[2m" !X! # Dim White - don't do this!!!! Dim="\[\e[2m\]"# Dim White
Update August 2019: Originally I wrote this without enclosing the color code between \[ and \] and it was causing long commands to wrap over themselves when typing in the Terminal. This Q&A helped narrow down the issue, and I updated my prompt script as noted above.
And amended the prompt script to include the time at the front:
# Format prompt script export PS1="$Dim\A $BrightPurple\h$Purple:\W$Cyan\$(parse_git_branch)$Red\$(__git_dirty)${NONE}$Color_Off \u$ "
Update July 2019: Sometimes when I needed to retroactively look at my work hours it was hard to figure out the working days, so I amended the script to include the date as well. This bit of the Linux documentation provided the necessary conversion characters. Final script as follows:
# Format prompt script export PS1="$Dim\D{%d-%b} \A $BrightPurple\h$Purple:\W$Cyan\$(parse_git_branch)$Red\$(__git_dirty)${NONE}$Color_Off \u$ "
Handy!!
Other Stuff
Four day weekend ahead! Will provide lots of time to complete the alpha woop woop.
Also saw a few plays this week!
Up Next
#workawayweekend
]]><p>Making progress on GFT! I set a deadline to have an alpha <strong>completed</strong> by this Sunday the 21st so it’s full speed ahead.Updating Sequelize Major Version (Or Not)https://www.niamurrell.com/code/2019-04-13-updating-sequelize-major-version/2019-04-13T05:13:21.000Z2020-06-20T21:43:54.608ZWorking on GFT after a work-trip break. Before diving in too deep I decided to upgrade Sequelize from version 4 to 5 on the project. There were some breaking changes which I became acquainted with 😐 In the end I decided to delay the upgrade and instead focus on making progress in the app itself.
Default Column Generation
The immediately apparent change was how column names are auto-generated now, depending on whether underscored: true is defined on models. It used to be that if you set underscored to true, the column names are generated in an underscored form (this applies to default columns like created_at, updated_at, etc.). In Sequelize 5 they’ve changed this to make auto-generated column names go in in camelCase with the field set to the underscored name. The behavior is defined here.
Apparently this is normal behavior on other ORMs, and I can see how it makes sense by reading some of the comments in the discussion. But my models weren’t set up in this way, and the result is that the model queries are changed significantly:
# SEQUELIZE 4 Executing (ff6153d8-1fd7-48cd-a7d2-254449eb2012): SELECT "user_id", "auth0_id", "status", "created_at", "updated_at", "deleted_at" FROM "LocalUsers" AS "LocalUser" WHERE (("LocalUser"."deleted_at" > '2019-04-13 08:15:47.032 +00:00' OR "LocalUser"."deleted_at" IS NULL) AND "LocalUser"."auth0_id" = 'auth0|hash');
# SEQUELIZE 5 Executing (18d55c6c-a112-4b1e-a17f-de6a10390a3f): SELECT "user_id", "auth0_id", "status", "created_at", "updated_at", "deleted_at", "created_at" AS "createdAt", "updated_at" AS "updatedAt", "deleted_at" AS "deletedAt" FROM "local_users" AS "LocalUser" WHERE ("LocalUser"."deleted_at" IS NULL AND "LocalUser"."auth0_id" = 'auth0|hash');
This prompted some NOT NULL violation errors, since the query was looking for fields like createdAt which don’t exist in my models. The solution is to define these auto-generated fields on every model:
# SEQUELIZE 5 WITH createdAt updatedAt fields defined Executing (92e27929-0895-4298-a050-790dae9d673d): SELECT "user_id", "auth0_id", "status", "created_at", "updated_at", "deleted_at", "deleted_at" AS "deletedAt" FROM "local_users" AS "LocalUser" WHERE ("LocalUser"."deleted_at" IS NULL AND "LocalUser"."auth0_id" = 'auth0|hash');
# SEQUELIZE 5 WITH createdAt updatedAt deletedAt fields defined Executing (99656f16-6bcd-411d-82f1-42b2c28541ec): SELECT "user_id", "auth0_id", "status", "created_at", "updated_at", "deleted_at" FROM "local_users" AS "LocalUser" WHERE ("LocalUser"."deleted_at" IS NULL AND "LocalUser"."auth0_id" = 'auth0|hash');
So then I would need to add this to all my model definitions and migration files.
An alternative way forward could have been accept the camelCase auto-defined column names, and maybe there would be less changing to do, and it would make my model files less verbose. Though not sure how this would affect other areas of the model definitions without looking into this further.
Association Queries
The new version also changed how model associations are queried:
# SEQUELIZE 4 Executing (default): SELECT "Venue"."venue_id", "Venue"."venue_name", "Venue"."country_id", "Venue"."created_at", "Venue"."updated_at", "Country"."country_id" AS "Country.country_id", "Country"."country_name" AS "Country.country_name" FROM "Venues" AS "Venue" LEFT OUTER JOIN "Countries" AS "Country" ON "Venue"."country_id" = "Country"."country_id" ORDER BY "Venue"."venue_name";
# SEQUELIZE 5 Executing (default): SELECT "Venue"."venue_id", "Venue"."venue_name", "Venue"."country_id", "Venue"."created_at" AS "createdAt", "Venue"."updated_at" AS "updatedAt", "Country"."country_id" AS "Country.country_id", "Country"."country_name" AS "Country.country_name" FROM "venues" AS "Venue" LEFT OUTER JOIN "countries" AS "Country" ON "Venue"."country_id" = "Country"."country_id" ORDER BY "Venue"."venue_name";
…prompting the following error in Sequelize 5:
Unhandled rejection SequelizeDatabaseError: column Venue.country_id does not exist
I did not get into this fix.
Model Definitions
There was another big change, in how models are defined:
I haven’t looked deeply into this Model class to understand this change, and decided that doing so (now) and re-doing all of the models in the new syntax could potentially take a looooot of time, time I’d really rather spend building out a working prototype of the app with all of the features I want in a proof-of-concept. So ultimately I decided to revert back to Sequelize 4 and save this upgrade for another day.
Define Model Attributes on Global Level
Not related to the version change, but I found a code snippet to define model attributes on a global level, instead of in each model as I have been doing up to now:
I think I will implement this when I do do the upgrade.
Other Stuff
When the time does come to upgrade, here’s a resource that may prove helpful…it describes how to use classes for model definition, before this was made the m.o. in Sequelize 5.
Up Next
Working on the model that I couldn’t get to work before the migrations detour…wish me luck!
]]><p>Working on <a href="/tags/gft/">GFT</a> after a work-trip break. Before diving in too deep I decided to upgrade Sequelize from version 4April Foolshttps://www.niamurrell.com/code/2019-04-05-april-fools/2019-04-05T20:21:06.000Z2020-06-20T20:32:46.146ZLearned about the say command on Mac’s! A friend had a practical joke played on her where her computer was speaking an eerie message to her at random times (genius joke!). She wrote about it on her blog, and it got me thinking…could be used for reminders like ‘work on your goals’ or ‘eat some fruit’ or ‘put down the remote!’ Think I’ll give this a shot, thanks Lara!]]><p>Learned about the <code>say</code> command on Mac’s! A friend had a practical joke played on her where her computer was speaking anSequelize Association Referenceshttps://www.niamurrell.com/code/2019-04-02-sequelize-association-references/2019-04-02T19:58:46.000Z2020-06-20T20:32:46.460ZSequelize Association References
I ran into a weird occurrence where I had created a model in which one field was a reference to another model:
However when looking at the SQL table definition to check everything was set up correctly, the shelf_id column was defined, but did not include an actual reference to another table.
First I tried removing the shelf_id column definition from my model, and this solved the problem—the column was added automatically due to the belongsTo association. However I’d lost my validations, and the column had a terrible name shelf_shelf_id. Another nitpicky point—it added the shelf_shelf_id column after the created_at and updated_at columns, when I prefer those to be at the absolute end, looking at the table left to right.
To solve the column name problem it was an easy adjustment:
Just adding the foreignKey is not enough; to trigger the reference, sourceKey must be defined as well.
Up Next
I made progress on another piece of app but a question came up: can I add an association between two models and use each to call the other without adding a reference to both? Will research that next and then finish out what I’m working on.
]]><h3 id="Sequelize-Association-References"><a href="#Sequelize-Association-References" class="headerlink" title="Sequelize AssociationBack From Holidayhttps://www.niamurrell.com/code/2019-03-31-back-from-holiday/2019-03-31T09:26:00.000Z2020-06-20T20:32:46.584ZBack from holiday! Had a great week of birthday, family, and travel. Now back to work. Some random things I’m thinking about & working on to get back into things…
Bash Scripting Safe Delete
I came across an interesting suggestion for deleting/trashing computer files from the terminal. Basically, it suggests writing a bash script to move files to the trash, thereby avoiding deleting a file permanently by mistake. I thought about doing this, but don’t actually delete anything from the command line often enough to make this useful at the moment…saving the reference here in case it comes up again in future.
Cleaning Up Dev Bookmarks
I randomly decided to clean up all of my dev-related bookmarks. Not quite sure how this made it onto my list of to-dos!
I had bookmarked an article about why this person decided to learn to code that I enjoyed re-reading. Though it doesn’t really need to be bookmarked as a reference, so saving it here.
Killing Machine Processes
Another thing I’d bookmarked that I’d rather document here where it’s searchable…how to check and kill a running process like a mongod or mongodb or postgress server. Because if you have one running, you can’t start another…but if you’ve closed the terminal window sometimes this can leave you stuck. The link demonstrates how to find a running process and then terminate it.
Because the opening last weekend was so awesome and the exhibition is really something, I will share it!
Go fam!
Up Next
Continuing to research how I can integrate testing automation into the app, increasingly necessary as I add to the size & complexity of the app.
And keeping coding!
]]><p>Back from holiday! Had a great week of birthday, family, and travel. Now back to work. Some random things I’m thinking about &Minimalist Minimum Viable Producthttps://www.niamurrell.com/code/2019-03-19-minimalist-minimum-viable-product/2019-03-19T22:23:09.000Z2020-06-20T21:43:54.609ZStill a long way to go, but gotta celebrate the wins! As of last night I officially, finally have a minimalist version of the MVP for project GFT. YAAAAAAAAAYYYYYYY!!! There is no design, and it’s not deployed, and it’s not pretty at all, but it WORKS and I can do most of the function I set out to do in the beginning. From here it’s all icing features and making it look pretty.
Very exciting!!
]]><p>Still a long way to go, but gotta celebrate the wins! As of last night I officially, finally have a minimalist version of the MVP for <aPostgres Errorshttps://www.niamurrell.com/code/2019-03-14-postgres-errors/2019-03-14T22:33:56.000Z2021-11-04T11:56:47.140ZThe other day I was doing something completely unrelated with homebrew and it erroneously updated postgres. Today I have all kinds of problems:
2019-03-14 17:32:01.898 CDT [7476] FATAL: database files are incompatible with server 2019-03-14 17:32:01.898 CDT [7476] DETAIL: The data directory was initialized by PostgreSQL version 10, which is not compatible with this version 11.2.
This message ultimately helped me solve the issue, but how did I get there?
Finding Postgres Issues
The first clue was obvious, I could not connect to the database any longer from my app:
Unable to connect to the database: { SequelizeConnectionRefusedError: connect ECONNREFUSED 127.0.0.1:5432 at connection.connect.err
I don’t remember exactly what made me look at homebrew first, but I checked to see what services were running, in case Postgres had stopped:
$ brew services list Name Status User Plist postgresql started user /Users/user/Library/LaunchAgents/homebrew.mxcl.postgresql.plist
The important thing to note here was that the started status was in green. I tried restarting the service at the suggestion of some StackOverflow article:
$ brew services restart postgresql Stopping `postgresql`... (might take a while) ==> Successfully stopped `postgresql` (label: homebrew.mxcl.postgresql) ==> Successfully started `postgresql` (label: homebrew.mxcl.postgresql) $ brew services list Name Status User Plist postgresql started user /Users/user/Library/LaunchAgents/homebrew.mxcl.postgresql.plist
My app still would not run. Interestingly, now the started status was in yellow.
A bit more StackOverflowing indicated that this means the postgres service had started but without homebrew being able to get a status (meaning maybe it started starting, but didn’t complete it successfully).
So I found a way to find out what the status is while restarting the service again:
The key here is the StandardErrorPath file location, which you can open to find out what the actual error is:
tail -n 10 /usr/local/var/log/postgres.log
This is where I found the very helpful error I mentioned before:
2019-03-14 17:32:01.898 CDT [7476] FATAL: database files are incompatible with server 2019-03-14 17:32:01.898 CDT [7476] DETAIL: The data directory was initialized by PostgreSQL version 10, which is not compatible with this version 11.2.
THE FIX!
Aaaaaaaages ago I wrote about upgrading Postgres, and needing to run that handy `brew postgresql-upgrade-database` command every time the database is upgraded. Homebrew even prompts you to do this when it upgrades Postgres. And I would have even sworn I did it!
I didn’t.
So I ran it again, but there was an error (because maybe I did already run it?). So I deleted the old .old file and tried upgrading again:
Warning!! There was a chance doing this would delete all the data, but I did it anyway. It didn’t delete it, but I recommend looking into the contents of the postgres.old file more closely before playing games with deleting it in future.
$ brew postgresql-upgrade-database Error: /usr/local/var/postgres.old already exists! Remove it if you want to upgrade data automatically. $ rm -rf /usr/local/var/postgres.old $ brew postgresql-upgrade-database
SUCCESS!!! It updated the data from the old version to the new version, and the started status turned green again.
And most importantly, my app works again 💃💃💃
Other Stuff
I read an interesting article today about generating PDF documents from your site in a Node app. Several options were well-documented, it’s a good read!
Up Next
Working on the user section in the app, it is nearly at MVP status! Well at least the backend function. I can’t even think about UI right now!
]]><p>The other day I was doing something completely unrelated with homebrew and it erroneously updated postgres. Today I have all kinds ofRouting, Flashy Progress With Logs & Express Sessionshttps://www.niamurrell.com/code/2019-03-10-routing-flashy-progress-with-logs-express-sessions/2019-03-10T16:40:45.000Z2020-06-20T20:32:46.467ZYesterday was another productive work day on GFT! I finished out my goals for the week of re-implementing all of the routes I’d done before the migration-gate setback, and also setting the app up to collect data from an API programmatically (I’d been doing it manually in Postman up until now for testing). I also added in some helpful flash messages into the front end.
Planning Routing
One thing that has helped a lot in working on the app is planning. I guess that should go without saying!? But it’s something I thought about way more than I actually did, while now I’m seeing the benefits of actually doing it.
I already wrote about planning the database (that helped hugely) and this week I’ve focused on planning and organizing all of the routes that will exist in the app. This app will have a lot of routes—at least more than any other app I’ve created so far—and sometimes I was even confusing myself about what things are, and where they should go.
My solution was to create a document listing all of the routes, and my status creating them, for example:
ENDPOINT
METHOD
ROUTE FILE
DESCRIPTION
DONE?
/
GET
global
Home page if (!user) login/sign up links
X
/
GET
global
Home page if (user) landing page
X
/login
GET
global
Auth0 authentication
X
/callback
GET
global
Auth0 cb auth function
X
/logout
GET
global
Auth0 log out function
X
/profile
GET
users
Auth0 display user profile
X
/admin
GET
admin
READ admin dashboard
/club
GET
club
READ all club
X
/club
POST
club
CREATE new show
X
/club/new
GET
club
READ new show form
/club/:id
GET
club
READ single show with gig count
/club/:id
PUT
club
UPDATE single show
X
/club/:id
DELETE
club
DESTROY single show
X
/club/:id/edit
GET
club
READ single show edit form
X
/club/:id/gig
GET
gig
READ show’s gig
/club/:id/gig/new
GET
gig
READ new gig form
X
/gig/:id
GET
gig
READ single gig
/gig/:id
POST
gig
CREATE single gig
etc….
So far my app has 7 categories (i.e. route file groupings), and each time I’ve started a new one, I plan out what the routes will be before writing any code. Doing so, I’ve been able to work through questions (like, should a gig go on its own route or be a nested route? What makes sense for the user? Vs what makes sense for keeping this organized? How does the club & gig database relation play into this?) before getting too far with any code…it’s an improvement over how I was working before!
Maybe some of this sounds really obvious, but figuring it out mostly on my own, I guess I have to work through these things 😅
API Integration, Express Sessions
I also officially integrated the API into my app YAAAAAAAAY!! 💃💃 It was really lame to be doing it manually before—I would call the API in Postman, reformat the output, save it to a file, and then write a function to persist the data, then delete the function. Super inefficient! I guess it worked for just testing the data (all I’d been doing until now), but this won’t really work in the long term.
Now I can just press a button and it pings the API, goes through my database to filter out any data that is already there, reformats the remaining payload to fit my db schema, and then persists the new information to my database.
I wanted to add a confirmation/review step in the middle of this process so that the site admin can see what’s going to be updated before the data is persisted. That means using 2 routes instead of 1 to call the API and update the data. After trying a few things, I discovered that you can use a session to hold data in the app across several routes.
For several reasons, it seems like doing so in memory is not best practice for apps in production, but I haven’t figured out why yet? I’m only holding data long enough for the user to confirm its accuracy, and then clearing it from the session memory once the data goes into the database. Several articles (like here and here) allude to the fact that I shouldn’t do this, but for now, and until I find a better solution or advice, I’m going with it! Hopefully I’ve done enough to avoid memory leakage and having the app store too much temporary data.
Flash Messages
I also got flash messages implemented using connect-flash. Flash messages are the little, temporary messages that might appear in a little bubble after completing an action (i.e. ‘Gig was successfully created!’). I used this package a while back in a tutorial I’d done and looked to see if there was anything more up-to-date, but couldn’t find anything. I’m guessing it’s because the popular thing now is not to do server-rendered apps at all (at least not in the way I’m doing), so there’s not as much being written about this more recently. But anyway, connect-flash still works great, so not complaining!
For future reference there were some grumblings about it not really being supported or maintained though, so this is something to keep in mind for future.
Logging 101
Now I’m implementing logging for the app. A lot of the app’s actions are already logged to the console (thanks Sequelize!), but once I started working with the API and especially with that two-step data sync, there were times in setting it up when I realized it would have been really helpful to also see in the console which HTTP requests are being made, response codes, etc. I got a glimpse of this not too long ago so now’s the time to finally get it going.
Research: there are SaaS products like Rollbar and Sentry (which I’ll reluctantly admit I only know about due to podcast advertising!!) that have made a business out of doing this. Otherwise, for Node apps the most popular logging tools seem to be morgan and winston. Morgan seems to be specifically for logging HTTP requests which is all I need at the moment, but Winston seems like it can expand to do quite a bit more in production, so I decided to go ahead with that from the beginning. I found some good articles like this one and this one and this one.
Then it seemed a lot like over-complicating things for what I actually need right now! So Morgan it is. I just added two lines to my ./app.js file:
const morgan = require('morgan'); app.use(morgan('dev'));
And now I can see what routes are being hit and when in the console.
I can see the value of saving the logs to a file in production, or logging more information even in the dev environment, but for now I’m good with this!
Up Next
Keep working on the app!
]]><p>Yesterday was another productive work day on GFT! I finished out my goals for the week of re-implementing all of the routes I’d doneMigrations Done!https://www.niamurrell.com/code/2019-03-07-migrations-done/2019-03-07T22:52:02.000Z2020-06-20T20:32:45.745ZHUUUUGE progress on GFT, I finally finished re-building the app after starting from scratch to implement migrations. So so so much work and now I’m right back to where I was over a month ago 😂 But it is better!
And I learned a lot in the progress. I think I will be much better set up to work on the next tasks, since I have a better understanding of associations and querying using sequelize.
API Detour
Last week I got some mentoring help on working with the API I’m getting data from, so I’m going to take a break from putting more routes & functionality in place to work on that. I hope I did the bulk of it and can do it rather quickly?
Other Stuff
During all of the recent work I started to experience why tests are great and make coding (and changing code) a lot faster. So now I want to add tests to the app. Logging server requests also would have been helpful debugging some issues so that’s another thing I want to add. And then now that I will be working with live data in the app, I need to figure out how to manage dev/prod environments, and that also led to working in a containerized environment, so I want to set that up early to avoid deployment pain later.
…meaning LOTS to work on in addition to the actual app itself!
Up Next
I think I’m going to prioritize the API work.
]]><p>HUUUUGE progress on GFT, I finally finished re-building the app after starting from scratch to implement <aRelational Databases Overdue 101https://www.niamurrell.com/code/2019-02-24-relational-databases-overdue-101/2019-02-24T22:32:53.000Z2020-06-20T20:32:46.380ZSoooo much progress this weekend! Progress in understanding if not the actual codebase…super happy about that. I got all of my models re-done using migrations and started working on adding in the associations. But I realized I had a pretty big blind spot when it came to associations—I know what they do and the general concepts, but translating the concepts I know into Sequelize language wasn’t really working, and I definitely had made some mistakes in my original attempts.
Relational Databases 101
So I went back and found a course to go in-depth on database design, and took the time to model out my models (which I probably should have done in the first place!). Super thankful to my employer on this one—we get LinkedIn Learning formerly known as Lynda.com for free and I found the perfect course: Learning Relational Databases.
The course reviewed the database development lifecycle, talked about gathering requirements, and then did a big section on designing databases. The biggest benefit for me was reviewing cardinality and optionality, and it was actually taught in a different (and more understandable) way than I’d learned before. Going through the course, I was able to visually map out my data tables and their relations. This became the bible for adding associations!
Adding Associations
I also got a few of these implemented and the database feels a lot more solid than it did before. Feeling pretty good that I will be able to more forward finally in not very much time at all!
]]><p>Soooo much progress this weekend! Progress in understanding if not the actual codebase…super happy about that. I got all of my modelsTest Takinghttps://www.niamurrell.com/code/2019-02-23-test-taking/2019-02-23T14:32:34.000Z2020-06-20T20:32:45.907ZI’m wrapping up the Learning How To Learn course today and we did a section on test taking. I don’t see myself taking any tests soon so probably not worth it to include with my other notes, but since you never know, including what was covered as a copy/paste job here.
Pre-Test Checklist
The more of these questions that get a ‘yes’ answer, the better.
Did you make a serious effort to understand the text? Just hunting for relevant worked-out examples doesn’t count.
Did you work with classmates on homework problems or at least check your solutions with others?
Did you attempt to outline every homework problem solution before working with classmates?
Did you participate actively in homework group discussions, contributing ideas and asking questions?
Did you consult with the instructor or teaching assistants when you were having trouble with something?
Did you understand all your homework problem solutions when they were handed in?
Did you ask in class for explanations of homework problem solutions that weren’t clear to you?
If you had a study guide, did you carefully go through it before the test and convince yourself you could do everything on it?
Did you attempt to outline lots of problem solutions quickly without spending time on the algebra and calculations?
Did you go for the study guide and problems with classmates and quiz one another?
If there was a review session before the test, did you attended and asked questions about anything you weren’t sure about?
Lastly (and most importantly!), did you get a reasonable night’s sleep before the test?
Hard Start, Jump To Easy
Contrary to popular advice, it’s not a great idea to start with the easy questions as a confidence-builder. Instead, do a quick review of the whole exam, and then start with the hardest questions.
When the hard questions prove very challenging, jump to an easy question and work on that. The key here is that doing so kicks in the diffuse mode of thinking—the brain will keep working on the difficult problem in the background.
Keep jumping back and forth, hard to easy, until all problems have been solved. Note: it’s a good idea to practice this outside of the test-taking environment beforehand to make sure it’s a method that works for you.
Physiological & Psychological Responses
If stress comes naturally in testing situations, it will be difficult (impossible) to stop the body’s physiological responses to stress.
Suggestion: tell a useful story to yourself about why you’re feeling physical stress for a better result. Turn “this test has me fearful” into “this test has me excited” for a mental shift.
Suggestion: do some breathing exercises, paying full and exclusive attention to your breath. You can also try relaxing your tongue.
Suggestion: make a plan for Plan B; it might take some of the ‘must-succeed’ stress out of a given Plan A situation.
]]><p>I’m wrapping up the <a href="https://www.coursera.org/learn/learning-how-to-learn/">Learning How To Learn</a> course today and we did aSequelize CLI Quick Referencehttps://www.niamurrell.com/code/reference/2019-02-22-sequelize-cli-quick-reference/2019-02-22T23:39:30.000Z2021-06-19T22:25:32.380ZI found this video to be very helpful for getting a start with using Sequelize CLI. I think I watched it at least 20 times to view and review the information. So for posterity’s sake and to avoid shuttling through this video again in the future, here is my summary:
Sequelize Migrations are useful because they let you change the structure of your database tables after they have already been created, even if they contain data. The changes are incremental and reversible (though it’s important to note, dropping existing data during a migration is not reversible).
A migration must contain an up function (the change you want to make) and a down function (the code to undo the same change). The migrations make use of Sequelize’s QueryInterface API to do things like bulkInsert, addColumn, or changeColumn, etc.
Sequelize CLI Commands
Commands: sequelize db:migrate Run pending migrations sequelize db:migrate:schema:timestamps:add Update migration table to have timestamps sequelize db:migrate:status List the status of all migrations sequelize db:migrate:undo Reverts a migration sequelize db:migrate:undo:all Revert all migrations ran sequelize db:seed:undo Deletes data from the database sequelize db:seed:all Run every seeder sequelize db:seed --seed XXXX-file.js Run specified seeder sequelize db:seed:undo:all Deletes data from the database sequelize db:seed:undo --seed XXXX-file.js Deletes specified seeder sequelize db:create Create database specified by configuration sequelize db:drop Drop database specified by configuration sequelize init Initializes project sequelize init:config Initializes configuration sequelize init:migrations Initializes migrations sequelize init:models Initializes models sequelize init:seeders Initializes seeders sequelize migration:generate Generates a new migration file [aliases: migration:create] sequelize model:generate Generates a model and its migration [aliases: model:create] sequelize seed:generate Generates a new seed file [aliases: seed:create]
Options: --help Show help [boolean] --version Show version number
Setting Up a Project Using Sequelize CLI With Migrations
I wrote up a detailed step-by-step in this post. The short version is as follows…
Creating a Model
A model and create migration file can be created with one command:
sequelize model:generate --name User --attributes firstName:string,lastName:string,email:string,registered:boolean,age:integer
This command creates the basic structure of each file. Add any modifications (such as validations, constraints, etc.) to both the model file and the migration file if necessary.
Add associations to the model file.
Run the db:migrate command to persist the model(s) to the database, and db:migrate:undo to reverse the changes.
The file will be an empty structure and you will need to fill in the migration instructions. Here is an example of a migration that will add a new column to the data table:
down: function (queryInterface, Sequelize) { queryInterface.removeColumn('Todos', 'title'); } };
Don’t forget to also update the model file manually. Sequelize CLI does not automatically update the model when a structure-changing migration is run against the model.
]]>Getting started with Sequelize CLI migrations. Sequelize Migrations are useful because they let you change the structure of your database tables after they have already been created, even if they contain data. The changes are incremental and reversible.Learning How To Learn To Codehttps://www.niamurrell.com/code/reference/2019-02-10-learning-how-to-learn-to-code/2019-02-10T21:10:37.000Z2021-06-19T22:25:32.555ZI started learning how to code on October 11, 2016*—a day forever enshrined on GitHub as my first and only contribution for the year. Since then I’ve learned from a multitude of resources from tutorials to web courses to podcasts to blogs, not to mention of course my own projects.
But let’s be honest, a lot of that time was spent floating around learning pretty aimlessly!
And it’s definitely fair to say I’ve learned quite a few things about the process of learning itself. Now, I find myself taking an online course called Learning How To Learn (LHTL), and with a project to complete about the very topic. What an excellent opportunity to summarize the things I wish I knew when I started, helped along by some principles picked up in the class.
This List
As this is an assignment for the course I’m taking, this list will focus primarily on the learning methods that most resonated with me as they specifically apply to teaching yourself how to code. For the sake of brevity, I’m not going to include specific learning tools or resources (other than this course!), but a lot of them are listed in my learning list if you want to check them out. So with that caveat, here are…
My Top Tips & Warnings
TL;DR
1 — Have A Goal In Mind
2 — Crush Procrastination
3 — Practice Every New Thing, Then Practice Again
4 — Teach What You’re Learning To Someone Else
5 — Take Breaks Regularly
6 — Learn A Bit About Learning
1 — Have A Goal In Mind
When I decided to learn to code, there were so many choices to make without having a lot of information. How do you know where to start when there are so many blog posts, books, videos, etc. all giving different advice? Or if you come across something like the developer roadmap, how on Earth can you not feel overwhelmed by the many options ahead?
With the benefit of hindsight, I can say that I firmly believe that there is no right or wrong choice in the beginning, so there’s little point in stressing about this. The important thing is to pick one thing and set small goals that you can get specific about.
Now, inevitably, the more you learn about whatever you do choose, the more you’ll realize how little you actually know! It can be very easy to fall into various rabbit holes under the guise of “learning something new,” but ultimately these can act as distractions to the ultimate goal.
To that I say give 10% of your time to these distractions—it does help to build your understanding of the greater context of programming after all. But for the remaining 90%, focus exclusively on your goal, and don’t pursue new technologies, frameworks, libraries, etc. until you actually plan to implement them in a project you’re working on.
One thing that worked for me was to create a learning list. It served as a repository for remembering the things I’d already learned (which can be easy to forget when you’ve moved on to the next thing!) and a place to jot down the topics that could otherwise become a few hours of googling without much progress on my actual goals.
2 — Crush Procrastination
I’ve heard it said that time spent coding is 90% frustration and 10% feeling invincible. In my experience the balance might be closer to 98/2! That means every time I sat down to learn, I knew I was in for some pain, even if the end benefits were really worthwhile.
This is a prime source for procrastination! In LHTL procrastination is defined as the brain’s self-preserving response to tasks and experiences it perceives to be painful. It’s a very in-the-moment response—the brain isn’t thinking at all about the long-term benefits of being able to code, and instead just sees ‘hard’ and thinks AVOID AVOID AVOID!
Understanding and memory are built over time by regular and repeated practice, so getting through these moments is really key to making progress. The number one tip here is just to start anyway. When the task at hand feels daunting, you can focus on the process of work rather than the outcome you’re hoping for.
For example, if you’re working on building your first web page, rather than thinking about all of the bells & whistles you want to include, instead focus on opening your text editor and putting 25 minutes of work into the project. Oftentimes just the act of starting can get you into a state of flow, and then next thing you know 25 minutes have turned into an hour, and you’ve made some good progress.
3 — Practice Every New Thing, Then Practice Again
It’s an awesome feeling when you’ve just completed a code-along workshop or course and have a finished product to show for it. You look at how pretty it is, and the fact that it’s actually functional and think, ‘wow, I built this!’. You might even show it to some friends and get some great-feeling praise and encouragement.
This is the moment (yes, after patting yourself on the back for completing the course…it is an accomplishment after all!)…to go back and make the project again. From scratch. And without referencing the completed code. Then once you’ve done it once, give it a few days or a week and then try it again!
This is called deliberate practice; testing yourself in this way will solidify your technical skills in a way that following along in a course once simply cannot do. In LHTL this is referred to as “illusions of competence”—when you think you know how to do something from reviewing it shallowly (like coding along as you watch a pro make something). In the early stages of learning how to code this is a very easy trap to fall into, and I can say from personal experience that it’s pretty painful to have to repeatedly look up basic syntax and methods months and months after you know you “learned” them.
It may feel like a waste of time to do a similar project multiple times, but in my opinion it feels a lot worse to have to rely on Google for every new project you work on!
4 — Teach What You’re Learning To Someone Else
Memory is a tricky thing to master, but there are some tips and tricks you can use to help commit all of the new information you’re learning to memory. For example, reviewing the information in different contexts such as location or time of day can be one way. Another way is to change the method of experiencing the information—say you’ve been learning a topic from a book, maybe try getting some instruction from a podcast or video on the same topic. Involving different senses is another method: visualize a concept with a funny image, or bring in your tactile senses by writing some code with pen and paper instead of typing.
One method I’ve found that rolls all of these tips into one is to try teaching what you’ve learned to someone else. To help them understand, you might have to make analogies that you hadn’t thought of before, or write or draw something on a white board to visualize the concept. In doing so, you might even expose some gaps in your own knowledge that maybe were easy to gloss over when you were just on your own. If you aim to truly help the other person understand a concept, it’s likely your brain will have to do cartwheels through the information in your own mind to really be effective.
If you don’t have a captive audience at hand, it doesn’t have to be one-on-one instruction. You could write blog posts, record a podcast, or even just tweet something you learned. As long as you aim to explain the information to someone as if they have zero knowledge on the topic, it’s likely to have a very positive effect on your own learning.
5 — Take Breaks Regularly
All of the frustration aside, if you actually enjoy making things with code, it will be very easy to get into a state of flow…you’re working away on a project and look up to notice that three hours have gone by and you’ve not had a thing to eat all day! It’s a great feeling and can be quite affirming of the choice you’ve made to get into programming.
Even so, it’s very important to take breaks! Human physiology aside, your brain actually needs breaks to do its best learning. In an ideal learning scenario, you’re regularly going back and forth between the focused mode (i.e. the flow state working on your project) and the diffuse mode, when your mind is free and open to connect new information with the neural networks already established in the brain.
This is especially important if (when!) you get stuck on a problem in your code. Rather than banging your head against an issue for hours on end, work on it in a focused manner for 20-30 minutes and then take a break to do something completely different and relaxing. Go for a walk, take a shower, play some music, or even take a nap. Even when you’re not consciously focused on the issue at hand, your brain will continue to work at solving it in the background. When you return to the problem a bit later on, you very well may find a solution is not so elusive anymore!
6 — Learn A Bit About Learning
When you start learning how to code, the amount of advice can become overwhelming quickly. And the truth is, without knowing much about programming (which, as a beginner, is a given), it’s just about impossible to know which advice to even consider taking. That’s why I recommend getting a bit meta and learning a bit about how the brain is naturally wired to learn. It will put a framework around how you structure your studies and environment, which in turn will give you the best chance at learning effectively…instead of floating around from one resource to another like I did!
* To clarify, I should say this is when I started learning *this time*, as I’ve been coding in some capacity since I was 11 or 12. But prior to this date my interest in coding was pretty much exclusive to Myspace and Geocities sites 😂
]]><p>I started learning how to code on October 11, 2016*—a day forever enshrined on GitHub as my first and only contribution forOne Step Forward...https://www.niamurrell.com/code/2019-02-04-one-step-forward/2019-02-04T22:18:49.000Z2020-06-20T20:32:45.908ZToday I worked on re-organizing GFT. Kind of. This app is starting to feel like one step forward, two steps back, so trying to keep the long-term goal in mind!
Sequelize Migrations
I got to the point where I really can’t proceed without being able to alter my database tables without dropping all the data at the same time. So I need to implement migrations. It will be a really big benefit in the long run, but I kind of need to start from scratch on the app, because the most documented way of implementing migrations—and that’s not to say it’s very well-documented at all—is to to use the sequelize-cli package. Lovely that there’s a package that will do the heavy lifting. But I’d already done a lot of that heavy lifting, so there’s a lot to delete first!
As I mentioned the last time I looked into this, there are a few good resources which I set myself up to start following the next time I'm working on the project.
Logging
One of those tutorials also mentions setting up server logging, so I kind of fell into a rabbit hole about that too! The first video I watch talked about logging best practices and why you do it in the first place. This video is one I have yet to watch yet, but seems to talk about using the winston logger, which appears to be the most popular one. Another popular logging tool is morgan (the one mentioned in the sequelize-cli walk-through), and this article talks about how to use it in conjunction with winston. And finally this discussion on StackOverflow is about advanced logging, which I’m definitely far from, but may find useful.
I have yet to try any of this, for fear of this becoming yet another rabbit hole that delays a proper launch of this app even longer. But it’s definitely something to keep front of mind for the (hopefully near) future.
Up Next
I’ve reset the app so that it’s ready to go with sequelize-cli next time I have time to code. That will be in a few days though—lots of theatre to see this week!
]]><p>Today I worked on re-organizing GFT. Kind of. This app is starting to feel like one step forward, two steps back, so trying to keep theSequelize CLIhttps://www.niamurrell.com/code/reference/2019-02-04-sequelize-cli/2019-02-04T21:08:08.000Z2021-06-19T22:25:32.380ZI’ve been working away on Project GFT and finally reached a point where I don’t think it’s wise to proceed without implementing the ability to migrate data which I started learning about a couple months ago. So I’m kind of starting over and re-building the app sort of from scratch, but using everything I already built. For future reference, below I’ll copy the steps of an edited version of my previous step-by-step.
Too Long? Don’t Read
Here are some of the resources I found to be the most helpful:
Note steps 7 & 8 can happen concurrently for each model.
Step 1 - Initiate Sequence
Create a new directory
Run git init to begin version control with an initial commit
Add your basic .gitignore as needed
Run npm init to set up the app for building with Node packages
Step 2 - Install Basic Node Packages
I’m building a Node app which will use Express to run a server and Sequelize to manage a PostgreSQL database. To future-proof the data tables (i.e. doing your future self a favor if she wants to add columns, associations, etc.) we’ll also use [sequelize-cli](https://www.npmjs.com/package/sequelize-cli). I also want to keep sensitive information out of the repo so will use an environment variable manager. Views will be written courtesy of the ejstemplate engine, and form actions will be helped along withbody-parserandmethod-override`.
npm i express sequelize pg pg-hstore dotenv ejs body-parser method-override
That said, I ignored most of these packages initially. Instead I set up a basic Hello, world application (app.js file in the root folder) with a single get route to make sure Express was working correctly:
Require this router module in the main app.js file
Step 4 - Set Up Views
Create a views directory in the root folder
Create a public directory in the root folder, as well as public/css and public/js directories. This is where Express will look for any static files to serve
Set up the templating engine and public folder in the main app.js file:
Add some basic content to views/index.ejs and update the get route to serve this file.
Now’s also a good time to break up the permanent elements of the template (like head, footer, etc.) into partials, which would go into a new views/partials directory.
Add some test code to CSS and JS files in their respective public folders. Link these in the index.ejs file (or relevant partials) to confirm it’s all linked and working.
Don’t forget to add a 404.ejs file to serve non-existing routes.
Step 5 - Set Up Database With sequelize-cli
Update postgres locally on your machine (or install it if it’s not installed). I use homebrew.
Open the postgres command line with psql
Create a new user who will be interacting with the app: CREATE ROLE username WITH LOGIN PASSWORD 'password' CREATEDB;. This gives them permission to create databases…this user will be employed by Sequelize shortly.
Create a database for the app if it doesn’t already exist: CREATE DATABASE dbname;. Now you can close the postgres command line…won’t need it again for the remaining steps.
Note: if you don’t create the user and database from the postgres command line first, it won’t be possible to establish a connection from the Express app. There are also npm packages that can do this.
Back in the project, run npm install -D sequelize-cli to save the package as a dev dependency on this project. At this stage I also added a new alias to my bash profile as follows:
alias sqlz="node_modules/.bin/sequelize"
If you skip using an alias, in the instructions below you’ll need to replace sqlz with node_modules/.bin/sequelize. Another option is to install the package globally (npm install -g sequelize-cli)…then you can prefix the commands below with just sequelize
OPTIONAL: Create a new .sequelizerc file in the project’s root folder based on the template below. If you skip this step, the folders listed will go into the root folder. Not the end of the world, but this offers a bit more organization:
Run sqlz init. The files and folders listed above will be auto-generated into the project folder.
Open config/db-config.js and wrap the object with module.exports; this is necessary because the default config expects a JSON file, but we’re using js to make use of environment variables and hide private information from git. Then update the dialect to postgres for all 3 environments. If you will not commit this file to source control, you can update the username, password, and database name that were set up above; host and port can be left as is. However since source control is highly recommended and best practice I set these up as environment variables instead. My finished product looked like this:
Though the app will eventually have an .env file to manage these variables, for now all five of these variables need to be exported on the command line. Example: export PG_HOST=localhost and export PG_PORT=5432, etc.
Note added much much later: You need to require dotenv in the db-config.js file in order for the environment variables to work as expected…added above!!
Test this is all working as it should by running sqlz model:generate --name User --attributes firstName:string,lastName:string,email:string in the command line. A model file and a migration file will be generated automatically for this test model. NOTE: you can edit the model and migration files however you want. Then run sqlz db:migrate to see the effects of these files in your database. Running sqlz db:migrate:undo will undo the migration, so you can play around with changing the files to customize the model and migration however you want.
Once everything’s working, delete the user model and migration files before proceeding with the application.
Some Notes
When I was building the models without using sequelize-cli, I had done a few customizations for personal preference. For example how I named some variables, or using an underscored version of the column names in my database. None of this can be set up by default using the CLI, so if you want a lot of customizations, it will add some extra steps to using this tool.
Another thing that caused some confusion for me at first was separating the files generated by the CLI from the files needed to actually run the full application in my mind. Sequelize CLI is a development tool which does not interact with the app at runtime. As a result, you need to require db/models/index.js in app.js (a step that was left out of most tutorials I came across) as follows.
Step 6 - Connect the Database Instance to the Application
Thankfully most of the work is done for you by Sequelize CLI. You just need to add the following to app.js:
const db = require('./db/models/index');
db.sequelize.sync() .then(() =>console.log('Database connected & synched.')) .catch(err =>console.error('Unable to connect to the database:', err));
The sync() method comes from Sequelize, and it creates tables in the database by following the model structure you’ve defined in the model files. Have a look at the ./db/models/index.js file and you’ll see that it loops through all of the files in that folder except index.js—so, all of your model files. These are the tables that will be created when you run sync(). And that’s the magic of Sequelize CLI—for the most part, it creates these files for you!
Step 7 - Add All Models
Use the sqlz model:generate command to create all the known models for your application. Edit the files (don’t forget to edit the migration file any time you edit the model file) as needed for your application and preferred customizations. For example if you want to include any validations or required fields, now’s the time to make those edits.
Based on this tutorial I decided to create all of the basic models first (without associations), and then go back and add the associations, testing and committing along the way. This ensures I can change the tables without altering the data…the whole reason I found it necessary to take 10 steps back and re-create the app using this method.
Example Model
sqlz model:generate --name Language --attributes language_name:string
Edit the generated ./db/models/language.js file according to preference. My result:
NOTE: If the table is not being created after running db:migrate, open the data tables (can be done on the Postgres command line, or in a program like Postico or PGAdmin) and check your SequelizeMeta table. This is a table that is generated automatically by Sequelize CLI to keep track of what migrations are available. If you see that one of your models isn’t listed in this file, that would explain why an expected migration isn’t happening. In this case, you might reconfirm that Sequelize CLI is using the correct database (I ran into an issue where I needed to re-export my environment variables, for example).
Step 8 - Add Seed Data
IMPORTANT NOTE ADDED LATER: Seeding data as described below can throw off the primary key sequence in Postgres databases. If this happens, you’ll get a bunch of errors any time you try to add records to the seeded databases (it will try to create a new record using an existing primary key). I wrote about how to fix this problem, for reference.
It helps to add some seed data to test the migrations, especially as you add associations. Doing so will further demonstrate that the data contained in the tables aren’t being lost when migrations are run. To do this with the Languages model above:
sqlz seed:generate --name languages
A new file is automatically created at ./db/seeders/XXXXXXX-languages.js. Open this file and add some seed data:
Note: there may be a better way to seed the dates. However using new Date.now() doesn’t work, because this generates a BIGINT whereas the postgres column requires a TIMESTAMP WITH TIME ZONE. You also cannot omit these fields, because it throws an error violating the NOT NULL requirement. For the sake of seeding, I opted not to figure out how to insert the current date programatically.
Another note: sqlz db:seed:all is only capable of seeding all of the seeders. Contrary to the docs, just running sqlz db:seed does not seed the single recently added file. Since seeders will error out if there is already data on the tables they’re trying to seed, you might find yourself regularly dropping and then re-migrating all tables in order to seed data. Otherwise, you can seed a single seeder file with the following command:
sqlz db:seed --seed XXXXXXX-languages.js
A single seed can also be reverted:
sqlz db:seed:undo --seed XXXXXXX-languages.js
Step 9 - Add Associations
Depending on the type of association, different steps are required. The Sequelize docs on associations discuss the types in depth.
One-To-Many Relationship (hasMany)
Example: A Country has many Venues, while a Venue has only one Country.
The association method in this case would go on the Country model: Country.hasMany(models.Venue). This will add a country_id column to the Venues table. Here are all of the steps to follow:
Add association method (such as Country.hasMany(models.Venue)) to the parent Country model file (Docs call this the source).
Add new column (such as country_id) to the Venue child model file (Docs call this the target). Include the references option to ensure referential integrity…this means for example, you can’t add 897097 as a country_id for a venue if this id does not already exist in the Countries table.
Open the new migration file and add a QueryInterface.addColumn to the up method, and add a QueryInterface.removeColumn to the down method. Include all of the references and validations as required.
sqlz db:migrate then check the new column has been added to the Venues table.
Test the down method by running sqlz db:migrate:undo. Once ok, run sqlz db:migrate again to confirm the change.
Optional: create a new seeder file (see step 8 above) for a venue which includes the country_id field. Test the references by trying to add a country_id that doesn’t exist in the Countries table. (You will of course need some countries seeded to do this.)
Example: A Book can have many Languages, and a Language will have many Books.
The association method in this case would go on both models and must include a matching through option. This will necessitate a new table which will be made up of references to each model. Here are all of the steps to follow:
Add association method belongsToMany to both model files. Be sure to specify the name of the joining table with through (examples below).
Open the new migration file and add a createTable to the up method, and add a dropTable to the down method. The table should include a column for each parent model (i.e. book_id and language_id), and each is a primary key.
Include references too, to ensure referential integrity…this means for example, you can’t add 897097 as a book_id for a language if this id does not already exist in the Books table.
sqlz db:migrate then check the new table has been added to the database.
Test the down method by running sqlz db:migrate:undo. Once ok, run sqlz db:migrate again to confirm the change.
Optional: create a new seeder file (see step 8 above) which includes the book_id and language_id fields. Test the references by trying to add a book_id that doesn’t exist in the Books table. (You will of course need some books seeded to do this.)
]]>Step-by-step guide to setting up a new Node.js project with a PostgreSQL database using Sequelize for an ORM.Handling Checkboxes In Forms With body-parserhttps://www.niamurrell.com/code/reference/2019-01-31-checkboxes-in-forms-with-body-parser/2019-01-31T22:07:19.000Z2021-06-19T22:25:32.787ZToday I learned a bit about HTML forms, specifically working with checkboxes. And more specifically, handling the data these checkboxes produce on the server with the help of body-parser, thanks to this SO Q&A.
Checkbox Input Format
To have a group of checkboxes grouped together in the form data, this is the proper format:
This will tell body-parser to create an array, for example if both boxes are ticked, the result would be:
languages: ['english', 'tagalog']
Both a name and value are required. If for example you tick the English box but have name="english" and omit the value, the form data will be sent as:
english: 'on'
Not very helpful to process the form data.
Tricksy body-parser
By default, body-parser will put the values into an array, but only if 2 or more checkboxes are ticked. If only one has been ticked, it returns the value as a string:
languages: 'english'
This makes it somewhat harder to process the form data, because then you have to add logic for handling either a string or an array. That just gets sloppy.
Instead you can force body-parser to always send the data back as an array (even for one item) by altering the input element slightly:
Now you can map away on the result until your heart’s content.
]]>What I learned about working with checkboxes and processing their data in an Express app with body-parser.Back At It - Express Referrerhttps://www.niamurrell.com/code/2019-01-29-back-at-it/2019-01-29T22:32:40.000Z2020-06-20T20:32:45.746ZBack at it! I’ve been sick for the past few weeks…in the process I learned that scarlet fever is not actually a thing of the past! Who knew. I would have thought 2 weeks at home would be the perfect opportunity to get a lot of work done on GFT. Unfortunately my body wasn’t having it.
Anyway I’m much better now so back at it!
Express Referrer on req.body
I was working on a new form input and needed to redirect the user back two pages on submitting the form, i.e. back to the page they were on before they opened the form.
I learned that Express adds a referrer onto the request object for each page—this lets you go back 1 previous page if you want (among other things I’m sure). So to go back two pages, I needed to send the referrer I wanted to the middle page and save that as a new referrer on the request body object.
]]><p>Back at it! I’ve been sick for the past few weeks…in the process I learned that scarlet fever is not actually a thing of the past! WhoGFT Landing Page & Unsplash APIhttps://www.niamurrell.com/code/2019-01-13-gft-landing-page/2019-01-13T14:42:06.000Z2020-06-20T21:43:54.610ZToday I mostly worked on creating a landing page for project GFT. It was meant to be a simple static site just to convey the basics, but does what starts off simple stay simple? No, no it doesn’t 😂
GFT Landing Page
Although I already wrote a pretty decent landing page as a learning exercise aaaages ago, I decided I wanted to do something with a little more oomph. So then I decided to create it using the static site generator Hugo because they have some pretty slick themes and it’s very simple to deploy on Netlify.
I nearly finished customizing a theme called Infinity before I remembered that I wanted to start off with a blog 😂. So then I found a new theme Meghna and customized it (judging by the amount of typos in the files by the way, I’m wondering it’s it’s named after someone named Meghan? 😂 😂 😂 ). There were a lot of extras to get rid of, and some re-theming to do…in the end I like the result though!
I also became re-acquainted with Unsplash, and used its API for the first time. It’s pretty neat. You can take advantage of the fact that they’re already hosting all of the images, and add them anywhere with a pretty flexible link structure:
# use a specific photo and pull it at specific dimensions https://source.unsplash.com/{PHOTO ID}/{WIDTHxHEIGHT}
# create a collection and then pull images from it randomly https://source.unsplash.com/collection/{COLLECTION ID}
# append any url with a size to specify dimensions https://source.unsplash.com/collection/3787551/1600x900
# append any random images with a time frame to say how often it should change https://source.unsplash.com/collection/3787551/1600x900/daily
]]><p>Today I mostly worked on creating a landing page for <a href="/tags/gft/">project GFT</a>. It was meant to be a simple static site justGrab Bag: pmset, APIs, & Promiseshttps://www.niamurrell.com/code/2019-01-12-pmset-api-promises/2019-01-12T11:19:14.000Z2020-06-20T20:32:46.571ZBit of a grab bag of learnings today!
MacOS Mojave Power Management Settings
The other day I wrote about playing around with my laptop's power settings. Since updating to MacOS Mojave, the battery was draining overnight while the laptop was in hibernate mode. [This article](https://appletoolbox.com/2018/10/how-to-fix-macos-mojave-battery-draining-issue/) gave a pretty good explanation of what was happening and some things to try to fix it. Then later I came across a [more complete manual](https://www.dssw.co.uk/reference/pmset.html) for `pmset` so I actually understood what the article was suggesting 😂
Since the issue only presented itself while hibernating without being plugged in, I only needed to change the battery settings (-b) rather than the settings for all power modes (-a) like the article recommended. In the end I settled on the following:
Last time I also wrote about how I'd been listening/reading into nested API endpoints. Today I worked on implementing this into my API and there was a lot to consider. [This article](https://medium.com/studioarmix/learn-restful-api-design-ideals-c5ec915a430f) gave a good discussion on some of these considerations, and more. For example:
pre-fixing all API endpoints with v1, v2, etc. future-proofs use of your API, in case major changes are needed in the future.
The more I work on this app, the more I can see how and why React is really useful. For example, I am making a lot of queries to the database to get information that’s needed at the app level. However since I’m rendering each page with EJS, I have to query the database for each page. With React, I could make fewer queries and save the relevant information in the app’s state, which makes a cheaper and more efficient database setup.
Now, I obviously don’t have any familiarity (yet) with querying data using React, so it’s possible I understand it wrong. BUT, if that’s in fact how it works, then it would be a big improvement on what I’m doing now.
Remembering Promises
I ran into an issue with a Sequelize Promise from a helper function:
My helper function would query the database to load all venues:
This worked and everything rendered properly in the app, but I got an error from the action:
(node:16076) Warning: a promise was created in a handler at path/shows.js:33:3 but was not returned from it, see http://goo.gl/rRqMUw at Function.Promise.attempt.Promise.try (path/node_modules/bluebird/js/release/method.js:29:9)
I tried all kinds of things to fix this because I haven’t worked with promises in this way in a while (maybe ever?). In the end all I needed to do was amend the route function to return loadVenues, even though the helper function already returns:
GitHub finally announced free private repos! As a result I consolidated all of my repos onto GH and saw my contributions graph for 2018 go from 390 to 804 contributions 😃
Up Next
Today I added a form to GFT to be able to create a new production; next is to handle the form & persist its data.
]]><p>Bit of a grab bag of learnings today!</p>
<h3 id="MacOS-Mojave-Power-Management-Settings"><aOld Friendshttps://www.niamurrell.com/code/2019-01-07-old-friends/2019-01-07T23:47:37.000Z2020-06-20T21:44:17.728ZToday I went back and revisited my Value App. I use it pretty regularly to track my gym membership utilization and (amazingly!) I’ve been going to the gym enough that the way I had the data represented was more distracting than useful. So I went in an made an update there to make it more user-friendly.
API Endpoints
I also started working on a new endpoint in GFT and did a bit of research about nesting endpoints in the process. Coincidentally, I listened to an old episode of the Full Stack Radio podcast where they were talking about API design just a day or two ago, and it was helpful to have some context when it came time to work on the app, and decide how to set up the routes for this new section. This discussion on StackOverflow also helped set me on the right path.
Other Stuff
A few days ago I updated my MacOS which was long overdue! But since doing it, it drains the battery whenever it’s meant to be hibernating (i.e. overnight). So I’m playing around with different settings, but so I don’t forget what it was originally and can change it back…
]]><p>Today I went back and revisited my <a href="/tags/value-app/">Value App</a>. I use it pretty regularly to track my gym membershipGFT Models Completehttps://www.niamurrell.com/code/2019-01-05-gft-models-complete/2019-01-05T14:10:01.000Z2020-06-20T21:43:55.094ZHappy New Year! Also known as the year project GFT comes to life. I’ve been working on it over the past few weeks and made some good progress despite not really writing about it.
Latest Milestone
All of the mvp data models and associations are set up now. I also implemented Auth0 to manage the user accounts and authentication. It’s a pretty sweet tool, though the documentation could use some work. I’m on the free plan which only manages authentication, but I like that I can grow into a paid plan which includes auth as well, so I can have admin accounts, etc.
Up Next
Continuing to work on the backend API and start working on a UI.
]]><p>Happy New Year! Also known as the year <a href="/tags/gft/">project GFT</a> comes to life. I’ve been working on it over the past fewRefactor Party & Sequelize CLI Introhttps://www.niamurrell.com/code/2018-12-12-refactor-party/2018-12-12T23:39:03.000Z2020-06-20T20:32:46.585ZI’ve been having a refactor party working on GFT.
I made all of the models into modules and set up a function for the app to import all models automatically, rather than manually requiring each one as I create it.
I also set it up to make associations between the models. Unfortunately this means I have to drop and re-make several of my data tables. Or maybe not! It seems I can avoid this using Sequelize migrations and the sequelize CLI. That will be my next bit of research.
I also created a new model which has several associations attached. Now that I understand how it works, it’s easy peasy! So the pain was worth the learning :P
Up Next
The Sequelize CLI could have done a lot of this work of setting up the models, db connection, and associations for me automatically. It will also set up the migrations. But since I’ve already done a lot myself, I’m worried bringing this into the project will mess everything up. But it will be worth it in the long run. I wish I knew everything about Sequelize before I started this project!
Here is a good demo I found walking through setting up a Sequelize project using the CLI, and here is the accompanying repo.
EDIT: Also here is a great video demo of sequelize-cli in action.
]]><p>I’ve been having a refactor party working on GFT.</p>
<p>I made all of the models into modules and set up a function for the app toSequelize Associationshttps://www.niamurrell.com/code/2018-12-09-sequelize-associations/2018-12-09T11:06:10.000Z2020-06-20T21:43:55.093ZIt’s been some time since I’ve written here but I’ve been working away on GFT. The latest thing I’m wrapping my head around is creating associations using Sequelize.
I created a sandbox repo to play around with all of this research, basically following the walk-through tutorial listed above. It was really helpful to go through this—in addition to learning how to set up the associations, I also came to understand how and why a lot of other examples I’ve seen (including the Sequelize docs) use export modules and the database. It’s a lot cleaner with less repetitive code/imports, so I plan to refactor my app as well.
But before that, I made this demo repo and tried out the different kinds of associations. And I still go stuck in the same place!!
Other Stuff
I came across an interesting course called Data Structures and Algorithms in JavaScript which I think is free for the month of December. It’s part of the ‘Advent of courses’ Egghead is offering this month.
Up Next
Progress on GFT is stuck until I can figure out these associations, so will keep working on that.
[UPDATE SEVERAL HOURS LATER]: I did it!! I got it to work in my demo app, very exciting. I’m pretty sure the same implementation failed in the actual app, but it’s worth another shot.
]]><p>It’s been some time since I’ve written here but I’ve been working away on <a href="/tags/gft/">GFT</a>. The latest thing I’m wrapping myProgress on GFThttps://www.niamurrell.com/code/2018-11-10-progress-on-gft/2018-11-10T12:00:23.000Z2020-06-20T20:32:46.449ZDatabase Mapping aka ERM Tool
I got a great tip on a tool to create database maps like what I mentioned the other day…it’s free and comes from a coding bootcamp. It’s available HERE.
]]><h3 id="Database-Mapping-aka-ERM-Tool"><a href="#Database-Mapping-aka-ERM-Tool" class="headerlink" title="Database Mapping aka ERMContinuing Advanced React Coursehttps://www.niamurrell.com/code/2018-11-07-continuing-advanced-react-course/2018-11-07T22:46:13.000Z2020-06-20T20:32:46.145ZToday I continued with the advanced React course and completed 2 modules. It has me thinking about some things with GFT.
Too New
In the class we are making an app with a React front end and a Node backend using GraphQL, Prisma, and Yoga. The latter two are very new and I think not something I want to rely on for these initial stages of the project. If I were to do so I’d foresee lots of changes and updates and bugs as they continue to develop the services, which seems to be happening at a rapid pace. So I won’t be able to build my project like-for-like following what we learn in this course.
That said I really like GraphQL so far—it seems like a much more logical way to query data. However it doesn’t have a built-in way to carry out anything other than simple CRUD commands (i.e. no logic, etc.) so I would need to use it in conjunction with an ORM still. That’s what Prisma & Yoga are for, but I might see about continuing to use Sequelize in place of those. Here are some resources I found to look into this further:
I got into the next Chingu cohort! Argh really debating this one…I love it, but also want to put all of my time into GFT. Priorities.
Up Next
Thinking I’ll skim through the rest of this course for the parts most relevant to my project, so I should be able to finish faster. Then will get back to building!!!
]]><p>Today I continued with the advanced React course and completed 2 modules. It has me thinking about some things with GFT.</p>
<h3Next Level With Nexthttps://www.niamurrell.com/code/2018-11-06-next-level-with-next/2018-11-06T22:48:42.000Z2020-06-20T20:32:46.458ZI’ve moved on to my next course and started using Next. It replaces React Router and Redux and allows server-side rendering of pages built with React. So far I’m really liking it for a few reasons:
Server-side rendering means there will be something available in the app when the page loads as well as for SEO
It keeps semantic HTML markup even if I don’t write it that way, for example links with the <Link> tag.
Less import statements to remember!
I’m really just beginning but those are my first impressions.
Other Stuff
It’s a lot harder to learn this stuff and work on it after a full day’s work.
Up Next
Steam rolling through this class so that I can get back to building my own app. Hope to finish it out this week, as I have an unplanned break from my computer coming up beginning Sunday.
]]><p>I’ve moved on to my next course and started using <a href="https://nextjs.org/">Next</a>. It replaces React Router and Redux and allowsStarting React Againhttps://www.niamurrell.com/code/2018-11-04-starting-react-again/2018-11-04T13:39:27.000Z2020-06-20T20:32:45.746ZI’m starting React again! I did a class with React a while ago but I don’t think the instruction in that class matched up with how I can take things in. Now I’ve found a different course to use and started that today. Here are some of my notes for future reference:
Browser Dev Tools & React
One little shortcut I want to remember in the dev tools is the $0 trick…in dev tools if you click on an element, you can then reference that element in the browser by calling on $0.
With the React dev tools installed (it’s a Chrome/Firefox extension), you can do something similar for React components and type $r…it will show all the data attached to the object including props, state, etc. Sounds like this will be helpful with debugging in the future.
Basic React Component
import React from"react";
classComponentNameextendsReact.Component{ render() { return ( <React.Fragment> <h1>Some JSX all in one element</h1> <h2>!! No sibling elements allowed!!</h2> <h3>Alternatively use the React Fragment to wrap siblings</h3> <h4>{this.props.subheading}</h3> </React.Fragment> ); } }
exportdefault ComponentName;
Note that if the point of this component is just to render the HTML above, it’s called a stateless functional component and can be written as a function instead:
class is a reserved word in React so to add a class attribute to an HTML element, you have to use className
JavaScript and HTML comment syntax won’t work; comments have to be wrapped in curly braces and JS block comment syntax: { /* comment goes here */ }
Other Stuff
Actually I finished the course!
It was an all-day marathon but I’m glad I learned a lot. Now to try to apply it to GFT.
By the way I also got all the venues loaded into GFT this morning before starting React.
Up Next
Need to learn about using React with Postgres instead of Firebase (what we learned in the course), and how passing data will work in my app…then do it!
]]><p>I’m starting React again! I did a class with React a while ago but I don’t think the instruction in that class matched up with how I canRandom Tipshttps://www.niamurrell.com/code/2018-11-01-random-tips/2018-11-01T20:47:43.000Z2020-06-20T21:43:55.093ZI’ve picked up some random tips over the past few days working on GFT. In no specific order:
The 1997 version of escaping apostrophes in MySQL is \'. In 2018 PostgreSQL it’s ''. Also find & replace all is brilliant.
The method of modeling a database structure with symbols to denote table relationships is called crow’s foot annotation. Here’s an example. It’s also called an entity-relationship model/diagram (ERM/ERD).
A great way to figure out the tech stack for a site/company you want to learn more about is to find job descriptions for their engineering roles. (Big duh moment on this one!) Another option is sites like StackShare or TechStacks but they don’t have many, many companies.
Even though PostgreSQL can (uniquely, I understand, for a relational db) take an array as a data type, it’s less efficient than using a standard join table when the data will be queried a lot. There was further discussion about this here.
Now that I’ve decided to re-structure my database tables forgoing arrays, it’s actually a lot more straightforward to model them! So up next is building those models, and then trying to get some data loaded into them.
I also decided to build the front end in React and don’t want to get too far with Express views. So I’ll also continue the React course I just started.
]]><p>I’ve picked up some random tips over the past few days working on <a href="/tags/gft/">GFT</a>. In no specific order:</p>
<ul>
<li>TheDatabase Progress & Considerationshttps://www.niamurrell.com/code/2018-10-30-database-progress-considerations/2018-10-30T22:56:09.000Z2020-06-20T21:43:54.609ZMore progress made today on GFT. I got two more db models created and seeded the data in them. I also learned about UUIDs for the next few models coming up.
UUIDs
I came across these while setting up the models. I wanted the primary key to be generated sequentially; Sequelize does this automatically to create an id column, but I wanted to name this column differently to make it easier to reference foreign keys down the line.
UUID stands for universally unique identifier and it’s a randomly-generated string for each line of data. Turns out this isn’t at all what I wanted for the first models (something like 9eb174d5-f4d6-4a66-b808-25e3e88efb81 is definitely overkill for a table with 8 rows of data!), but I think it will be useful later for interactions/transactions that occur in a much higher volume.
But I did learn that Sequelize gives you the option of using UUIDV1 or UUIDV4 if you do use these…this article explained that V1 UUIDs will contain information to identify your computer as well as the time & date that the row of data was created, while V4 IDs will always be completely random.
Since I’m using scripts to seed the data at this stage, there’s a high enough chance that I could end up with duplicate IDs if I were to go with V1, so best to avoid that for now, though I do think it might be useful to use them for other types of data.
Up Next
Codebar tomorrow, I’m going to work on migrating a huge external data dump into the app.
]]><p>More progress made today on <a href="/tags/gft/">GFT</a>. I got two more db models created and seeded the data in them. I also learnedContinuing Postgres Setuphttps://www.niamurrell.com/code/2018-10-27-continuing-postgres-setup/2018-10-27T16:55:20.000Z2020-06-20T21:43:55.274ZToday I’ve kept working on my new project. There are a few things I want to remember…
Postgres & Sequelize
It’s been a while since my last project using these tools so I’ve done some new research on both. Here are some of the resources I may want to reference again in the future:
I also came across twovideos of someone teaching the topic in a bootcamp class which were pretty helpful, especially combined with the companion repo.
In the end I was able to get user input data persisted in the DB so next step is building out my database!
Prettier Update
In yesterday's post I wrote about adding Prettier to a project…today I realized my text editor already has it built in 😂 It wasn’t for nothing though—it’s still good (I think) to have it and its scripts included in a repo other people will be working on—but for this solo project all I needed to do was create a .prettierrc file in the directory, and set the Prettier package to run every time I save a document. So one less dependency in the app! For now at least.
Other Stuff
I got a new wireless keyboard while I was in the states (really can’t get used to the UK keyboard layout…I tried!) to replace one I was borrowing from work. It’s new and modern with a built-in number pad. Sadly though, it’s too new to work with my computer!! Looks like I’ll need to update my entire OS (and who knows what that will break 😅) in order to get it to work like the old ones did. Classic Apple 😭
]]><p>Today I’ve kept working on my <a href="/tags/gft/">new project</a>. There are a few things I want to remember…</p>
<h3Prettierhttps://www.niamurrell.com/code/2018-10-26-prettier/2018-10-26T09:20:00.000Z2020-06-20T20:32:46.460ZToday I added Prettier to the value app. Having a defined style for the code in this project simplifies merging code from contributors…either it matches the style or it doesn’t!
Adding Prettier To An Existing Project
I initially started this while reading this freeCodeCamp Medium article—it has a good overview and I’d follow most of the steps listed there again in the future. But looking through the docs, I saw some of the steps could be amended slightly:
Add the npm package with npm install --save-dev --save-exact prettier: this uses the new syntax for adding dev dependencies, and locks in the specific version against future stylistic changes made by Prettier.
Include single quotes around the path that tells prettier which files to check (i.e. '**/*.js' instead of **/*.js). Without the quotes it only checked files contained in a single parent folder; with the quotes it checked root level files as well as grandchild files (see glob syntax).
Add multiple file types for Prettier to check by putting the file extensions inside an object (i.e. '**/*.{js,css}').
Use the -l command to see which files will be changed before running Prettier to change any files!! My first script looked like this: "prettier": "prettier -l '**/*.{js,css}'".
After running the -l command (or npm run prettier to be precise), if there are any files you don’t want Prettier to change create a .prettierignore file in the root directory and copy/paste those file paths into this file.
IMPORTANT: Commit before running prettier!
Actually Running The Module
Once the setup is done, I edited the prettier script to replace -l with --write, which tells Prettier to actually change the files to match your syntax requirements. This is why committing first is important!
Then I ran npm run prettier…and the magic happened! It outputs a list of files that were changed. You can run git diff path/to/file.js to see what it actually has changed. For me the result was pretty great! It changed a scary number of files but looking through the actual changes, not many lines of code at all were changed. And the changes were great!
Adding Prettier to Workflow
There are some pre-commit hooks available which will run Prettier automatically before committing code. Since I’m still learning (and also have plans to add a linter in future), I decided to keep it manual for now.
So I added an additional script that I can run to check which files will be changed:
"prettier-test": "prettier -l '**/*.{js,css}'",
I also added a dev script that will run Prettier locally when I test changes to the app:
I know that this isn’t ideal since it adds (probably unnecessary) manual steps for contributors, but one step at a time!
Other Stuff
I’ve been in NY this week and got a warning of gale force winds at the exact time my flight was due to take off! Rather than getting stuck for who knows how long in an airport (and possibly experiencing a scary take off as well!) I’ll leave a day earlier…so this long trip will come to a close sooner than expected!
]]><p>Today I added <a href="https://prettier.io/">Prettier</a> to the value app. Having a defined style for the code in this projectScaffolding Project GFT & Postgres CLI Commandshttps://www.niamurrell.com/code/reference/2018-10-21-scaffolding-project-gft/2018-10-21T16:37:50.000Z2020-06-20T21:43:55.274ZThe time has come! Today I started coding for Project GFT. Basically it was scaffolding the app. There were some things I ran into that I hadn’t done in a while, so here’s the step-by-step for scaffolding, for future reference.
Step 1 - Initiate Sequence
Create a new directory
Run git init to begin version control with an initial commit
Run npm init to set up the app for building with Node packages
Step 2 - Install Basic Node Packages
I’m building a Node app which will use Express to run a server and Sequelize to manage a PostgreSQL database. I also want to keep sensitive information out of the repo so will use an environment variable manager.
npm i express sequelize pg pg-hstore dotenv
That said, I ignored most of these packages initially. Instead I set up a basic Hello, world application (app.js file in the root folder) with a single get route to make sure Express was working correctly:
Require this router module in the main app.js file
Step 4 - Set Up Views
Create a views directory in the root folder
Create a public directory in the root folder, as well as public/css and public/js directories. This is where Express will look for any static files to serve
Install the EJS templating engine with npm i ejs
Set up the templating engine and public folder in the main app.js file:
Add some basic content to views/index.ejs and update the get route to serve this file.
Now’s also a good time to break up the permanent elements of the template (like head, footer, etc.) into partials, which would go into a new views/partials directory.
Add some test code to CSS and JS files in their respective public folders. Link these in the index.ejs file (or relevant partials) to confirm it’s all linked and working.
Don’t forget to add a 404.ejs file to serve non-existing routes.
Step 5 - Connect Database
Update postgres locally on your machine (or install it if it’s not installed). I use homebrew.
Open the postgres command line with psql
Create a new user who will be interacting with the app: CREATE ROLE username WITH LOGIN PASSWORD 'password' CREATEDB;. This gives them permission to create databases…this user will be employed by Sequelize shortly.
Create a database for the app if it doesn’t already exist: CREATE DATABASE dbname;
Back in the app, set up a new database connection, and add the relevant fields to the .env file:
const db = new Sequelize( process.env.PG_DATABASE, // dbname above process.env.PG_USER, // username above process.env.PG_PASSWORD, { // password above host: process.env.PG_HOST, // locally, localhost dialect: "postgres", port: process.env.PG_PORT, // different from Node's app port operatorsAliases: false, pool: { max: 5, min: 0, acquire: 30000, idle: 10000 } } );
db.authenticate() .then(() => { console.log("Database connection established."); }) .catch(err => { console.error("Unable to connect to the database:", err); });
Note: if you don’t create the user and database from the postgres command line first, it won’t be possible to establish a connection from the Express app. There are also npm packages that can do this.
Go back to the postgres command line and verify that the data has been saved.
Postgres CLI Commands
Speaking of which, here are the basic Postgres CLI commands I’ve been using to date:
From Main Command Line
brew info postgresql gives some information about the postgres installation
psql opens the postgres command line as the super user
User Management
\du lists all users
CREATE ROLE username WITH LOGIN PASSWORD 'password' CREATEDB; creates a new user, requires a password, and gives permission to create databases.
ALTER ROLE username CREATEDB; gives/removes permissions for the user
DROP USER username; deletes the user and their permissions
Database Management
\l lists all databases
CREATE DATABASE dbname; creates a new database
\c dbname username moves you into using the database to access its tables as the specified user (username is optional)
Table Management
\dt lists all tables
\d tablename lists columns in a table
TABLE tablename; displays table data contents
DROP TABLE tablename;permanently deletes the table and its contents
Other
\? lists all the available postgres command line commands
\q quits the postgres command line
Up Next
So that’s the basics done! Next up is setting up some db models for my actual app, along with some accompanying views & forms to be able to start storing actual data. I’ll be working with a few different data sources, so need to plan the models to be as compatible as possible.
]]><p>The time has come! Today I started coding for <a href="/tags/gft/">Project GFT</a>. Basically it was scaffolding the app. There wereTesting Pull Requestshttps://www.niamurrell.com/code/2018-10-20-testing-pull-requests/2018-10-20T21:54:29.000Z2020-06-20T20:32:45.746ZBeen a busy week on this work trip. Pretty much no time for working on any of my projects…shame it’s fallen right in the middle of Hacktoberfest!
Working With PRs in Master Branch
In some previous posts I wrote about how I’m learning how to be a maintainer for an open source project. I had opted to have people make edits to the master branch to submit pull requests…but then I didn’t know how to pull down their code in order to test it before merging. Seems like it would be a pretty straightforward thing…and it turns out it was!
It’s a matter of creating a new branch locally, and then doing git pull in that branch to the URL of the other person’s fork of the master branch. Then I can test it locally. Turns out GitHub offers a simple way to remember this from the pull request page!—open the command line instructions from the PR and then you can just copy/paste the act of creating & pulling down a new local branch from a contributor.
Other Stuff
I took a day trip to Italy today! I’d never been to Sanremo and it’s just 2 hours away by train, so duh 😋
Up Next
One open PR down, one more to go. Then back to working on my other projects.
]]><p>Been a busy week on this work trip. Pretty much no time for working on any of my projects…shame it’s fallen right in the middle of <aI Open-Sourced A Project!https://www.niamurrell.com/code/2018-10-07-i-open-sourced-a-project/2018-10-07T11:09:44.000Z2020-06-20T21:44:17.728ZOk so that title’s a bit misleading…technically everything I’ve put on GitHub is open source I guess 😋 But yesterday I added some files to the repo of the value app to make it contributor-friendly and this morning I got my first pull request!
Prepping the Repo
Aside from adding the files I wrote about the other day, I had to make some other updates to the repo as well. The main one (and a step I nearly missed) was updating the node packages. I had done some a few weeks ago but others had gone out of date again. May as well get things totally up to date before other people start working on it.
I also had to rethink how I was working with the branches. I had been using a development branch to work on, while deployments were coming from the master branch. I know this is good practice, but with just me contributing it ended up being more hassle than helpful 😂 Also while I’m still learning how to maintain a project with other people contributing, I’m not really sure how to instruct people to make pull requests to the dev branch? I tried setting development up as the default branch, but then that didn’t seem to make much sense either. So in the end I changed it back to master, deleted development, and created a new branch heroku which now triggers Heroku to build and deploy the site (instead of changes to master). I’m not 100% sure this is best practice but it’ll do for now. We’ll see how it goes.
First Contribution
The first contribution I got was for a bug that’s been in the app for a while. Turned out to be a simple function invocation I forgot to add when I first created the function. I don’t know how I overlooked that! So already super awesome to have another set of eyes on it 😂
Other Things To Consider
Maybe I should add a linter to the project? It’s something I didn’t really think about before—I’m the only one working on it so the syntax style is pretty consistent (hopefully!). But with multiple people working on it, it probably couldn’t hurt to include. Something to work on.
Another thing is putting it out there for people to actually discover the project so that they can contribute. The repo and issue tags are a start, and things like Hacktoberfest and 24 Pull Requests will help too. But I think I’ll add it to a few more places…one recommendation was the Dev.to community’s open source thread so that’s where I’ll start!
Other Stuff
I started working on templatizing my personal site so that I can add posts and content more easily in the future. I started with both Hexo and Hugo and will test setting up the Netlify CMS both ways to see which works better. So eventually it will be great! But wow, didn’t realize how much it’s going to take to break apart all those static pages I created, yikes 😁
Funny how I am suddenly working on all of these icebox projects when I really should get working on the big project!
Up Next
Lots of fun options. Feels great 😄
]]><p>Ok so that title’s a bit misleading…technically everything I’ve put on GitHub is open source I guess 😋 But yesterday I added someHacktoberfest Night! & Database Planninghttps://www.niamurrell.com/code/2018-10-05-hacktoberfest-night/2018-10-05T19:26:43.000Z2020-06-20T21:43:55.303ZToday I started working on open sourcing my project for Hacktoberfest. There were a few more things that anticipated that I need to do to welcome contributors. Namely:
Add a code of conduct
Add a license, not just refer to it in package.json
Add a contribution guide
Add a pull request template
Add an issue template
Improve the instructions for local installment.
Of course before getting started on any of that, I found a bug in the project! Serious lolz. So I got nothing open source -related done, but at least implemented & deployed the new currency support I added so that it’s on the live version of the site.
For when I get back to it, here are some templates that were recommended to me at tonight’s Hacktoberfest coding event:
I’m not a big fan of stickers but I love the Octocats! It’s great when GitHub hosts an event because they always have new fun ones. My favorite one from tonight is wearing lederhosen 😄
GFT Database Planning
Yesterday I learned that arrays and JSON are valid data types in PostgreSQL. That’s great news! I had decided on using a Postgres database for my GFT project, but realized that one of the pieces of data (the list of cast or characters appearing in a show) will never be in a consistent format or length. That’s one area where a db like MongoDB would have no issues.
I considered doing one giant table of “characters” and one giant table of “actors” and then can do a join to assign the actors to the different roles. However those queries would certainly take a long time especially when the database grows quite large. In that case a lookup to a specific show would be way more efficient (in my somewhat ignorant-to-this-topic mind).
So I considered adding a second database, adding MongoDB for the cast lists, and using Postgres for the majority of the site’s other data. But then I learned Postgres can take JSON objects as a table entry, so maybe I can figure out a way to still get everything in one? I still need to look up how I would actually query the individual attributes of a JSON object nested in a table, but assuming I can learn about that, this could be the solution. So a bit more work to be done in that respect.
Other Stuff
We watched First Man today at work…it was so gooood!! They definitely went a bit heavy on the story exposition (well, ‘heavy’ may be the wrong word…it is an entertainment film after all) but all the space stuff and progress of the lunar missions was so cool to watch. Well actually, they skipped over a lot of those missions too…..anyway the film was great! Especially after seeing the Saturn V rocket in Houston last week 😍🤓😍
Up Next
Checking out the Tolkien Middle Earth exhibition this weekend! Will be nice to go out to Oxford for a bit in addition to seeing the exhibition.
And then lots of coding work to do!
]]><p>Today I started working on open sourcing my project for Hacktoberfest. There were a few more things that anticipated that I need to doBack Down On Earthhttps://www.niamurrell.com/code/2018-10-03-back-down-on-earth/2018-10-03T22:35:53.000Z2020-06-20T21:46:11.567ZI think my head has been in the clouds a bit. Not that that’s a bad thing, but after tonight’s mentor session I went to, I think I’m now back down on Earth!
No More Serverless…For Now
After the research I’ve been doing over the past few days, I’ve now decided to abandon that and build this app with what I know. The app, which I’m calling GFT for now, is something I actually want to use, and something I just want to get out there. And while I do want to learn how to use serverless functions, and more of the AWS services, the time it would take to learn those would add a lot onto the time of building the app which is actually more important to me.
I also learned that serverless may not be the best way forward for this anyway, since serverless functions (in their current functionality) are best for running periodic jobs and not necessarily good for running RESTful routes, since it takes a bit of time to spin them up initially. Also for a site like this, server side rendering is likely to be faster since there will be so many data queries. I also learned about some great 3rd party APIs that I can work into the project to manage things like image resizing and user authentication, which will also speed up getting an MVP completed.
Through all of this I realized I may have a lit bit of a leaning towards perfectionism since thinking about the ‘right’ way to start this project has been preventing me from actually writing any of it at all!!
All of that said, I did really like what I started learning about serverless and the Serverless framework, so I’m not giving up on them! I will find other ways to learn about them, maybe on smaller projects that aren’t already so overwhelming.
The Plan From Here
So now I am going to start off by building a monolith like I know and love…it will be a Node app using Express. I will probably use Postgres with Sequelize…a sentence I never thought I’d say after the last time I used these in a project! I might try deploying it on a Digital Ocean droplet to start, and am going to have a look at using Auth0 for authentication instead of Passport—that way I don’t have to worry about storing usernames or passwords on my own database servers.
Or hmmm maybe I actually don’t want to just hand that over to someone else.
Ok so still some things to think about! But at least I can get started with the basics.
Up Next
I actually won’t have any significant chunks of time to work on this for a few weeks due to some work stuff and travel…so updates may be few & far between!
]]><p>I think my head has been in the clouds a bit. Not that that’s a bad thing, but after tonight’s mentor session I went to, I think I’m nowServerless Researchhttps://www.niamurrell.com/code/2018-10-01-serverless-research/2018-10-01T21:29:03.000Z2020-06-20T20:32:46.380ZI’m getting acquainted with the Serverless framework in preparation for the next big app I’ll be working on. Yesterday I did some basic scaffolding and deployed a basic Node app using Express with Lambda functions. Next up is connecting a DynamoDB database..in working on this I learned that a lot of the config settings that need to go into the serverless.yml file are actually AWS CloudFormation syntax, so I’ll need to get familiar with that before I’ll probably feel comfortable building the full API.
As I go I’m writing up a full step-by-step for future reference; when I’m done with it, I’ll link it HERE.
]]><p>I’m getting acquainted with the <a href="https://serverless.com/framework">Serverless framework</a> in preparation for the next big appServerless AWS Explorationhttps://www.niamurrell.com/code/2018-09-30-serverless-aws/2018-09-30T22:40:44.000Z2020-06-20T20:32:46.145Z
The below is a work in progress since I decided not to carry on down this path. This step-by-step pretty much follows the Serverless Getting Started guide but posting this anyway.
Prerequisites
You will need the serverless framework installed globally on your machine:
npm install -g serverless
You will need an AWS account that’s been set up with your credit card.
IMPORTANT NOTE: Using AWS services can lead to charges showing up on your credit card statement. Yes, most of this is free for 12 months or longer. Yes, you would need to make over a million calls or store GBs of data before seeing any charges. However to be on the safe side, if at any point during the testing phase of this application you want to ensure no charges will be made, you can run the command serverless remove to decommission all AWS services created by the framework. Make sure you back up any data or important settings before doing so.
Serverless: Setting up AWS... Serverless: Saving your AWS profile in"~/.aws/credentials"... Serverless: Success! Your AWS access keys were stored under the "default" profile.
Prepare the project for Node with npm init (you can add the flag -f to skip the questionnaire and begin with a blank package.json)
Add express and serverless-http:
npm install --save express serverless-http
Add the barebones application to a new file app.js in the root directory:
Deploy the app with sls deploy. Thsi will take a while the first time, while serverless provisions several AWS services. At the end it will spit out an endpoint where you can view the deployed app. Voila!
Add .serverless to the .gitignore file. Commit all updates.
Add A Data Store
DynamoDB is the NoSQL database option in the AWS ecosystem. We can add this easily using the serverless framework.
1.
…decided not to complete this!
]]><blockquote>
<p>The below is a work in progress since I decided not to carry on down this path. This step-by-step pretty much follows theGrace Hopper Celebration Wrap-Uphttps://www.niamurrell.com/code/2018-09-30-grace-hopper-celebration-wrap-up/2018-09-30T20:40:44.000Z2020-06-20T21:52:32.590ZIt’s over! 😫 😫 All good things must come to an end I guess. But overall attending GHC was pretty awesome from beginning to end. Here are my favorite bits.
Highlights - Talks & Workshops
First-Timers Orientation
The conference runs Wednesday - Friday, but they put on a 1-hr session on Tuesday evening for people who’d never attended GHC before. They pretty much recapped all of the information on the website, but it was a great opportunity to walk through the venue, get oriented, and ease into the talking-to-random-strangers aka networking aspect of GHC. They also gave a bit more context of how the sessions were categorized, which helped me decide on some schedule changes. Overall I found it very useful and would recommend to any future GHC first-timers!
Opening Keynotes
Wednesday morning kicked off with a few keynote sessions. It’s pretty amazing to be in one room with 22,000 current & future female technologists. And I had a goosebumps moment when I remembered watching the live-stream 1 year prior while getting ready for work, wishing I could be there too…what a difference a year makes!
Padmasree Warrior gave an inspiring keynote with some actionable advice: 1) pay attention not just to your industry, or technology, but how technology is changing your industry. 2) Develop the skill of working across boundaries and learn more than your own discipline; sometimes the “barriers” we see in this respect are self-created.
Jessica Matthews also told the inspirational story of how she came to start a business that’s disrupting the energy industry and bringing electricity to developing nations. She spoke about how she didn’t and couldn’t have planned her journey, but rather it was following the path of what needed to be done that got her to where she is. Great quote: “Your destiny is unshakeable, regardless of what your plans are.”
There were several other speakers who spoke about great things they’ve done with technology in their communities. Not gonna lie, my tinkerings with some little websites felt pretty inferior by comparison! But we’re all on a journey, and these sessions were a great kick-off to get me in a ‘mindset of possibility’ before going into the next sessions.
Career Development Workshops
I went to a number of career development workshops, and saw some similar themes come out of all of them:
A professional path can happen by design, but there will also be unexpected turns along the way. In either case, what you do with the situations you’re presented with will ultimately determine how personally satisfied & fulfilled you’ll be with your career (and life).
When it comes to taking risks on the job and in your career, you don’t know where the boundaries are until you meet them; you’ve gotta try things out if you want to make sure you keep growing.
Being very clear on your personal values will help you make decisions when faced with a fork in the road. Some speakers spoke about how this really helped when personal issues forced them to take an undesired break from their careers; others gave excellent prompts on how to identify these values, and how to apply them to your career using the Agile methodology.
Self promotion is a skill that can (and should) be developed. One fantastic workshop gave some step-by-step advice on how to develop this skill, and how to revisit it periodically to make sure you can make the most out of every networking and business opportunity. #### Open Source Day
All day Thursday I participated in an open source hackathon, working on the Mozilla FixMe platform, a new part of the Open Source Student Network. It’s an app that helps students find good projects they can contribute to in order to dive into the world of open source. There is a set of criteria that determines what makes a “good” open source project, and contributors can add projects, or work on the platform itself.
I spent most of the day working on the front end of the site, tackling some issues to improve site performance. Although the code I ended up changing ended up being not even one full line to make the fix (!!), I learned a lot about how Google Lighthouse audits work, and how to delay unnecessary javascript and CSS resources from loading before a site’s first paint. That was actually something I wanted to learn about for my own sites, so I was happy about that. I also came across some outdated info in the MDN Docs and ended up contributing to that too!
So I had a great time working on the project team I joined, and think I’ll keep contributing to the platform if I can balance the time with my other personal projects. It was also really interesting to hear about the other open source projects that other groups worked on throughout the day.
…And the free lunch was great!
Coding & Product Workshops
I really enjoyed the hands-on nature of the hackathon, and carried this on with a few other workshops. One of the best ones by far was a serverless workshop using the AWS ecosystem; we built a full-stack application from scratch in one hour (ok, they supplied the code 😋) using S3, DynamoDB, API Gateway, and Lambda. Having worked with AWS before, and having tried and failed at deploying other full-stack applications on AWS, it was really great to get a step-by-step guide on how to go about doing this. Obviously to do it in an hour we breezed through some of the settings, but the presenters gave an excellent tutorial which I took home with me, so I’ll be able to go through more slowly and really learn how the services work together. Perfect timing for the next app I want to build, which I’d already set my sights on using these services for!
A few other workshops about the product and testing processes were equally applicable and productive. Here are the key takeaways from those collectively:
Test early with actual users to find out what your users want from the product, and then build those things.
Building these things can be done cheaply: even mockups and drawings can allow you to measure real behavior, capture emotions as well as data, see what people will actually give to use the product (their personal details? money?), and these things can be done quickly.
Testing is very effective on small parts of a product, or even a single behavior.
If you add exit points into your product test sessions, you’ll quickly see when people might stop being engaged, and where you’re likely to lose them.
You can use “priority sliders” first individually, then with a group to gain consensus on what the team should focus on…this helps ensure everyone is working towards the same goal throughout a project.
Things I Missed Out On
When it comes to GHC the FOMO is real. It’s just not possible to be everywhere and see everything.
There were a few very high-calibre featured speakers I didn’t get to see, including Anita Hill, Priscilla Chan, and Joy Buolamwini. They really bring out the big guns for this conference! That said, the talks I missed were a great source of conversation with people who had been to them, so I was able to get some of the information that was shared. Also, I feel like the events I did attend were practically applicable, with information I can take directly into the projects I’m working on…I wouldn’t have wanted to miss out on those!
I also didn’t spend much time at all in the career expo. Hundreds of companies and universities where there talking about what they do and what kinds of opportunities they have available. And they were giving away great swag too! I only got to pop in for about 30 minutes at the very end, so missed the information, live AMAs, and technology showcase that went on there.
There were also some outside events that I would have loved to join. For example there were a number of community and affinity group luncheons and brunches and meet-ups which would have been great to participate in—especially the one with London-based attendees, as I’d have liked to have people here at home to meet up with again afterwards and keep those relationships and learnings growing.
But despite these things I missed out on, I left feeling like I’d gained a wealth of knowledge, so no complaints!
Top Tips For Next Time
I hope and expect I’ll attend another GHC in the future…these are the top things I’d like to remember for the next time around.
The prep I did before arriving was absolutely worth it in the end. All of the info about logistics was spot on. I also gained a lot by joining Slack and Whatsapp groups ahead of time—that’s the only way I found out about the non-GHC events and parties that happened after hours, and I met some really great people at those! I’m so glad I’d taken the time to read through those long articles.
I don’t think I would have made it through the week as well as I did (and I barely did!) if I hadn’t had a decent breakfast every morning. It was a bit boring—2 packs of plain instant oatmeal made with soy milk, and a banana—but it kept me full & attentive through the early afternoon…very important as on one day I didn’t even have time to get lunch until nearly 3pm. Quick, substantive veggie options were limited in or near the convention center, so this really made a big difference.
Not every session is a winner. I stuck through to the end for the 1.5 that weren’t top notch, but if something else more valuable had been going on at the same time, I wouldn’t have hesitated to leave.
Space Bonus
Finally, what would a trip to Houston be without visiting the Johnson Space Center! IT WAS SO COOL!! A group of us (thank you Slack channel) drove down after the conference ended and spent the day learning about space and visiting the NASA facilities, seeing the rockets, and glimpsing the equipment real astronauts use to train before their missions. Talk about geeking out. I hope they do GHC again in Houston so that I can go back again 😄
Up Next
I left feeling immensely motivated and excited about the projects I’ve been working on, and it was great to have made some new connections that I hope will grow into a community that I can go to when it comes time to start making those projects more public. I’m sure I’ll run into a lot of glitches and obstacles along the way, so it’s really great to know that the community is out there. In fact, I already started scaffolding my next app, so it’s working already!
A Huge Thanks 👏
Lastly, I just think it needs to be said that all of the work that went into organizing a conference like that is greatly appreciated!! If for some reason someone who had anything to do with putting it on (organizers, sponsors, volunteers…everyone) stumbles across this blog some time in the future, THANK YOU! The effort and attention that went into to every experiential detail was clear, not to mention the quality of the talks and workshops throughout the whole event. I’m really grateful to have been able to take part and have a pretty good feeling that the majority of the other 22,000 people felt the same. Well done and thank you! 👏👏👏
]]><p>It’s over! 😫 😫 All good things must come to an end I guess. But overall attending GHC was pretty awesome from beginning to end. HereGHC Day 1https://www.niamurrell.com/code/2018-09-27-ghc-day-1/2018-09-27T05:58:32.000Z2020-06-20T20:32:46.375ZWow, yesterday was so much! Definitely no time to write a full recap now, as day 2 starts in just about 2 hours (thank you jet lag for the early morning wake up—I got so much done this morning 😋).
Today I’m doing a hackathon all day so had to set some things up. One thing to remember, to update PostgreSQL to the latest version it’s a 2-step process:
brew upgrade postgresql
brew postgresql-upgrade-database
This helps avoid similar issues to what I ran into when it was first installed. Thanks to this post from Olivier Lacan for explaining what issues might arise before updating versions! This article also explains what’s happening but thankfully could ignore most of it with the commands above.
Up Next
GHC Day Two!
]]><p>Wow, yesterday was so much! Definitely no time to write a full recap now, as day 2 starts in just about 2 hours (thank you jet lag forGHC Arrivalhttps://www.niamurrell.com/code/2018-09-25-ghc-arrival/2018-09-25T20:01:55.000Z2020-06-20T21:44:17.728ZI made it! Long day of travel but today I finally arrived in Houston, just in time for the kickoff.
First Timers Orientation
Today was pretty low key—the conference is so huge that they put on a one-hour first timer’s orientation to give an overview of the schedule, event types, and a general how-to. It was recapping a lot of the information that’s on the GHC website but still nice to ease in before the full 20,000+ people descend. I had a nice chat with a hardware engineer from Northrop Grumman…very different from the web dev world! It was also helpful to get acquainted with the conference center, pick up my badge, etc. before the madness. I even got a photo op without random people in the way!
Let The Games Begin
Tomorrow the real deal kicks off and I’ve booked a full day of sessions. I hope I will have the energy to write a recap tomorrow!
Other Stuff
On the flight over, I finished up all the currency options I wanted to add on the value app. So that’s all done now, on to the next improvement :D
]]><p>I made it! Long day of travel but today I finally arrived in Houston, just in time for the kickoff.</p>
<h3More GHC Prephttps://www.niamurrell.com/code/2018-09-24-more-ghc-prep/2018-09-24T21:57:09.000Z2020-06-20T20:32:46.460ZWorking on a bit more prep for GHC since my trip was delayed by a day (dental emergency 😷).
Getting in the Mindset
There is so much going on during the conference that I already have big time FOMO since it’s literally not possible to take part in everything. So instead I’ve been getting super clear on what I do want to do to make sure I at least don’t miss out on that stuff.
Going through the links I previously posted has helped. From one of those I also found a GHC prep worksheet with some good prompting questions to ask afterwards. I’m also trying to narrow down who I want to meet, how I want to introduce myself, etc.
…And Also The Logistics
I also got some of the basics covered…bought some snacks, packed layers and a water bottle, etc. Figured out how to get around Houston. Ahhhh here it comes it’s time!!
]]><p>Working on a bit more prep for GHC since my trip was delayed by a day (dental emergency 😷).</p>
<h3 id="Getting-in-the-Mindset"><aGrace Hopper Celebration Countdownhttps://www.niamurrell.com/code/2018-09-19-grace-hopper-celebration-countdown/2018-09-19T21:55:39.000Z2020-06-20T21:44:17.728ZThe countdown is on! In less than a week I’ll be heading to Houston for the Grace Hopper Celebration. Super excited!
Scheduling
A few weeks back they opened the schedule for sessions taking place throughout the event. There are so many great-sounding talks and panels that I may have overdone my schedule…not sure I’ll have much time for the expo or you know, talking to people 😅.
Now I’ve found some lists of all of the evening events taking place. A good number of them are already closed for RSVPs, but maybe that’s a good thing, as I could definitely see the FOMO causing me to get no sleep or general recuperation between the crazy days.
But anyway I’m really looking forward to it! Last year I live-streamed the keynotes and loved what I saw. Super excited to do all of the things that they didn’t live stream this year! Case in point, I’ll be doing my first hackathon!! I’m sure I’ll have so much to write about all of this later.
Trying to close out the minor feature adds on the value app asap so that I can start working on a new project free & clear minded.
]]><p>The countdown is on! In less than a week I’ll be heading to Houston for the Grace Hopper Celebration. Super excited!</p>
<h3Currency Support For The Winhttps://www.niamurrell.com/code/2018-09-12-currency-support-for-the-win/2018-09-12T22:26:04.000Z2020-06-20T21:44:17.728ZI got a flash of inspiration to dust off the value app and add currency support. Well actually not that inspired…I use the app, and I spend money in a different currency now 😝
toLocaleString
One vanilla JS method I was reminded of was toLocalString() which makes displaying currencies super easy. My recollection of this was a bit spotty, and I thought I may need to use a library or something robust to work with currencies, but turns out it’s normal vanilla JavaScript for the win.
This method takes a locale (what kind of numbers to use) and some options, which include currency options:
When the locale is set to undefined, it will use whatever type of numbers the browser detects as that user’s computer default. So that’s Western numbers, or Japanese, or Arabic, Thai, etc. maximumFractionDigits limits the float to two decimal places; this is necessary because my prices are being updated every time someone uses a Thing, and the number isn’t always rounded to 2 decimals like a normal price. The kicker is setting style to currency, which also requires a specific currency to be selected. In my case I’ve set this to be either a currency selected by the user, or US dollars:
<% var userCurrency = thing.purchaseCurrency || "USD" %>
The currency does have to be the 3-character ISO code for global currencies. Finally symbol ensures it displays the $£€’s (etc) with the number.
Currency Support Is Implemented!
And that was it! I added a new field for the user to set the currency for each new thing in all of the views and voila. Since I’m not really doing any exchange rates on the site (yet!) it was a pretty straightforward implementation.
Up Next
Before deploying this I’m also going to make it so that a user can set a default currency on their account—one less selection to make when adding a new thing. Should have that going in the next couple of days. So the userCurrency variable above will change slightly:
<% var userCurrency = thing.purchaseCurrency || user.defaultCurrency %>
To be continued…!
]]><p>I got a flash of inspiration to dust off the <a href="/tags/value-app/">value app</a> and add currency support. Well actually not thatColor Tool - Picularhttps://www.niamurrell.com/code/2018-09-08-color-tool/2018-09-08T21:30:35.000Z2020-06-20T20:32:46.380ZFound out about this color tool Picular which lets you search for what color is evoked by different words. They do an image search of the word, and return a palette of colors based on the colors present in most of the images. Clever!]]><p>Found out about this color tool <a href="https://picular.co/">Picular</a> which lets you search for what color is evoked by differentValue App Fixeshttps://www.niamurrell.com/code/2018-09-07-value-app-fixes/2018-09-07T21:55:14.000Z2020-06-20T21:44:17.728ZBeen doing more than documenting of late! But want to remember some things I learned this week…
App Stops Working 101
Recently the live site of my value app stopped working. Everything looked ok, but when I tried to add a new use to various things, it wouldn’t save the date to the database. The error I got was something like this:
I looked into all kinds of possible solutions for the app’s logic in order to replace the push method with something else, to add new dates into the uses array. I brought the problem with me to Codebar and got some really great advice: before changing any of the code, first update all the npm packages. The logic is that any updates (in this case, to the version of MongoDB that mLab runs for my database server) may have been addressed by package developers, which will make your code work again. And in this case, it worked!
I ran npm outdated in the project folder and learned that quite a few of the packages had updates available:
So I went through and updated the packages one by one (to know exactly what to fix, in the event any single package had breaking changes). Most of them had minor updates only, but mongoose and passport-local-mongoose needed a major version update, so it was especially important to go package by package.
Thankfully not one of the packages ended up breaking the app on update. And even better, just updating the packages made my app work again! So now I can track the cost per use of the gym membership I bought a couple months ago and yeah…I need to keep going there 😋
Other Stuff
I’m feeling very inspired to develop the app further so that using it can be a little bit easier. Actual action TBD!
My coach at Codebar also recommended a good way to add some testing into the app. Since it’s pretty much already built, it doesn’t seem there’s much sense in retroactively adding unit tests, but as an alternative he recommended Cypress, a framework for end-to-end testing. That means that instead of testing individual functions, it runs tests against the user experience, i.e. if the user clicks X button, does YZ happen? We took a very brief look during the session and I’m looking forward to learning more about this and implementing it in the site.
Up Next
I’ve been thinking about the theatre project I came up with nearly 2 years ago but never started. Think I will make a stab at building out the database and API for that. Will be a great tool to test out serverless functions and React!
]]><p>Been doing more than documenting of late! But want to remember some things I learned this week…</p>
<h3 id="App-Stops-Working-101"><aRegular Expressions Referencehttps://www.niamurrell.com/code/reference/2018-09-01-regular-expressions-reference/2018-09-01T18:03:05.000Z2022-05-02T18:22:05.908Z
This post is being added retrospectively in order to consolidate all of my learning info in one searchable place. Comments are new (May 2022) but the code is old…use at your own risk!
Here are the notes I took in a workshop where we learned about regular expressions aka regex.
The basic construct of a regular expression is:
\pattern\flag
Common Flags:
\i = case insensitive \g = general - will find all patterns (not just first) /m = multi-line \s = any character that’s a space \S = any character that’s not a space \^ = beginning of a string [^d] = any character in a set that is NOT d \$ = end of a string [a-z] = any character a to z . = any characters (except in brackets, when it just means itself) \. = literally a period \d - any numerical character \D = any NON-numerical character, equivalents to [^0-9] {n} = matches number of times \b = word boundary ==> \b\w+\b matches EVERY word without punctuation \B = any sections that’s NOT a word boundary * = matches any number of patterns to infinity
Flags can be in any order, best practice is to list them alphabetically
Creating a set inside a pattern - match any of the characters, i.e. /pipp[aeiou]/gi would match pippa, Pippe, pippo, etc..
Creating a RegEx in JavaScript:
variable method: var myRegex = /abc/g; class method: var myRegEx = new RegExp('abc','g');
]]>Here are the notes I took in a workshop where we learned about regular expressions aka regex.Winding Down Chinguhttps://www.niamurrell.com/code/2018-08-05-winding-down-chingu/2018-08-05T17:58:36.000Z2020-06-20T20:32:46.028ZToday I worked on the Chingu project…we’re winding down as the final due date is Tuesday! I mostly worked on making the page mobile-friendly.
Image Resizing
Our images are being sourced from many places around the web, and they’re all different aspect ratios. We wanted a way to have a uniform image size, while maintaining the aspect ratio of the original source image. I solved this by moving the height/width from the img element to its container div, and then making the image keep its ratio with object-fit: cover:
To make this responsive I added a media query to slightly shrink the size in smaller devices.
Adding Multiple Class Names to Elements in React
While styling I also had to create some classes, and add them to existing elements in the site. Not so straightforward, as they were elements rendered by React! Adding a single class name is easy enough:
]]><p>Today I worked on the Chingu project…we’re winding down as the final due date is Tuesday! I mostly worked on making the pageMERN Heroku Deployment Pt. 2https://www.niamurrell.com/code/2018-07-28-mern-heroku-deployment-pt-2/2018-07-28T16:17:00.000Z2020-06-20T20:32:45.908ZToday I picked up where I left off a couple weeks ago and got our app deployed WOO!!!!
NPM Run Build
Last time I was hung up on how to build the React files instead of using npm start which set up a development server. Although that was perfect for building and running the React app locally, this isn’t how it should be done in production.
We did have a build script in the app (it just ran webpack). Eventually I went with a few posts’ suggestions to add Webpack as a normal dependency (it had been a dev dependency) to the app. This wasn’t necessary to run the app locally, but when I pushed it to Heroku, it was a necessity.
Ultimately the Heroku build and deployment started working when I split it in two steps: first initiate the Express server using the npm start script (Heroku default) in the root folder:
"start":"cd Server && npm install && node app.js"
Second step was to add a post-build script to make sure Heroku builds the React app:
"heroku-postbuild":"cd Client && npm install && npm run build"
This successfully got all of our packages installed and running. Yeah!
But…Another Problem
Even though everything built as it should, still nothing was being rendered when visiting the deployed app’s URL (or the localhost root for that matter).
Thanks to some helpful guidance at a meetup, I noticed that I had removed an important line of code from the Express server, the one that directs the app to a specific folder to serve static files. Important, because this is exactly what was causing the problem! So I added it:
// Point Node to React build files app.use(express.static(path.join(__dirname, "../Client/build")));
And from here it worked!!!! The page would load from the Heroku URL as well as a local server. The only thing that didn’t seem to be working was serving the other static files, like CSS and JavaScript.
Serving Static CSS Files
Once again, my limited React knowledge proved to be another obstacle, and more specifically Webpack (I think). Here’s what I could see:
1. React was creating our `index.html` file using a package called `html-webpack-plugin` to create the file in `Client/public/index.html`.2. This `index.html` file included direct paths to static files, such as `<link href="../src/style.css" type="text/css" rel="stylesheet" >` and `<script type="text/javascript" src="../src/utils/search_box.js"></script>`. But I don't know if these were linked by my teammate or automatically by `create-react-app`.3. All of the static files in this `src` directory were not being carried over to the `build` folder when Webpack carried out each build.
So my goal was to get these files brought over by Webpack.
Interestingly, some of the other files in this src folder seem to be needed only by React to render components, etc.
Only style.css and searchBox.js need to be accessible from the build folder.
I found this great article which explained how to make Webpack bundle the CSS in with the final output file. Although by default create-react-app does it slightly differently (it’s configured to create a css file in /build), this would work too.
So in our Client/src/index.js file I added an import to pull in the CSS:
import"./style.css";
Then I added two packages to help Webpack handle the CSS file (note not saving it as a dev dependency so that the file is still handled by Webpack in Heroku’s production environment):
npm install css-loader style-loader --save
And finally added the Webpack rule in Client/webpack.config.js to put these packages to use:
After this, voila! The CSS worked in the front end both on my local machine and live on our Heroku site. PROGRESS!
Serving Static JS Files
Next was getting the static JavaScript to work. Notice in the Webpack config above that there is already a rule to handle .js files. This is necessary in order to render the React components and build the app. But I don’t want my front-end JS file compiled with the rest of the app.
FAST FORWARD: Posting this a few days later…in the end my teammate moved the event handlers into each React component rather than putting the JS in a separate file. Problem solved!
Webpack Config
The final thing that got in the way was that our Webpacg config file was set up for the webpack-dev-sever to run locally on our machines. Great for development, but it caused all kinds of problems with Heroku. In the end, I created a separate production config file which entirely removes the development environment settings, and set the build command to use this file instead by editing the build script to:
"build":"webpack --config webpack.config.prod.js"
Other Stuff
There was another great article about create-react-app that was helpful, but not mentioned above.
]]><p>Today I picked up <a href="/code/2018-07-14-mern-heroku-deployment/" title="where I left off a couple weeks ago">where I left off aBubbling Lines In Atomhttps://www.niamurrell.com/code/2018-07-15-bubbling-lines-in-atom/2018-07-15T08:10:08.000Z2020-06-20T20:32:45.624ZI often forget some keyboard shortcuts I like to use. This is one I had to look up again…to bubble/moving lines up or down in Atom, select the line(s) then:
Ctrl + Cmd + Up/Down
I don’t know if this is actually called bubbling but when I search this blog by that term, at least I’ll find it. 😋
]]><p>I often forget some keyboard shortcuts I like to use. This is one I had to look up again…to bubble/moving lines up or down in Atom,MERN Heroku Deploymenthttps://www.niamurrell.com/code/2018-07-14-mern-heroku-deployment/2018-07-14T16:03:43.000Z2020-06-20T20:32:46.028ZToday I worked on deploying our Chingu project to Heroku.
One Step At A Time
The first attempt to just deploy our master branch didn’t work. So I broke it down and went step-by-step. The project structure is a bit different to previous apps I’ve deployed—in addition to the main package.json in the root folder, we also have our backend and frontend servers each running their own scripts and dependencies in Server/package.json and Client/package.json. Heroku runs apps with an npm start script, so I needed to make this script run both servers.
First I removed the Client server from the run script just to try and get our Node server running. I was able to do this by making the start script change into the Server directory, install all of the dependencies, and then run start:
"start": "cd Server && npm install && node app.js"
Adding Client Server
In the dev environment we use a package called concurrently to run the backend and front end servers with one script yarn dev. But on Heroku it’s a production environment and we don’t use concurrently, so need to break this up. I found two articles that mention how to add a second script to run after the initial npm start:
This successfully moved to the Client directory, installed all of the dependencies, and ran the app. I could see from the server logs that it ran the app in the exact same way it did on my local machine: it creates a development server with webpack-dev-server and makes the app run on localhost:3010. But this is not what we want! We want the app to build and use the already-running Node server to run the app on Heroku instead of this newly-created dev server.
This is where my knowledge came to a startling stop: we used create-react-app to build the application, and it has many many dependencies to get it to run, including webpack-dev-server. I needed to figure out how to get it off of the default dev server and run build instead. This is normal for React apps apparently. But I don’t know React!
Moving React App Off Of Dev Server
In the blog posts mentioned above, one of the essentially just created a dev environment for the production server. I don’t really think this is ideal. The other blog post had a different file structure, with the Express and React servers in one root directory. Our setup is different, so this didn’t work exactly. A third example also had the two servers together.
I worked on this for a few hours but didn’t come to a solution yet, so will have to post more on that next time!
Other Stuff
Today’s coding session was with a Meetup group I used to join before I moved away…nice to be back again! I also got to work with one of my Chingu teammates in person which was really cool.
Up Next
Goal is to get the app successfully deployed tomorrow latest!
]]><p>Today I worked on deploying our Chingu project to Heroku.</p>
<h3 id="One-Step-At-A-Time"><a href="#One-Step-At-A-Time"MERN Inithttps://www.niamurrell.com/code/2018-06-26-mern-init/2018-06-26T22:02:17.000Z2020-06-20T20:32:46.028ZI got our React app to pull data from MongoDB!
Wooooo!
]]><p>I got our React app to pull data fromI Broke Everything (nvm To The Rescue)https://www.niamurrell.com/code/2018-06-25-i-broke-everything-nvm-to-the-rescue/2018-06-25T17:39:35.000Z2020-06-20T20:32:45.908ZIn working on the Chingu project, I brilliantly managed to break node and npm on my computer. Awesome! So today I went through uninstalling everything and setting some things up as new.
Node, NPM , and nvm
I really don’t know how I managed to break npm; I was trying to use a new command npm outdated which is meant to produce a list of which packages are out of date in any given package-lock.json. It didn’t give me the expected result, but told me to update npm; so thinking that could solve the problem, I tried to do that with npm i -g npm and next thing I know all the node modules are gone and nothing is working.
Some research showed that by default sometimes npm can be installed without the ideal permissions, and this is what I think caused the problem. Instead you can use nvm to install node (and therefore npm) which avoids permission problems. There’s another fix which involves changing the folder permissions, but since it seems like there are other benefits to using nvm, I decided to go with that option.
So I took the leap and uninstalled Node all together, which deleted all of the npm global packages, npm, the whole lot. Then I re-installed Node & npm using nvm and all seems to be working now!
A Note About Global npm Packages
Unlike n which I used as a Node version manager before, nvm installs packages under each version of Node. That means if/when I install another version of Node on this machine, any global packages won’t be available to the new version. I’ll need to remember this flag for the packages to be brought into the new version:
nvm install node --reinstall-packages-from=node
NVM Commands
Probably good to note some additional nvm commands for future reference (from the docs):
Verify Installation
To verify that nvm is installed, do:
command -v nvm
which should output ‘nvm’ if the installation was successful. Please note that which nvm or nvm -v will not work, since nvm is a sourced shell function, not an executable binary. However nvm -vwill print out a manual for using nvm.
Other Common Commands
nvm install 8.0.0 Install a specific version number nvm use 8.0 Use the latest available 8.0.x release nvm run 6.10.3 app.js Run app.js using node 6.10.3
What I’m Looking For
added August 2019, since I seem to always type the wrong thing!
Added February 19, 2020 since the above doesn’t work.
Using the --lts flag doesn’t work in the above…you have to write an actual version number to use the --reinstall-packages-from=node flag, which also must come at the end of the command. To avoid a lot of dumb copy/pasting, I added this function to my bash shell:
# install new node version function nvmi { nvm install $1 --reinstall-packages-from=node }
So now I can just type nvmi 12.16.1 (or whatever version) to get the latest Node and my global packages. Voila!
Other Stuff
There is a lot on these days. It’s nice to have these projects to work on to make sure something fun happens every day 🙂
Up Next
More big work to do on Chingu project asap.
]]><p>In working on the Chingu project, I brilliantly managed to break node and npm on my computer. Awesome! So today I went throughWorking On A React Project Without Knowing Reacthttps://www.niamurrell.com/code/2018-06-23-working-on-react-project-without-knowing-react/2018-06-23T20:52:36.000Z2020-06-20T20:32:46.146ZThese past few days I’ve been putting a lot of work in the Chingu project. I’m really enjoying it, but working on React without knowing React is pretty tough!
MERN App Setup
I think the reason it’s a bit difficult is because we are setting up the basic structure of our MERN (MongoDB, Express, React, Node.js) app; the trouble is that I know the MEN part and no R, while one of my other teammates is learning the R but doesn’t know the MEN part. So getting them to link with each of us working on what we know has been a challenge!
To start, we set up the front end and backend servers successfully, but then it came time to link them. I worked on a few different things for hours but couldn’t get it working. Then my teammate found a recent article that shows an approach to making it work, and it did, but as it’s not a custom-fit for our needs, there’s still a bit of work to do—namely, the demo doesn’t include a database at all.
To make things more complicated, somehow the copy-paste from this demo includes older versions of some of the dependency packages…one of which won’t even run the code on my computer because there’s a space in the folder path (insert facepalm!!)! So pretty stuck for the moment, but we’ll come to a way forward eventually.
Other Stuff
I’ve had less time to write posts recently, but I finished the UX course I started a long while ago finally, and now have started a Product Manager course to see if that’s an interest.
Up Next
Continue courses & Chingu work. Oh and move countries :P
]]><p>These past few days I’ve been putting a lot of work in the Chingu project. I’m really enjoying it, but working on React without knowingThe Forever Git Cheat Sheethttps://www.niamurrell.com/code/reference/2018-06-22-the-forever-git-cheat-sheet/2018-06-22T18:59:55.000Z2021-08-19T16:36:40.664ZGit is great at throwing wrenches in the work. For reference here is everything I’ve learned how to fix.
This is a manual process if the directories are already cased properly locally. The problem is that by default git ignores case changes for filenames and directory names. Here is an answer explaining how to change that (though not recommended, read comments), and here’s a potential fix if the files/folders are not cased properly locally.
Check out a Pull Request on the original repo when I have a fork on my local machine
The GitHub PR page includes instructions for checking out a PR on the command line, but if you are running a fork locally, you need to work with the upstream branch instead of the origin branch.
Next time you attempt any GitHub actions from the command line, you’ll get prompted to log in. Use the personal access token as the password with your normal username.
]]><p>Git is great at throwing wrenches in the work. For reference here is everything I’ve learned how to fix.</p>
<h3Node-Express-MongoDB Project Setup with Heroku Deploymenthttps://www.niamurrell.com/code/reference/2018-06-19-node-express-project-setup/2018-06-19T20:20:55.000Z2021-06-19T22:25:32.381ZHere is the step-by-step for creating a new Node.js app using Express and MongoDB. Because I did this a long time ago, and had to remember.
Update Node to Long Term Stable version (nvm installation is simplest method)
Check npm version with npm -v and update if necessary
Check for nodemon with nodemon -v. If it’s not there, install it globally with npm install -g nodemon
Install MongoDB Community edition. You need to be able to successfully run a mongod server and access a mongo shell using the mongo command. Cloud Atlas is not required (ignore that in the MongoDB documentation). I wrote about this previously.
Set Up Express
Create a project folder and cd into it:
mkdir new-project cd new-project
Initiate a git repository: git init
Another option for the previous 2 steps is to create an empty GitHub repo and clone it to your machine.
Add .gitignore file to ignore system files like .DS_Store, etc.
Add .README file, can be empty to start
Commit project folder as Initial commit and push to remote repo as necessary. From here no more commit/push instructions will be included, but commit changes often!
Run npm init and follow instructions (answer questions) to create package.json file. Or npm init -y to skip the questionnaire.
NOTE: The steps below assume the entry point is set to app.js
Add node_modules to .gitignore file
Install Express by running npm install express --save
Create app.js file in main project folder and add server boilerplate:
var express = require("express"); var app = express();
app.get("/", function (req, res) { res.send("hello world"); });
var port = process.env.PORT || 3000; app.listen(port, function() { console.log("App running on port " + port); });
Save file then run nodemon app.js
Open localhost:3000 in browser; if you see hello world, the basic setup was successful.
Scaffold the Routing
Rather than putting all of the routes in the main app.js file, this can be modularized.
Make a routing index file:
mkdir routes touch routes/index.js
Add node modules and an exporter to routes/index.js, and move the routing code from app.js to this file:
var express = require("express"); var router = express.Router();
router.get("/", function (req, res) { res.send("hello world"); });
module.exports = router;
Access and use the exporter in the root folder’s app.js file:
// Require Routes var indexRoutes = require("./routes/index");
// Run app app.use(indexRoutes);
Run nodemon app.js and refresh the page at localhost:3000; you should see the same hello world
Set Up Views, Template Scaffold, & Static Files
Express looks for everything it should display on the front end to be stored in a views directory. We can also use the ejs package for templating. We also need to tell Express where to find static files like CSS, images, and local JavaScript.
In root project folder run npm install ejs --save
Tell Express to use ejs in the /app.js file: app.set("view engine", "ejs");
Set up the basic scaffolding for the page templates:
To keep some things secret from the public when code is published to GitHub, environment variables can be used, and dotenv is an npm package that helps manage these visibly.
Install the dotenv package as a dev dependency:
npm install dotenv --save
Create a file called .env in the project’s root directory, and add all of the secret info as key-value pairs:
If other people will be collaborating on the project, also create a file called .env.default in the project’s root directory, and copy/paste from the .env file, omitting the values:
PORT= NODE_ENV= MONGODB_URI= SESSION_SECRET=
Make sure your collaborators get the secret sauce via secure channels so that they can replicate your dev environment on their own local machines.
SUPER IMPORTANT! Add the new .env file to .gitignore
Make the app use the .env file by invoking it in app.js. I usually do this conditionally by creating a dev environment, and using the environment files here only; later when deploying the app to a remote server, new values can be assigned to each key specifically for the production environment:
var nodeEnv = process.env.NODE_ENV || "development"; if (nodeEnv === "development") { require("dotenv").config()}
Link MongoDB Database
Add Mongoose to the project, this will be the ORM to manage MongoDB from Node:
npm install mongoose --save
In the /app.js file, require mongoose and connect to the database server. Also include the database model(s) which will be created in the next step:
var mongoose = require("mongoose"); var TestItem = require("./models/test"); mongoose.connect(process.env.MONGODB_URI, {useMongoClient: true});
Create a directory for the Mongoose models and add the file referenced in the previous step:
mkdir models touch models/test.js
Create a database model in the newly created file models/test.js:
var mongoose = require("mongoose");
// Test Schema & Model Setup var testItemSchema = new mongoose.Schema({ name: String, age: Number });
To test everything is linked correctly, add a dummy db entry into the very bottom of the app.js file:
// TEMPORARY DATABASE TEST -- DELETE WHEN REAL DATABASE MODELS ARE READY var george = new TestItem({ name: "george", age: 47 }); george.save().then(() =>console.log("DATABASE IS LINKED & SAVING DATA!"));
Look for this console message on the Node server. If it’s there, that’s all finished!
Deploy To Heroku
Since I broke everything and had to reinstall the Heroku CLI, let’s start at the beginning.
Then I followed the prompts to log in with my existing Heroku account.
But actually…this isn’t completely necessary because it’s also possible to do the deployment by setting Heroku to watch a GitHub repo and automatically build and deploy with each push to the repo. Once completed, you can see build and server logs in the web interface; that said, installing the Heroku CLI is helpful, because you can see the logs a bit quicker by running heroku logs from the command line.
To enable automatic builds from GitHub, open the Deploy tab and follow the steps to authenticate GitHub access from this Heroku app. A bit farther down the page, click Enable Automatic Deploys to your chosen branch so that Heroku will run a new build with each code push. If you ever want to change which branch deploys it’s quite simple—just click Disable Automatic Deploys, change the branch, and enable them again.
SO…back on the Heroku web dashboard, we need to add a MongoDB database. Open the Resources tab and then Find More Add-Ons. mLab offers small free MongoDB servers perfect for a demo app, so find this on the list and add it to the project. When this is done in this method, Heroku automatically adds the new MONGODB_URI environment variable to this app, so as long as the process key has the same name for the local dev environment, the app will be able to get the correct production value and access the web-hosted MongoDB server.
Now’s a good time to add in any other environment variables that you may need (like API keys, etc.); from the Settings tab, click Reveal Config Vars to add or edit these.
Heroku is configured by default to run the npm start script to start your app. Make sure this script exists in the root folder’s package.json file. In this case it will point to app.js:
"scripts": { "start": "node app.js" }
Ans that’s it! Once you have a successful build, you can click the Open App button from the top of the Heroku dashboard and you should see the same demo app page that you loaded locally earlier.
The End
These steps set up the basic boilerplate for a MEN app. Obviously a lot more can be added. For now this is good though!
]]><p>Here is the step-by-step for creating a new Node.js app using Express and MongoDB. Because I did this a long time ago, and had toChingu Kickoffhttps://www.niamurrell.com/code/2018-06-10-chingu-kickoff/2018-06-10T18:53:18.000Z2020-06-20T20:32:46.146ZToday we kicked off our Chingu project! I also stayed up for basically 18 hours straight flying to Munich so not much I will write today. Bottom line, we will be building an app using a tech stack I pretty much know nothing about. So I will be learning a lot! We will be using Python, Django, and React. Glad I will learn about these, but preparing myself!!
First Foray
I found some links that will hopefully get me started:
]]><p>Today we kicked off our Chingu project! I also stayed up for basically 18 hours straight flying to Munich so not much I will writeSearch Resurfaceshttps://www.niamurrell.com/code/2018-06-04-search-resurfaces/2018-06-04T21:01:48.000Z2020-06-20T20:32:45.624ZYesterday I started organizing the content on the site I’m building by adding categories & tags to all of the posts. In doing so, I realized that the search engine I built for the site can’t properly search categories or tags!
Lunr Search Limitations
A while back I figured out how to add a lightweight search engine to Hexo blogs using Lunr. Now that I am using categories and more importantly tags to organize the content, I need the search engine to return results for tag searches in addition to post content searches. Lunr is set up to index an array of single-level objects, however the JSON generator I use to create this JSON file nests categories and tags. Lunr has noplans to add support for nested JSON content. Further, the mapper function the maintainer mentions in these issues won’t work for my format of JSON.
So this means changing the JSON generator. I am looking into that now and it looks like it can be a small tweak to the code…will be giving that a go. Hopefully I can get it to work!
Other Stuff
I did half of the design section on the UX & Web Design course I’m taking.
Up Next
Chingu starts tomorrow!
]]><p>Yesterday I started organizing the content on the site I’m building by adding categories & tags to all of the posts. In doing so, ICSS Positioning Woes & URL Encodinghttps://www.niamurrell.com/code/2018-06-03-css-positioning-woes-social-links/2018-06-03T13:28:45.000Z2020-06-20T20:32:46.146ZToday I added a section for all posts that includes sharing links for Twitter, Facebook, Reddit, etc.
Positioning Issues
In order to call attention to the sharing links, I added a scale event to each icon as well as the section header, using a JavaScript mouseenter event listener over the whole wrapper div. It looked great and I was happy with the outcome, but scaling the text up made the header element wider than the page, which added an unnecessary horizontal scroll.
I searched and tried lots of ways to fix it but in the end couldn’t get it today. I’ll try again another day.
Social Links & URL Encoding
I also added in the social links for several sites. This great repo lists lots of social sites and how to do sharing URLs without needing APIs, registrations, JavaScript, etc. Just the plain & simple links. So I set that up pretty easily, but one question came up about URL encoding…it needs to have all characters escaped. So for an email address, for example:
However I also wanted to put the title in some of the links as well. The static site generator (Hexo) makes it easy to include with a variable:
<%= page.title %>
But this leaves in all of the spaces and reserved characters like & and ? which are in some of the post titles. Hexo does not offer an easy way to access/amend the title unfortunately.
Most of the links worked anyway (thanks modern browsers), but I think I could write a plugin for Hexo to fix this. Something to tackle in the future.
Other Stuff
I also added category & tag pages to the site to help with navigation. Hexo has tag_map and category_map settings with no documentation, but I think I will need to use it pretty soon. Luckily I found an article with a good explanation.
Up Next
Continue working on the UX/UI course I started 2 days ago, and wrap up this web project once and for all!
]]><p>Today I added a section for all posts that includes sharing links for Twitter, Facebook, Reddit, etc.</p>
<h3 id="Positioning-Issues"><aGit Problems & GDPR Talkhttps://www.niamurrell.com/code/2018-05-29-git-problems-gdpr-talk/2018-05-29T15:13:10.000Z2020-06-20T20:32:45.624ZEventful day! Productive though.
SVG Issues
As I mentioned yesterday I implemented a lot of SVG icons into my site from Font Awesome. Well, there was one icon that I got from another source—it was exported from Figma and the formatting of the SVG markup was very bloated.
I tried a lot of things to make it more general, so that I could manipulate the size & color using CSS. No luck. Because of the way it’s structured, I can’t access the fill color. Worked on this for an hour or so, and then finally just created a second SVG in another color. Not what SVGs are meant to do!
I’ll need to come back to this later.
Git Issues
Ahhh seriously messed this one up! I love git for always having your back.
So I had committed something 222 to my master branch, and the commit before that one 111 was pushed to origin. I wanted to go back to 111, merge some changes from another branch, and merge 222 into the updated master. Huge fail. Somehow I reset the HEAD alllll the way back to the very first commit of the whole project FOUR MONTHS AGO!!!
In the process of fixing it I learned about reflog and discovered it was a simple command to undo the horror I’d just done:
$ git reset 'HEAD@{1}'
Eventually things got back on track!!
GDPR Talk
I also went to a talk about GDPR and data handling. Very interesting and comprehensive! Getting into the practice of implementing the requirements on my sites now to familiarize myself.
]]><p>Eventful day! Productive though.</p>
<h3 id="SVG-Issues"><a href="#SVG-Issues" class="headerlink" title="SVG Issues"></a>SVGLearning SVGhttps://www.niamurrell.com/code/reference/2018-05-28-learning-svg/2018-05-28T19:13:50.000Z2021-06-19T22:25:32.489ZSecond post of the day! I couldn’t hold off on working on the project after all, and worked on removing the Font Awesome dependency in favor of using SVG icons instead.
SVGs as Icons
A while back I learned about the basics of SVG: what they are, how to make them, and how they're perfect for crisp logos and icons instead of using images or icon elements, which require external stylesheets. However, when I actually tried to bring SVGs into my project, I got a big fat mess.
I think the main reason was because the SVGs I was using to start had a lot of extraneous code in them that I didn’t really understand. Also, with little confidence of using the inline <svg> element, I was placing them as an img src which meant I couldn’t really manipulate them. Learning about the things below solved all the problems.
Inline SVGs
The only way to manipulate SVGs with CSS is to include the full SVG element inline with the page markup (as far as I know). But since SVG markup is looong, I wanted to avoid placing it inline. Since I’m using the Hexo static site generator, I can use its templates to create partials for the SVGs. For example I have a partial for the twitter logo:
To get rid of all of that extraneous code, there is a great tool called SVGOMG which will clean the markup right out. For example, my search icon looked like this to start:
One thing SVGOMG removed that I didn’t like was the accessibility markup. In Sarah Drasner’s SVG talk she very succinctly identified what’s needed to make sure SVGs can be handled correctly by screen readers and keyboard users. First, the SVG element needs to include an aria-labelledby attribute which references a title element; the title element must be the first child within the SVG, and it also needs to include an id. Adding role="img" lets screen readers know that it’s an image and most will skip over these, however since most of my SVGs will be placed within an anchor tag, they’ll still be processed.
Later I found this article which gives even more detail about making SVGs accessible. Tl;dr they should also include a description element. It’s also important to note that the role should be "presentation" in cases like SVG backgrounds, or "text" when they’re text.
One note about the title: in addition to its accessibility usefulness, unfortunately it doubles as a hover tooltip…not pretty. To get rid of this, add pointer-events: none; to the element’s CSS. Since the SVG is within an anchor tag, it will keep all the needed functionality.
Ok, now all the basics are done! Last step is to make them look how they should. One great tip from this video is to add a blanket fill property to all SVG elements in the CSS; that way, by default they will inherit whatever text color is assigned to their parent elements. Combined with the title handling above, this goes near the top of the CSS file:
svg { fill: currentColor; pointer-events: none; }
Last thing is to throw some size on them so that they are bigger than 0x0 px (the default, how I’ve stripped the SVG files). Since this will change depending on the use, I’ve included a class for each SVG file to access them easily. Or, if there are several SVGs under one parent (like in a nav menu), I can size them in one go:
SVGs seem to line up slightly differently from how icons were in line with the text, so it took some fiddling around with this. In this case, aligning it as a subscript worked for my nav menu.
One article I found that I didn’t implement is about just that—getting SVGs to line up properly with text. There are some nice ideas about giving a font size to them so that the SVGs also inherit sizing, rather than needing to explicitly define it for each use. I don’t have that many icons on my site, but maybe I’ll try this one day!
Sourcing SVGs
While there are a lot out there freely available, ironically I’m still using the Font Awesome icons, because they make them available as SVG downloads! I bought a forever-license a year and a half ago as part of a Kickstarter campaign, and this is the first time I’ve had use for it…love it. The license also gives me access to the regular- and lightweight icons that aren’t available for free.
Other Stuff
In all of the reading and research I also came across this CSS Tricks article: Inline SVG vs Icon Fonts [CAGEMATCH]. It’s a good read if you’re interested in learning more about SVG icons vs. icons!
Up Next
]]><p>Second post of the day! I couldn’t hold off on working on the project after all, and worked on removing the <aBash Shell Colors!https://www.niamurrell.com/code/reference/2018-05-28-bash-shell-colors/2018-05-28T15:53:44.000Z2021-06-19T22:25:32.484ZToday I changed the colors in my bash shell and added the current git branch to the command line. The git branch was actually what I was going for…the colors were a nice bonus I found along the way 😄
Note added Oct 2018 for clarity: I use MacOS which by default uses the bash shell in both the Terminal program and in my text editors’ command line. If you use a different shell or framework like ZSH, or one of the many windows shells, your implementation of the below would be slightly different.
Bash Shell Scripting
I grazed the surface of this a while back, and learned a bit more about shell scripting today! The main thing was learning about the prompt script PS1 which determines what shows on the command line and how it looks. By default, mine was set up like this:
Computer-Host-Name:current-folder username$
I was fine with this, but wanted to also add in the git branch. This YouTube video prompted this whole rabbit hole and led me to a gist which shows how to figure out what git branch you’re on and add it to the command line. But a simple copy paste (without really understanding the script) gave me a longer command prompt:
No good! So then I found this article which did a good job explaining what all the letters and numbers in the script mean. For example:
\u username \h computer host name \w path to current directory \W current directory (folder name only)
Now we’re getting somewhere! So I edited the script a bit, found some additional color options (or even more if I want to adjust later), and now I’ve got a concise prompt with colors I like. I also created aliases for the colors to make the script a bit easier to read. Here’s the final outcome:
# Colors Color_Off="\[\033[0m\]" # Text Reset Blue="\[\033[0;34m\]" # Blue Cyan="\[\033[0;36m\]" # Cyan BrightBlue="\[\033[0;94m\]" # Bright Blue
# Git branch function parse_git_branch() { git branch 2> /dev/null | sed -e '/^[^*]/d' -e 's/* \(.*\)/ (\1)/' }
# Format prompt script export PS1="$BrightPurple\h$Purple:\W$Cyan\$(parse_git_branch)$Color_Off \u$ "
Update 2019: I refined this more than once! Latest post encapsulating all of my updates is here.
Sourcing Changes Without Closing Terminal
One thing to note: rather than restarting Terminal every time you make changes to the .bashrc file where all of these scripts go, you can just re-source it: source ~/.bash_profile
Then all the new colors, shortcuts, or scripts are available in the current bash session. Note here that my .bash_profile file is already pointed to .bashrc.
Terminal Contrast Adjustments
After I got it working in Terminal, I went to Atom and opened the terminal there. The colors were all wrong! Turns out this is because Terminal adjusts colors for better contrast, so (on my screen at least) “blue” looked more purple, but the shell in Atom doesn’t make these adjustments.
Thankfully the terminal package I use (platformio-ide-terminal) lets you change the ANSI colors, so I did this to match the default colors in Terminal. Voila! Great, consistent, perfect-contrast colors no matter which shell I’m using.
Other Stuff
All of this took a good few hours out of my day. So much for working on the actual work I planned to do 😂
]]><p>Today I changed the colors in my bash shell and added the current git branch to the command line. The git branch was actually what I wasAccessibility, Share Links, And Morehttps://www.niamurrell.com/code/2018-05-27-accessibility-and-more/2018-05-27T09:54:59.000Z2020-06-20T20:32:45.908ZI did more work on the site today and learned a lot about accessibility. I also implemented some new features like social sharing and started learning about SVG icons.
Web Accessibility
First up today was an accessibility pass on the site. Although I normally have accessibility in mind and consider semantic markup, alt text, contrasting colors, etc., this freeCodeCamp Medium article I came across recently showed that there were still a bunch of things I could improve upon. What I did today:
Hide thumbnail image links from screenreaders and keyboard tabbing; the thumbnails are repetitive since they sit right next to another link that goes to the same place, so it’s a better experience to get rid of them. This article from 2012 shows a comparison of how to best combine role="presentation" and aria-hidden="true" with tabindex="-1" to create a better user experience. I also removed the alt text from these images (alt="") since it was just a further repetition of the title.
Learned about tabindex which determines whether an element can be focused, and also the order elements are focused in. Best practices says it’s better not to use it for any value other than -1…good markup will make it not necessary to use.
Added title attributes to <iframe> elements. The site drops in a media player and the code was copy-pasted from the media provider, but the iframe element did not include a title, so I added it.
Label icons. The site uses a few Font Awesome icons for navigation, but without a label, screenreaders just see an empty link; they needed an aria label:
<ahref="https://twitter.com/spacex"target="_blank"rel="noopener"> <iclass="fab fa-twitter"aria-label="Space X on Twitter"></i> </a>
Label buttons. Same as the icons, I added aria labels to the submit buttons on my search form and email sign up.
One thing I didn’t do was shrinking the text width. I made an attempt at this a while back (after reading this article about it) and it’s pretty decent, but on super-wide screens maybe still a bit too wide. This is still on the to-do list.
Adding Social Media Share Links
I wanted to add the normal share buttons to each post but without using the developer tools or buttons. First, because I want consistency in the buttons’ appearance; and second, because I really don’t want to add a bunch of trackers and crawlers to the site. Just plain links are what I want. I found this great repo which lists how to create a plain sharing link for a long list of social media websites. Win!
SVG Icons
Another thing on the list is to remove the Font Awesome dependency on my site so I started with a bit of research about using SVG icons instead. This YouTube video was a great, quick look at how to include and style them, and this one went a bit more in-depth on more customizations. This video of a talk by Sarah Drasner gave a whole bunch more things to be aware of, including how to make the SVG icons accessible.
I’ll be picking this up in my next coding session!
Other Stuff
Finished 2 books today! One on negotiation, and I took a lot of notes, so been reading it for a while. The other was a YA apocalyptic future novel. So yeah, diversity 😋
Up Next
Tomorrow I want to swap out all FontAwesome icons for SVGs, add the sharing buttons, and get started on moving my comments from Disqus to my own forms.
]]><p>I did more work on the site today and learned a lot about accessibility. I also implemented some new features like social sharing andMajor Hexo Workdayhttps://www.niamurrell.com/code/2018-05-26-major-hexo-workday/2018-05-26T20:15:29.000Z2020-06-20T20:32:46.028ZLooooooong day today working on one of my Hexo sites, I got so much work done! Big fan of 4-day weekends over here. 😄
I’d been sitting on some site improvements for a while and got a lot of them implemented today. In the process I learned some new things about Hexo and Netlify:
Netlify Forms
Super easy to set up. They give you the ability to add forms to your static website without needing a server to run the post requests. It’s just a matter of adding netlify and a name attribute to the form tag:
<pclass="hidden"><label>Don’t fill this out if you're human: <inputname="bot-field" /></label></p>
<buttontype="submit">Submit</button>
</form>
I also added the action attribute to redirect to this contact-confirm page after submitting the form…it’s possible to submit via XHR and avoid going to a new page, but I didn’t set that up today.
Netlify also does spam filtering on these forms by default. I opted to add netlify-honeypot as an added measure of anti-spam…this is a hidden field that bots wouldn’t know if hidden; any form submissions that have this input filled out will be automatically rejected.
To see the responses, it’s just a matter of logging into the site’s Netlify dashboard. Or even better…set up email notification and then I can reply directly to the person who submitted the form.
Hexo Title Casing
A while back I noticed that one random post title was appearing on the site as 011 - the Truth About Pineapples with the word ‘the’ in lowercase, even though I’d written it in uppercase in the post title. Well on further review today, I found that all posts with ‘the’ as the first word were being de-capitalized. No, wait!—looking even deeper it turned out all appearances of ‘the’ were being de-capitalized. What gives!?
Turns out there is a setting in Hexo’s _config.yml (under ‘writing’) that titlecases post titles by default; presumably because I have a number prefix in front of the word ‘the’, it made them all lowercase. It was as simple as setting titlecase: false and voila! All of the post titles appeared as they should.
Likewise, in the process I learned about the filename_case: 0 setting in the same section of _config.yml. This setting determines how post filenames are generated by Hexo. By default, 0 makes no changes, but I could change this to 1 and have the filenames automatically be made into lowercase. This is a good find! Before, to create a new post in the command line, I always typed the slug:
$ hexo new this-is-what-i-want-my-post-to-be-titled
Not only is it annoying to type hyphens instead of spaces, afterwards I would also have to edit the host title in the actual post file in order to case it properly. Now, with the setting filename_case: 1, the command is much easier:
$ hexo n "This Is What I Want My Post To Be Titled"
Hexo Helpers & Navigation Current Page
Another improvement I’d had on the list for a while was to add hover effects to the navigation bar, and to make the nav reflect whatever current page you’re on. The hover effects were straightforward, but determining the current page was not so simple. Because the nav is set up using a template which loops through menu items, it was figuring out how to set an if condition against the loop. My efforts, Googling, and searching through issues in the Hexo GitHub repo all turned up nothing, BUT!…eventually I found a good example in someone else’s Hexo theme, and added my own condition to the ternary statement:
I got a complimentary ticket to GHC 2018!! Annnd I found a premium-economy flight for £400 from London. Accommodations look like they’ll cost a pretty penny but so far, so good $$-wise. I’m so excited!
Up Next
Probably will be working on more site improvements tomorrow!
]]><p>Looooooong day today working on one of my Hexo sites, I got so much work done! Big fan of 4-day weekends over here. 😄</p>
<p>I’d beenNetlify CMS Setup & Git Rebasehttps://www.niamurrell.com/code/reference/2018-05-15-hugo-project-ongoing/2018-05-15T20:40:33.000Z2021-06-19T22:25:32.380ZI’ve been putting in a bit of work on the new Hugo site I’m building out. On Sunday I deployed it to Netlify again and today I set up the CMS.
Adding Netlify CMS To a Hugo Site
This assumes a basic site is already deployed to Netlify. These are the instructions to add a CMS. For basic setup reference next time…
<!-- Include the styles for the Netlify CMS UI, after your own styles --> <linkrel="stylesheet"href="https://unpkg.com/netlify-cms@^1.0.0/dist/cms.css" /> <scriptsrc="https://identity.netlify.com/v1/netlify-identity-widget.js"></script> </head> <body> <!-- Include the script that builds the page and powers Netlify CMS --> <scriptsrc="https://unpkg.com/netlify-cms@^1.0.0/dist/cms.js"></script> </body> </html>
collections: -name:"blogs" label:"Blog Posts" folder:"content/blog" create:true slug:"{{slug}}" fields:# The fields for each document, usually in front matter - {label:"Title", name:"title", widget:"string"} - {label:"Publish Date", name:"date", widget:"datetime"} - {label:"Tags", name:"tags", widget:"list", default: [] } - {label:"Categories", name:"categories", widget:"list", default: [] } - {label:"Banner Image", name:"banner", widget:"image"} - {label:"Body", name:"body", widget:"markdown"}
Note: This config is very specific to the content of the site so refer to the docs for full customization instructions.
In Netlify settings for the site go to the Identity tab and enable the Identity service. Then open the Identity settings and enable Git Gateway (this allows the CMS to update the site by pushing content edits to GitHub as commits).
In Site Settings -> Identity -> Registration, you’ll most likely want to make the registration invite only.
Go back to Identity Settings, and invite whatever users need to be able to use the CMS (including yourself).
In the Deploys tab go to Deploy Settings -> Post Processing. Add a snippet with before </body> to redirect logged-in users to the CMS:
<script> if (window.netlifyIdentity) { window.netlifyIdentity.on("init", user => { if (!user) { window.netlifyIdentity.on("login", () => { document.location.href = "/admin/"; }); } }); } </script>
Still in Post Processing, add a second snippet with before </head> for the Identity service to work:
Commit all of these changes and push the changes to GitHub.
Visit the CMS at mysite.com/admin and log in.
Rebasing
Another tip: now that content can be added to the site, reminder to git pull before making additional changes locally. Otherwise, merge conflicts and rejections! The best way to do this is to rebase with the git pull:
# commit local changes git pull --rebase git status ---> (check everything worked) git push
I have yet to try this so these commands might be wrong! I’ll correct it if so.
]]><p>I’ve been putting in a bit of work on the new Hugo site I’m building out. On Sunday I deployed it to Netlify <aKill A Ghost Processhttps://www.niamurrell.com/code/reference/2018-05-11-kill-ghost-process/2018-05-11T19:23:17.000Z2021-06-19T22:25:32.380ZThere is something that came up when I was helping with a workshop at Codeland: remembering how to find and kill a ghost process running on a machine.
Example: trying to run a server on a certain port, and it’s unable to because there is already a process running on that server. But I don’t have any terminal windows open, how the heck do I find it! Or I accidentally closed the window running a database server daemon. Yikes!
I’ve run across this more than once, so once and for all, for easy access and reference:
$ lsof -i :PORT_NUMBER $ kill -9 <PID>
If permissions prove to be an issue, use sudo with care.
Note to future self: you’re welcome.
]]><p>There is something that came up when I was helping with a workshop at Codeland: remembering how to find and kill a ghost process runningUpdating Rubyhttps://www.niamurrell.com/code/2018-04-29-ruby-update/2018-04-29T13:58:17.000Z2020-06-21T10:41:29.938ZToday I did a walk-through for a workshop I’ll be helping out at, going through the process of setting up a Jekyll blog (memories!).
Updating Ruby
Turns out my version of Ruby was pretty out of date! I used the Ruby environment manager rvm to update, but got a pretty nasty warning at the start:
$ rvm -v Warning! PATH is not properly set up, '/Users/username/.rvm/gems/ruby-2.3.3/bin' is not at first place. Usually this is caused by shell initialization files. Search for 'PATH=...' entries. You can also re-add RVM to your profile by running: 'rvm get stable --auto-dotfiles'. To fix it temporarily in this shell session run: 'rvm use ruby-2.3.3'. To ignore this error add rvm_silence_path_mismatch_check_flag=1 to your ~/.rvmrc file. rvm 1.29.3 (latest) by Michal Papis, Piotr Kuczynski, Wayne E. Seguin [https://rvm.io]
I went ahead with the installation:
$ rvm install ruby-2.5.1
After the installation I set the new version to be the default with rvm use default 2.5.1. But I was still getting rvm warnings so I tried resetting the .bashrc and .bash_profile settings with rvm get stable --auto-dotfiles as per the warning instructions. This added the following line to my .bashrc file:
export PATH="$PATH:$HOME/.rvm/bin"
Well shocker, that was already there! And I was still getting a warning. Hmmm…
StackOverflow to the rescue: I just needed to run rvm reset and the warnings went away. Nice!
$ rvm -v rvm 1.29.3 (latest) by Michal Papis, Piotr Kuczynski, Wayne E. Seguin [https://rvm.io] $ rvm list
rvm rubies
ruby-2.3.3 [ x86_64 ] =* ruby-2.5.1 [ x86_64 ]
# => - current # =* - current && default # * - default
Other Stuff
Didn’t write on the day but I went to another fun meetup the other night and spoke to quite a few people. Literally did not open my laptop once though 😂
Up Next
STILL working on those websites.
]]>Quick reference for updating Ruby on MacOS.CSS Under The Hoodhttps://www.niamurrell.com/code/2018-04-25-css-under-the-hood/2018-04-25T20:01:21.000Z2020-06-20T20:38:56.555ZI’m back! Back to a normal schedule after some work events & travel. Slowly getting back into the coding projects I left off with a few weeks ago which has been good! Big help: I left each one in a place that’s turned out to be really straightforward to pick up again…tips for future me!
CSS Meetup Group
Tonight I went to the inaugural meetup for the new CSS.la group. In one of the projects it’s a lot of CSS I’ve been working on so I thought it would be good to talk to some more people who are doing the same. We learned about the basics of how CSS works under the hood and got some good info I didn’t really know before!:
The steps to rendering a web page:
request goes out
response comes back in bytes
bytes are translated into strings of text
tokenizer translates the text into nodes which get parsed and put into a tree structure (the DOM)
when a node contains a link to a stylesheet another request goes to the server
server responds with more bytes which are translated
CSS strings are tokenized, parsed and put into a tree structure (CSS OM)
the object models (DOM & CSS OM) are combined into a render tree
the browser uses the render tree to layout the page and determine where everything will go (this is called reflow)
then it paints all of the individual nodes
then it puts the painted nodes where they go on the page (this is called composite)
How different CSS properties trigger different stages of the above process: for example changes to opacity and transform only trigger a new composite whereas something else might trigger a new reflow, paint, and composite. This has effects on performance. CSS Triggers is a good site for learning about this.
In the dev tools console you can read all CSS properties on all nodes with document.styleSheets if you need to debug
Houdini is a CSS translator to let you try new CSS properties before they’re widely supported
Up Next
Working on 2 websites currently & eager to finish one so that I can start working on something new. The other one will take a while.
]]><p>I’m back! Back to a normal schedule after some work events & travel. Slowly getting back into the coding projects I left off with aNetflix Deliveryhttps://www.niamurrell.com/code/2018-03-29-netflix-delivery/2018-03-29T21:36:07.000Z2020-06-20T20:38:54.014ZI went to a super interesting trio talk tonight about how the delivery teams at Netflix operate in order to be able to serve the many many millions of people who use the service on a daily basis. The volume is really staggering…on average is 16,000 years of content being streamed on a daily basis, and on a peak day it’s been as high as 29,000 years. Absolutely insane.
They do a number of things to make sure the site and user experience is delivered as seamlessly as possible for everyone everywhere. The first talk was about how they introduce purposeful failures throughout the system as a method of testing. For example they are running hundreds of thousands of EC2 instances daily…they’ve built systems to purposefully fail some instances, clusters, etc. for the purpose of testing fallbacks. Even beyond that, they build mirror systems into those failure injections so that they can compare results in the failing system to the normal system without affecting the user experience. Overall, the purpose is to find and flag anything that could cause issues before the issues ever present themselves to the user.
Some other quick highlights/key learnings:
Different teams run their own products: there’s no “developer team” and “DevOps team”…instead teams develop, deploy, and maintain their product from beginning to end, and they’re each responsible for making sure it works with other parts of the system
Spinnaker manages deployments automatically: there are very few manual events taking place throughout the system
Deploy regionally and test before next deployment: thought automated, a lot of thought goes into the deployments to ensure nothing breaks, and that there’s time to make fixes if it does
Plan time of deployments: likewise, they don’t do deployments out of office hours…and certainly not between 7-10pm weeknights when the service is in high use
Redundancy –> 3 regions & 3 avail zones in each: if something fails, the client can get whatever data from another server, usually before the user even notices a problem has occurred with their initial connection
Failsafes at every level: they build resiliency into the apps to completely control the user experience…the app can get ahead of any issues before they become apparent to the user, same as the backend servers can
That’s a huge simplification of the three talks but overall I learned a lot and found it very interesting!
]]><p>I went to a super interesting trio talk tonight about how the delivery teams at Netflix operate in order to be able to serve the manySmörgåsbordhttps://www.niamurrell.com/code/2018-03-25-smorgas/2018-03-25T22:19:10.000Z2020-06-20T20:38:50.606ZSo much to catch up on after a busy week! I’ve made some good progress on the sites I’m working on, and also went to a few good events.
Websites
I’m slowly but surely pushing updates on one of the sites I’m working on into production. I’m really liking how it’s turning out. Of course, inevitably, things keep coming up that I think I’ve already figured out, and it turns out I haven’t. Right now it’s figuring out how to shift my page grid around and use the template structure I’ve already established. I think the solution will be adjusting the template structure, but want to make sure I think it all the way through before implementing anything.
On the other website I’m still waiting on content that needs to go in but have started working on the skeleton using lorem so it’s coming along.
Events
2 days ago I went to a really cool meetup where they were doing 2-minute lightning tech talks. There were 22 speakers and the topics were really varied, ranging from cryptocurrency to CSS to open source to career stories, and so so many more. It was great and I learned some interesting things! There was also some really, really good food 😍. Note to all meetup hosts: food other than pizza is appreciated!!
Yesterday I went to an all-day workshop about how to tell stories in writing or coding or speaking. I really enjoyed it—I met lots of interesting people and sadly, didn’t have enough time to talk to most of the people I met! They had so many interesting stories, and the workshop was set up that I actually got to hear them, albeit not long enough. We also had a look at contributing to open source which was helpful to walk through. It was a looong day but worthwhile!
Other Stuff
I’ve been working a running program and hit a 5k pb today! I took over a minute off…nice to see the program is working!
Up Next
I want to finish up the first site by the end of this week (may be tricky with a few events planned) so that I can focus on the other one exclusively over the next couple of weeks.
]]><p>So much to catch up on after a busy week! I’ve made some good progress on the sites I’m working on, and also went to a few goodRevisiting My Most Recent Projecthttps://www.niamurrell.com/code/2018-03-18-revisiting-last-project/2018-03-18T23:34:03.000Z2020-06-20T20:38:47.401ZAfter finishing the client site mockup yesterday I went back to my most recent project—it’s the one I wrote from scratch using CSS Grid. While it looked fine in the state I last wrapped it up in, there were definitely some things I wanted to improve on.
Refactoring Layout
For example I built a post archive page with search functionality, but from the way I wrote the initial layout, it would have required a lot of changes to add the one more link into the navigation menu. Not to mention adding a section to the home page..and a big call to action footer section (which would also be a sidebar when looking at post pages). Lots of breaking changes, based on how I wrote the grid!
So every time I sat down to tweak a little thing here or there, I kept going back and forth on how I should implement it. So today I spent a few hours laying the site out in Figma, both the desktop and mobile views, and a few of the pages. It really helped to tweak things in Figma and get it looking how I wanted it.
Nav & Icons/SVG
Once I had the layout set I started working on implementing…started with the nav bar. One thing I need to figure out is how to use SVG images inline in the navigation. I tried a few things that didn’t work so will need to figure that out. For now I’m using Font Awesome icons, but I’d really rather not add in 3 huuuuuge CSS files just to use 2 icons so I’ll need to fix that. Plus I’ll learn more about working with SVG!
Other Stuff
Gorgeous run today!!
Up Next
With the layout set I think I can wrap up this site by the end of the week. Dependent on work that comes in for the other project of course. Fingers crossed!
]]><p>After finishing the client site mockup <a href="/code/2018-03-17-figma-is-awesome/" title="yesterday">yesterday</a> I went back to myFigma Is Awesome!https://www.niamurrell.com/code/2018-03-17-figma-is-awesome/2018-03-17T23:20:36.000Z2020-06-20T20:40:43.330ZOk…loving Figma! It took some getting used to at first but once I got the hang of it, things moved much faster. Today I sat down and watched the intro video series all the way through and I’m glad I did—enough of the menu items are hidden or nested in the default view and it would have been hard to get much done without them. There are also a lot of keyboard shortcuts to take advantage of…made things a lot faster.
I finished the initial mockup for the homepage of the site I’ll be working on next and it looks pretty good! Hoping to get it signed off on tomorrow and then I’ll get coding.
Other Stuff
Now that I’m seeing how much better things can look than this current website, I was to re- redo it all over again. On one hand, I’ll never get to anything new if I keep redoing my site every couple of months! On the other hand…improvements! We’ll see… 😋
Up Next
Reviewing Q1 goals…I think I did pretty well with a couple of weeks to spare! I’ll have a closer look over the next couple of days in case there’s anything I missed.
]]><p>Ok…loving <a href="https://www.figma.com/">Figma</a>! It took some getting used to at first but once I got the hang of it, things movedSite Mockup With Figmahttps://www.niamurrell.com/code/2018-03-16-site-mockup-figma/2018-03-16T22:32:31.000Z2020-06-20T20:32:46.379ZI’m working on mocking up an initial layout for this new site I’m building. I’m finding it tedious, mostly because it’s taking me more time to learn the layout tool than to actually come up with a layout! I’m using Figma after hearing a lot of good things about it. I can definitely see that this is a very valuable step in the process. It’s helpful to have come across this video tutorial series to learn the basics about using the tool. Hoping to get something mocked up this weekend!]]><p>I’m working on mocking up an initial layout for this new site I’m building. I’m finding it tedious, mostly because it’s taking me moreTesting New Hugo Themehttps://www.niamurrell.com/code/2018-03-14-testing-new-hugo-theme/2018-03-14T22:08:01.000Z2020-06-20T20:40:35.996ZToday I did a test deployment using the Hugo theme I plan to use for this new site I’m working on. I started from scratch with the theme, rather than trying to get the content from my first test run to work on a new theme. It’s pretty clear that theme setups can be drastically different, so porting from one to another with existing content is likely to be a big pain…good to know for future!
Netlify Deployment Round 2
Much quicker this time around, having done it before. I got the site up and running with the CMS in about 20 minutes! I can’t get over how awesome all of this static gen/Netlify stuff is.
I also tried Netlify’s form handling and set up a contact form on the demo site. Initially there were some conflicts with the theme’s JS but I got it working.
Hugo Theme
The one downside of using this theme rather than building from scratch is it’s sooooo bloated! There is so much in it I don’t need. And it loads so so many JS and CSS files. Not a big fan of that.
Up Next
Now I feel pretty set to start working on this site. I’ll mock up some designs for sign off then will probably get started over the weekend!
]]><p>Today I did a test deployment using the Hugo theme I plan to use for this new site I’m working on. I started from scratch with theDeploying A Hugo Site & Netlify CMShttps://www.niamurrell.com/code/2018-03-12-deploying-hugo-netlify-cms/2018-03-12T09:31:44.000Z2020-06-20T20:40:32.185ZI’m learning a bit more about Hugo. Today I tried to deploy the test site to Netlify so that I can install the CMS. There were several problems…this is what I learned in the process.
Hugo Themes
One thing that’s not great is how specific a site will be to its theme…or rather how specific themes are: it makes changing themes not so simple because you have to edit so many settings and files to move from one theme to the other.
Themes As Submodules
So what I did last time was totally wrong: if you make and commit changes to the theme (which is a git submodule), it breaks the deploy process. This is because adding a submodule through git from a remote repository actually adds a specific commit, and Netlify looks for that commit’s SHA during deployment. But since it was looking to match the latest commit (the local one I made) with the origin repo (remote), it doesn’t find a match and breaks.
To solve this I did git reset --hard <remote SHA> and deleted the changes I made to the theme. There is a way to customize themes which I will have to look into more deeply once I get through this test deployment.
Deploying to Netlify
One thing that’s important for Netlify to deploy correctly is having all of the basic structure folders in the GitHub repo it’s deploying from. But in a demo project, at least initially, some folders will be empty initially. Problem: Github doesn’t accept empty folders being pushed to the remote repository! In my case I had to add dummy files to make sure these folders remain in place, for the benefit of Netlify (thanks to this post for explaining):
$ cd main/project/folder $ touch layouts/.gitkeep $ touch data/.gitkeep
Another strange thing was that Netlify, by default, runs a really old version of Hugo during the build process. That resulted in a failed deployment:
ERROR: 2018/03/13 00:51:25 hugo.go:421: Current theme does not support Hugo version 0.17. Minimum version required is 0.25
To fix this I found the Hugo version I’m running locally:
$ hugo version Hugo Static Site Generator v0.37.1 darwin/amd64 BuildDate:
Then tell Netlify to use this version too:
From the Project Overview, open Site Settings
Open Build & deploy
Scroll down to Build environment variables and click Edit variables/New variable
Create a new variable with the key HUGO_VERSION and value 0.37
Save
Next time around everything went to plan and the site deployed. Woop woop!
Adding Netlify CMS
THIS IS AN AWESOME TOOL!! Not much to say about setup…the docs were thorough and I didn’t run into any issues. It works by having you add an admin page to the static site with their JavaScript embedded. As the site owner I can grant access to anyone to be able to make edits to the content, and they authenticate using email, Google auth, or GitHub, Bitbucket, etc. Once logged in, there’s a WYSIWYG editor, or you can just write Markdown. Then when you publish, it adds the new content as a commit to the repo, which automatically triggers a new deploy in Netlify. GENIUS!
Oh and it’s free!
Other Stuff
I watched a few videos in the React section of the course I was doing but I’m going to tap the breaks on learning React for now. I’ve got this other project to work on, and I think I need to spend some more time in vanilla JS before jumping in. So will get back to that later.
Up Next
Play around with the publish mode in the CMS…it allows you to draft/edit/publish posts instead of automatically publishing as step 1. Then once I’ve got a handle on all of this, will start building out the client site.
]]><p>I’m learning a bit more about Hugo. Today I tried to deploy the test site to Netlify so that I can install the CMS. There were severalSandboxing Hugohttps://www.niamurrell.com/code/2018-03-10-sandboxing-hugo/2018-03-10T20:40:09.000Z2020-06-20T21:45:05.829ZGot an intro to Hugo today! Yesterday's quick look into Gatsby showed me that I’m not ready to tackle a React site yet so today I looked into Hugo. I’m going to be building a site for a small business and it has a few requirements:
Cheap (ideally free)
Modern & responsive
Low maintenance
Full-feature blog
Easy for client to add/edit content
Using a static site & generator covers #1-4 and after looking into Netlify CMS, I think that will be # 5 covered as well. But Hexo doesn’t integrate as easily with Netlify CMS yet so I figured I’d give Hugo a try!
Hugo First Impressions
Really easy to get set up and give it a go. The syntax is very different but not impossible. The structure is not far off from Hexo and quite similar to Jekyll. Plus there’s great documentation and a video series which highlighted some of the main differences.
I also found this tutorial very helpful—it shows how to get started with Hugo, how to deploy the site to Netlify, and how to add Netlify CMS to the site. So exactly what I will be doing. 😋
Git Submodules
The quickstart tutorial recommended installing the theme as a submodule—never heard of that before! This keeps the theme separate from the site repo, basically a repo within a repo. To add the submodule to a project:
git submodule add https://github.com/path/to/repo
The bit that stumped me was handling changes. I made some changes to the theme, but they weren’t being added to git staging when I ran git add . in the project folder. I learned you have to commit changes in the submodule separately, and then commit that you made changes to the main project:
This was confusing at first, and apparently it gets way even more confusing when the submodule is a repo that’s shared by other people…although that is the main reason why you would use it—to use other bits of code which may itself get updates and changes regularly. In these scenarios, there’s a lot more to do for keeping the submodule up to date with the remote repo…I won’t really have to do that with this project though (luckily!). Found a pretty good article to read up on this though, if ever needed.
Up Next
Lots of plans tomorrow so not sure how much I’ll have time for, but next steps are to try a different theme, deploy to Netlify, and add a CMS to the test site.
]]><p>Got an intro to Hugo today! <a href="/code/2018-03-09-gatsby-intro/" title="Yesterday's">Yesterday's</a> quick look into GatsbyGatsby Introhttps://www.niamurrell.com/code/2018-03-09-gatsby-intro/2018-03-09T22:22:12.000Z2020-06-20T20:32:45.624ZToday I watched a few videos getting an intro to Gatsby. I’ll be working on a personal site/blog and would like to create it so that the site owner can add content using a CMS like Netlify CMS or Contentful. Both of those seem to work well with Gatsby sites and I thought maybe I could jump in and just start using it.
Wrong! Definitely haven’t learned enough React yet to have any kind of efficacy using Gatsby. So I will keep working!
Other Stuff
I watched some pretty good conference talks from Ela Conf.
Up Next
Continuing with the React tutorials, and starting to work on this new project.
]]><p>Today I watched a <a href="https://www.youtube.com/watch?v=b2H7fWhQcdE&list=PLLnpHn493BHHfoINKLELxDch3uJlSapxg">few videos</a> gettingMore React - Basic Structure & Propshttps://www.niamurrell.com/code/2018-03-04-more-react/2018-03-04T18:02:21.000Z2020-06-20T20:38:27.094ZToday I continued learning React in the class I’m doing. We’re using create-react-app and I’m definitely feeling like a lot of the basics are being abstracted away, but I’ll go with it for now. Actually, it’s a lot of new ideas even with a lot of things that have been taken away, so maybe it’s a good introduction. We started by building a basic app and passing props around.
Basic App Structure
Based on what we’ve covered so far, the basic structure of an app is as follows:
index.js uses React and ReactDOM to render your app file
The app file is itself a component which passes props on to its subcomponents. For example in our RecipeApp.js, we display the Recipe component and put several details in:
classRecipeAppextendsComponent{ render() { return ( <div className="App"> <Recipe title="Gnocchi" ingredients={["Flour", "Potato", "Water", "Salt"]} img="https://d3cizcpymoenau.cloudfront.net/images/legacy/33593/CVR_SFS_potato_gnocchi_008.jpg" instructions="Blend all ingredients well. Form into small balls. Boil then pan-fry the balls." /> </div> ); } }
The Recipe component uses these props to render data:
Setting default props ensures that something is available for the .map() function above. Another option is to define the default props separately from the class:
propTypes is a React package that sets requirements on component props. It’s not included in React and needs to be added separately: npm i prop-types. It’s only useful in development and does nothing in production. Here’s the documentation for future reference.
Up Next
More React lessons!
]]><p>Today I continued learning React in the class I’m doing. We’re using <code>create-react-app</code> and I’m definitely feeling like a lotStarting Reacthttps://www.niamurrell.com/code/2018-02-24-starting-react/2018-02-24T20:00:47.000Z2020-06-20T20:40:20.381ZToday I finished up the D3 sections of the course. In the end I decided to watch the videos only, so as to have a decent introduction to D3. Without having something in mind to put it to use with straight away, I was having a hard time finding the motivation to dive very deeply into it. On the other hand I am really super keen on getting intro’d to React to see if I want to completely re-do the whole site I just finished using React! So after wrapping up with D3 we started on React.
React First Impressions
Having literally just started, I’m sure there are lots of things I have to look forward to. They’re not apparently clear yet. But the things that have stood out so far:
Everything is built in modular components which are stitched together (I like!)
Because the components are small pieces, inline CSS is the norm
I see the potential for a crazy fractured file structure which I’m not usually a fan of.
The intro to JSX has also been interesting, I think there will be some little niggles that trip me up while getting used to the slightly-different syntax from normal JavaScript/HTML.
Website Project
I’m still thinking about the website project I just “finished” too. Now that it’s up there is a loooooong list of things I think should be better. I don’t know if I should put time into them though, immediately. Doing so would take away from learning time from other things (plus I might want to re-do it again with React after anyway), not to mention some projects I want to do for work. I’ve had less time during the weeks recently to work on things so figuring out what to prioritize has been a bit tricky recently. Doesn’t help that I want to see more progress overall, at the same time.
Up Next
Continuing with this course, hopefully to wrap it up within a week…or 2 weeks with a nice demo coming out of it.
]]><p>Today I finished up the D3 sections of the course. In the end I decided to watch the videos only, so as to have a decent introduction toRedirects For The Winhttps://www.niamurrell.com/code/2018-02-17-redirects-for-the-win/2018-02-17T23:10:27.000Z2020-06-20T20:39:14.198ZSite is published! Not surprisingly it was a little bit more of a headache than anticipated but it got there in the end.
Unlocking the domain for transfer was probably the most nail-biting. I did a test run last week and everything happened within just a couple of minutes. Of course it takes multiple times longer the day before the domain expires…just to make it extra interesting!
Once the domain was unlocked I transferred it and then implemented a custom domain using Netlify. Netlify is amazing. It was so easy to set up, and they manage the DNS as well, and provide a free SSL certificate. But the biggest win was being able to set up a redirects file which absolutely saved the day, since I had been using a URL shortener WordPress plugin before. Setting up the redirects in one files saves loads of time from creating dummy landing pages for each link.
And now I’m 100% switched over and off of Wordpress. Feels pretty awesome!
Up Next
Now that it’s published, of course there are so many things I want to re-do straight away. So will work on some of those tomorrow! But after this weekend I’m going to put it down for a bit to work on other things in the queue.
]]><p>Site is published! Not surprisingly it was a little bit more of a headache than anticipated but it got there in theT-Minus One Dayhttps://www.niamurrell.com/code/2018-02-16-t-minus-one-day/2018-02-16T23:07:12.000Z2020-06-20T20:37:53.061ZT-minus one day until launch for the new website. Well, technically it’s already launched, but tomorrow I’m taking down the existing site and pointing the URL to the new site. There is so much I still want to do to it before go-live but I need to just get it out. Literally…it’s up for renewal the day after tomorrow!
Latest Updates
Today I styled the search engine form, inspired by this pen on CodePen. I think it looks pretty cool! I also added an archive list using tables, which I had to look up, because I don’t think I’d written an HTML table since the late 90s 😂
Other Stuff
New podcast! I came across the Indie Hackers podcast and am really enjoying the episodes so far.
Up Next
Moving the site over tomorrow morning…fingers crossed all goes well!
]]><p>T-minus one day until launch for the new website. Well, technically it’s already launched, but tomorrow I’m taking down the existingSearch Engine Refactor - jQuery to Vanilla JShttps://www.niamurrell.com/code/2018-02-14-search-engine-refactor/2018-02-14T23:26:11.000Z2020-06-20T20:37:49.112ZToday I added the ability to search to the project I’ve been working on. I had a good starting point from when I added search to this blog, but I didn’t want to introduce jQuery into that project, so I had to rewrite some sections. In the end I also refactored it a bit to be much clearer to read.
jQuery to Vanilla JS
The biggest change was handling the AJAX requests (loading JSON data) using XMLHTTPRequest instead of $.getJSON(). I considered using the Fetch API or Axios (based on my recent exploration of AJAX methods); but since fetch isn’t supported in IE, and since I really am trying to avoid outside dependencies as much as possible, I went for the simplest option.
Not surprisingly, removing jQuery made the code a lot longer. But that prompted me to break it down into smaller functions to make it more readable. I also think I did a good job improving the function names—I was able to take out most of the comments and it’s still very understandable.
I also made the AJAX call a higher order function since it gets called multiple times:
functiongetJSON(callback, input) { var request = new XMLHttpRequest(); request.open("GET", "/content.json", true); request.onload = function() { if (request.status >= 200 && request.status < 400) { var data = JSON.parse(request.responseText); callback(data, input); } }; request.send(); };
So nice to see I am learning & improving!
Up Next
I’ve got all the data showing up as it should, and now need to style it and then incorporate search into the nav and footer.
]]><p>Today I added the ability to search to the project I’ve been working on. I had a good starting point from when I <aDNS and Domain Name Transferhttps://www.niamurrell.com/code/2018-02-12-dns-and-domain-transfer/2018-02-12T21:50:54.000Z2020-06-20T20:37:44.289ZToday I worked on some admin stuff for the website project I’ve been working on. I’m moving it from be registered & hosted on one domain, to being hosted & served by Netlify. I also want more the domain because it costs about 25% more on the existing service than it would elsewhere.
No More AWS
The original plan was to move the domain to AWS because I host other sites there, and I like having everything in one place. But on looking into it further, given it’s on Netlify which has its own CDN and provides free SSL on custom domains, being on AWS actually seems to mean paying for a few things Netlify is already providing for free. Even if it’s just pennies a month, why pay when it’s free elsewhere?
Or at least I’m pretty sure it is. In my mind I hadn’t separated the AWS Route 53 registrar service from its DNS service. The domain registration is roughly the same annual fee ($12) as other registrars. On top of that it’s $0.50/month for the DNS services. Plus, since AWS CloudFront is also required for SSL certificates, there are a few pennies every month for those services as well.
I came across some interesting blog posts which led me to Google Domains…it’s the same annual registration fee, private registration, and added bonus—an easy way to integrate domain-name email as well. And as far as I can tell (I’m really hoping I’m understanding correctly!?) the DNS services are included too.
So in a few days I will make the big transfer, shut down the Wordpress site, and it will be purely my own project out there in the wild. Exciting!
Other Stuff
Catching up on a bunch of podcasts, there is so much good content out there! CodeNewbie and Command Line Heroes are great, and discovered the Indie Hackers podcast today too. Looking forward to diving into that one next!
Up Next
I will be working on building an extended footer for the new site, and also adding search functionality. Glad I already figured that out for this blog 😝
]]><p>Today I worked on some admin stuff for the website project I’ve been working on. I’m moving it from be registered & hosted on oneIntro to SVGhttps://www.niamurrell.com/code/reference/2018-02-10-intro-to-svg/2018-02-10T13:18:47.000Z2021-06-19T22:25:32.380ZFitting with the work we’re doing with D3, now we’re learning about scalable vector graphics aka SVG.
The basic SVG element is placed in your HTML and contains the following:
Lines and curves are then placed inside the SVG element in HTML. Descriptors of some of the basic building blocks are below, and at the very end an example of putting it all together.
Basic SVG Rules
If you draw an SVG element outside of the SVG area, it will get cropped or just won’t be visible.
SVG elements are drawn top to bottom in the order of the html. To layer elements, the bottom layers must come first.
The default fill color for any SVG element is black.
Drawing Lines
To draw a line, identify the coordinates of the starting position (x1 and y1), the coordinates of the ending position (x2 and y2), and the width of the line (stroke-width). The color can also be set with the stroke property.
Note that the (0,0) coordinates are in the upper left corner, and that the y-axis increases in numbers from top to bottom. So the line above would start in the upper left and move to the lower right ends of the box.
Drawing Rectangles
Rectangles (rect) require starting x and y coordinates, a width, height, and optionally rx and ry which give a horizontal & vertical radius to the rectangle corners:
Circles are determined by the x & y coordinates of the center (cx and cy) and the radius r of the circle. To draw an ellipse, use a separate radius for x and y with rx and ry.
In this way, they can be styled as one element either inline in HTML as above, or in CSS.
Rotating SVG Elements
Use the CSS transform property to rotate lines, shapes, or text elements. It should be defined with the number of degrees to rotate, and the x + y coordinates of the point to rotate around.
Adding Text
Text can be added by identifying where it should be placed and then using the <text> element. Other properties can help with placement:
text-anchor sets a point where the bottom-middle of the element should be anchored horizontally: start, middle, or end
alignment-baseline sets the point where the left-middle of the element should be anchored vertically: hanging (bottom-left), middle, or baseline (top-left)
font-size and font-family can be used as they are in normal CSS
Colors are set like other SVG elements with fill, stroke, and stroke-width
Putting It All Together
A polygon, circle layers, text, and rotation can all be referenced in this CodePen pen. Here is another pen just to play around with SVG elements.
SVG Path Element
A simpler way to draw SVG elements without taking all of the steps in the above is to use the <path> element, which can contain a very long list of instructions about how to draw the shape.
The main attribute is the d attribute which takes a number of commands indicating where to draw:
M moves the cursor from one location to another without drawing anything: M X Y moves it to point X,Y
L draws a line from the cursor position to the XY coordinates specified in L X Y.
L commands can be chained to create polygons
Z closes the path; it’s a shortcut to move the cursor back to the path’s starting point
H and V are additional shortcuts to draw horizontally or vertically from the current position
There are also several curves which, due to their mathematical principles, would normally be drawn in software which would output an SVG path element, but to list them:
Q makes a quadratic Bezier curve
C makes a cubic Bezier curve
A makes a circular arc and is the most flexible, and also most complex
These commands can also be used with lowercase letters: instead of indicating what X,Y point to go to from the current position, with lowercase letters it indicates how far you want the cursor to go from the current position.
I made some SVG flags using path elements and regular shapes to play around with these concepts. One thing I learned from watching the code-along after: for the UK flag’s diagonal crosses I could have set the starting points outside of the SVG area to avoid making the corners manually. Otherwise I think I did pretty well!
Other Stuff
This week I’ve been working on that other side project and it is deployed! Well a test site is up, and the final deployment will happen this week. I have a few nice-to-haves I’ll be adding in the meantime but overall it’s done, working, and should last a while. I’m really pleased with how it turned out, and I learned a lot!
Up Next
Next in this course we are going back to D3 for the next level, and will be incorporating SVG elements in with the data. I’ll keep adding to the D3 post so that everything’s in one place for reference.
]]><p>Fitting with the work we’re doing with D3, now we’re learning about <strong>scalable vector graphics</strong> aka SVG.</p>
<p>The basicCSS Site - Prefixes & Morehttps://www.niamurrell.com/code/2018-02-03-css-grid-site-tweaks/2018-02-03T13:55:27.000Z2020-06-20T20:37:36.131ZI got a lot more work done on the new site today. It was a lot of little tweaks but aggregated I’d say I made some good progress (I hope?!).
So now the site is completely responsive, although now I’m working on collapsing the nav menu for small screens, and something with the spacing is off so I’ll need to figure that out tomorrow.
I also learned a bit about browser support for CSS and all of the prefixes that need to be used. There are a lot! But I found some good tools (Prefixer tool and Should I Prefix) that can help with this. Although I think it will be even better once I start using build tools that can do it automatically.
I also sorted out all the meta tags so that the site content will look as it should for Twitter, Facebook links, etc.
Other Stuff
I saw an awesome play tonight!! The Imposter–seriously so good.
Up Next
Tomorrow I finish up with the nav, and then lots of other things. The to-do list seems to be growing faster than the done list! But I think I will do an initial deploy test run tomorrow or the day after so that I have time to work out those kinks.
]]><p>I got a lot more work done on the new site today. It was a lot of little tweaks but aggregated I’d say I made some good progress (IGrid It Uphttps://www.niamurrell.com/code/2018-02-02-grid-it-up/2018-02-02T22:14:14.000Z2020-06-20T20:40:03.350ZI spent the day working on a website that I’m building from scratch. It’s coming together really nicely!
CSS Grid Is Awesome
It’s been awesome to learn how CSS Grid works while building this. Bottom line: it is great. I’m still playing around with (and a bit perplexed by) making grids completely responsive: at the moment things seem to grow & shrink well until about tablet-size and then they stop shrinking. It’s also not at all vertically responsive. I know I need to add in some shifted grid areas for one section in particular, but otherwise I think it’s because I still need to master auto-fit / auto-fill and minmax().
I’ve also had a few cases where it’s better to use a flex display rather than grid, for example if there is an odd number of elements, and I want the odd one out to be center-justified if it wraps into a new row.
Overall I can definitely see that I’ve learned a lot since I first started learning Flexbox and Grid 2 weeks ago.
Up Next
I have a lot of cleanup to do next to get rid of weird formatting from porting the posts from Wordpress to markdown files. Then I have some other adjustments (add JS for sticky/scroll nav, add RSS feed, etc.). Otherwise, I’m ahead of schedule for deploying!
]]><p>I spent the day working on a website that I’m building from scratch. It’s coming together really nicely!</p>
<h3D3 Beginningshttps://www.niamurrell.com/code/reference/2018-01-31-d3-beginnings/2018-01-31T21:08:58.000Z2021-06-19T22:25:32.496ZToday we started learning D3. Lots more new info to process! I will compile this post as a catch-all reference guide over the next few days of instruction.
I don’t know why I assumed it would require a big installation to work with D3. Not so! It’s just a matter of including the JS library in your HTML:
<scriptsrc="https://d3js.org/d3.v4.js"></script>
Basic Selections
d3.select() // select one element d3.selectAll() // select multiple elements
The basic selector methods select in the same way CSS and jQuery select, by .class, #id, or element. These methods return a selection object containing a _groups array and a _parents array.
If you want to access the elements themselves, use the node method (or nodes for multiple elements):
d3.selectAll("li").nodes(); // returns an array of li elements d3.selectAll("li").node(); // returns the first li element
Selections can be manipulated with several methods:
.style(property [, newValue]) allows you to add CSS
.attr(attribute [, newValue]) allows you to change attributes
.text([newValue]) allows you to add/remove text
.html([newValue]) allows you to add/remove HTML
.append(tagName) allows you to add HTML elements & return a new D3 selection
For each of these methods, you can also place a callback function in place of newValue. This callback has a specific structure which is defined below.
If you don’t pass in any value, these methods will act as getters:
// Manipulate elements d3.select("#page-title") .style("background-color", "#000") .style("color", "#fff") .attr("class", "#new-class") .text("This new text will replace the old!");
// Get values already ascribed d3.select("#page-title") .style("background-color") // #000 .style("color") // #fff .attr("class") // list of classes .text(); // whatever text is inside
Instead of getting classes with the attr method, it’s preferred to use the classed method instead. The first parameter of the method is a list of classes and the second is true if you want to add the list of classes to the selection, or false if the classes should be removed from the selection:
selection.classed("space separated list of classes", boolean);
Finally, the remove method also works as a selector and removes elements at the same time.
Event Listeners
selection.on("eventType", callback)
Note that only one event listener can be attached to each element; if you attach more than one, it will only run the last one.
You can also remove an event listener with null passed in as the 2nd parameter:
selection.on("eventType", null)
For the callback function, the d3.event property must be used inside of the event handler to gain access to normal event handling object properties. Here is an example of an form submission event handler callback function in action:
// On submitting form, add the value of the input to a new list item // then clear the input
Here is a first look at passing data into the DOM for display. This work with an empty ul with an id of #quotes, and an array or objects var quotes which contains (you guessed it) movie titles and quotes.
Select all lis in the list…but there are none to start! D3 creates a selection object with empty nodes for these lis.
Use the data method to attach the quotes array data to placeholder __data__ nodes.
Use the enter method to create a D3 selection from the placeholder nodes.
Append the data to the li DOM elements (note: append must be after the parent element has been selected, otherwise the element in question will be appended to the html element)
And finally set the text to return the desired property from the data object with a callback function.
Also worth noting: once the elements have been added to the DOM, they can be selected and manipulated using normal D3 selectors, and they remain bound to whatever data they were created with. In the above example, we could select the lis to change the text to the film title for example:
Callback functions in D3 take two parameters: the first is the data that’s getting passed into the DOM, and the second is the index it’s being passed in at (not needed/shown above). This is the default structure any time a callback is passed into a D3 method.
Refactoring
The operation above could be refactored and expanded on to make a more visually compelling display:
Like enter(), there is an exit() method on D3 objects to remove data. By default data is bound by index, so it’s necessary to bind data to elements to remove items correctly.
For example, if there are 5 values and you only want to display three of them (lets say odd integers from 1-5), by default D3 will recognize that there are three elements to keep, but it will only keep indices 0, 1, and 2. Not what we want!
Instead we can bind the data to DOM elements by adding a key function as the second parameter to the data() method during the selection. In the refactored code above, we add all quotes to the DOM and style them. Now let’s select only certain quotes, bind the data to each DOM element, and delete the ones we don’t want:
var nonRQuotes = quotes.filter(function(movie) { return movie.rating != "R"; });
When items are added to or removed from the DOM, they are stored separately from items that were already in the DOM. This refers to the selection types:
Enter selection: data with no DOM elements attached
Exit selection: DOM elements with no data attached
Update selection: items with both data and DOM elements attached
To treat all of the items on a page as one, these separate storage areas need to be merged:
selection.merge(otherSelection)
This will create a new single selection with everything in it. All together, this makes up the general update pattern that is standard in D3:
Grab the update selection, make any changes unique to that selection, and then store the selection in a variable.
Grab the exit selection and remove any unnecessary elements.
Grab the enter selection and make any changes necessary to that selection.
Merge the enter and update selections, and make any changes you want to be shared across both selections.
Putting It All Together
To put it all of this (so far) together we coded a simple form which would display all of the unique characters in a string as a bar graph, where the height of the bar represents the number of times the character appears. It also stores the count from a previous string, but exits those items when a third string comes into the mix. This is the code I came up with (partly on my own):
// From sorted string create objects with CHARACTER and COUNT for each unique character functiongetFrequencies(str) { let sorted = str.split("").sort(); let data = []; for (var i = 0; i < sorted.length; i++) { var last = data[data.length - 1]; if (last && last.character === sorted[i]) last.count++; else data.push({character: sorted[i], count: 1}); } return data; }
The main part I had trouble with was handling the new vs. old string. In my first attempts I tried to store these values for comparison, but merging them was very convoluted and the walk-through showed a much better way (above).
I also tried a few different approaches for the getFrequencies() function, but ultimately created the currentObj in a way that didn’t work well with joining the data in D3: it was necessary to create an array of objects so that each object could be treated as a data entry. Creating a single object from the array ({h: 1, e: 1, l: 2, o: 1} etc.) made it much harder to join, trying to iterate through the keys. Actually, I couldn’t do it at all! So good to have the walk-through :)
]]><p>Today we started learning <a href="https://d3js.org/">D3</a>. Lots more new info to process! I will compile this post as a catch-allES2016 & ES2017https://www.niamurrell.com/code/reference/2018-01-30-es2016-es2017/2018-01-30T21:29:03.000Z2021-06-19T22:25:32.380ZThe next section of the class I’m doing builds on the ES2015 section and shows what’s new in ES2016 and ES2017.
If you need to pad a string to be a specific length, these methods let you do it. The first parameter is the total desired length, and the second is the character to pad with (empty spaces if 2nd param is omitted):
Async functions simplify writing promises: with the await keyword (which can only be used inside async functions) you can pause the execution of the function to wait for a Promise to be resolved.
asyncfunctiongetMovieData(){ console.log("starting!"); var movieData = await $.getJSON('https://omdbapi.com?t=titanic&apikey=thewdb'); console.log("all done!"); // does NOT run until the promise is resolved! console.log(movieData); }
To handle errors with async functions, you can use a try/catch statement:
asyncfunctiongetUser(user){ try { var response = await $.getJSON(`https://api.github.com/users/${user}`); console.log(response.name); } catch(e){ console.log("User does not exist!"); } }
getUser('elie'); // Elie Schoppik getUser('foo!!!'); // User does not exist!
Sequential vs. Concurrent Async Requests
If you run multiple async requests within a function, each will wait in turn until the previous is resolved. In the example below responseTwo does not make the HTTP request until responseOne resolves:
asyncfunctiongetMovieData(){ var responseOne = await $.getJSON(`https://omdbapi.com?t=titanic&apikey=thewdb`); var responseTwo = await $.getJSON(`https://omdbapi.com?t=shrek&apikey=thewdb`); console.log(responseOne); console.log(responseTwo); }
This should be refactored to start the HTTP requests in parallel, and then await their resolved promises:
asyncfunctiongetMovieData(){ var titanicPromise = $.getJSON(`https://omdbapi.com?t=titanic&apikey=thewdb`); var shrekPromise = $.getJSON(`https://omdbapi.com?t=shrek&apikey=thewdb`);
var titanicData = await titanicPromise; var shrekData = await shrekPromise;
A proposed change in ES2017 is to introduce the rest & spread ... operator to objects. This would gather the rest of the keys and values in an object and create a new object out of them:
var instructor = {first:"Elie", last:"Schoppik", job:"Instructor", numSiblings:3};
You can also spread out keys and values to move them from one object to another:
var instructor = {first:"Elie", last:"Schoppik", job:"Instructor"};
var instructor2 = {...instructor, first:"Tim", last:"Garcia"};
The spread operator can also be used to assign default values more concisely than the Object.assign() method:
var defaults = {job: "Instructor", ownsCat:true, ownsDog: true};
var matt = {...defaults, ownsCat: false};
var colt = {...defaults, ownsDog: false};
Up Next
Next section we start on D3 and data visualizations!
]]><p>The next section of the <a href="https://www.udemy.com/the-advanced-web-developer-bootcamp/">class</a> I’m doing builds on the <aES2015 Introhttps://www.niamurrell.com/code/reference/2018-01-29-es2015-intro/2018-01-29T22:18:19.000Z2021-06-19T22:25:32.380ZI’ve been looking forward to this for a while! Although I’ve used ES6 in several projects and courses here and there, until now I haven’t really had a proper introduction to the basic ins & outs. This is the overview of all of the course sections on ES6 (aka ES2015).
The const variable sets a value that cannot be changed for strings, numbers, booleans, null, undefined, or Symbol. Note that arrays and objects can be changed:
var bim = "bim"; // bim bim = "bam"; // bam
const bim = "bim"; // bim bim = "bam"; // TypeError: Assignment to constant variable. const bim = "bam"; // SyntaxError: Identifier 'bim' has already been declared
The let variable sets a value with scope only in certain blocks (if, for, while, do, try, catch, finally). Let can be reassigned, but cannot be redefined after its initial declaration. One difference between var and let: although let does hoist to the top of the block it’s in, it’s definition does not and trying to access it will result in a Reference Error:
Let is useful when you want a variable to only be accessible in a specific scope. An example with setTimeout:
// As below, var is global and the for loop runs before setTimeout for(var i = 0; i < 5; i++){ setTimeout(function(){ console.log(i); },1000) } // 5 (five times)
// Pre-ES2015, the fix is to put a new function inside setTimeout: for(var i = 0; i < 5; i++){ (function(j){ setTimeout(function(){ console.log(j); },1000); })(i) } // 0 // 1 // 2 // 3 // 4
// With let, i is not global so a 2nd function isn't necessary: for(let i = 0; i < 5; i++){ setTimeout(function(){ console.log(i); },1000); } // 0 // 1 // 2 // 3 // 4
Template Strings
Template strings give a more streamlined way to concatenate strings:
// Old way: console.log("Welcome " + name + ", enjoy your time here!");
// New way: console.log(`Welcome ${name}, enjoy your time here!`);
You can also write multi-line strings with backticks.
Arrow Functions
Functions can also be streamlined with arrow functions. And bonus: if the function is on one line, no curly braces or return statement are needed:
// ES2015 var doubleAndFilter = arr => arr.map(val => val * 2).filter(num => num % 3 === 0);
doubleAndFilter([5,10,15,20]); // [30]
Note that is there is only one argument in the function, it does not need to be wrapped in parentheses.
One really important thing about arrow functions is that unlike using the function keyword, the keyword this is not automatically attached to the function. Instead, this is attached to the enclosing context. So be sure to use the function keyword if this is necessary:
For this reason, it’s bad form to use arrow functions as methods on an object!
Another important difference is how the arguments keyword works. It doesn’t! Well, it doesn’t work inside a function, but it does work if it’s called inside a function that’s in another function.
Default Parameters
Super cool! You can set a default value for the parameters of a function with ES6. If you pass one argument to a function with two parameters, it will consider the argument as the first default). Examples:
functionadd(a=7, b=9) { return a + b; }
add() // 16 add(1) // 10 add(1, 4) // 5
For…of Loops
Works in places where for...in loops can’t, like in arrays. Can’t be used on objects, or any other data type without the Symbol method in its prototype. Strings, arrays, maps, and sets do have this symbol iterator.
Rest & Spread Operators
Uses ... as a placeholder for the rest of the arguments in a function:
// ES5 functionsumArguments(){ var total = 0; for(var i = 0; i < arguments.length; i++){ total += arguments[i]; } return total; }
// A little fancier ES5 functionsumArguments(){ var argumentsArray = [].slice.call(arguments); return argumentsArray.reduce(function(accumulator,nextValue){ return accumulator + nextValue; }); }
// ES2015 - do NOT use arrow functions here! var instructor = { sayHello(){ return"Hello!"; } }
Adding Properties to Objects:
// ES5 var firstName = "Elie"; var instructor = {}; instructor[firstName] = "That's me!";
instructor.Elie; // "That's me!"
// ES2015 var firstName = "Elie"; var instructor = { [firstName]: "That's me!" }
instructor.Elie; // "That's me!"
Object.Assign
In ES5 you can’t assign an object to another without changing the original object:
// ES5
var o = {name: "Elie"}; var o2 = o;
o2.name = "Tim"; o.name; // "Tim"
To get around this reference issue, we can use the assign method:
// ES2015
var o = {name: "Elie"}; var o2 = Object.assign({},o);
o2.name = "Tim"; o.name; // "Elie"
Object.assign() accepts a series of objects and returns a new object with all of the keys and values assigned to it from the series. To create a new object, be sure to include an empty object as the first parameter. Otherwise it will alter the first parameter with all of the new key-value pairs added to it.
But do note: it doesn’t create a deep clone; if this is necessary it will need to be hard coded:
// ES2015
var o = {instructors: ["Elie", "Tim"]}; var o2 = Object.assign({},o);
o2.instructors.push("Colt");
o.instructors; // ["Elie", "Tim", "Colt"];
Improvements For Working With Arrays
Array.from()
Array.from() allows us to create an actual array from an array-like object (as in from strings, maps, sets, ...arguments, DOM selectors, etc.). These objects look like an array but don’t have all of the array methods attached:
// ES5 var divs = document.getElementsByTagName("div"); // returns an array-like-object divs.reduce // undefined, since it is not an actual array
var converted = [].slice.call(divs) // convert the array-like-object into an array converted.reduce // function reduce() { ... }
// ES2015 var divs = document.getElementsByTagName("div"); var converted = Array.from(divs);
var firstSet = newSet([1,2,3,4,3,2,1]); // {1,2,3,4} var arrayFromSet = Array.from(firstSet); // [1,2,3,4]
Find and FindIndex
Find is a useful way to search through an array for a value without using a for loop. The find() method accepts a callback with value, index and array (just like forEach, map, filter, etc.) and returns the value if found, or undefined if not found.
If you only need the index, rather than writing this function with two parameters and returning the index, there is another method findIndex which just returns the index automatically, or -1 if the item is not found.
The includes method is more straightforward than using indexOf to look for a value in a string: it returns a boolean if the value is in the string or not. Note that as of ES2016 the includes() method works on arrays as well as strings.
//ES5 "awesome".indexOf("some") > -1// true
//ES2015 "awesome".includes("some"); // true
Improvements For Working With Numbers
Now there is a simpler way to check if a number is not a number NaN using the isFinite method which is called on the Number constructor:
// ES5 functionseeIfNumber(val){ if(typeof val === "number" && !isNaN(val)){ return"It is a number!"; } }
// ES2015 functionseeIfNumber(val){ if(Number.isFinite(val)){ return"It is a number!"; } }
Similarly you can use Number.isInteger() to check for an integer.
Destructuring Objects & Arrays (& Swap)
ES2015 makes it a bit easier to pull/reference values stored in objects and arrays.
Object Destructuring
Given an object:
var instructor = { firstName: "Elie", lastName: "Schoppik" }
To create variables from the values stored within the object, ES5 code is a bit repetitive:
var firstName = instructor.firstName; var lastName = instructor.lastName;
firstName; // "Elie" lastName; // "Schoppik"
With ES2015 we can create the variables with one line of code by wrapping the keys inside curly braces. The variable names must match the key names.
var {firstName, lastName} = instructor;
firstName; // "Elie" lastName; // "Schoppik"
…BUT if we want to rename the variables to something other than the key names, this is possible:
var {firstName:first, lastName:last} = instructor;
first; // "Elie" last; // "Schoppik"
This also is useful for creating objects. Rather than writing a createObject function with lots of or statements, we can pass a destructured object into the function as a parameter instead. This way the default will be invoked if nothing is passed to the function, otherwise it will create an object as desired:
// ES5 Way functioncreateInstructor(options){ var options = options || {}; var name = options.name || {first: "Matt", last:"Lane"} var isHilarious = options.isHilarious || false; return [name.first, name.last, isHilarious]; }
This example from the class is a weird choice because couldn’t you just return [b, a] from the ES5 function? But anyway, I’ve needed this before so not complaining!
Class Keyword, and Methods
The class data structure is now available in JavaScript as a reserved keyword. The class keyword creates a constant which cannot be redeclared, and it doesn’t hoist so classes should be declared at the top of a file. We can still use new keyword to create objects, now called instances. Example:
// ES5: create a constructor function functionStudent(firstName, lastName){ this.firstName = firstName; this.lastName = lastName; }
//ES2015: constructor is built with class instead classStudent{ constructor(firstName, lastName){ this.firstName = firstName; this.lastName = lastName; } }
// Either way, create a new object (aka instance) with the new keyword var nia = new Student('Nia', 'Murrell');
Instance Methods
Note that with class the prototype is abstracted away, and instead, instance methods should be included in the class definition. Under the hood, the method is added to the prototype for you:
// ES5: methods are added to the prototype functionStudent(firstName, lastName){ this.firstName = firstName; this.lastName = lastName; }
// ES2015: methods are included in the class definition! classStudent{ constructor(firstName, lastName){ this.firstName = firstName; this.lastName = lastName; } sayHello(){ return`Hello ${this.firstName}${this.lastName}`; } }
Class Methods, aka Static Methods
If you want to add a method to the class itself rather than to objects created from the class, we use the static keyword. These are called static methods; some other examples are array.isArray, Object.create. To add static methods in ES6:
We learned about prototypal inheritance in a previous section: this is how you assign methods from one constructor function to another in a way that will also more the this reference to the new object. With ES2015 the new keyword extends make this one step instead of two:
// ES5 Steps // Create a constructor function functionPerson(firstName, lastName){ this.firstName = firstName; this.lastName = lastName; }
// ...then add a method to the prototype Person.prototype.sayHello(){ return"Hello " + this.firstName + " " + this.lastName; }
// ...then create a second constructor functionStudent(firstName, lastName){ Person.apply(this, arguments); }
// ...then add the Person methods to the Student prototype // ...THEN assign the dunder proto back to the Student. WHEW! Student.prototype = Object.create(Person.prototype); Student.prototype.constructor = Student;
This is simplified in ES2015 with extends, which brings over all of the methods from the first class onto the second. Combined with the super keyword, this allows you to set up one class based on another, transfer the methods to the new class’ prototype, and still reduce code duplication without requiring the apply method to do it:
classStudentextendsPerson{ constructor(firstName, lastName){ // you must use super here! super(firstName, lastName); } }
// Note we can still add extra props to the new class if we want to classStudentextendsPerson{ constructor(firstName, lastName, dorm){ super(firstName, lastName); this.dorm = dorm; } }
// Or we could use the rest operator to simplify further classStudentextendsPerson{ constructor(){ super(...arguments); this.dorm = dorm; } }
Maps & WeakMaps
Map is another new data structure to ES2015, and they are similar to “hash maps” in other languages. A Map is like an object, except that the keys can be any data type. A WeakMap is similar to a Map, except that all of the keys must be objects and you can’t iterate over them. While WeakMaps are less common, there are several reasons to use a Map:
Finding the size is easy - no more loops or Object.keys()
You can accidentally overwrite keys on the Object.prototype in an object you make - maps do not have that issue
Iterating over keys and values in a map is quite easy as well
If you need to look up keys dynamically (they are not hard coded strings)
If you need keys that are not strings!
If you are frequently adding and removing key/value pairs
If you are operating on multiple keys at a time
Maps are created with the new keyword and key-value pairs are altered with set and delete. Unlike an object, you can also get the size() of a Map:
var firstMap = newMap;
firstMap.set(1, 'Elie'); firstMap.set(false, 'a boolean'); firstMap.set('nice', 'a string'); firstMap.delete('nice'); // true firstMap.size(); // 2
var arrayKey = []; firstMap.set(arrayKey, [1,2,3,4,5]);
var objectKey = {}; firstMap.set(objectKey, {a:1});
To access the values in a map, the get() method is used. Maps can also be iterated over with forEach and for...of loops:
There is also a built-in iterator for keys and values, or you can access everything together by destructuring an array and using the entries method:
firstMap.values(); // MapIterator of values firstMap.keys(); // MapIterator of keys
var m = newMap; m.set(1, 'Elie'); m.set(2, 'Colt'); m.set(3, 'Tim');
for(let [key,value] of m.entries()){ console.log(key, value); }
// 1 "Elie" // 2 "Colt" // 3 "Tim"
Sets & WeakSets
A Set is another new data structure to ES2015; it’s an object in which all values must be unique. So sets are useful when you want to ignore duplicate values, don’t need to access values with keys, or don’t care about the ordering of the values. A WeakSet is similar to a set, except that all of the values must be objects, and they cannot be iterated over.
Sets are also created with the new keyword; they are altered with the add and delete methods. You can also check if a set contains a value with has:
var s = newSet;
// can also be created from an array var s2 = newSet([3,1,4,1,2,1,5]); // {3,1,4,2,5}
// to add values to a Set s.add(10); // {10} s.add(20); // {20, 10} s.add(10); // {20, 10} --> note the duplicate is not added
s.size; // 2
s.has(10); // true
s.delete(20); // true
s.size; // 1
Sets can be iterated over with a for...of loop:
s2[Symbol.iterator]; // function(){}... // we can use a for...of loop!
Promises
Promises help run asynchronous code: it’s a promise to return some result one the code has finished running. Promises are created with the new keyword and accept a callback function with 2 parameters: resolve and reject (although you can name it whatever). Each parameter itself is a function which will be run depending on the outcome of the promise. To create an async function:
Promises can be chained with multiple .then() functions (aka, a really dumb name, they are thenable), each of which returns a value to the next. When there are multiple promises to be resolved, we can use the Promise.all() method, which accepts an array of promises. This will reject all of the promises once a since promise in the chain is rejected. If it’s going to fail, it should fail quickly!
Likewise, if all of the promises will resolve, it returns an array of the returned values from all of the promises in the order in which they were resolved (even if they are not resolved sequentially…they may not be).
// We write a function that returns a promise via jQuery functiongetMovie(title){ return $.getJSON(`https://omdbapi.com?t=${title}&apikey=thewdb`); }
// We could run the function multiple times var titanicPromise = getMovie('titanic'); var shrekPromise = getMovie('shrek'); var braveheartPromise = getMovie('braveheart');
// Or we could use Promise.all to get all the values Promise.all([titanicPromise, shrekPromise, braveheartPromise]).then(function(movies){ return movies.forEach(function(value){ console.log(value.Year); }); });
// 1997 // 2001 // 1995
Generators
Generators are a new type of function available in ES2015. Normal functions will keep running until something is returned, or there is no more code to run. But with generator functions, execution can be paused and resumed later. This is helpful when there is a time-consuming function and you only need to run parts of it at a time (if you ask me, write smaller modular functions?).
A generator function is created with the star * symbol. When a generator function is invoked, the object it returns has a method next(), and that method returns another object, which has the keys value and done:
value is what is returned from the paused function using the yield keyword
done is a boolean which returns true when the function has completed
function* pauseAndReturnValues(num){ for(let i = 0; i < num; i++){ yield i; } }
var movieGetter = getMovieData('titanic'); movieGetter.next().value.then(val =>console.log(val));
But note!: This is improved even further in ES2017 with async functions, so newer practices are available. As a result generators are less & less common.
Other Stuff
Next lessons we do ES2016 and ES2017 so this document will get even bigger!!!!!
]]><p>I’ve been looking forward to this for a while! Although I’ve used ES6 in several projects and courses here and there, until now IConstructor Functions & OOPhttps://www.niamurrell.com/code/2018-01-24-constructor-functions-oop/2018-01-24T18:17:56.000Z2020-06-20T20:39:47.339ZContinuing the course today…today was all about object oriented programming in JavaScript.
Constructor Functions
Today we reviewed constructor functions using the keyword new. One thing that was new to me was how you can DRY up code by using the call or apply methods to create a constructor from another:
// Make a new function using call functionMotorcycle(make, model, year){ Car.call(this, make, model, year) this.numWheels = 2; }
// Or put the arguments in an array with apply functionMotorcycle(make, model, year){ Car.apply(this, [make,model,year]); this.numWheels = 2; }
// Or use apply with the arguments keyword! functionMotorcycle(){ Car.apply(this, arguments); this.numWheels = 2; }
Or actually I thought it was new but then found it in my notes from several months ago 😂. So a necessary review apparently!
Prototypal Inheritance
One thing that actually was new was learning about prototypal inheritance, which is how you can create a new object based on another object, including methods that are attached to the original object’s prototype. There are two steps:
Create the object.
Reset the constructor property to transfer this to the new object:
// Add a method to its prototype Person.prototype.sayHi = function(){ return"Hello " + this.firstName + " " + this.lastName; }
// New object constructor based on the first functionStudent(firstName, lastName){ return Person.apply(this, arguments); }
// Theoretically this is how you would add a method to the new Constructor // WRONG! This will also mutate the original object's prototype Student.prototype.sayHi = function(){ return"Hello " + this.firstName + " " + this.lastName; }
// Instead you can create a new object which inherits its prototype // STEP ONE - create object Student.prototype = Object.create(Person.prototype); Student.prototype.constructor; // Person
//STEP TWO - reset constructor Student.prototype.constructor = Student;
Other Stuff
Now we’re learning how to build a JSON API…today we set up the basic structure and will build from there.
Up Next
Finish building a JSON API then the next module is ES6 (FINALLY!!!!).
I also started on a new web project with CSS Grid which is fun! I want to finish it in the next couple of weeks.
Also trying to read the book Clean Code…I have it one more week at the library so need to find the time to read that too lolz…
]]><p>Continuing the course today…today was all about object oriented programming in JavaScript.</p>
<h3 id="Constructor-Functions"><aMore Closureshttps://www.niamurrell.com/code/2018-01-23-more-closures/2018-01-23T17:12:55.000Z2020-06-20T20:32:45.907ZBack to the topic of closures, back to where I left off back in August.
Closure Exercises
We did a few exercises, for reference later:
// Write a function called specialMultiply which accepts two parameters. If the function is passed both parameters, it should return the product of the two. If the function is only passed one parameter - it should return a function which can later be passed another parameter to return the product. // // Examples: // // specialMultiply(3,4); // 12 // specialMultiply(3)(4); // 12 // specialMultiply(3); // function(){}...
functionspecialMultiply(a,b){ if(arguments.length === 1){ returnfunction(b){ return a * b; }; } return a * b; }
// Write a function called guessingGame which takes in one parameter amount. The function should return another function that takes in a parameter called guess. In the outer function, you should create a variable called answer which is the result of a random number between 0 and 10 as well as a variable called guesses which should be set to 0. // // In the inner function, if the guess passed in is the same as the random number (defined in the outer function) - you should return the string "You got it!". If the guess is too high return "Your guess is too high!" and if it is too low, return "Your guess is too low!". You should stop the user from guessing if the amount of guesses they have made is greater than the initial amount passed to the outer function. // // Examples (yours might not be like this, since the answer is random every time): // // var game = guessingGame(5) // game(1) // "You're too low!" // game(8) // "You're too high!" // game(5) // "You're too low!" // game(7) // "You got it!" // game(1) // "You are all done playing!"
functionguessingGame(amount){ var answer = Math.floor(Math.random()*11); var guesses = 0; var completed = false; returnfunction(guess){ if(!completed){ guesses++ if(guess === answer) { completed = true; return"You got it!"; } elseif(guesses === amount) { completed = true; return"No more guesses the answer was " + answer; } elseif(guess > answer) return"Your guess is too high!" elseif(guess < answer) return"Your guess is too low!" } return"You are all done playing!" } }
Up Next
Next section is all about objects.
]]><p>Back to the topic of closures, back to <a href="/code/reference/2017-08-05-heroku-workflow-advanced-js/" title="where I left off">whereTesting With Jasminehttps://www.niamurrell.com/code/2018-01-22-testing-with-jasmine/2018-01-22T16:05:53.000Z2020-06-20T20:32:45.907ZToday I learned about how to write tests with Jasmine. We’re starting with tests in the browser and will incorporate this into Node apps a bit later in the course. This is something I’ve been wanting to get more familiar with (after doing a bit with Mocha) for a while so glad to be diving in!
Jasmine Matchers
The main test matchers in Jasmine:
toBe / not.toBe - === comparison
toBeCloseTo - similarity
toBeDefined - item is not undefined
toBeFalsey / toBeTruthy
toBeGreaterThan / toBeLessThan
toContain - if something is contained in an array
toEqual - == comparison
jasmine.any() - checks the type of a function or array
Here are some examples:
describe("Jasmine Matchers", function() { it("allows for === and deep equality", function() { expect(1+1).toBe(2); expect([1,2,3]).toEqual([1,2,3]); }); it("allows for easy precision checking", function() { expect(3.1415).toBeCloseTo(3.14,2); }); it("allows for easy truthy / falsey checking", function() { expect(0).toBeFalsy(); expect([]).toBeTruthy(); }); it("allows for easy type checking", function() { expect([]).toEqual(jasmine.any(Array)); expect(function(){}).toEqual(jasmine.any(Function)); }); it("allows for checking contents of an object", function() { expect([1,2,3]).toContain(1); expect({name:'Elie', job:'Instructor'}).toEqual(jasmine.objectContaining({name:'Elie'})); }); });
Pending Tests
One handy tidbit…if you know you want to include a test but don’t know what it should test yet, there are 3 ways to do this:
describe("Pending specs", function(){
xit("can start with an xit", function(){ expect(true).toBe(true); });
it("is a pending test if there is no callback function");
it("is pending if the pending function is invoked inside the callback", function(){ expect(2).toBe(2); pending(); }); });
Other Testing Info
Also learned a bit about the different kind of testing out there. So far I’ve only come across TDD (test-driven development) which is when you write unit tests first, then write the code to pass the tests. I hadn’t heard of BDD (behavior-driven development) before—the idea is that you are testing not only the expected result but also the expected behavior of whatever functionality you’re testing.
There is also integration testing, which comes into play as the codebase grows to make sure all of the components and unit tests work together as they should. There is also acceptance testing, which is using the completed application to make sure pre-defined specifications are being met. Finally, stress tests determine how well the application will handle itself during unfavorable situations (super-high traffic, systems going down, etc.).
Other Stuff
I completed another section in the course which was a review of JavaScript array methods forEach(), map(), filter(), reduce(), some(), and every(). Then looking ahead to the React method, I watched a helpful talk on YouTube about the kinds of things that are helpful to know about before diving into learning React. All of the things they said are in this course—awesome!
Up Next
Review of closures and the this keyword and then we start getting into ES6.
]]><p>Today I learned about how to write tests with Jasmine. We’re starting with tests in the browser and will incorporate this into Node appsCSS Grid Introhttps://www.niamurrell.com/code/reference/2018-01-21-css-grid-intro/2018-01-21T12:18:55.000Z2021-06-19T22:25:32.380ZI couldn’t hold off! Today I did the CSS Grid course. Start to finish in one day!
To set the number of columns, add a grid-template-columns property to the container. This can be set by pixels, rems, auto, repeat, etc. To set the number of rows, it’s grid-template-rows:
.container { display: grid;
/* 4 columns, specific width */ grid-template-columns: 100px50px100px100px;
/* 3 columns, specific outer width, fluid center */ grid-template-columns: 100px auto 100px;
/* 3 columns, 1st clamped to max 100px, 2nd 300px, 3rd auto */ grid-template-columns: fit-content(100px) 300px auto;
/* 4 rows, 1 fractional unit each */ grid-template-rows: repeat(4, 1fr);
grid-gap: 20px; }
Note: auto will be sized automatically based on the content within the largest grid item.
Columns and rows are explicit if you specifically define how many there should be, and what their sizes should be; and implicit if you don’t define this information. When you have more container items than explicitly-defined rows and columns, the extra items will overflow to their best fit.
If you want a bit more control over what that “best fit” will be, you can use grid-auto-rows and grid-auto-columns to define the size of overflow areas. By default, overflow items will be put into the next row in the grid, but you can change the default behavior and make them overflow to a column with grid-auto-flow: column; (default value is row).
Sizing Rows & Columns
To create a gutter/margin within the grid, use grid-gap. An interesting thing about grid-gap: if you have this defined, it makes it so that setting column widths by percentage isn’t great! If you have 4 columns of 25%, it will actually go off the page because of the extra 60px of grid-gap, using the example above. So percentages are ok if used in combination with auto, but the better option is using fractional unitsfr.
Fractional units works similarly to flex-grow and flex-shrink in Flexbox: they proportionally fill any unused space. So if you have 3 divs: div1 width is set to 50%, div2 is 3fr, and div3 is 1fr, div1 will take up 50% of the screen, then from the remaining unused space, div2 will get 75% of it, and div3 will get 25%.
You can also use a repeat() function to define row and column widths. The grid will repeat whatever you have as the second argument, meaning you can create a mix of repeating grid areas. You can also use repeat in conjunction with other definitions. Some examples:
This says to leave it up to the grid to determine how many columns will be created, based on the viewport width. This enables the site to be responsive!!
There is a slight difference between auto-fit and auto-fill: auto-fill will dynamically create the explicit grid area based on the viewport width, whereas auto-fit will create the explicit grid area based on the number and contents of the grid items. So let’s say you want one grid item to always be on the right-most edge of your viewport: if you use auto-fill this will be possible, but if you use auto-fit, the item will only stay to the right-most side of the other grid items.
Minmax()
Now to get super-duper responsive layouts, minmax() can be used together with auto-fit or auto-fill. Within a minmax() definition, you declare the minimum and maximum widths or heights that the tracks should take up. As a result, the tracks will be determined based on the size of the window. For example:
Individual grid items can also be resized in a different way to their default row/column pattern. To have a grid item go across multiple columns, add a span instruction to that particular grid item: grid-column: span 2. The same span technique works across rows: grid-row: span 4.
Note: if you’re spanning 3 columns, but there are only two columns on that row, by default the 3-column grid item will be pushed down to the next row, leaving empty space: CSS Grid will always push items to wherever they can fit by default. Likewise, if you try to span more columns than are defined in the grid, new implicit columns will be created.
grid-column and grid-row are shorthand for grid-column-start and grid-column-end (and same for rows). So it’s possible to specify and exact location in the grid where the item should begin and end. Or you can condense it into two parts of the same line:
.my-grid-item { /* Start at 2nd track, end at 5th */ grid-column-start: 2; grid-column-end: 5;
/* Start at 2nd track, end at 5th */ grid-column: 2 / 5;
/* Span 3 columns, must end at track 5 */ grid-column: span 3 / 5;
/* Must start at track 1, span 4 columns */ grid-column: 1 / span 4;
/* Span all columns!! */ grid-column: 1 / -1; }
Note that to use the 1 / -1 technique, you have to define your rows or columns—whichever you want to apply this span to. So if you have only defined columns, and then try to set grid-row: 1 / -1;, it won’t work. It’s also important to note that it will only be able to span explicit columns or rows; if other grid items have overflowed into implicit areas, the full-width span may not work in the way you want or expect it to.
Filling Empty Grid Spaces
If you have changed the sizing for some grid items, because of how overflow works, you might end up with holes in the layout—grid areas where the next grid item couldn’t fit. If order isn’t important, you can fill in these empty grid spaces by setting the container to dense; this way, when faced with empty spaces, the grid will check whether there is any grid item that can be used to fit the space.
Going back to the layout of columns and rows, it’s also possible to name areas and then assign grid items to a named area, rather than referencing column or row numbers. For example:
By identifying a name for each area of your grid and then assigning a grid item to that area, grid items will be stretched to fill up the whole area. This is also a good way to completely change the order for a responsive layout. From the example above, you could add a media query to change which sections are displayed where:
It’s also possible to name grid lines instead of grid areas, and then use those names to assign grid items. You would set this up by adding the line name inside square brackets [] when defining the column or row widths/heights. You can also give more than one name (separated by a space) to each grid line. For example:
Grid areas can be ordered…especially useful for media queries if you want to change from the default order on smaller screens. We use the order: 1 property to define an order for an individual grid item. The default order for every item is 0, so you can use -1 to move something to the top, or order all of the items.
Note: changing the order with CSS doesn’t change the order for accessibility purposes! If you move text around in the display, a screen reader will still read them in the order they appear in your HTML.
Aligning & Centering Items and Content
CSS Grid comes with 6 properties to help align individual grid items. They start with justify- for items on the row (x) axis, or align- for items on the column (y) axis. Unlike with Flexbox, these designations don’t change. For quick reference, the CSS Tricks Guide shows demos of each, but to quickly explain…
Justify/Align Items
Determines how unused space in a grid area will be allocated for all grid items. Default is stretch which takes up all available space. Other options are start, end, and center. These can be applied individually to the container, or combined in one row with place-items:
Determines how unused space in the grid container will be allocated. Default is stretch which takes up all available space. Other options are start, end, center, space-around, space-between, and space-evenly.
Justify/Align Self
Determines how unused space in the grid area for an individual grid item will be allocated. Default is to inherit the definition that was set for the whole grid.
To center text within an individual item, you can set its display to grid and use these properties:
p { display: grid; justify-content: center; align-items: center; }
Final Tips
So that’s all the basics covered! To wrap up the course we built a few demo sites using a mix of the properties above. Some final highlights & tips:
Nesting Grids
Grids can be nested within each other as much as you want. A good example is for cards, where you want the elements in the card to display a certain way, but also want the cards themselves to display well next to each other. In this case you would put display: grid; on the wrapper containing the cards and on the card container itself. I wrote this example to demonstrate.
Flexbox vs. CSS Grid
Flexbox and CSS Grid can work well together, although there are some things that each can do that the other can’t:
Flexbox gives you the option to order rows/columns from right to left or down to up with row-reverse and column-reverse. CSS Grid doesn’t have a built-in option for this.
If you want to stack elements in an inverted pyramid (i.e. overflow divs are centered if they’re in a row on their own), you have to use Flexbox; Grid can’t break its column definitions.
Likewise if you want variable column widths on each row, Flexbox is the necessary choice.
There is no concept of grid-gap automatic margins in Flexbox.
CSS Variables
Finally, not really related to CSS Grid but I also learned how to create and use CSS variables (aka custom properties) thanks to the Net Ninja’s newest YouTube tutorial series. Variables allow you to set a property value which you can then reference throughout your CSS; a good example is for color schemes…you set the color in a variable and then use the variable rather than a hex code. Then if you decide to change your color scheme, you only need to update the variable value, rather than every place that color appears. Brilliant!
CSS variables need to be declared within a selector, and the de facto way to do this is to declare them at the top of your CSS in a root element. Variables are declared and called with double dashes --:
Imagine this with much much more CSS and it’s pretty awesome to think of just changing the hex colors once. Awesome! Important to note though, not currently supported in IE.
Whew!
So that was a long and productive day!
]]><p>I couldn’t hold off! Today I did the <a href="https://cssgrid.io/">CSS Grid course</a>. Start to finish in one day!</p>
<p>For quickAJAX Basics - XHR, Fetch, jQuery, & Axioshttps://www.niamurrell.com/code/reference/2018-01-20-ajax-basics/2018-01-20T17:12:26.000Z2021-06-19T22:25:32.488ZContinuing in my latest course today we picked up with AJAX and learned a few things.
AJAX
AJAX allows you to get and load data from a server to an already-loaded page without reloading that page. There are a few different ways to make AJAX requests:
XMLHTTP Requests
XMLHTTP requests (XHR for short) are AJAX in its rawest, native form. The basic syntax is:
// Initiate a request var XHR = new XMLHttpRequest();
// Do something every time the "ready state" changes (codes 0-1-2-3-4) XHR.onreadystatechange = function() { // ...only if a response has come back without error if (XHR.readyState == 4 && XHR.status == 200) { console.log(XHR.responseText); } };
To test this I wrote a Bitcoin price checker which calls an API and updates the price with the click of a button. Then, because this is old and clunky, we learned some newer ways to accomplish the same thing…
Fetch API
Update June 2019: This David Walsh blog post is another good go-to reference for using the fetch API. It covers its usage a lot more deeply and includes some gotchas.
Beyond these basics, there are some additional options that can be used with the Fetch API. While the first argument will always be a url, options can be passed in as a second argument, within an object:
fetch(url, { method: "POST", body: JSON.stringify({ name: "Nia", login: "Bia" }) }) .then(function(res) { // Do something with res }) .catch(function(err) { // Handle error })
More info about using options to change headers and HTTP request types, etc. can be found in the docs.
One thing to note about error handling: catch will only throw an error if there is an error with the request itself—not if there is an error in the response, like a 404 error to the fetch url for example. So we should handle response errors in the fetch request too:
functionhandleErrors(request) { if (!request.ok) { throwError(request.status); } return request; }
We wrapped up the section with one more Fetch demo putting all of this together.
But… not all browsers support fetch() so we learned some other AJAX tools…
jQuery AJAX
jQuery uses the method $.ajax() as a shortcut for the XHR described above. There are some additional AJAX shortcut methods—$.get(), $.post(), and $.getJSON()—which also call $.ajax() under the hood. The basic syntax is:
$.ajax({ method: "GET", // GET is default url: "some.api.endpoint", dataType: "json"// Optional. By default it will guess based on result. }) .done(function(response) { // Do something with the response }) .fail(function() { // Handle error })
Another alternative that’s compatible with more browsers, but less cumbersome than including the entiiiire jQuery library is Axios. The Axios library (which can be included from a remote host: <script src="https://unpkg.com/axios/dist/axios.min.js"></script>) makes XHR requests, automatically parses JSON data, and can be used with Node.js using the same syntax as front-end code. The basic syntax is:
functionhandleErrors(err) { if (err.response) { console.log("Problem with response: " + err.response.status); } elseif (err.request) { console.log("Problem with request!"); } else { console.log("Error: " + err.message); } }
Note the different error handling for Axios: it’s built in to determine where the error is being generated so you can form the appropriate responses more easily.
To wrap it all up I wrote AJAX calls using all 4 methods in one quote generator.
Other Stuff
Today I went to a pair programming event and got to work on some algorithm challenges with someone. We had a good time! The more I do it, the more I think pairing success really comes down to the two people in the pair being a good fit, regardless of the skill level of either person.
Up Next
There are so many things I want to get done! I realized the other day that a site I manage is up for renewal in 4 weeks…I got a good deal for the first year but the price will go up dramatically so I want to move it before then. But since it’s a WordPress site I want to basically re-build it from scratch using a static site generator. But to do that I want to use CSS Grid so I have to learn that first! And I also really want to try using Gatsby as the gennie, which means I need to learn React, which means I need to finish this course asap. Realistically, I don’t think I can do all of this and build the site in a month!! :(
]]><p>Continuing in my <a href="https://www.udemy.com/the-advanced-web-developer-bootcamp/">latest course</a> today we picked up with AJAX andStack & Heap Reviewhttps://www.niamurrell.com/code/2018-01-18-stack-heap-review/2018-01-18T16:21:05.000Z2020-06-20T20:32:46.027ZWe’ve moved on to JavaScript in the course and today was a review of the stack & heap. It was good to review as I’d forgotten some details:
Variables and declarations stored in memory are stored in the heap rather than the stack
When functions are called they are added onto the stack in a stack frame
The stack frame stores the main function at the bottom of the stack. It also keeps track of the line number where the value needs to be returned to.
Up Next
Next we go into AJAX!
]]><p>We’ve moved on to JavaScript in the course and today was a review of the stack & heap. It was good to review as I’d forgotten someCSS Transitions, Animations, & Flexboxhttps://www.niamurrell.com/code/reference/2018-01-15-css-transitions-animations-flexbox/2018-01-15T14:04:40.000Z2021-06-19T22:25:32.380ZToday I started my next course, the advanced web developer bootcamp. It covers a lot of topics that are high on my list to focus on in the next few months like ES6, React, and more. The course kicks off with CSS transitions and animations, something I’ve used only rarely and hadn’t really learned the basics of how to use them. Then we started on Flexbox. I’m really keen on learning CSS Grid (not included in this course), but I also hear a lot about how Flexbox and Grid can be used together, so this will be a helpful start!
Transform lets you move, warp, rotate, and scale elements, for example:
transform: translate(20px, 20px);
translate moves elements along their X and Y axis, so this would have the effect of moving the element down and to the right by 20 pixels. If you only want to move something along one of the axes, you could use translateX() or translateY() as an alternative.
scale works similarly: scaleX() or scaleY() or scale(X, Y).
And rotate works in the same way, only you specify degrees to turn: positive degrees to rotate clockwise, or negative degrees to rotate counter-clockwise (example transform: rotate(45deg)).
One thing to note with all of these is that the transform by default runs from the middle of the element. If you want it to rotate or scale, etc. from a certain point, you can define that point: transform-origin: 0 0;.
Transition is the property that defines how a transform should behave and there are four main properties:
transition-property: which properties should be affected by the transition
transition-duration: how long the transition should take
transition-timing-function: how the transition should be applied
transition-delay: whether you want any delay before the transition begins
These can also be chained under one transition property:
transition: opacity 0.5s ease-in-out 300ms;
One note about timing functions, these can be as simple as linear time or as specific as you want with custom timing cubic-bezier functions. There are some great examples of the default options at easings.net, or you can create your own with a tool like Ceaser.
Animations
Animations work similarly to transitions, only you identify multiple stops during the transition, instead of just what you should see at the beginning and end. These stops are called keyframes. Here’s the basic setup to change the size and appearance of text over a 5 second period:
Identify what you should see at each keyframe during the animation.
You can have as many or as few keyframes as needed to pull off the effect you want.
There are some additional animation properties which are unique to animations (and some Codepen pens for demo):
animation-iteration-count: how many times it should animate, or it can be infinite
animation-fill-mode: what happens right before & after the animation (demo). Options are forwards, backwards, both, and none
animation-direction: a way to re-use animations without having to re-write them entirely, options are forward, reverse, and alternate
animation-play-state: whether an animation is running or not, options are running and paused
One thing it’s worth noting with animations: there are four animations that are the most efficiently loaded by browsers: translate(), scale(), rotate(), and opacity. Other properties require the browser to do a lot more in order to render properly so the intended effect may not always be carried out flawlessly. More reading about that can be found in this article.
To put all of this together we created an animation of the sun rising and setting, where the sun and sky both change colors throughout the day. Here’s how mine looked, and here was the final solution of what it was going for. Not too far off as a first attempt! The big thing is remembering that both time and position have to be calculated if they are to remain linear…my first attempt had the sun jumping across the sky because the X-axis change wasn’t consistent between keyframes : D
Finally, animations can be compressed into one line in the same way transitions can:
animation: rainbowtext 3s forwards linear infinite 0.5s;
The order is flexible but there are some rules:
The first time that’s encountered will be made the duration and the second will be made the delay
The first word will be parsed as the animation name
Flexbox
To use Flexbox, divs must be placed within a container div, which is given a display of flex:
Here the CSS would be .container {display: flex;}. Then all of the container children move around based on the other flex properties you set. Terminology-wise, the container becomes a flex container and the children are flex items. How the flex items move will depend on what you identify as the main axis and cross axis.
The main properties to working with Flexbox are:
Container Properties
flex-direction: determines where the flex items start and which direction they go from there. Default is row (left to right). Other options are row-reverse (right to left), column (top to bottom), and column-reverse (bottom to top).
flex-wrap: specifies whether items should be forced onto one line, or if they can wrap to the next line. Default is nowrap. Other options are wrap and wrap-reverse (changes the cross axis direction).
justify-content: determines how items should be distributed within the space along the main axis. Default is flex-start which puts empty space last. Other options: flex-end puts empty space first; center leave space on both sides; space-between puts even space between items, with the first and last at the end; space-around puts even space around items, including at the front and end if space allows.
align-items: determines how items should be distributed within the space along the cross axis. Default is stretch which takes up all available space. Other options: flex-start puts empty space at the end of the axis; flex-end does the opposite; center puts items in the middle of the cross axis; and baseline which aligns items so that the text has the same position.
align-content: determines how space is placed between rows on the cross axis. The options stretch (default), flex-start, flex-end, space-between, space-around, and center work the same way as the items above.
Flex Item Properties
order: specifies how an individual flex item should be ordered within its container. By default all flex items have an order of 0.
align-self: allows you to override align-items for individual flex items.
flex: combines the properties below into one line in the order grow-shrink-basis
flex-grow: determines how unused space should be spread amongst flex items. Default is 0. It divides the empty space evenly, and then gives the number of space blocks to each item. So if you have three divs div1, div2, and div3 you can set div1 { flex-grow: 1;} and div2 { flex-grow: 3;}…div1 will get 25% of the empty space and div2 will get 75% of the empty space; div3 will keep its normal size.
flex-shrink: determines how flex items should shrink when there isn’t enough room in the container. Default is 1. Setting flex-shrink: 0; says that that flex item should never shrink. Setting flex-shrink: 2; will shrink twice as fast as flex-shrink: 1;, etc.
flex-basis: specifies the ideal size of a flex item before it goes into its container
Putting It All Together
To bring all of this information together I built the “holy grail layout” from scratch and made it responsive. Here’s the pen (it includes some things I could do better next time around).
Up Next
Next in the course we build a demo website from scratch, then move on to async and AJAX. Should be an interesting week!
]]><p>Today I started my next course, the <a href="https://www.udemy.com/the-advanced-web-developer-bootcamp/">advanced web developerExerciseshttps://www.niamurrell.com/code/2018-01-13-exercises/2018-01-13T23:56:18.000Z2020-06-20T20:32:45.746ZBeen working on some exercises and katas. I found a pair programming buddy on Slack and we had the first one today—it was fun! Although one kata stumped me: you are given an input string:
Yesterday I went to another mentoring meetup too–that was fun! Learned about freelancing on freelance websites.
Up Next
More exercises and pair programming!
]]><p>Been working on some exercises and katas. I found a pair programming buddy on Slack and we had the first one today—it was fun! AlthoughBreak Day, JavaScript Challengeshttps://www.niamurrell.com/code/2018-01-10-javascript-challenges/2018-01-10T23:19:22.000Z2020-06-20T20:32:46.146ZSort of a break day today—I just worked on some code challenges printing various things in the console. I’m going to start doing CSX so I started the initial prerequisites today. I think this course will be good practice, and I’ll still need to find something else to work on alongside it. So into the next thing!]]><p>Sort of a break day today—I just worked on some code challenges printing various things in the console. I’m going to start doing <aMySQL Wrap-Up - Node Demo App & Triggershttps://www.niamurrell.com/code/2018-01-09-mysql-wrapup/2018-01-09T20:02:42.000Z2020-06-20T20:51:39.580ZWhoa, totally didn’t intend to finish up the MySQL class in less than a week! I guess I’m really impatient to get through my learning list.
Node / Express / MySQL Demo App
Today we finished up with the demo app which I’ve stored in this GitHub repo. It was pretty much a repeat of the demo exercises we did yesterday. I coded ahead of the videos instead of doing the code-along and was glad to see I can still make an Express app from memory!
The conclusion of this section left a few things wanting. We didn’t learn how to create a database or create tables, etc. from the app at all, and didn’t really go into many real-world applications of using MySQL in an app. But oh well, there are other resources out there. I started with this video which answered some of those questions.
Database Triggers
There was a section added to the course about database triggers. Again, I feel like we only scratched the surface but it’s good to know how to validate data on the db side. I added the notes from this to my MySQL Quick Reference gist.
Final Thoughts On The Course
Overall, really good—I know a lot more now about MySQL than I did a week ago. Questionable how well I’d be able to start applying the information in real-world scenarios. There are other learning/practicing resources out there though, like this set of exercises which I started on after finishing the course. I already learned a few new things!
But all of this said and done, I’m not sure I can recognize the differences between MySQL and PostgreSQL just yet. And having gone through the pain of getting Postgres installed & working on my machine (we used Cloud9 for the course, so no local installation), realistically I’ll just use that for whatever I build to test out these relational database skills!
The other big component I think we were missing was about how to actually structure databases. It’s like we got the tools to build the house, but no blueprints—not even a mention that one should start with blueprints. So that part I will have to try and pick up somewhere else!
Other Stuff
Today someone told me about Code Retreat…one day event filled with pair programming challenges, all over the globe. Looking forward to that next winter!
Up Next
Debating between jumping into a new project or doing another course first (I already registered). And there’s still CS50 to finish.
]]><p>Whoa, totally didn’t intend to finish up the <aDatabase Schema & MySQL/Node.js Integrationhttps://www.niamurrell.com/code/2018-01-08-database-schema/2018-01-08T18:14:10.000Z2020-06-20T20:32:45.746ZCarrying on with the MySQL course…
Database Schema Design
Picking up from where I left off yesterday, today we built the schema for the Instagram clone database. Here’s what I could have improved on in my attempt, and some new things I learned to consider:
Don’t forget about using UNIQUE on fields that aren’t a primary key, but should also still be unique (like a username, email address, etc.)
If data in a table won’t be referenced by other tables, they don’t need to be given an id field. For example likes on a photo and follower-followee relationships may not need to be referenced specifically, so no need to create that extra field or use this memory.
You can set PRIMARY KEY to multiple columns; doing so will make the combination of those columns the primary key. This is useful when you want to allow a relationship only once (for example, only 1 like per user, per photo).
My method for the hashtags table was very inefficient; it would require hashtags to be stored multiple times and to be uniquely attributed to each photo. Instead it would be better to create two tables: one only for hashtags, and another solely for the relationships between tags & photos:
Note on the hashtags: another good option for smaller (compared to hashtags on Instagram) data set might be to store the tags as text with each photo, as it would make searching for them faster. There’s a study on comparing the query times for all three of these hashtag search methods but apparently it was taken offline…but it’s in the course video for future reference.
Database Queries
Once the schema was written we got a huge data set to work with in order to practice writing queries. In going through the exercises another tip come up:
When looking for the “top 5” of a category one way to do it is ORDER BY category LIMIT 5. In the event of ties, the results will display whatever comes first—which would be a direct result of how you structure the query. So probably better to limit the result to slightly higher so that you can check for ties:
-- Notice a tie for 5th place: +----------+-------+ | tag_name | count | +----------+-------+ | smile | 59 | | beach | 42 | | party | 39 | | fun | 38 | | food | 24 | | lol | 24 | | concert | 24 | +----------+-------+
-- This query returns FOOD as number 5: SELECT tag_name, COUNT(photo_id) AScount FROM tags JOIN photo_tags ON tags.id = photo_tags.tag_id GROUPBY tags.id ORDERBYcountDESC LIMIT5;
-- This query returns CONCERT as number 5: SELECT COUNT(pt.photo_id), t.tag_name FROM photo_tags AS pt INNERJOIN tags AS t ON pt.tag_id = t.id GROUPBY pt.tag_id ORDERBYCOUNT(pt.photo_id) DESC LIMIT5;
Using MySQL with Node.js
Next we started building a Node app in order to see how MySQL can be integrated with a web application. The most popular Node ORM for MySQL is appropriately named mysql:
npm install mysql
We create a database from the MySQL CLI, then setting up the connection is similar to what I’ve seen before with Sequelize and Mongoose:
var mysql = require('mysql');
var connection = mysql.createConnection({ host : 'localhost', user : 'username', database : 'join_us' });
And that simply we can write database queries from Node!:
var q = 'SELECT CURTIME() as time, CURDATE() as date, NOW() as now'; connection.query(q, function (error, results, fields) { if (error) throw error; console.log(results[0].time); console.log(results[0].date); console.log(results[0].now); });
Another way to write queries or commands using objects of data (rather than a single datapoint) is as follows:
var person = { email: faker.internet.email(), created_at: faker.date.past() };
var end_result = connection.query('INSERT INTO users SET ?', person, function(err, result) { if (err) throw err; console.log(result); });
In this case the mysql ORM translates the query into INSTER INTO users (email, created_at) VALUES (e@b.com, 2017-01-08 14:28:39).
Up Next
Finish up this class tomorrow and then look for some other resources to practice writing queries.
]]><p>Carrying on with the MySQL course…</p>
<h3 id="Database-Schema-Design"><a href="#Database-Schema-Design" class="headerlink"MySQL - The Good Stuff...and New Hexo Home Pagehttps://www.niamurrell.com/code/2018-01-07-mysql-good-stuff-hexo-home-page/2018-01-07T22:49:44.000Z2020-06-20T20:35:12.664ZToday we started to get into the good stuff with MySQL! And I made a big change to this blog, now it’s like a real live website 😄.
MySQL Good Stuff
We picked up with many-to-many relationship queries today which went much faster than I expected. Which was great because then we started on a big fun project! We will be building the database for an Instagram clone. The first task was to come up with a database schema to store and link users, photos, comments, likes, followers, followees, and hashtags. I built a scaffold to start, and over the next section we’ll build it as a code-along, so I’ll get to see how I can improve on what I came up with. It was fun (and complicated!) to come up with how the tables might be structured and how they would all fit together, but awesome practice for an app I think I’m going to start on pretty soon. Anyway I’m sure there are lots of improvements to be made but here’s what I came up with as a start:
And as always, notes from the course today have been added to this gist.
Hexo Website Update - New Home Page
I also put some work into this site today, and finally transformed it from just a blog into a full website. Yay! Now the blog is hosted in its own directory, and I have a landing page to introduce myself and all of the content. I also think it links better to the portfolio. And there are some other sections I expect to add in the future, so now all ready to go for that. I’m really liking working with this Hexo site because it’s so easy to maintain…so I can spend my time working on projects more than this site!
The ability to change your blog destination was only recently added to hexo-generator-index, the Hexo component that lists and paginates blog posts. But for some reason the newest version doesn’t come with the Hexo installation, so I had to update it manually:
npm install hexo-generator-index@0.2.1 --save
Then in the _config.yml (site, not theme) I updated the index generator path to blog:
Next was to create a new layout index.ejs for the index page, and then add an index.md file in the main source folder. The markdown file’s main purpose is to give Hexo a new index.html file to generate; I added the title and layout to the front matter, and filled in all of the content in the layout.
And voila! New home page and a blog under its own directory. This is long overdue but I’m glad to have it now!
Other Stuff
4 hours to braid my hair and I’m only half done 😫. I’m so glad I don’t have to do this too often!
Up Next
Plugging away at MySQL until I finish this week.
]]><p>Today we started to get into the good stuff with MySQL! And I made a big change to this blog, now it’s like a real live websiteMySQL Data Types & Joinshttps://www.niamurrell.com/code/2018-01-06-data-types-joins/2018-01-06T22:01:07.000Z2020-06-20T20:32:46.460ZProgress keeps going with MySQL, and made a nice improvement to the blog today too.
MySQL Progress
Today we picked up with learning about different data types you might use in a database. We focused on string types CHAR and VARCHAR; number types DECIMAL, FLOAT, and DOUBLE; and temporal types DATE, TIME, and DATETIME. Then we did logical operators for comparison using regular operators < > <= >= && || and keywords like BETWEEN, NOT BETWEEN, IN, NOT IN. All of this came together when we looked at case statements which bring even more logic into evaluating and displaying data.
After that we started working on joins: making data tables connect to each other and storing it efficiently to avoid redundancies. We did one-to-many relationships today and next time pick up with many-to-many relationships.
All of the notes are in this gist for future reference.
RSS Feed For Hexo Site
I also added RSS to this blog with the hexo-generator-feednpm package. It was probably the easiest part of this whole site. 😂 After publishing it I subscribed to myself in Feedly and it looks great! Way better than the output the old Jekyll site had, although admittedly I could have edited that, whereas I have nearly zero control over how the Hexo feed is generated. So glad it works!
Other Stuff
I also made some small improvements to the site: portfolio image links are now clickable with a stealthy hover transition, and I fixed the navigation links which kept bouncing off to the GitHub Pages url.
Up Next
Getting my head around table relationships and then we start building stuff! Since it’s moving so quickly I decided to finish this course before going back to CS50.
]]><p>Progress keeps going with MySQL, and made a nice improvement to the blog today too.</p>
<h3 id="MySQL-Progress"><aMySQL Course Continuedhttps://www.niamurrell.com/code/2018-01-05-mysql-cont/2018-01-05T20:41:01.000Z2020-06-27T16:35:30.616ZContinuing with MySQL today! I’m halfway done with the course now, and think I may actually be able to finish it this weekend. That’s great! Considering I gave myself 2 weeks and I’m 4 days in. That’s even sooner I can move on to the next topic. 😋
More SQL Queries
Rather that splitting all of my notes across blog posts I’m adding everything to this gist for future reference. Today I learned about refining selections with commands like DISTINCT, ORDER BY, LIMIT, and combinations of these along with wildcards % and _. I also did aggregate functions like MIN, MAX, SUM, AVG, GROUP BY and COUNT. Lots of info to take in but so far it’s all making sense and I can’t wait to put it into practice.
Other Stuff
I discovered that sadly emojis aren’t very reliable and will need to find another way to represent progress on my learning page. ::sad-face-emoji::
Up Next
Up next is a review of data types then we start getting into joins and making projects work—woo!
]]><p>Continuing with MySQL today! I’m halfway done with the course now, and think I may actually be able to finish it this weekend. That’sMySQL String Functionshttps://www.niamurrell.com/code/2018-01-04-mysql-string-functions/2018-01-04T17:28:07.000Z2020-06-27T08:48:53.975ZKept working on the MySQL course. First we finished up with basic CRUD commands which I added to yesterday’s post for easier reference.
Running SQL Files
Until now we’ve been doing all of the commands in the command line, but now we will be writing them in a .sql file going forward. Then you can run a file containing many commands at once from the MySQL command line with source file.sql. The root directory is whatever directory we’re in when we open the MySQL CLI, so sometimes the file path will need to be included, for example: source inserts/test.sql.
MySQL String Functions
Next up was getting into string functions. When queries start getting long there are some SQL tools which can help make it look better like SQL Format. Here’s an overview of the string functions covered today:
CONCAT (x, y, z) & CONCAT_WS
Concatenates xy and z together.
If not part of a table: SELECT CONCAT('Hello', 'World'); // HelloWorld
Also apples to whole columns: SELECT REPLACE(title, 'e ', '3') FROM books;
Can be combined with other string functions (and optionally aliased):
SELECT SUBSTRING(REPLACE(title, 'e', '3'), 1, 10) AS 'weird string' FROM books;
Result:
+--------------+ | weird string | +--------------+ | Th3 Nam3sa | | Nors3 Myth | | Am3rican G | | Int3rpr3t3 | | A Hologram | | Th3 Circl3 | | Th3 Amazin | | Just Kids | | A H3artbr3 | | Coralin3 | | What W3 Ta | | Wh3r3 I'm | | Whit3 Nois | | Cann3ry Ro | | Oblivion: | | Consid3r t | +--------------+
REVERSE
Does what it says on the tin.
SELECT REVERSE('Hello World'); // dlroW olleH
Can be combined with other functions: SELECT CONCAT('woof', REVERSE('woof')); // wooffoow
Can be called on table columns: SELECT CONCAT(author_fname, REVERSE(author_fname)) FROM books;
CHAR_LENGTH
Returns character length of what you ask for.
SELECT CHAR_LENGTH('Hello World'); // 11
Can be combined with other functions: SELECT CONCAT(author_lname, ' is ', CHAR_LENGTH(author_lname), ' characters long') FROM books;
Changing String Case
SELECT UPPER converts everything to upper case
SELECT LOWERconverts everything to lower case
SELECT UPPER('Hello World'); // HELLO WORLD
SELECT CONCAT('MY FAVORITE BOOK IS ', LOWER(title)) FROM books; returns column of titles with all of the data in lower case
Other Stuff
Really not happy with AWS and how CloudFront is serving my site. No matter what I set the cache time limit to be, it doesn’t pull an updated version of the home index.html! Really don’t want that while the blog is still sitting on the home page…I’m planning to change that soon so maybe I will go back, but for now I’m going to move the site off of AWS and go back to GitHub Pages.
Up Next
Getting through MySQL a lot faster than I thought I would, so will keep up with that until finished! Although I haven’t given up on CS50—I’ve allocated some big chunks for that over the weekend to make sure I finish the course.
]]><p>Kept working on the MySQL course. First we finished up with basic CRUD commands which I added to yesterday’s post for easierSite Is Deployed! And MySQL Basicshttps://www.niamurrell.com/code/2018-01-03-site-deployed-mysql-basics/2018-01-03T21:10:38.000Z2020-06-20T20:27:24.512ZOk now it’s deployed! Probably should have saved the celebratory dancing for today:
CloudFront Settings
Following on from yesterday's post, I didn’t need to use an AWS Lambda function after all. CloudFront is capable of handling redirects to an index.html file, it was just a matter of changing the origin settings in the CloudFront distribution. This super helpful post on the AWS forums pointed me in the right direction: rather than selecting the S3 bucket from the dropdown menu, I made the origin a custom origin, and used the endpoint of the S3 bucket instead. And voila! Everything works. I probably wouldn’t have figured this out so quickly (relatively!) without a tip in the right direction from someone in the Learn Teach Code Slack so super grateful for that too!
MySQL Basics
Jumping into the next topic I want to learn, today I started learning about MySQL, starting with some SQL basics. For future reference:
Cloud 9 Commands
mysql-ctl start: Start the MySql server
mysql-ctl stop: Stop the MySQL server (rarely do this)
mysql-ctl cli: Start the MySQL command line interface
Basic MySQL Commands
exit; or quit; or \q; or ctrl-c: Leave the MySQL CLI
help;: Get a list of commands
show databases;: Show all of your databases on this server
select @@hostname;: See you own host name
Creating Databases
Start the CLI: mysql-ctl cli;
List available databases: show databases;
The general command for creating a database: CREATE DATABASE database_name;
A specific example: CREATE DATABASE soap_store;
Dropping Databases
DROP DATABASE database_name;
For Example: DROP DATABASE hello_world_db;
Using/Opening Databases
USE <database name>;
For Example: USE dog_walking_app;
SELECT database();: Find out what database you’re using now
SHOW WARNINGS;: If the most recent insert gives a warning, this is how you see it. But you must do this right when the warning is given; it won’t work later (although app server should have error handling)
NULL / NOT NULL & Default Values
NOT NULL means this column is not allowed to have no value
Unless specified the default value for an INT will be 0
Unless specified the default value for a VARCHAR will be an empty string ''
You can insert data into a table as NULL unless that column is specifically marked NOT NULL
To set a default value, add this when creating the table (can be combined with NOT NULL):
CREATE TABLE cats ( name VARCHAR(20) NOT NULL DEFAULT ‘unnamed’, age INT NOT NULL DEFAULT 99 );
Primary Key & Auto Increment
Primary key is a unique value assigned to each row for identification
This can be set up as an auto-incrementing column when creating a table:
CREATE TABLE unique_cats ( cat_id INT NOT NULL AUTO_INCREMENT, name VARCHAR(100), age INT, PRIMARY KEY (cat_id) );
Primary key can also be set along with the actual column:
CREATE TABLE employees (
    id INT AUTO_INCREMENT NOT NULL PRIMARY KEY,
    first_name VARCHAR(40) NOT NULL,
    last_name VARCHAR(40) NOT NULL,
    middle_name VARCHAR(40),
    age INT NOT NULL,
    current_status VARCHAR(40) NOT NULL DEFAULT 'employed'
);
Result:
mysql> DESC employees;
+----------------+-------------+------+-----+----------+----------------+
| Field          | Type        | Null | Key | Default  | Extra          |
+----------------+-------------+------+-----+----------+----------------+
| id             | int(11)     | NO   | PRI | NULL     | auto_increment |
| last_name      | varchar(40) | NO   |     | NULL     |                |
| first_name     | varchar(40) | NO   |     | NULL     |                |
| middle_name    | varchar(40) | YES  |     | NULL     |                |
| age            | int(11)     | NO   |     | NULL     |                |
| current_status | varchar(40) | NO   |     | employed |                |
+----------------+-------------+------+-----+----------+----------------+
Reading Data In Tables
SELECT * FROM tablename: Read all data in the table, in the default order / how the table was created.
SELECT name FROM tablename: Show one column.
Can also be combined: SELECT name, age FROM tablename
Columns will be displayed in the order that the SELECT command is written; but again if it’s SELECT * it will display in the default order.
WHERE Keyword
Select by age: SELECT * FROM cats WHERE age=4; (INTs don’t require quotes)
Select by name: SELECT * FROM cats WHERE name='Egg'; (VARCHARs require quotes)
Queries are case-insensitive. Produces same result as previous: SELECT * FROM cats WHERE name='egG';
Can also compare columns to each other: SELECT cat_id, age FROM cats WHERE cat_id=age;
Aliases
Change the display of column names. Useful when joining tables which may have columns of the same name.
SELECT cat_id AS id, name FROM cats;: Renames cat_id column display to id
SELECT name AS 'cat name', breed AS 'kitty breed' FROM cats;: Can do multiple columns at once.
Updating Data In Tables
The format: UPDATE tablename SET column_name='new value' WHERE column_name='select value'
Change tabby cats to shorthair: UPDATE cats SET breed='Shorthair' WHERE breed='Tabby';
Update Misty’s age: UPDATE cats SET age=14 WHERE name='Misty';
Deleting Data From Tables
The format: DELETE FROM table_name WHERE column_name="data"
Best to select first to ensure you have the right data: SELECT * FROM cats WHERE name='egg';
…THEN run the delete command: DELETE FROM cats WHERE name='egg';
DELETE FROM cats;: DELETES ALL ROWS IN THE TABLE!!!!!
Up Next
Tomorrow I’m scheduled to continue working on MySQL.
]]><p>Ok <strong><em>now</em></strong> it’s deployed! Probably should have saved the celebratory dancing for todayAWS Lambda Functions & Deployment Progresshttps://www.niamurrell.com/code/2018-01-02-aws-deployment-cont/2018-01-02T19:13:00.000Z2020-06-20T21:27:48.785ZSite is live and deployed!
Once I figured out how to make AWS CloudFront and S3 work properly together, everything was fine. Mostly…
Setting S3 Bucket Permissions
In yesterday's post I wrote about updating the S3 bucket policy so that CloudFront and only CloudFront can access and serve the pages from that bucket. Since CloudFront caches the files in the S3 bucket, I thought that it might take some time before I could see the changes take effect in the browser. A StackOverflow post also suggested this.
But that wasn’t the issue at all. From an article I found: Objects do not inherit properties from buckets, and object properties must be set independently of the bucket. Basically you not only have to update the bucket permissions for CloudFront to gain access, but you also MUST make every individual file public as well, a fact which was not included on the AWS guides I was reading yesterday. Today once I found this out, I made the files public, and the whole site was available instantly!
Root Folders & AWS Lambda Functions
…well, sort of. Although each individual file is available, the linking within the site still isn’t working. Let’s say a person tries to visit https://dev.niamurrell.com/portfolio…this would give an access denied error; but if you tack on to the end and try to visit https://dev.niamurrell.com/portfolio/index.html then it works fine.
This is because CloudFront works by authenticating each individual request to objects (aka files) stored in the S3 bucket. If someone requests /portfolio/, there isn’t actually an object there to authenticate, so nothing loads. This is where AWS Lambda functions come into play. Lambda functions are snippets of code that you can write and integrate into websites or applications. Unlike running a server, this code stays dormant until exactly when you need it, so you only pay for the time that the code is actually running. And better still, the first 1 million requests per month are free—after that it goes up to a whopping $0.20 per additional million requests. I think I’m a long way from breaking the bank!
This AWS Blog post details how to get it working, although it’s a bit out of date. Also one thing it didn’t mention: in the Lambda dashboard you must be in a region that supports Lambda functions and CloudFront working together (like US East N. Virginia). That one took me some time to figure out.
In any case, I’m still getting some errors so will continue to work on this.
Other Stuff
I went to a JS.la lunch today which was great! I learned about a bunch of very awesome-sounding groups and events that I look forward to participating in.
Up Next
Figure out the Lambda function so that this site can be fully operational once and for all.
]]><p>Site is live and deployed!<br><img src="http://emojis.slackmojis.com/emojis/images/1471045841/799/dancing.gif?1471045841"Deploying New Blog Site (!!)https://www.niamurrell.com/code/2018-01-01-deploying-new-blog-site/2018-01-01T21:47:00.000Z2020-06-20T21:50:08.804ZI finished my site! So happy. The biggest hurdle was getting the search to work. Not going to write about that here since I did a massive step-by-step in a separate post. But there is one thing I want to recap…
Arr.indexOf()
I learned a new array method in the process of getting the search to work. You can use Array.indexOf() to determine the first index where an item in an array can be found. For example from the docs:
var array = [2, 9, 9]; array.indexOf(2); // 2 is at the 0th index
If the search element is not in the array, it returns -1:
var array = [2, 9, 9]; array.indexOf(7); // -1; 7 is not in the array
I was able to use this to filter search results from a set of data. I started with two arrays of objects: data objects contained all of the fields related to a blog post such as title, path, tags, and the post content; results objects were output by the search engine and contained a reference which was set to the blog post’s path.
I needed to create a new array of objects in the same format as data, but only with the posts that also came in the search results, i.e. an array matches. This was accomplished by first creating a new array of only the posts’ paths, and then using .filter() to narrow the data down to match the results. But since I needed all of the relevant results to be in the matches array, a for loop would not work, nor would .map(), because each of these would return out of the function after the first result. indexOf() allowed the filter to work with all of the results items:
I’ve had a placeholder on my dev site for several months…finally time to get some real content on there! The site is served from an AWS S3 bucket, so it was as simple as generating the site files (command line: hexo g from within site directory) and then uploading them to the bucket. In the bucket properties I changed the Static Website Hosting settings so that the index document would be index.html instead of comingsoon.html. And voila! The site is up live on the long S3 default URL.
To link it to my own domain name there is still some work to do. In order to take advantage of AWS’ free SSL certificates, I’m set up to use CloudFront to distribute the site. This is necessary because the certificate can only be attached to an EC2 server instance or a CloudFront distribution; since it’s just a static site (i.e. no server needed) CloudFront is the best option. CloudFront basically cashes the site files every 24 hours and stores them on servers around the world, resulting in super-quick loading no matter where someone visits my site from.
First step (I'm now acutely aware) is to update the CloudFront settings to point to the new root file:
Navigate to this particular distribution in the CloudFront dashboard
Under the General tab clicke Edit
Set the Default root object to index.html
Now visiting the domain https://dev.niamurrell.com brings up the home page of my new site. Yay! But clicking on any link results in the same permission denied error page I was getting back in August…so the index page is available for the public but somehow the other S3 bucket contents aren’t. But since they are available when I visit the long S3 bucket URL, it must be a permission issue between CloudFront and S3.
Turns out there is a setting to adjust for this; an assumption is made that if you want to set up access to an S3 bucket from CloudFront, you also want to block access directly to those S3 URLs. And there is an adjustment that can be made to do this:
From the CloudFront dashboard, open the distribution in question.
Click to Origins, select the origin, and then click Edit
Change Restrict Bucket Access from ‘No’ to ‘Yes’ and some more options will appear on the screen.
Here you can Create A New Identity and automatically grant it access to the S3 bucket.
Now going back to the S3 bucket Permissions and reviewing the Bucket Policy, a new policy appears for the CloudFront distribution:
So we should be all set, except for one little note in the AWS docs:
There might be a brief delay between when you save your changes to Amazon S3 permissions and when the changes take effect. Until the changes take effect, you can get permission-denied errors when you try to access objects in your bucket.
Once I get this working I will need to get the AWS command line working on my computer so that I can update the bucket without logging into the AWS website.
In the meantime, finished transferring over the files from the old blog so that when it’s ready, I’m ready!
Up Next
Going to a JS meetup tomorrow and a study session so should be a productive day.
]]><p>I finished my site! So happy. The biggest hurdle was getting the search to work. Not going to write about that here since I did a <aAdding A Search Engine to A Static Sitehttps://www.niamurrell.com/code/tutorials/2018-01-01-adding-search-engine-to-static-site/2018-01-01T12:00:00.000Z2020-06-27T08:51:36.823ZI have been working on getting a search engine implemented on my new Hexo-generated static website. It’s been a mission to say the least! Since I’m moving my site from the Jekyll generator to Hexo, I have a working example of what the end goal is. Here are the steps I took to translate the search function from Jekyll to Hexo, and what ultimately led to success.
Note: This walk-through assumes you already have a Hexo site set up and access to it from the command line. If that’s not the case, check out the Hexo docs, this intro to Hexo video series, or my other Hexo posts for more info about setting up a Hexo site.
Generating Search Data
This is the necessary first step for searching a static site. After all, we need something to search! For a static site, search data can be stored as a JSON file which contains documents for all of the content on your site. For example:
[ {"title":"Workshop Day & Major App Work to Do", "path":"blog/2017-07-16-workshop-day/", "content": "This is the long long long post content that I wrote on my blog. ...", "tags": ["array", "of", "tags"], "categories": ["array", "of", "categories"]},
{"title":"Jekyll Blog Success & More Express", "path":"blog/2017-07-03-jekyll-blog-success-more-express/"},
{"title":"Jumping Into the Backend", "path":"blog/2017-07-02-jumping-into-the-backend/"},
{"title":"And So It Begins", "path":"blog/2017-07-01-dev-blog-begins/"} ]
In real life all of these JSON documents would also contain fields for the post content, any tags or categories, etc, like in the first index. You get the idea!
Jekyll uses Liquid as a templating engine, and Jekyll will parse Liquid tags to create a JSON file containing all of this post data. But Hexo doesn’t have the same functionality with its templating engine (EJS), so we’ll need to generate the JSON in some other way.
Thankfully there are some Hexo plugins built to do just this. First I tried hexo-generator-search (link) but found that this plugin is optimized for outputting XML data; although it can make a JSON file, the output wasn’t clean and had lots of new line \n tags and other code remnants in the text. I also tried hexo-generator-json-content (link]) which seemed more promising: it’s more customizable as far as which fields are included in the JSON file, and the miscellaneous characters occurred less frequently.
To install this plugin, navigate to your site’s directory in the command line and install the plugin with npm:
npm i --save hexo-generator-json-content
Add your personal configuration to your site’s _config.yml file (more on this below, or in the documentation), and the next time you run hexo generate or hexo server, a new file called content.json will appear in your site’s root folder.
So now that we’ve got the data, let’s search it!
Writing A Search Engine
Looking through a lot of Hexo theme repos, it seemed like writing a full search engine is how most of them operate search, if they have it. But since these engines are tied in with each individual theme, it was at times difficult to read through their code and pull apart the pieces that would apply to my own custom theme. I found this post about how to do it in your own theme which was a start, but it was this more detailed post with code that laid it out more clearly (note: the post is in Chinese…thanks Google translate!). Unfortunately as awesome as Google translate is, it also translated some of the code…hah!
Ultimately though, this code kept throwing errors, and in fixing it, I realized that this search engine does way more than I even need. My goal is to generate a list of posts that contain the search term. I won’t be displaying the full results or highlighting the search terms or even creating a results page. All of the examples and tutorials I found were doing this, so rather than getting this code to work with my site, I opted to look for something more to the point of what I needed.
Implementing Lunr
Lunr is a lightweight JavaScript search engine built to work with static sites. My old Jekyll site uses Lunr to search its JSON file. First I tried basically copying the code from the Jekyll site:
jQuery(function () { // Initialize lunr with the fields to be searched, plus the boost. This creates an index (idx). var idx = lunr(function () { this.field("title"); this.field("url"); this.field("content", { boost: 10 }); this.field("tags"); this.field("categories"); });
// Get the generated search_data.json file so lunr.js can search it locally. var data = $.getJSON("/search_data.json");
// Wait for the data to load and add it to lunr data.then(function (loaded_data) { $.each(loaded_data, function (index, value) { idx.add( $.extend({ "id": index }, value) ); }); });
// Event when the form is submitted $("#site-search").submit(function (event) { event.preventDefault(); // RTH: per Google, preventDefault() might be the culprit in Firefox var query = $("#search-box").val(); // Get the value for the text field var results = idx.search(query); // Get lunr to perform a search display_search_results(results); // Hand the results off to be displayed });
functiondisplay_search_results(results) { var $search_results = $("#search-results");
// Wait for data to load data.then(function (loaded_data) {
// Are there any results? if (results.length) { $search_results.empty(); // Clear any old results
// Iterate over the results results.forEach(function (result) { var item = loaded_data[result.ref];
// Build a snippet of HTML for this result var appendString = '<li><a href="' + item.url + '">' + item.title + '</a></li>';
// Add the snippet to the collection of results. $search_results.append(appendString); }); } else { // If there are no results, let the user know. $search_results.html('<li>No results found.<br/>Please check spelling, spacing, yada...</li>'); } }); } });
But this code doesn’t work with the Hexo configuration…in fact it doesn’t seem to work at all. Turns out Lunr went through a major upgrade, and this code no longer works with the current version of Lunr. So now I get to start from scratch! The Lunr docs are pretty helpful, so I went through it step by step.
Step 1: Confirm It’s Working At All
Step one was getting anything to show up in the search results. The main change from the code above to the newer version is that the add method must take place at the same time that the index is being created. I tried it with my JSON file first but it didn’t work. So following the documentation, I added a data object directly into the add method. I also simplified the result display to see what it actually give back to you:
this.add({ "title": "Twelfth-Night", "body": "If music be the food of love, play on: Give me excess of it…", "author": "William Shakespeare", "id": "1" }); });
$("#site-search").submit(function (event) { event.preventDefault(); var query = $("#search-box").val(); var results = idx.search(query); display_search_results(results); });
functiondisplay_search_results(results) { var $search_results = $("#search-results"); var appendString = '<li>' + JSON.stringify(results) + '</li>'; $search_results.append(appendString); } });
This gave the following result…not exactly diamonds, but at least we know it’s searching!
Next I tried adding a second document into the add function in order to try more search terms. The result is that it could only search the first document, and would otherwise return an empty array. So let’s get that working next…
Step 2: Search Multiple Documents
The reason for this is that the add method only adds one document at a time. So we need to include a forEach function to add each document into the index. We also need to add a forEach to the display_search_results function to list each result:
jQuery(function () { var data = [{ "title": "Twelfth-Night", "body": "If music be the food of love, play on: Give me excess of it…", "author": "William Shakespeare", "id": "1" }, { "title": "Romeo and Juliet", "body": "Wherefore art thou Romeo? Deny thy father and refuse thy name. Or if thou wilt not be but sworn my love...", "author": "William Shakespeare", "id": "2" }];
var idx = lunr(function () { this.field('title') this.field('body')
Hooray! Now when we search, a result comes up for each document. If the term is in both (like the word love), two results are listed. And if we search for a term with no results (like the word alien), we are helpfully told as much.
But we’re still seeing completely unhelpful results which basically spit back what we searched for. So now lets display something useful!
Step 3: Display Useful Results
So Lunr provides search results with a ref number, starting at the number 1:
The data is stored in an array, and these ref numbers reflect the position in the array, although it’s off by one. So we can create an index variable to link ref with the original data, and then call whatever fields we want to display on the page from the data in the forEach loop within our display_search_results function:
results.forEach(function (result) { var index = parseInt(result.ref) - 1; var item = data[index]; var appendString = '<li>' + item.title + '</li>'; $search_results.append(appendString); });
And we have a winner! Now when we search any term within either data item, its title is returned and displayed as a list item in the search results.
Step 4: Bringing In External JSON
Now that we know the search engine displays the results we want, let’s make the data live outside of this search function. After all, a new JSON file will be generated each time a new post is published to the site, not to mention it will be a pretty large file with new posts being added on a daily basis (sometimes as long as this one!). To start let’s use the same simple data but save it to a new file in the root directory of the site; I added a third document for testing purposes:
## /test.JSON [{"title": "Twelfth-Night", "body": "If music be the food of love, play on: Give me excess of it…", "author": "William Shakespeare", "id": "1" }, {"title": "Taming of the Shrew", "body": "Sit by my side, and let the world slip: we shall ne'er be younger.", "author": "William Shakespeare", "id": "2" }, {"title": "Romeo and Juliet", "body": "Wherefore art thou Romeo? Deny thy father and refuse thy name. Or if thou wilt not be but sworn my love...", "author": "William Shakespeare", "id": "3"} ]
The Jekyll site used a jQuery method to load the external JSON file:
var data = $.getJSON("/test.json");
However when I load this into the current file, it throws an error: data.forEach is not a function. By logging the value of data I see why: this jQuery method returns an object rather than just the array of data contained in the file; and the forEach method only works on arrays, not objects. So we need to find a way to access the array. It’s also necessary to recognize that the data may not be fully loaded as soon as the .getJSON method is called. This was the result the first time I tried it; the data were loaded, but not in time for the search function to run, and it threw data is not defined.
A bit of stack overflowing and documentation reading confirmed that indeed, the getJSON method returns a promise to get the JSON, but does not actually complete it at the time the promise is made. Since JavaScript is asynchronous, it keeps processing code (keeping that promise in its back pocket!) and the data isn’t actually there when we need it. To get around this we need to be clear that any functions which rely on the data are only called once the data have been fully loaded. So we can put the whole index builder function inside a callback which will only execute once the data have been loaded:
Notice that we also take idx out and declare it as a global variable; this is to ensure that it’s available to the .search method that will be run later as part of the search field’s event listener. We can confirm that the data and idx variables are logging the same values as they did when we had the data locally.
But there’s still one step to go. We also need to load the data within our display_search_results function. We can wrap the existing function components within a similar AJAX callback to achieve the same results:
functiondisplay_search_results(results) { var $search_results = $("#search-results");
And voila! We have a working search engine accessing data from an external JSON file.
Step 5: Searching Blog Data
Now that we know everything is working as it should, it’s time to try searching with the JSON file which contains the blog data. If you can recall from waaaay at the beginning of this post, we generated a JSON file using the hexo-generator-json-content Hexo plugin. It gives us a format exactly like our test file, but with much much more data. But to start things off, lets start by only searching a few fields. We can turn fields on and off by adding rules to the site’s _config.yml file:
Notice that we use this.ref instead of this.field for the path field. This will tell Lunr to treat the post’s filepath as the results reference, rather than a random number like we did with the dummy data earlier. Using path is ideal because unlike title it’s guaranteed to be unique; we can use this to build out the links on the results list later too. With this setup, our result output is slightly different than it was before:
Since we no longer have integers as ref values, we can’t use the same index lookup that we used with the dummy data. Instead we’ll need to pull out any matching documents from the original data, which we can do with the ref value and an object filter:
This function has two steps: first we take the results (which is an array of objects including our ref values) and create a new array which only contains the search results’ path names. Then we take the data array (another array of objects) and filter it by those path names; indexOf is a JavaScript array method which returns -1 if a search element (the object path in this case) doesn’t exist in the array. The result is a new array containing only the posts relevant from the search; we store this in the variable matches.
We can update our display_search_results function to display results based on the matches rather than the results:
functiondisplay_search_results(results) { var $search_results = $("#search-results");
$.when($.getJSON("/content.json")).done( function(data) { var matches = filter_results(data, results);
I think we all deserve a pat on the back, as we now have a fully operational search engine on our Hexo site 😎.
Wrapping Up
From here there are a few more customizations to do depending on your individual preferences. For example if you have custom fields in your posts or want to include your tags, categories, etc. you can add them by editing your _config.yml file. Don’t forget to include these fields in the Lunr idx function too! You can also edit _config.yml to include pages in your search data, just note that the structure of objects in your content.json file will change as a result, and you’ll need to account for this in the index builder and display_search_results functions. Happy coding!
]]><p>I have been working on getting a search engine implemented on my new <a href="https://hexo.io/">Hexo</a>-generated static website. It’sSo Close To Search Engine Completionhttps://www.niamurrell.com/code/2017-12-30-so-close-search-engine/2017-12-30T12:00:00.000Z2020-06-20T20:15:38.770ZBAHHH so close yet so far!! I am literally inches from the finish line for my search feature. Today I made huge progress: I got search results to display for multiple documents, then I got it to work correctly with an external JSON file. Now I’m working on applying that code to a more complex JSON file which includes all of the content from my site. Because the data is referenced slightly differently I have to change some of the functions to call that data differently. And that’s what I’m stuck on. I’m so close though, I’ll definitely get it done really soon.
Chrome Dev Tools
Today I worked with the debugger in Chrome for the first time. It is so awesome!!! The main challenge that stumped me yesterday turned out to be an off-by-one issue, which I wouldn’t have figured out without Chrome’s debugger. I was also able to clearly see the differences between the Jekyll JSON output and what I’m working with for my site. This information makes it so much clearer to move forward. Now I get what all the fuss is about!
]]><p>BAHHH so close yet so far!! I am literally inches from the finish line for my search feature. Today I made huge progress: I got searchCloud Computing & Web App Security Talkshttps://www.niamurrell.com/code/2017-12-29-security-talk/2017-12-29T12:00:00.000Z2020-06-20T20:15:38.864ZTonight I went to a double-talk on two topics: cloud computing and web app security. Both were pretty decent and gave me some things to think about.
From cloud computing I learned about AWS’ Lightsail which might help with the deployment of apps there in the future. I am completely aware that I still need to post my write-up from attempting to deploy using Elastic Beanstalk and the vanilla services. But it would be nice to round those out with something that actually worked! So maybe that’s it.
In the security talk I had a panic moment thinking about whether my blog and apps are vulnerable to various nefarious activities. Glad to say I’ve just made some attempts to do bad things and they failed 😌. But definitely need to keep this topic more front of mind too.
Other Stuff
I spent another few hours working on the search engine. I don’t have it working yet which is frustrating, especially because I think I’m right there! But with the frustration today I’ve realized I’ve been breaking two of my top guidelines: 1) I haven’t asked anyone for help and 2) I don’t have a second thing I’m working on right now to switch to when I need a break. No excuses for either! So planning to change that.
Up Next
I’ll keep working on the search engine but will also dive back into CS50 to finish up the course. I’ve already done all of the lectures and most of the projects, I just have 3 (maybe 4) assignments to finish up and submit in order to get the certificate. Turned out I have until May (not this year’s end) to complete it hence haven’t been prioritizing. All of the remaining projects are in Python so will get to be learning that a bit more!
]]><p>Tonight I went to a double-talk on two topics: cloud computing and web app security. Both were pretty decent and gave me some things toSearch Nightmareshttps://www.niamurrell.com/code/2017-12-27-search-nightmares/2017-12-27T12:00:00.000Z2020-06-20T20:34:15.066ZI’m having trouble implementing the search feature on my blog. I spent all. day. working on it and have literally nothing to show for it. Ho hum!
Well, not all day actually. With fresh eyes in the morning I refactored the layouts and partials a bit to make the theme more modularized. As I’m adding more pages, I realized this would help dry it up.
I also got all of the tags working properly: they are listed on a page with all of the relevant articles, and clickable by themselves to generate individual tag pages. I also added a tags display onto each post page, which wasn’t on my original blog. Finally, I also made some design tweaks throughout the site to soften things up a bit…get rid of all the hard corners.
So all in all not a completely unproductive day!
Up Next
I would love to get the search running. I have some leads to try tomorrow, and hopefully my brain will start working properly again by then! After that I will migrate all of the posts from the old Jekyll blog to the new one, and then I’ll be ready to deploy! I think I will definitely make the deadline on this one, maybe even finish sooner.
]]><p>I’m having trouble implementing the search feature on my blog. I spent <strong>all. day.</strong> working on it and have literallyHexo Data Fileshttps://www.niamurrell.com/code/tutorials/2017-12-26-new-site-complete/2017-12-26T12:00:00.000Z2020-06-20T20:24:37.433ZOne huge step closer to finishing my new site!
Accessing Data Files
Since I want to have a portfolio section, I need an easy way to add projects and have Hexo generate them as a single page. Each project would have a name, description, some links, etc….basically it’s not as straightforward as a list to just loop through. Thankfully Hexo allows you to create data files (either YAML or JSON) to do just this.
First I created a _data directory in the source folder (the site’s source folder, not my theme’s source folder) and added my projects in the YAML format:
It also works if the data file is in the JSON format:
[ { "name": "RGB Guessing Game", "description": "How well do you know your RBG color values? Test your skills.", "tech": "HTML5, CSS3, JavaScript", "code": "https://github.com/niamurrell/rgb-game", "demo": "https://codepen.io/niamurrell/full/xPmLMV/", "image": "", "visible": true }, { "name": "Inspirational Quote Generator", "description": "Get inspired by a random quote in this freeCodeCamp demo project.", "tech": "HTML5, CSS3, JavaScript, API", "code": "https://github.com/niamurrell/fcc-quote-generator", "demo": "https://codepen.io/niamurrell/full/evyVgg/", "image": "", "visible": false } ]
Then I created a portfolio.ejslayout within my theme, and a portfolio page (with hexo new page portfolio in the command line) to make sure it’s stored in the site’s source folder, and not contained inside the theme. The page won’t get any content added—all of that will need to go directly into the template—but the page is where the title and subtitle will come from (these are also needed by my header partial), and how Hexo will generate a page to link to from the menus.
To display the data, I added a for loop into the portfolio.ejs layout:
So going forward, all I’ll need to do to add a new project to the portfolio is add a new entry in the projects.yml file and all of the html will be generated automatically.
Still To Do
There are still two more big features to implement before pushing the site live: making the tags work, and making a search engine work. Then I’ll have the new site equal in functionality to this site I’m using now, although I’ll make some improvements so hopefully it’ll be just a bit better.
One thing I don’t love about Hexo is that by default, it makes the index page a blog page, and you can’t move the blog to a different location. I’d like to fix that too eventually.
Other Stuff
Another improvement—I’ve added my learning plan to the site! I was keeping it in a Google doc but it was pretty unwieldy…I think I’ll have a better time keeping it up to date in this new (public!) format.
Up Next
I wonder if I can finish tomorrow…!?
]]><p>One huge step closer to finishing my new site!</p>
<h3 id="Accessing-Data-Files"><a href="#Accessing-Data-Files" class="headerlink"Hexo Hexo Hexohttps://www.niamurrell.com/code/2017-12-25-hexo-hexo-hexo/2017-12-25T12:00:00.000Z2020-06-20T20:12:47.730ZThings are coming along with my new site! Today I got the blog ported entirely. I’ll still need to copy over most of the posts, but otherwise it’s pretty much ready to go live and replace this Jekyll blog.
Now I’m working on the portfolio page, and trying to set up my projects in a “database” (YAML or JSON file) to render them easily to the page. I have the data linking properly but so far can’t get the links to display, so I’ll keep working on that next.
Other Stuff
Short post today because it’s Christmas!
Up Next
After I get the portfolio section looking decent, I’ll be implementing a search engine to the site along with pages for each post tag. To think I would have done this all manually before! I’m looking forward to porting my travel blog too at some point so that it will be easier to keep up to date.
]]><p>Things are coming along with my new site! Today I got the blog ported entirely. I’ll still need to copy over most of the posts, butAdvanced JavaScript Topicshttps://www.niamurrell.com/code/reference/2017-12-23-advanced-javascript-topics/2017-12-23T12:00:00.000Z2021-06-19T22:25:32.495ZToday I finished the Frontend Masters course, and we dug deeper into some advanced JS topics. Some of it was recap and some of it was new:
Scope
Where variables have their meaning. Some good reminders on the rules of scope:
Scope is created dynamically when we run a function, i.e. when we open a new execution context.
A function has access to its own local scope variables, and inputs to a function are treated as local scope variables. A function has access to variables in higher generation scopes (parent, grandparent, global, window, etc.), but not sibling of child scopes.
A function’s local scope variables are not available anywhere outside that function, regardless of the context it’s called in:
var ACTUAL = null; var firstFn = function () { var localToFirstFn = 'first'; secondFn(); };
var secondFn = function () { ACTUAL = localToFirstFn; };
secondFn(); // error firstFn(); // ACTUAL === null
If an inner and an outer variable share the same name, and the name is referenced in the inner scope, the inner scope variable takes precedence. This makes the outer scope variables inaccessible from anywhere within the inner function block. If the name is referenced in the outer scope, the outer value binding will be used.
A new variable scope is created for every call to a function:
var fn = function () { var localVariable; if (localVariable === undefined) { ACTUAL = 'alpha'; } elseif (localVariable === 'initialized') { ACTUAL = 'omega'; } localVariable = 'initialized'; };
fn(); // ACTUAL === 'alpha' fn(); // ACTUAL === 'alpha'
An inner function can access both its local scope variables and variables in its containing scope, provided the variables have different names
Between calls to an inner function, that inner function retains access to a variable in an outer scope. Modifying those variables has a lasting effect between calls to the inner function:
var outerCounter = 10;
var fn = function () { outerCounter = outerCounter + 1; ACTUAL = outerCounter; };
fn(); // ACTUAL === 11 fn(); // ACTUAL === 12
Module Pattern
Writing modular functions allows you to set private methods (useGas) and private properties (gasLevel) which can only be accessed by privileged functions (go) to prevent manipulation from the outside on variables that should have set limits:
var Car = function() { var gasLevel = 10; functionuseGas(amt) { if (gasLevel - amt < 0) { console.log("Out of gas :("); } else { gasLevel -= amt; } } return { radioStation: "104.1", changeStation: function(station) { this.radioStation = station; }, go: function(speed) { useGas(speed); } }; };
Underscore.js Library & each(), map(), filter()
The Underscore library adds a lot of methods to the underscore symbol: var _ = {...}. We did a lot of exercises with _.each(), _.map(), and _.filter().
_.each()
_.each() iterates over a list of elements; the iterator comes with three parameters:
To invoke the _.each() method, the function takes two parameters: a list (array or object) and an iterator function. Note: the native JavaScript forEach method only works with arrays. With .each() you can notreturn any values in the loop. Example:
_.map() iterates over a list of elements and returns a new list of values by mapping each original value through a transformation function (iterator). With _.map() you mustreturn a value in the iterator function so that there is a value to go into the array.
var makeExcited = function(val) { return val + "!!!"; }
Note that all of these functions work the same way, by running a function as though it has three arguments: function(element, index, wholeThing). If the function doesn’t have three arguments, it assumes the first, or first 2 if there are two present.
_.filter()
_.filter() iterates over a list and returns an array containing only the values that pass the tester function (aka predicate): _.filter(list, tester) Example:
var evens = _.filter([1,2,3,4,5], function(num) { return num % 2 === 0; });
console.log(evens); // [2,4]
Using Objects Instead of Arrays
These methods work on both arrays and objects. To access the keys & values of objects you can look at the parameters of the function as function(value, key, object) instead of function(element, index, array). Example:
Keep working on Hexo site. It’s coming along nicely and definitely want to have it up by the 31st.
]]><p>Today I finished the Frontend Masters course, and we dug deeper into some advanced JS topics. Some of it was recap and some of it wasProductive Dayhttps://www.niamurrell.com/code/2017-12-22-productive-day/2017-12-22T12:00:00.000Z2020-06-20T20:12:47.862ZToday I blocked out chunks of time to work on different projects. Very effective!
I finished half of a FrontEnd Masters course and got the template set up for my new Hexo site.
Other Stuff
Falcon 9 launch was awesome. I mean SPACE!!!! 💫🌟✨🚀😃
Up Next
Finish FEM course and publish new site v0.
]]><p>Today I blocked out chunks of time to work on different projects. Very effective!</p>
<p>I finished half of a FrontEnd Masters courseHexo & Planninghttps://www.niamurrell.com/code/2017-12-21-hexo-planning/2017-12-21T12:00:00.000Z2020-06-20T20:12:47.728ZToday I set about planning what I’m going to be working on in the short term. One of the priorities will be my personal portfolio site. I really like using Jekyll for this blog and want to learn how to do it from scratch and with Node.js instead of Ruby. So I found Hexo which is another static site generator…I’m going to use it to launch a site by 31 December. So today I spent some time researching the tool and how it works.
Hexo Intro
Hexo is a node package which allows you to create and compile static websites. So basically, I’ll be able to write super-simple markdown files and then run the code through Hexo, which in turn generates all of the HTML files and links and site structure. Then I can upload this generated bundle of files (in effect, a website) to a web host (or most simply, and AWS S3 bucket), and the site will look great. Basically it takes away the need to hard-code individual pages if the goal is to have a static website (and therefore save on server costs). I think it will work perfectly, because I’ll be able to add content much more easily to the site.
Hexo Command Line
To use this tool, most of the work is done through the Hexo Command Line Interface (CLI). Here are some of the basic commands I learned about today:
npm install -g hexo-cli // installs the Hexo CLI to access commands below hexo version (or -v) // checks CLI version hexo init "projectName" // installs the basic folder structure hexo server // generates static site and opens localhost port to preview ^C // stops server hexo server --draft // opens localhost port for preview, with draft content included hexo new "postTitle" // generates new post markdown file in the _posts folder in source hexo new draft "postTitle" // generates draft in source _drafts folder hexo new page "pageTitle" // creates new directory within root, with index markdown file hexo publish "draftTitle" // moves draft from _drafts to _posts folder
Note about the new command: you can change the default new type in the config.yml file…for example just typing hexo new "postTitle" could be set to create a new draft rather than a new post, and so on. You can also create new “scaffolds”, which are the templates these new files will be created as.
Asset Folders
One interesting new thing to remember is how Hexo stores assets which belong to each post. If you set post_asset_folder to True in the config.yml file, any time you create a new post, it will also create an assets folder alongside the new post markdown file. In this folder you can store assets like images, etc. which will add to the content of that particular post.
You can then access these assets with their own syntax. There are additional properties that are accessible with these tags. The documentation is quite good too!
Project Plans
There are quite a few more details which are pretty much all in the docs and/or this YouTube series, where I got a great introduction. My goal is to combine my existing website theme with the theme of this blog and get something launched in 10 days. I’d also like to port this blog over to that site (though probably not within the 10 days) so that I have less websites in general. So the countdown is on!
Other Stuff
I also picked up a JS course I started before Thanksgiving. So far it’s a lot of review but looking forward to getting into the more advanced topics.
Up Next
I will finish the JS course by the end of the weekend and will work on my portfolio site for the 10-day deadline.
]]><p>Today I set about planning what I’m going to be working on in the short term. One of the priorities will be my personal portfolio site.Deployment Done! Lessons Learnedhttps://www.niamurrell.com/code/2017-12-20-value-app-deployed/2017-12-20T12:00:00.000Z2020-06-27T08:49:38.726ZHooray! The value app is officially deployed. It’s a bit anti-climactic, as in the end I’ve deployed it on Heroku rather than AWS. I’ll post separately all of the things I learned about AWS along the way, even though I won’t be using it going forward. Long story short: testing and working on the deployment over the last ~10 days quadrupled my AWS bill. And while $4 isn’t breaking the bank, it doesn’t beat free!
I’m glad I went through the process anyway. I learned a LOT. Now I’m glad to be able to move on to the next thing though, this has taken up way too much time!
Other Stuff
Major hiccup in the study plans today, so I’ve got to re-configure how I’ll be learning and what I’ll be working towards for the next few months.
]]><p>Hooray! The <a href="/tags/value-app/">value app</a> is officially <a href="https://valuemax.herokuapp.com/">deployed</a>. It’s a bitDeployment In Progresshttps://www.niamurrell.com/code/2017-12-19-deployment/2017-12-19T12:00:00.000Z2020-06-20T20:12:47.875ZFor the past week or so I have been working on deploying the value app. To do it I’m learning how Amazon Web Services work and work together. I’ll be really glad to understand it once I finally get it working but it has been sloooooooowww. Every time I think I’ve pretty much got it with just onemorething, that one more thing turns out to be a giant rabbit hole. Lots of elusive cheshire cats and false friends. The good thing is I’m documenting everything I try (including what doesn’t work, although documenting slows things down even more), so that next time, hopefully it will be a much simpler process. But for now, nothing really to report!
Other Stuff
There’s now a regular coding study group one town over which is awesome! Met some people working on cool things tonight, although I didn’t get much actual work done this time.
Up Next
Since my goal was to deploy by Sunday (2 days ago) that is #1 right now. Eyes on the prize.
]]><p>For the past week or so I have been working on deploying the value app. To do it I’m learning how Amazon Web Services work and workValue App MVP COMPLETE!!!https://www.niamurrell.com/code/2017-12-12-valueapp-mvp-complete/2017-12-12T12:00:00.000Z2020-06-27T08:49:38.747ZIT’S FINISHED!!! Tonight I finished the final missing piece for my value app. Well…the last piece on v1.0 at least. It was all thanks to some help I got at a Meetup tonight…super stoked!
New Approach To Deleting Dates
I had been really stuck on figuring out how to delete a single date from an array of dates. The array is a property in the MongoDB document, and the list of dates is populated to the site with a forEach loop.
My initial approach was a bit convoluted (in hindsight!):
Give each date an ID of that date
On click, event listener creates a variable of that date
Router takes that variable and looks for a match in the array with a for loop.
On finding a match, that date is deleted:
var deletedUse = newDate(req.body.hiddenDateInput); for (var i = 0, j = foundThing.usageDates.length; i < j; i++) { console.log(foundThing.usageDates[i]); if (foundThing.usageDates[i] == deletedUse) { foundThing.usageDates.splice(i, 1); break; } } foundThing.save();
The issue with this was that the date stored in the database was being captured by default in UTC time, while the newly created variable to search against was not. So going through the array, there would never be a match and no date would be deleted.
Instead of this, the hero of the day recommended deleting the selected index of the array…that way you wouldn’t have to worry about matching at all. I didn’t know that the forEach function could take additional arguments…turns out it can and one of them is index! This was so much more straightforward:
var index = req.body.usageDatesIndex; foundThing.usageDates.splice(index, 1); foundThing.save();
So now the app is fully functional and ready to deploy. Speaking of which…
Yesterday’s Issues
I really cracked myself up with that one yesterday! 😂😂😂 I figured out what I’d done wrong though—I was updating the dependencies to get ready to deploy, and used npm update out of habit, but I’d built the project using yarn. So after I’d “updated,” some of the dependencies disappeared all together and the app crashed. Once I figured it out I ran yarn upgrade to get everything back to normal and it was all good!
Ready to Deploy
I also got started on the AWS deployment. I’m trying Elastic Beanstalk but there’s a bit of extra configuring to do in order to implement GitHub integration. I’m documenting the process step-by-step so will be good to have for future use.
Up Next
Deploy deploy deploy!
]]><p><strong><em>IT’S FINISHED!!!</em></strong> Tonight I finished the final missing piece for my <a href="/tags/value-app/">value app</a>.Grrrrrrhttps://www.niamurrell.com/code/2017-12-11-grrrrrr/2017-12-11T12:00:00.000Z2020-06-20T20:12:47.732ZToday I wanted to deploy the value app to AWS. After a whole bunch of reading up on it over the past few days I was ready to just do it, just break it if I need to, and see what happens. That turned into 3 hours of more reading and then somehow breaking the app and I can’t even run it locally anymore. How does that happen!?!?!! I mean, it’s actually hilarious 😂😂😂
So I have nothing productive to update today, sadly. I did make a good plan though, so will be ready to deploy as soon as I fix whatever I broke.
Other Stuff
I found out I don’t have a hard deadline of the 31st to finish CS50 which is great. Still working on it but glad to know I can still get the certificate in the new year if it takes longer.
Up Next
Figure out how I broke my app.
]]><p>Today I wanted to deploy the value app to AWS. After a whole bunch of reading up on it over the past few days I was ready to just do it,Express-less Node.js Server Part 2https://www.niamurrell.com/code/tutorials/2017-12-10-expressless-server-part-2/2017-12-10T12:00:00.000Z2020-06-27T08:49:38.730ZCreating & Routing A Node Server …continued
Today I picked up where I left off yesterday, and got the query from the URL parameters to persist as a JSON object. I learned about the Object.assign() method which does the trick. After creating an empty object as a global variable (var db = {}), you can assign data to a target: Object.assign(target, data). So for this server I added this into the routing logic to produce the desired result:
// Handle routes if (pathname === "/set") { // SET sends params to JSON object db = Object.assign(db, query); resMessage = "You have stored " + JSON.stringify(query) + " in memory."; console.log(db); } elseif (pathname === "/get") { // GET finds params from JSON object var key = query.key; var value = db[key]; resMessage = "The value of '" + key + "' is: " + value; }
So that’s the challenge done! The full code is in this gist.
Other Stuff
I spent a good 20 minutes trying to figure out how to take Git Code Lens annotations out of the editor in VS Code. For future reference: shift + alt + b!!!!
Up Next
Deploy my value app without the delete function. Hoping I can get that working at some meetups this week, but I’m overdue in trying to deploy on AWS so I will do that first.
]]><h3 id="Creating-amp-Routing-A-Node-Server-…continued"><a href="#Creating-amp-Routing-A-Node-Server-…continued" class="headerlink"Express-less Node.js Server Part 1https://www.niamurrell.com/code/tutorials/2017-12-09-expressless-server/2017-12-09T12:00:00.000Z2020-06-20T20:19:34.671ZI’m learning how to write a server in Node.js without using any frameworks. It’s a coding challenge that I want to try completing without using Express, so back into the learning curve! So far I’ve learned that Express is awesome. 😝
Creating & Routing A Node Server
Node has several built-in modules which are needed to create a server and routing:
http, which actually creates the server using the createServer() method, and then determines the port the server will be running on using the listen() method
url, which uses the parse() method to allow you to create routes so that the server responds with different actions, depending on what URL you visit.
For now I’m just getting it to respond with plain text but you can also serve html files, video, audio, JSON, etc etc.
For this challenge I’m trying to set up a server which will store key-value pairs in memory based on the URL parameters. I haven’t even gotten to dealing with URL parameters yet, or to creating the streams to store this data. For now I’ve been able to get the routing working, and my server can handle the routes I need with or without a search query:
var http = require("http"); var url = require("url");
var handleRequest = function(req, res) { res.writeHead(200, {"Content-Type": "text/plain"}); var parsedUrl = url.parse(req.url, true); var pathname = parsedUrl.pathname;
// Routing if (pathname === "/set") { res.end("You hit the set route!"); } elseif (pathname === "/get") { res.end("You hit the get route!"); } else { res.end("Proper URL usage: '/set?somekey=somevalue' OR '/get?key=somekey'"); } }
// Create & start server http.createServer(handleRequest).listen(4000); console.log("App running on port 4000");
Originally I was using req.url in the if statements, which would be fine if I weren’t using query strings. But because the queries should be different each time, this didn’t really do the trick, so pulling out the pathname from the parsed URL object was the simplest solution I could find for this.
]]><p>I’m learning how to write a server in <a href="https://nodejs.org/en/">Node.js</a> without using any frameworks. It’s a coding challengePython Intro Continuedhttps://www.niamurrell.com/code/2017-12-07-python-continued/2017-12-07T12:00:00.000Z2020-06-27T08:48:16.402ZStill working on this CS50 assignment. I’ve finished porting to Python some of the first programs we wrote in C. There are some really cool things Python does out of the gate that made me a little bit jealous! For example:
Iterating Through A String
We did a couple of cipher programs to change a message from the user into a coded message. To write this in C it requires a for loop to manually go letter by letter:
// prompt user for word to encode printf("plaintext: "); string plain = get_string();
// for each letter, shift by key and output cipher value printf("ciphertext: "); for (int i = 0, n = strlen(plain); i < n; i++) { // do the shifting }
The way that loops are written in Python makes it so much simpler! And being able to do this for a string, not just an array or object, is pretty cool if you ask me:
# prompt user for word to encode print("plaintext: ", end="") plain = cs50.get_string()
# for each letter, shift by key and output cipher value print("ciphertext: ", end="") for c in plain: # do the shifting
But…ASCII Values
One thing that I like in C that doesn’t work in Python is the fact that characters (letters, numbers, etc.) are equivalent to their ASCII value, so a == 97, A == 65, etc. This made it pretty straightforward in the cipher exercises because you can just do simple addition or subtraction to shift the letters. In Python you have to explicitly change characters into numbers with ord(char), do the manipulation, and then change it back to a letter with chr(num). I think it’s because Python forces type without needing the programmer to explicitly define type…so with characters they must be stored as strings? Anyway not the end of the world but I thought this was interesting.
Sentiment Analyzer
Next up we are writing a program to analyze the sentiment of someone’s tweets using the Natural Language Toolkit and the Twitter API. Pretty big jump from our little cipher programs but I’m on it!
Python Class Syntax
I’m getting familiar with the syntax of writing objects in Python, for example:
classStudent(): def__init__(self, name, id): self.name = name self.id = id
Classes require an initialization function so will always start with the __init__ method. They use the self parameter so that methods can be called on the class; self will always be the first parameter, and there will always be at least this one parameter.
Data Structures
I also learned the difference between a list, dict, and set in figuring out how to load the positive and negative word lists being used to analyze the tweets:
List: Items are kept in order as values Dict: Items are a key-value pair Set: Values only, order is not maintained, and duplicates are not allowed.
So in this case set is best, and has the added benefit of a speedier search since it’s not necessary to read through the whole list—it will just stop when the relevant word is found.
]]><p>Still working on this <a href="/tags/cs50/">CS50</a> assignment. I’ve finished porting to Python some of the first programs we wrote inCracking On With Pythonhttps://www.niamurrell.com/code/2017-12-06-cracking-on-python/2017-12-06T12:00:00.000Z2020-06-20T20:12:47.728ZContinued working on my first Python assignments today—the air quality is too bad to go to the gym so snuck in some study time before our Christmas party! And pretty awesome/creepy—as I was googling for some info on how to take command line arguments in python, Google broke and put me into a coding challenge, apparently a recruiting tool for them. Very clever!
But I put that one aside to get through this assignment, I don’t think my cipher programs are going to get me in the door there just yet 😝.
Other Stuff
I had to return Clean Code to the library before finishing and now I’m 3rd in line for the book! So annoying…when I borrowed it I got it straight away and now there’s a waiting list. I doubt I’ll get it again before the new year ☹️. Downside of doing things library-style.
]]><p>Continued working on my first Python assignments today—the air quality is too bad to go to the gym so snuck in some study time beforePython Pickuphttps://www.niamurrell.com/code/2017-12-05-python/2017-12-05T12:00:00.000Z2020-06-20T20:12:47.875ZI’ve picked up my CS50 assignments to close out the course by the end of the year. That will be my primary focus for the next few weeks, and with just a few assignments to do it should definitely be feasible.
Python
I started today by porting to Python some of the very first programs I wrote in C. I knew it would be less complicated but wow! The first program Mario went from 21 lines of code to 8. At first I started to replicate the nested for loops necessary in C, but quickly realized it’s completely not necessary in Python. I like this 😋
Up Next
Finish this assignment on Thursday–Christmas party tomorrow!
]]><p>I’ve picked up my CS50 assignments to close out the course by the end of the year. That will be my primary focus for the next few weeks,Clean Codehttps://www.niamurrell.com/code/2017-12-03-clean-code/2017-12-03T12:00:00.000Z2020-06-20T20:12:47.734ZClean Code by Robert C. Martin
A few weeks ago I got this book delivered from the library. I’d heard it recommended from several people and when I learned I can get it from the library, I jumped on it. Fun fact: there are only two copies of this book in the whole LA Public Library Network! I’m glad they have it at all 😋
So I started reading it when I got it but wasn’t sure of the best way to take/keep notes for future reference. Well today I found someone who outlined the whole book! So I forked the repo and will be adding my own notes as I go HERE.
Other Stuff
I watched a handful of CS50 seminars which were introductions to topics like Data Visualization, audio recognition, React, D3, Pandas, city planning, etc. They were given as inspiration for final project ideas. I’m uncertain whether I will finish the remaining assignments before the end of the year.
Up Next
TBD.
]]><h3 id="Clean-Code-by-Robert-C-Martin"><a href="#Clean-Code-by-Robert-C-Martin" class="headerlink" title="Clean Code by Robert C.BMP Maskerhttps://www.niamurrell.com/code/2017-12-02-bmp-masker/2017-12-02T12:00:00.000Z2020-06-27T08:49:37.918ZC & BMP Masker
Today I worked on a small program in C to play with .bmp image files. I wrote a version of this for CS50 to reveal a secret message as part of a homework assignment. Today I added a way to create secret messages of my own—fun stuff!
First I had to get C compiling and working locally on my computer since we use Cloud9 in CS50. Turns out it was already installed as part of the Xcode developer tools—I just needed to turn it on in the command line. This link helped me figure that part out.
The message revealer program (unmask.c) reads a bitmap pixel by pixel and removes “noise” (red pixels) from the image, leaving a message that can be read by the naked eye. To write mask.c I swapped the colors so that it would add noise instead of removing it. It took a few tries to get the right kind of noise:
First I tried adding red every nth pixel; this only created stripes and didn’t obscure the secret message at all. That was a bit of a duh hindsight moment–I’d ignored the fact that it’s first looking row by row, not just pixel by pixel, so of course each row would have the same pattern of red pixels, thus creating stripes!
So then I learned how to generate random numbers in C: int r = rand() % 10 + 1. The rand() function creates a random number (integer in this case) between 0 and the modulo divisor, and I added 1 to avoid dividing by 0 which was causing errors in writing the output .bmp.
With the randomness in place, I wrote my first pass only affecting the white pixels, to make sure that the hidden message would stay in tact. But this just made the message stand out more, completely defeating the purpose! So then I tried adding some white noise to the original image, thinking that it would help obscure things a bit better. Nope! After trying all sorts of things in Photoshop and the installing Gimp to try its brushes and failing, it was looking like there was no good way to modify the original image and make this work. And you shouldn’t have to!—isn’t that the whole point of creating the noise programmatically?
Well I took a long drive home from the coffee shop where I was being frustrated working and it dawned on me to just leave the message alone and run it through mask clean. And it worked! So now I can create hidden messages and unmask them too. Fun times.
Other Stuff
I have been learning how to delete items from an array inside a database model based on user selection for the value app. Everything I try isn’t working but I’m almost there—now the only thing causing issue is the fact that the selected items are dates—I think because dates are mutable and the format of the date is different depending on how and when it’s being displayed or selected. So still working on this…it’s the last step before being able to finally deploy.
Up Next
Travel is now complete for the year so no more breaks! I need to decide what I’m going to focus on for the next few weeks.
]]><h3 id="C-amp-BMP-Masker"><a href="#C-amp-BMP-Masker" class="headerlink" title="C & BMP Masker"></a>C & BMP Masker</h3><p>Today ISnag Resolved! On To The Next...https://www.niamurrell.com/code/2017-11-23-today/2017-11-23T12:00:00.000Z2020-06-27T08:49:38.730ZSnag Resolved
Tried a few more things to fix the value appbug I’ve been working on.
Considered calculating the current cost per use each time it needs to be displayed and rendering the result. Although this works and always gives an accurate result, I don’t think it’s the best solution because the function would need to be run over and over again. It still seems better to store the value since it’s a number that needs to be displayed so often.
I picked up from before trying to get the updated data to be submitted when the user makes updates. I had added the fields and added event listeners so that the data would be updated automatically, and would go into the database correctly. I made the useCount and currentValue fields disabled so that the user can’t change the data. All was set up as it should be, but I was still stuck in the same place as yesterday where all of the fields weren’t being saved as part of the form object.
Key Learning! Disabled fields aren’t sent with form data when they post. Didn’t know that! It worked once I took off the disabled tag. Yay!
However I don’t want the user to change these values and mess up the calculations, so for now I’ve set both fields to hidden so that the user can’t see them at all. This isn’t an ideal solution since there are ways to get around this and submit bad information anyway, but as far as an MVP goes I’m happy with this.
Deleting Uses
Now I am working on the final element of completing this project as an MVP: deleting usage dates from a Thing. For each Thing, the app stores the date each time someone says they’ve used it…this number of uses is how the app calculates each Thing’s current cost-per-use. The user can see a list of the dates they’ve used it, and should be able to delete a date. This is what I’m working on now. More on that in the next post..!
Other Stuff
Happy Thanksgiving!
]]><h3 id="Snag-Resolved"><a href="#Snag-Resolved" class="headerlink" title="Snag Resolved"></a>Snag Resolved</h3><p>Tried a few more thingsSnag Continuedhttps://www.niamurrell.com/code/2017-11-22-snag-continued/2017-11-22T12:00:00.000Z2020-06-20T20:12:47.729ZI am still working on trying to fix the bug I came across recently and have done a few back-and-forths about how to address it.
#1: AJAX Research
When I left off before I thought updating the value using an AJAX request may be a good fix. On second thought, it’s not. There is already a page reload in place for editing the things, so I should be able to carry out the operation on the server as the data are being updated through this page’s PUT route.
An AJAX request would be a great solution if I weren’t already serving the page through Express routes…in fact maybe in a future refactor this could be a more seamless way to do all of the page updates. But in this case, it didn’t seem right or necessary to scrap all of the page routing because of this one hurdle.
#2: Create Object From Form Data
Back to the original plan to submit updated information from the form and use this with the findByIdAndUpdate Mongoose query method. The issue before was that the useCount and currentValue were not part of the form, and one or both of these would be required to include with the update. So I got to finding a way to include them, with two options:
Calculate the new currentValue on the fly, or
Add the useCount to the form.
Option 2 doesn’t make much sense from a UI perspective, so I went for option 1. To do this I attached an event listener to the input field where the user can update the original purchase price. As they edit the number there, a second, disabled field is updated to show what the new cost-per-use will be.
On second thought, because this display number will be rounded to two decimals, if I use this field to update the value in the database, eventually the numbers could be off due to rounding. Not good!
So back to plan A of including the useCount on the form somehow. And that’s where I’m stuck at the moment.
Creating An Object From Form Data
Now I have all the possible fields on this form, matching the fields in the database model being updated. But for some reason (which I’ll be figuring out tomorrow hopefully) only half of the object is being created from the fields in my form. Each input field has an attribute which should create an object: thing[name], thing[purchasePrice], thing[purchaseDate], thing[useCount], etc. This should create and object:
Only the first two are showing up in the object. So up next is to figure out how to get the others added as well, so that all of the necessary info can be updated with the PUT route.
Up Next
↑
]]><p>I am still working on trying to fix the <a href="/code/2017-11-20-snag/" title="bug">bug</a> I came across recently and have done a fewHigher Order Functions & Callbacks Meetuphttps://www.niamurrell.com/code/2017-11-21-higher-order-functions/2017-11-21T12:00:00.000Z2020-06-27T08:49:38.425ZI went to a meetup tonight where the topic was higher order functions and callback functions in JavaScript. While I’ve used both on many occasions this was probably the first time I’d heard them properly explained and defined so it was really helpful to walk through step by step.
We also went through what the JS engine actually does to execute code, reading line by line, allocating memory to declare variables, and creating new execution contexts to call functions. Again, having it explained in this was was really helpful, and I was glad to see that taking CS50 has already started to pay off!—having gone through similar info in C it was cool to learn how that applies (technically and exactly) in JavaScript.
The only bad thing about events like this is I realize just how much more I have to learn!! Well, that’s not bad at all, it’s great. But where is the time 😅😂 ?!
Up Next
Well I guess the good thing is I can already see some spots in my value app code where I can put what we learned into practice immediately. So I’ll have a bit of refactoring to do, in addition to working out that snag and deploying.
]]><p>I went to a meetup tonight where the topic was higher order functions and callback functions in JavaScript. While I’ve used both on manyHit A Snaghttps://www.niamurrell.com/code/2017-11-20-snag/2017-11-20T12:00:00.000Z2020-06-27T08:49:38.729ZSo close with my value app!! I got it to a point where I considered the MVP just about finished and in testing the site I noticed a bug. The per-use cost would update properly whenever I added a new use, but I noticed that if I edit the initial purchase amount, the per-use cost wasn’t updating at the same time.
I realized this was because I’m using findByIdAndUpdate, using only the user input from the form to update the document, whereas the per-use-cost would also need to be calculated and updated based on the newly updated initial purchase price. I had a few ideas to try and fix this:
Add the current per-use-cost into the update object somehow so that it is submitted with the other form data: doesn’t work because you would still need to pull the useCount from the stored data.
Instead of findByIdAndUpdate, use findById to pull the existing document from the database, including the current useCount. Calculate the new useCount and create a new object containing all of the updated information. Use Model.update() to then send the new object to the database. I tried this with the code below, but the data didn’t persist. I’m still not entirely sure why so I will try to figure this out, but may move on to option 3 instead.
I don’t like this anyway because it’s really messy!
Option 3: it may make more sense beyond this issue to use update the values using AJAX instead of reloading the page for each update. I was already thinking this may be the best solution for deleting useDates as well. So next I’ll learn a bit about AJAX to see if it’s really a good solution.
]]><p>So close with my <a href="/tags/value-app/">value app</a>!! I got it to a point where I considered the MVP just about finished and inBack To Basicshttps://www.niamurrell.com/code/2017-11-14-basics-recap/2017-11-14T12:00:00.000Z2020-06-20T20:12:47.734ZNow that I’m back in town for the foreseeable future and things have slowed down quite a bit at work, I really want to accelerate my studies back to the rate I was working over the summer. I’ve been sitting on a few courses for things I really want to learn: MySQL, UX Fundamentals, and JavaScript ES6.
I was (awesomely!) gifted a free year to Frontend Masters so since that has a time limit on it, I’m going to do that first. They have a lot of great JavaScript courses so I’ll start on the ES6 course first.
Back To Basics
Before jumping into that course I figured I’d watch through the Intro to JavaScript class first. It’s only about two and a half hours and it never hurts to recap right? Figured I could knock it out in one sitting before jumping into ES6. And for the most part that was true, and I had some basic concepts reinforced like:
What makes a compiled vs. interpreted language, and how JS fits into that
How JS handles type and coercion when type is not defined or is unclear
The default falsy values: 0, -0, NaN (not a number), "", false, null, undefined, void
At the end of the lecture there was a coding challenge which took me longer than I expected but was fun to work on. Well..except the part when an infinite loop crashed my browser lol. But in the end I got it and finished up the course. Onto ES6 from here!
Other Stuff
I am also still working on CS50 but not 100% sure I will complete all of the assignments to get the certificate. At the moment I’m feeling much more motivated by working on things I can implement now rather than the theoretical. There’s still a month and a half to finish up though so maybe I’ll finish…tbd.
Up Next
Finish styling up the value app, and get started learning ES6. Maybe I will port the whole project to ES6 as an exercise at some point.
]]><p>Now that I’m back in town for the foreseeable future and things have slowed down quite a bit at work, I really want to accelerate myJavaScript Numbers - toFixed, parseFloat, toLocaleStringhttps://www.niamurrell.com/code/reference/2017-11-09-tofixed-parsefloat/2017-11-09T12:00:00.000Z2021-06-19T22:25:32.489ZMore work on my value app today which I’m naming valueMax for the time being. I’m meant to be styling the site but there turned out to be some functional kinks to iron out.
toFixed & parseFloat
While working on styling the site, I decided to change the main display from showing the date purchased to showing the current cost-per-use of each thing. I wanted to to look like currency, so tried to use toFixed(2) to guarantee two decimal places on each price. This threw a huge error Cannot read property 'toFixed' of undefined every time, but I couldn’t figure out why. toFixed is a vanilla JavaScript method so why wouldn’t it work in my code? Hmmm..
Some stackoverflowing gave a good clue that toFixed only works on numbers and will throw an error on strings. I know I’m saving the number as a number in my database, but could it be rendering to the page as a string? First I double-checked that it was indeed a number in the database using Robo 3T, and confirmed all prices with cents are being stored as a double, so that should be fine.
I also thought about forcing the current value to always be stored in the database with two decimal places. But then quickly ruled that out…the more times the number is divided, the less accurate the output would be if I limit the number of decimal places. So no go.
Next thing to try to was make sure my currentValue is indeed a number before using toFixed, and this is where parseFloat comes in: parseFloat(thing.currentValue).toFixed(2). This turns thing.currentValue, which is a number rendered as a string, back into a number, to then be fixed to two decimal places.
And it worked! So lesson learned: no matter how a number is stored in the database, it will be rendered as a string in the front end. To manipulate the number for display, it needs to be made a number again to avoid errors. I think I had learned this before in a class but I guess it takes working on it properly for it to stick.
toLocaleString
Happy with this result my next aim was to display separators in the prices, so 11324893.67 would display as 11,324,893.67. And this led me to toLocaleString (MDN)! This is a method that will add separators based on the locale of the user’s OS. So for example US currency will display $11,324,893.67 while those in Italy for example will see €11.324.893,67. So this actually killed 2 birds with one stone–sweet!
I’m not 100% sure I’ll keep this as my method of currency support–what if a user makes purchases in different currencies for example? As someone with obligations in the US and the UK, I find it pretty annoying when sites allow my browser to determine what content & functions I have access to. But anyway good to know toLocaleString exists!–I’ll keep it for now and improve later.
Up Next
Style the single thing view. Then do another pass on all the styling.
]]><p>More work on my <a href="/tags/value-app/">value app</a> today which I’m naming valueMax for the time being. I’m meant to be styling theBack In Businesshttps://www.niamurrell.com/code/2017-11-07-back-in-business/2017-11-07T12:00:00.000Z2020-06-27T08:49:38.415ZWoo! Feels good to be back at it. For the past month I’ve been traveling for work and between the events we were working on and all of the travel, I got pretty much no time to work on my courses or projects. Today I finally picked up my value app to get back in the swing of things. Feels awesome!
Semantic UI
Since the site is working properly, I want to get it looking decent with the aim to deploy pretty soon. I’ve used Bootstrap on a few other projects and think it’s ideal to have experience with other frameworks, so I’m learning Semantic UI to style this app.
First impressions: I love semantic code! Adding styles and colors and layout, and more importantly reading that code, is so much more friendly and straightforward than how I’ve written other sites in the past. I noticed I’ve been a bit clearer with my class names and id tags too.
Today I mainly worked on the page layout & spacing for looking at each thing. It’s still pretty boring just being a text site but spreading out the information helps a lot with readability.
Up Next
I’d like to use this project to get familiar with using AWS to launch a web server and database, so that will be the next step after getting the design to a presentable state.
I’ve also got stacks of coursework I’ve been looking forward to jumping into!
]]><p>Woo! Feels good to be back at it. For the past month I’ve been traveling for work and between the events we were working on and all ofDates in JavaScripthttps://www.niamurrell.com/code/2017-10-03-date-picker/2017-10-03T11:00:00.000Z2020-06-27T08:49:38.694ZDoing a bit of reading up to try and get my dates working properly in the value app. I found a great article on UX design guidelines for date/time inputs…it has some pretty good examples on what I’m trying to avoid!
Moment.js
I added Moment.js to give more control over how my dates are displaying in the app. By default they all displayed in UTC time (Sun Aug 27 2017 17:00:00 GMT-0700 (PDT)) but obviously this is ugly. Yesterday I got it to look a bit better by appending toDateString() to the date which was a bit better: Sun Aug 27 2017. With moment I can set the date to any format I want, for example moment(thing.purchaseDate).format("dddd, D MMMM YYYY") displays Sunday, 27 August 2017. Much better! And of course I can change the format any number of ways, and also eventually add support for users to select their own format.
Datepickers
I also needed to solve the issues presented by using the input type="date" form field which acts very differently in different browsers (see yesterday's post for details). The rabbit hole led me to jQuery UI which has a datepicker widget. Super helpful because I didn’t even know jQuery has a UI API before this. This jQuery UI Intro on YouTube, as well as this intro to the datepicker helped me get set up pretty quickly.
And the best of all: using this means using input type="text" instead of input type="date" which I picked up from the Chrome developer FAQs. By using the datepicker to input the date as text instead of a JavaScript date object, it now uniformly enters the date in the user’s timezone in all the browsers I am able to test.
So all in, got all the date issues ironed out and now ready to move on to styling the site. But it works!
Other Stuff
I finished Ariana Huffington’s book Thrive which introduces a third metric to measure success by (in addition to the metrics of money & power, which everyone already seems to be pretty comfortable judging others by 😁): one’s ability to thrive. “Thriving” combines one’s wellbeing, intuition, spirituality, and positive habits. It was a quick and encouraging read I’d recommend!
Up Next
Keep working on the value app & deploy it in the next couple of weeks.
]]><p>Doing a bit of reading up to try and get my dates working properly in the <a href="/tags/value-app/">value app</a>. I found a greatValue App Finished!https://www.niamurrell.com/code/2017-10-02-value-app-finished/2017-10-02T11:00:00.000Z2020-06-20T20:12:47.876ZValue App is finished!
Well, functionally finished that is. All of the logic, date additions, etc. are all fully functional in the app. Super happy about that! I do still have quite a bit to work on though.
JavaScript Date Object
This is a new beast whose tricks I’m slowly learning. First all my dates were coming in as strings which doesn’t necessarily change the function of the app, but doesn’t strike me as being good practice either. To fix this I added the Date object on top of the incoming form data: purchaseDate: new Date(formDateInputField) instead of purchaseDate: formDateInputField.
Next I ran into browser issues with this whole setup. In Chrome, there is a calendar dropdown which seems helpful, except that the calendar records UTC time while my computer is several hours behind. This means that no matter what date I pick on the calendar, the day after is what’s being saved to the database. Not ideal. In Firefox it saves it as my local timezone, but you have to manually type in the date each time. Also not ideal.
Two fixes for this I will experiment with: first I want to add my own JS visual date picker which will populate the date input to make it easier to use. Second I’m going to try the MomentJS npm package which looks like it handles time zones and date displays better than the basic JS date object. Added bonus, I can style the site with relative time (like ‘2 days ago’ etc.) which I think will look pretty cool.
Styling The Site
Also to do: need to style the site and make it look nice. It looks like crap right now.
Editing Things
The way you edit a thing right now isn’t great, and I’d like you to be able to remove accidental uses too, so will need to massively re-do this page & route.
And More Features
I also want the app to support subscription-type things like gym memberships or TV services where you pay monthly or quarterly. Right now the purchase price is set in time and the per-use price is calculated from that. I want to be able to track things accurately if you have to put more money into it. And currency support!
Up Next
Going to fix the dates before styling so that I can start to use the app myself. Then styling. Also would like to finish this week’s CS50 homework before the week’s end.
]]><p>Value App is finished!</p>
<p>Well, functionally finished that is. All of the logic, date additions, etc. are all fully functional inPython Intro via CS50https://www.niamurrell.com/code/2017-10-01-cs50-python-intro/2017-10-01T11:00:00.000Z2020-06-20T20:12:47.876ZI picked up CS50 and watched the next few lectures. Great to feel like progress is happening again!…it helped that the last 2 lectures didn’t come with any homework =)
Intro To Python
The course introduced Python as we’re now switching from C. I’ve had a very brief intro before but it was helpful to see side-by-side comparisons of how we’ve done things in C compared to how they would be done in Python. Next step is porting all of the earlier homework assignments we wrote in C to Python.
Up Next
Write my first proper Python programs!
]]><p>I picked up CS50 and watched the next few lectures. Great to feel like progress is happening again!…it helped that the last 2 lecturesDatabase Planning - Store vs. Calculatehttps://www.niamurrell.com/code/2017-09-30-database-value-storage-planning/2017-09-30T11:00:00.000Z2020-06-27T08:49:38.727ZI’ve been working on the calculations for the value app and the question came up–should I store the current value of each thing and then query that item for displaying on the front end, or should I calculate the value whenever it needs to be displayed?
My original thought was to calculate it each time by dividing the original purchase price by the number of uses (stored as a virtual type). I figured there must be a convention around these things and I discovered database normalization which actually recommends against storing calculated values in a relational database to reduce redundancy (among other reasons). However this Q&A helped form a plan I’m happy with.
I imagine I will be displaying the values more than updating them–a user will see all of their things when they log in, but they may only want to update one during any given login session. So therefore it makes sense to store the current per-use value within the userThing model. Then whenever updates are made, I’ll recalculate the value and post it as an update to the currentValue field.
In hindsight this seems pretty obvious.
]]><p>I’ve been working on the calculations for the <a href="/tags/value-app/">value app</a> and the question came up–should I store theHTTP Basicshttps://www.niamurrell.com/code/reference/2017-09-30-http-basics/2017-09-30T11:00:00.000Z2021-06-19T22:25:32.564ZContinued with CS50 today and final a topic that’s review woo! Just to track my notes from the lecture…
HTTP Basics
DHCP software (dynamic host configuration protocol) runs on a router an assigns an IP address to each device on that accesses that router.
IPV4 is the original type of IP address which takes the format 0.73.145.255 where each number is between 0-255, i.e. 8 bits each, i.e 32 bits total (max 4 billion device IP addresses).
IPV6 has 8 places of 16 bit hexadecimal characters and allows for a bajillion more IP address (to paint a picture…).
A DNS (domain name system) converts IP addresses to domain names.
TCP (transmission control protocol) is coupled with IP (internet protocol); IP gives an address of where a packet of information should go; TCP breaks data into packets, and tracks and guarantees delivery. If a packet doesn’t make it through, TCP will request the missing packet.
UDP (user datagram protocol) is similar to TCP but used (for example) for streaming live events; after buffering TCP would wait for all the data before displaying, and you would progressively get behind ‘live’ whereas UDP will just skip whatever was buffering to ensure you always go with the latest packets (and stat live).
Port numbers are included with TCP packets to determine how they should be handled:
21 - FTP
22 - SSH (encrypted shell)
25 - SMTP (email)
53 - DNS
80 - HTTP
443 - HTTPS
Firewalls block IP addresses that are determined by the network admin. You can also block entire ports (no FTP allowed, for example).
HTTP: hyper text transfer protocol. It includes a get request as the first line. The server will return a status code:
We also learned some terminal commands I didn’t know about:
nslookup www.google.com will return the IP address of the domain name
traceroute -q 1 www.google.com will return the pathway 1 query at a time until it gets to the destination…you can see how your request to a serve thousands of miles away is routed across the globe, step by step
Up Next
Watch next two CS50 lectures this weekend so that I have only the assignments to think about over the next couple of weeks. Continue work on value app.
]]><p>Continued with <a href="/tags/cs50/">CS50</a> today and final a topic that’s review woo! Just to track my notes from theValue App Reconsiderationshttps://www.niamurrell.com/code/2017-09-29-value-app-reconsiderations/2017-09-29T11:00:00.000Z2020-06-27T08:49:37.918ZI finished the MongoDB course and got back to working on the Value App.
MongoDB Course Wrap Up
Turns out this course was a big distraction. I definitely didlearn some things that I’ll probably be able to use in the future, but after the first section of the course it veered off into topics that literally have nothing to do with this project. On top of that, I realized after finishing the whole thing that we literally never once touched the front end in the course–again not really helpful with my project since that was the main problem I was having: figuring out how to display the data in the front end properly. Also, all of the code in the course was written in ES6 and while I’m really glad to have been exposed to this, porting all the code I already wrote to ES6 just seems like a big exercise in yak shaving at this point.
So overall, not as helpful as I first imagined. BUT, the info was good and thorough, so maybe on future more relevant projects it will be really helpful to have this to go back to.
Back To Value App
It turns out the reason my things weren’t displaying properly was because of one simple mis-named variable (typical!). One of the course videos spelled out pretty well how you have to pay attention to naming and referencing models in a particular way, so that actually helped me solve the issue. Great!
Reconsiderations
For simplicity’s sake, and just to get an MVP out the door, I reconsidered and re-wrote my database models for this project. Originally I was nesting globalThings inside of userThings which were nested inside of each user. For now I will forgo the globalThings (maybe will add back in later) because it’s not really necessary as part of this proof of concept, and I want to see some progress. I.e. I want to use this app!
Git Stash & Amend
Because I had already gotten pretty far on working on the globalThings setup and because I’m working on the master branch (bad, bad) I had to get acquainted with some new git commands to get things working properly. There was one commit with breaking changes (i.e. what prompted these reconsiderations) and I learned you can git stash to go back to the previous commit without committing the work in progress. When finished, you can git stash pop to go back to your work in progress.
So I put that work in progress on a new branch (which I should have done in the first place!), went back to the master branch, and rolled back with git reset --hard 2746d86e (or whatever commit). Since the remote branch already had the newer commit, it was necessary to force the upstream push with git push -f origin master.
Then I removed all the code for globalThings in the project and committed. Of course I forgot one tiny thing not worth its own commit and learned you can git commit --amend (or git commit --amend -m "Commit Message") to make small changes without having to do a new commit. And of course, got reminded of how to exit vim with esc + : w q. I always forget that one.
Other Stuff
Totally unrelated but I’m reading Elon Musk’s biography which is really interesting, and today watched his presentation at this week’s SpaceX event. Really cool to see the latest of what’s in the works but totally different to watch him presenting, compared to the larger-than-life, epic, mythic person that’s characterized in this book! It’s like two completely different people.
Up Next
Next in the Value App is getting the value calculations to work. I also decided to move forward with CS50 without completing the assignment yet…I’ll go back to it to finish the course but I don’t want to lose any more momentum.
]]><p>I finished the MongoDB course and got back to working on the Value App.</p>
<h3 id="MongoDB-Course-Wrap-Up"><aPlugging Awayhttps://www.niamurrell.com/code/2017-09-26-plugging-away/2017-09-26T11:00:00.000Z2020-06-20T20:12:47.876ZI’ve been silent here on the blog for a bit but have been plugging along at the learning! I am mainly working on the MongoDB class (about 80% finished and should wrap up this week) ahead of taking the next steps on my value app. I was in Denver over the past few days and got some work done there–shout out to the Roostercat Cafe!
I haven’t been a big fan of this class unfortunately. Parts of it are fantastic (see previous posts) but a big section in the middle was built entirely around a very advanced Electron app. Well maybe it’s not very advanced, but it’s beyond what I’ve learned so far and the new bits of that app were a pretty big distraction from trying to learn the new bits that the class is actually about. It was a cool intro to what you can do with Electron to create desktop apps though…silver lining.
Up Next
Finish the class. Work on apps. Work on CS50.
]]><p>I’ve been silent here on the blog for a bit but have been plugging along at the learning! I am mainly working on the MongoDB classVirtual Types in MongoDBhttps://www.niamurrell.com/code/reference/2017-09-19-virtual-types/2017-09-19T11:00:00.000Z2021-06-19T22:25:32.496ZLearned another thing that directly applies to my app which is great–virtual types are what you use to store information on your server as a result of the data that’s stored in your database. For example, in my Value App I need a constantly-updated count of the number of times the user has used a thing in order to calculate its current value. Before learning about virtual types, I thought I would be calling thingArray.length all the time, or would have to manually increment a usageCount variable each time there was a new use. Not so! I just need to set a virual type to count however many usages are present whenever it’s time to do the calculation. This following code shows how to set it up. This is declared outside of the model.
Debating whether to go to a meetup tomorrow where I might be able to get some help on my double login problem.
]]><p>Learned another thing that directly applies to my app which is great–<strong>virtual types</strong> are what you use to storeTest Driven Development - Mocha Introhttps://www.niamurrell.com/code/reference/2017-09-18-tdd-intro/2017-09-18T11:00:00.000Z2021-06-19T22:25:32.380ZBuilding Tests
This MongoDB class is having a lot more benefit than expected. Before even getting into building an app, we’ve learned how to build tests using Mocha to assert what the results of a given action should be. For example, to test delete actions:
const assert = require("assert"); const User = require("../src/user");
describe("Remove/destroy a user", () => { let joe;
beforeEach((done) => { joe = new User({ name: "Joe" }); joe.save() .then(() => done()); });
it("removes a model instance", (done) => { // Chain promises so that you remove the user, when that's done search for the user, // and when that's done run the test to see if the user exists joe.remove() .then(() => User.findOne({ name: "Joe" })) .then((user) => { assert(user === null); done(); }); });
it("removes a class method", (done) => { // Remove a bunch of records with some given criteria User.remove({ name: "Joe" }) .then(() => User.findOne({ name: "Joe" })) .then((user) => { assert(user === null); done(); }); });
I also learned that there are built-in functions in Mongo which do exactly the things I need to know how to do for my app. Yay!
Up Next
This stuff is really fun and I can totally anticipate getting sidetracked and not finishing CS50 in time. So I’ve gotta go back to that!
]]><h3 id="Building-Tests"><a href="#Building-Tests" class="headerlink" title="Building Tests"></a>Building Tests</h3><p>This MongoDB class isTriple Dead Endhttps://www.niamurrell.com/code/2017-09-17-triple-dead-end/2017-09-17T11:00:00.000Z2020-06-27T08:49:38.726ZI hit a wall in all three of the things I’m working on right now. It’s been frustrating but I kind of have a path forward, at least for one of them.
CS50 Dead End
I know I say this with every assignment, but today I started on the latest assignment and literally had no idea where to begin. We are building a spellchecker in C and are given a “dictionary” (i.e. a list of 143,000 words) as well as a long text to spellcheck. We have to write a program which reads the dictionary and stores all of the words into memory using one of the data structures we learned about in the lecture (hash table, tries, etc.); then using that dictionary, we have to spell check the text. And these actions are being timed–we need to write the program to do all of this as quickly as possible.
I got as far as writing to code to open & read the dictionary…and got totally stuck at writing a function for a hash table or a trie. That was pretty frustrating and I just didn’t have it in me to power through today. If I weren’t so stubborn about finishing the course, today would have been the day I’d give up!
Metro App Dead End
I also picked up the Coding For Product project again to try and get it to be a bit more presentable. Although we got it working for our final presentation at the end of the workshop, there were still a few important bits & bobs we didn’t have time to implement before, which really should be addressed if it’s going to be a good example of code to reference or talk about.
The first thing I wanted to work on was getting the login sessions to persist which I finally did do over the lastthreedays, but in doing so, I somehow made it so that 2 login attempts are required before you can get into the app. I don’t know what I’m missing and it’s frustrating, after spending hours staring at the same brick wall.
I braved StackOverflow to try & get some help but haven’t gotten any responses yet. I will try some Slack groups or maybe a meetup this week if I can’t work it out. But for today, I’d had enough.
Value App Dead End
I also spent several hours working on my Value App trying to access nested, referenced data inside a MongoDB collection. When I build the model, I followed along from another project where I was able to do the exact same thing successfully, but in this project for some reason it’s not working. I think it’s something to do with accessing objects vs. arrays, and how to call them using Mongoose. Anyway lots of trial & error, YouTubing, StackOverflowing and I couldn’t figure it out.
So at least with this one I’ve determined something I could do now. I enrolled in a (yet another) Udemy course specifically focused on MongoDB and Mongoose which I’m hoping will help me build the app. Actually I think it really will, because my only experience so far is doing CRUD commands with things like blog posts or comments, but my app will be a little bit more involved and truth be told, I wouldn’t know where to start on some of the features once I get past these schema design issues.
Is it bad/procrastination/the easy route/overloading my workload to add another course into the mix right now? Probably. But I don’t know where to get the kind of help I need, and I’m tired of getting nothing done!
I’ve only just started but I think it will be good as the course uses ES6, which I don’t have much practice in but want (need) to learn, and it definitely looks like we’ll be covering all of the skills I need to build my app. So here’s going for the best!
Other Stuff
I’m re-listening to the book Grit by Angela Duckworth and this time taking notes before I return it to the library. It’s a good book with some good advice to remember! I also picked up the Elon Musk biography (on sale today on Amazon) and am looking forward to reading about his backstory.
Up Next
Speeding through the Mongo class so I’m not too delayed on completing an MVP for my value app. I also don’t want to let CS50 build up as too hard in my head so will jump back into the spellchecker assignment asap.
]]><p>I hit a wall in all three of the things I’m working on right now. It’s been frustrating but I kind of have a path forward, at least forPersistence - Double Headerhttps://www.niamurrell.com/code/2017-09-15-persistent-double-header/2017-09-15T11:00:00.000Z2020-06-20T20:12:47.735ZTwo days in a row, success! 🎉🎉🎉🎉🎉🎉 Now when a user logs into the site and the server is restarted, they are still logged in afterwards.
Refactoring Mess
I got help figuring out the issues at a Meetup event tonight…it was so useful! When I left off yesterday, I could see that the user session was indeed being created and stored in the database (good), but for some reason when they log in it would redirect them back to the login page rather than going to the user’s dashboard (bad).
The person who helped me showed me a bit more of the Chrome developer tools I hadn’t seen before. With this we were able to see that it was going to the dashboard, just quickly routing again back to login. Hmmm.
Then we rolled back to the last version that allowed the login to work, and did the refactor again step by step. The key thing was testing that it still worked after every change. For some silly reason I didn’t do that yesterday when I moved and changed all the code around! Rookie move, that’s for sure. Going through step by step I was able to find the one section of code that was breaking the whole thing. Not surprisingly it was a section I didn’t fully understand, other than it was what the package docs said to do.
Eventually I figured out that some of the options were configured for an HTTPS environment, and when I adjusted them it started working. So now it’s completely working as it should!
Well, almost…
There’s now a weird thing happening where it takes two attempts to log into the site. Even worse, if you try one user on the first attempt and a different user on the second attempt, it logs you in as the first user! Pretty critical error, so that’s what I’ll be working on next.
Up Next
I’ll also need to put this aside eventually to finish the CS50 assignment this weekend.
]]><p>Two days in a row, success! 🎉🎉🎉🎉🎉🎉 Now when a user logs into the site and the server is restarted, they are still logged inPersistence - 1 Down, 1 To Gohttps://www.niamurrell.com/code/2017-09-14-persistent-login-codepen/2017-09-14T11:00:00.000Z2020-06-27T13:20:09.656ZI got the login sessions to persist!! Wooooo 🎉🎉🎉 !!! After all of yesterday's research it only took about 5 minutes to set it up…turns out with MongoDB and the connect-mongo npm package it’s actually pretty simple, as suspected. Big relief!
Persisting Sessions with PostgreSQL
Next I went back to my CFP project to try and get it working with a Postgres database with Sequelize as the ORM. Just remembering how to use the Postgres command line was tricky! It’s crazy how if you don’t use this stuff you really do lose it.
Now with a bit more understanding I can also see that our code for that project is pretty all over the place! I tried to set up some database models and put a lot of code in the wrong place which made it difficult to bring sessions in, and I’m still trying to figure it out.
Other Stuff
I went to my first CodePen meetup tonight hosted by Media Temple. It was great! Met some really cool people and learned more about how to get started with CSS Grid. So that project is still very much front of mind!
Up Next
Tomorrow there’s another meetup in my area and there will be “advisors” who can help on random coding issues. Hopefully I can get the sessions to persist by the time it’s over.
]]><p>I got the login sessions to persist!! Wooooo 🎉🎉🎉 !!! After all of <a href="/code/2017-09-13-persistent-login/" title="yesterday'sLogin Sessions & Cookieshttps://www.niamurrell.com/code/2017-09-13-persistent-login/2017-09-13T11:00:00.000Z2020-06-27T08:49:38.735ZI took another crack at setting up persisting sessions today. This is something I haven’t implemented correctly on a couple of projects now, and I really want to get it working. This way I won’t have to log in again every time I restart the server while I’m building my value app, and after deployment users won’t have to keep logging in either.
Figuring Out Sessions & Cookies
I was under the impression that it’s necessary to store session data in a database which I wasn’t figuring out so easily. Turns out that may not be the best path; this article helped elucidate the options, and explained that storing sessions in a database can be pretty inefficient because of how many calls you’d be making to the db. Good point!
But I kept reading and learned that with Express & Passport, storing sessions to a db seems to be the accepted norm and best practice. Why is this? I was pretty convinced by the argument above. Well this article explains some errors you might make setting up your server file; fixing them results in fewer calls to your database. Also if you use only cookies, you’re limited by whatever settings the user sets in their browser, which I could see might make the site stop working correctly?
If cookies are the preference I came across another npm package cookie-session which stores session info in a cookie on the client side. You would use this instead of express-session which stores a session id in a cookie on the client side, but stores all other session info elsewhere (database, cache, memory, etc.). But further reading suggests this opens security issues, and instead it’s safer to keep user info from going back and forth to the client.
So now I am back to figuring out how to store session data in my database, as an extension of express-session. So…back to square one! The npm package connect-mongo seems to be the way to go; it’s maintained by the team behind MongoDB so that’s promising for long-term support. More good news: because I’m using the MEAN stack for my value app (or, MEN stack actually..) there is a lot more knowledge out there on implementation since it’s a popular combination. By contrast using PostgreSQL and Sequelize on one of the other apps wasn’t so easy to figure out, apparently this is a much less popular combination and there’s very little written about this implementation. So I’m hoping I will have success this time around!
Up Next
Next up is to try & implement connect-mongo with Express & my database. I’m also due to start the CS50 homework and finish by Sunday ideally.
]]><p>I took another crack at setting up persisting sessions today. This is something I haven’t implemented correctly on a couple of projectsData Structures Introhttps://www.niamurrell.com/code/reference/2017-09-12-data-structures-intro/2017-09-12T11:00:00.000Z2021-06-19T22:25:32.380ZLecture day for CS50. This week it’s all about data structures, and we learned a few types:
Linked Lists (singly-linked & doubly-linked)
Stacks
Queues
Trees (an specifically, binary search trees)
Hash tables
Tries (aka reTRIEvals)
And here are some of the related structs:
Linked List
A chain of nodes which point to other nodes, held together by a start pointer at the beginning and a NULL termination at the end. Nodes are recursive, i.e. call other nodes within the node, until NULL is reached. Linked lists of nodes are useful because you don’t need to know how much memory to allocate before creating the list, unlike an array of data, where if it turns out you need more memory, you have to do a lot of extra work to copy & redefine the array. With linked lists you can expand more freely.
Linked lists can be singly-linked so that the nodes all call next in the same direction, or they can be doubly-linked so that each node points both forwards and backwards.
Definition of a singly-linked node struct:
typedefstructnode { int n; structnode *next; } node;
Definition of a doubly-linked node struct:
typedefstructnode { int n; structnode *prev; structnode *next; } node;
To search a linked list, go through each node (first the int n then next to the next node) until you find the value you’re looking for:
boolsearch(int n, node *list) { node *ptr = list; while { if (ptr -> n == n) { returntrue; } ptr = ptr -> next; } returnfalse; }
Stacks
Data is stored vertically so that you can only retrieve the last node added to the stack (LIFO: last in, first out). Stacks can be altered with push (add data) or pop (remove data). Top should be defined as a global variable so that it always lets you reference the last node added to the stack. Definition of a stack struct:
typedefstruct { int *numbers; int size; } stack;
Queues
Data is stored in a line and you always retrieve data from the front of the line (FIFO: first in, first out). Queues can be altered when you enqueue a node at the end of the line or dequeue a node from the front of the line. A front variable is maintained to store the current location of the front of the queue. Size also needs to be kept track of. Definition of a queue struct:
typedefstruct { int front; int *numbers; int size } queue;
Trees
Data is stored cascading from a root node in children; any node without children are leaves. In a binary search tree each node as 0, 1, or 2 children; the left child is always smaller than its parent and the right child is always bigger. This way you can easily throw out whole branches of data as you traverse the tree. It’s important for the tree to be balanced (i.e. not to heavy on one side or another) to ensure big O run time optimization. Definitions of a tree struct:
typedefstruct { int n; structnode *left; structnode *right; } node;
boolsearch(int n, node *tree) { if (tree == NULL) { returnfalse; } elseif (n < tree -> n) { return search(n, tree -> left); } elseif (n > tree -> n) { return search(n, tree -> right); } else { returntrue; } }
Hash Tables
With good design hash tables can have more efficiency than the above methods in terms of running time. Using a hash table is like splitting the data into buckets in a consistent manner, so that you have to search smaller collections of data when you’re looking for something. Each bucket is a linked list of the inner data.
Tries
An even more efficient style of hash table to reduce the running time greatly. With this recursive system, each bucket contains the same buckets as the parent level, and data are stored by traversing bucket by bucket until reaching an end marker. For example to store words, each bucket on the parent level would represent a letter A - Z, and then in each of those buckets are additional buckets A - Z. To find a word you follow the buckets one inside the next for each letter, until you determine the end of the word.
]]><p>Lecture day for <a href="/tags/cs50/">CS50</a>. This week it’s all about data structures, and we learned a fewC Structs & Bit Operatorshttps://www.niamurrell.com/code/2017-09-11-structs-bit-operators/2017-09-11T11:00:00.000Z2020-06-20T20:12:47.875ZStructs In C
I keep having to go back and look this up so lets keep it here for reference:
There was a bit of code that made no sense to me and took some digging to figure out. In the program I’m writing to recover .jpg files from an erased memory card, we are meant to find the beginning of each .jpg file by looking for a file signature: each .jpg file always starts with 4 specific bytes described below:
Specifically, the first three bytes of JPEGs are 0xff 0xd8 0xff from first byte to third byte, left to right. The fourth byte, meanwhile, is either 0xe0, 0xe1, 0xe2, 0xe3, 0xe4, 0xe5, 0xe6, 0xe7, 0xe8, 0xe9, 0xea, 0xeb, 0xec, 0xed, 0xee, or 0xef. Put another way, the fourth byte’s first four bits are 1110.
This bottom condition uses a bit operator to clear the lower four bits to make the first four bits 1110 (14, aka e). Nifty! And simpler than what I was going to write:
One thing that really bothers me about writing code is that after I finish a program, it looks so simple!!! When really it took hours upon hours to get it to be simple, and to get it to work. I guess it’s a good thing but it’s also like, this is so simple, how did I not figure this out sooner!?!! I’m even fooling myself, hah!
Up Next
Turns out there is homework in the next CS50 session.
]]><h3 id="Structs-In-C"><a href="#Structs-In-C" class="headerlink" title="Structs In C"></a>Structs In C</h3><p>I keep having to go back andC Troubleshttps://www.niamurrell.com/code/2017-09-09-c-troubles/2017-09-09T11:00:00.000Z2020-06-27T08:48:16.317ZI guess it shouldn’t really be a surprise that CS50 is getting harder with each passing week! This week’s homework is building some .bmp-reading and -copying and -resizing programs in C, no longer depending on the CS50.h helper file. I finished the first two assignments after hoooouuuurrrrssssss of brick walls and now I’m working on the .jpeg recovery program, which searches through a formatted disk to recreate the “deleted” .jpg files. Every time I working on these I assume I’ll put half the day towards them so I can spend the other time working on my other projects. Not so.
Up Next
So now I just want to power through it so I can get it over with.
The good news is, next week has no homework assignment!!!!!
]]><p>I guess it shouldn’t really be a surprise that <a href="/tags/cs50/">CS50</a> is getting harder with each passing week! This week’sMemory & Pointershttps://www.niamurrell.com/code/2017-09-05-memory-and-pointers/2017-09-05T11:00:00.000Z2020-06-20T20:12:47.875ZMemory Intro
Started learning about memory today and when happens when a program is run: the computer allocates some memory to run the program and partitions the memory for different functions. The stack and heap are shared within the same space; in a C program the stack is at the bottom with the main function making up the base. On top of that, for each function called within main, its data is stacked (and then inner functions stacked further on top, and so on…) until the function has executed & returned (and then erased from the memory store). The heap is where variables and stored values are held, starting at the top and moving downwards towards the stack. Problems happen when these collide.
You can use the malloc() function to tell the computer to allocate a certain amount of free memory to a given variable. This makes sure you don’t overwrite memory that’s needed for something else. You have to pay attention to how much memory is allocated (including a bit for ending strings \0, etc.). You also have to free() the memory once you don’t need it anymore, or it will cause memory leaks, which is a big problem in programs that aren’t closed frequently (ahem Chrome and its billion tabs!).
Pointers
We also learned what’s beneath the string variables that the course helper files allowed. A string doesn’t actually exist, rather it’s a pointer to an address where the beginning of the string is stored in memory. When you call a string the computer goes to that address in memory and pulls back everything up to the end \0 of the string. So the “string” data type we have been using is actually a char *, that is, an address of a character where the string starts in memory.
Three things to remember about pointers:
Initially pointers don’t point to anything (not setting this up is a huge source of bugs!!)
You must dereference a pointer to access its pointee
Assignment = between pointers makes them point to the same pointee
Other Stuff
I learned what Stack Overflow means!
Up Next
Watch the concept shorts to really solidify the topics from this lecture.
Start & finish the homework assignment THIS WEEK! Keep this train rolling…
]]><h3 id="Memory-Intro"><a href="#Memory-Intro" class="headerlink" title="Memory Intro"></a>Memory Intro</h3><p>Started learning about memoryCS50 Overloadhttps://www.niamurrell.com/code/2017-09-04-cs50-overload/2017-09-04T11:00:00.000Z2020-06-27T08:48:54.043ZIt’s always the smallest things that can make your code not work!!
Binary Search Algorithm
Today for me is was using less than < instead of less than or equals <=…as a result my binary search algorithm could only find its key in the top half of a sorted array, and returned false if the sought value was in the bottom half. I’m glad I figured out that it was even working in any way–the original test failed–as this made it easier to narrow down what the problem was. In the end I got the function to search both halves correctly:
// If value is in an array return true, else return false // where value is an integer and values is an array of integers
functionbinarySearch(value, values) { while (values.length > 0) { int l = 0, // Set left, right indices r = values.length - 1; while (l <= r) { // Terminate if left & right bounds cross over each other int m = (l + r) / 2; // Set middle index if (value == values[m]) { returntrue; } elseif (value > values[m]) { l = m + 1; //Throw out bottom half if greater } elseif (value < values[m]) { r = m - 1; // Throw out top half if lower } } returnfalse; } returnfalse; }
Game of Fifteen
Next was writing a Game of 15 puzzle in C which can be played from the console. I hit so many brick walls I literally cannot write about or even think about this anymore! But I got it done : D
When I finally finished I was so excited I thought, “oh now I’ll write it in JavaScript!” On second thought…
Other Stuff
I came across a video of Mark Zuckerberg doing a Q&A at CS50 in 2005. It was interesting to hear him talk about what it was like building the first iterations of (The) Facebook–the data structures, size limitations, social concerns, etc. It’s long (one to watch on double time) but interesting!
Up Next
The next CS50 lecture & homework set is all about working with memory, recovering data, etc. I know very little about this so interested to understand more.
]]><p>It’s always the smallest things that can make your code not work!!</p>
<h3 id="Binary-Search-Algorithm"><aLogin & Data Models & Grithttps://www.niamurrell.com/code/2017-09-03-login-data-models-grit/2017-09-03T11:00:00.000Z2020-06-20T20:12:47.729ZLogin Working
First up today, I was glad to get the login working on my value app. When I used the register form to create a new user, I could see in the Mongo command line that the user had been created, but in the browser I got an error 400 Bad Request. The error was caused by the field names I was using in the form; The npm package I’m using passport-local by default names the login fields username and password but instead of username, my field was named email. Once I changed it, it worked fine and routed correctly. It’s also possible to pass in the names of the field you want passport-local to consider as the username & password fields per the docs.
Rethinking Data Models
Next up was changing my schema models to reference each other; ultimately I want one document of things any user can choose from (and add to) to bring into their own list of things. I got the “global things” set up fine, and was working on referencing a globalThing from the user schema. I haven’t completely figured it out yet, but I did get the thing’s object ID to show up on the logged in user’s page, meaning it sees only the things belonging to that user and prints them. Now I just need it to print the actual array data instead of a random id number 8ac468230hgs08s!!
Other Stuff
I started on the book Grit by Angela Duckworth and I’m really enjoying it so far. I sometimes worry that I’m trying to do too many things at once (value app, CS50, MySQL course, Python intro, this blog, etc…for example), knowing that individually these things take a lot of time and attention so I need to cut the list down. And while that’s still true, one piece of encouragement I took from the book was that I am still going, which is a positive sign! It definitely hasn’t been all rainbows and lollipops, but it’s been nearly a year now that I’ve really be learning in earnest, and I still have as much excitement and drive around what I’m doing (maybe more) as I did when I started so that’s on the right track!
Up Next
It’s really encouraging and fun to see my app coming along that I can (literally) work on it all day. I need to make sure CS50 stays in the mix if I’m going to finish before year’s end.
]]><h3 id="Login-Working"><a href="#Login-Working" class="headerlink" title="Login Working"></a>Login Working</h3><p>First up today, I wasRouting With Querieshttps://www.niamurrell.com/code/2017-09-02-routing-with-queries/2017-09-02T11:00:00.000Z2020-06-27T08:49:38.726ZI did a lot of work on my value app today, mostly setting up the CRUD routes for the things. The last time I worked with it I was focusing on the login feature and was hitting some snags so today I decided to focus on the core functionality of the app: actually creating things and tracking their value! I can always add the login later.
RESTful Routing with Queries
After building the basic routes, I realized I had not set up my database to allow users to share the things. Ultimately users will be able to see all the things they can add (ideally with predictive search), so this really needs to be its own set of data. However for each thing a user has claimed, they will also need to be able to edit its purchase price and all the times they used it. So the user schema needs to reference the list of global things, but still have its own information about each thing. Not sure if I’m explaining this well after a few hours staring at this…
Anyway I made this possible by having the user create a new global thing first (ultimately they will be able to select from all of the global things, or create a new one), which redirected to the new route on submitting the initial form. On the new form, I wanted the thing name from the previous form to show up as a header. First I tried res.redirect to the new form, but learned that you can’t pass data through redirect routes. Then I tried res.render but this doesn’t work either; it tried to render a non-existent page since it was coming from a post route.
And hence I was reacquainted with query strings! This Q&A on StackOverflow had a very clear explanation on passing data through routes and I added the following to my post route on the initial form:
var newThingName = encodeURIComponent(req.body.name); res.redirect("/mythings/new/?name=" + newThingName);
On the mythings/newget route I created a variable from this query and passed it into the page:
var newThingName = req.query.name; res.render("things/new", {newThingName: newThingName});
Success!
Up Next
To link the things to a user, next up will be finishing up the user accounts and login. Then I’ll have to update all the models and routes to look for the things inside the user profile.
]]><p>I did a lot of work on my <a href="/tags/value-app/">value app</a> today, mostly setting up the CRUD routes for the <code>things</code>.App Progresshttps://www.niamurrell.com/code/2017-08-31-app-progress/2017-08-31T11:00:00.000Z2020-06-27T08:49:37.919ZToday I started building the routes and database schemas for my value app. I’m referencing some previous projects and exercises I did to build it, but there are some slightly different elements to figure out. For example in all of the login projects I’ve done, once a user logs in everyone sees the same thing, whereas for this app I want the person who logs in only to see main content that pertains only to their account. So I’ll need to figure that out. Otherwise it’s been a refresher today in routing an app and building a database schema (and thinking ahead to what I’ll need in the model). The next big chunk will be implementing the REST routes for each user’s things.
Other Stuff
Learned today I can code to music instead of just silence…that’s a win!
Up Next
I must recognize the limits of my time. CS50 and the value app are my only foci at the minute and the MySQL and other courses will have to wait unfortunately.
]]><p>Today I started building the routes and database schemas for my <a href="/tags/value-app/">value app</a>. I’m referencing some previousSearch & Sorthttps://www.niamurrell.com/code/2017-08-30-search-sort/2017-08-30T11:00:00.000Z2020-06-20T20:12:47.728ZSearch & Sort Functions
Today I have been working on the homework for CS50, writing a binary search function, and a sorting function (so the binary search can work) in C. I probably should have started with the sort function, since that’s the pre-cursor to doing a binary search, but for whatever reason I did it backwards. I wrote it as a while loop to run as long as the left and right boundaries don’t cross over each other (in which case the sought value is not found, return false). Set the middle value mid = (left + right) / 2 and then determine which half to search with if statements, updating the boundaries & middle as we go.
For the sort function it was a nested for loop to set the minimum value at index 0 and then check each remaining index to see if it’s lower than the min. If so, swap the numbers at the two indices, with the lowest always stored in the leftmost index.
I’m still less partial to C and it’s layout, so coded these in JavaScript on repl.it and then translated into C once I got them working. I thought I got the solutions right, and it even passed the initial tests, but the bigger test which checks an array of length 1000 is failing so I’ll look at that more tomorrow.
Other Stuff
Today I intended to work 90 minutes on this homework assignment so that I could dedicate a good 2 hours to my value app. 4 hours later…! Typical :P
Up Next
I decided to build my value app with a not-optimized database structure to start, just to prototype something. I also bought a MySQL class I’d been eyeing on Udemy ($10 sale!) so that I can eventually make it better. Not sure when I will have time to start that though.
]]><h3 id="Search-amp-Sort-Functions"><a href="#Search-amp-Sort-Functions" class="headerlink" title="Search & Sort Functions"></a>SearchValue App - Database Dilemmahttps://www.niamurrell.com/code/2017-08-28-database-dilemma/2017-08-28T11:00:00.000Z2020-06-20T20:12:47.875ZFollowing on from yesterday's post I have been rethinking my selection of MongoDB for the value app. I think it comes down to having a murky understanding of when to use a SQL database versus NoSQL. Originally I thought MongoDB would work best, and then each user document would look something like the below, containing all of their things along with their individual information:
But when I think about it it’s clear that this is really poor design. I want the site to display each use of a thing so that I can edit or delete one if I want. So then in the sketch above, each thing really needs to be an array including all of the usage dates. But then what if two users want to track their uses of the same thing? Then it’s just a mess of things being repeated in different documents and it just doesn’t make any sense. I could link the things as references, but the little I understand about SQL tables and joins makes me think that this structure should be a lot simpler that what I originally planned.
So clearly I need to learn more about SQL, which I already had next up for learning. But now the question is, do I just build this app poorly now because I want to use it and then rebuild it later, or should I take the time to learn more first before deciding? I’m kind of sick of waiting to build while learning! But I also don’t want to build something that I know from the start is made poorly.
Hmmmmmm…
Up Next
I want to do all the things.
]]><p>Following on from <a href="/code/2017-08-27-new-project/" title="yesterday's post">yesterday's post</a> I have been rethinkingNew Project! Value Trackerhttps://www.niamurrell.com/code/2017-08-27-new-project/2017-08-27T11:00:00.000Z2020-06-27T13:20:09.684ZReading advice everywhere I’m constantly reading, “build your own projects,” “BUILD YOUR OWN PROJECTS,” “BUILD. YOUR. OWN. PROJECTS!!!“ So today I started one 😄 I think I’d been experiencing paralysis in coming up with something to build because I tend to want everything I do to be epic but I realize I need to just get over that, otherwise I’ll never build anything! And coding along with tutorials doesn’t really cut it…they leave a lot of learning out!:
Value App Project
There are some things that I stress about buying because I’m not 100% sure I’ll actually use them, or that I’ll get as much value out of them as I want to. Examples: gym membership, any membership really, pricier clothing or accessories, etc. I always thought it would be helpful/motivational to keep track of when I use these things, so that I can see the per-use value go down every time. For example, if I know it can cost me £4 each time I use the gym going 10 times in a month vs. £40 if I go once, I’ll be way more inclined to go! Is that weird? ¯\_(ツ)_/¯ Anyway today I wanted to use this, so I decided to just build it.
I’m going to use Node and Express so that I can practice more, following theUdemy course and my Coding For Product project. I’m also going to use MongoDB because I’m more comfortable with it, and haven’t solidly learned how to reference between tables using SQL. Also I know I can deploy this for free on Heroku with mLab, not sure of the SQL options there yet.
Today I mapped out the page structure and general app behavior so that I know what I need to build:
I am pretty sure I know how to build most of the functionality of this app, but there are some new things I’ll need to figure out/reacquaint myself with:
Persistent login user session
Data associations (references & sharing items across users)
Processing updates on the server (not direct user edits)
I also want to try using Foundation (instead of Bootstrap) as it’s one of those things a lot of people talk about that I’m not familiar with.
Should be a fun one!
CS50
The full court press didn’t press…more on that this week.
Portfolio Website
Still contemplating CSS Grid. A huge part of me just wants to use Bootstrap to get something up, and then try Grid later…but I also want to do it now!! More hours per day please.
Up Next
I want to build my value app so I can use it asap–just the function now and I’ll take my time on the UI since these other projects are more pressing.
]]><p>Reading advice everywhere I’m constantly reading, “build your own projects,” “BUILD YOUR OWN PROJECTS,” “<strong>BUILD. YOUR. OWN.Mentoring Meetuphttps://www.niamurrell.com/code/2017-08-25-mentoring-meetup/2017-08-25T11:00:00.000Z2020-06-27T08:48:16.219ZPicked up CS50 again today…I don’t really look forward to it and have been having motivation issues when it comes to dedicating the time, but every time I sit down to work on it, I remember actually it’s not that bad! In today’s assignment we’re learning about compiling code in C and writing makefiles. When I look at the assignments it’s a lot of information to take in, but with a good, quiet place to concentrate, I’m getting through it.
Buuuut it was kind of cut short this afternoon because there was a mentoring meetup night I wanted to go to in my area. It’s when a bunch of people learning to code come, and a bunch of people who work as developers come, and we meet, chat, code, get/give advice, etc. I’d been to a few with this group before and have never been disappointed!
CSS Grid Advice
I didn’t bring my laptop this time and tried to get some advice about CSS Grid with my portfolio site in mind. On one hand it was interesting to hear that some companies are discouraging their developers from using it in their production code because it’s too new. On the other hand there was genuine excitement about Grid and how much sense it makes compared to the band-aids pretty much all front end web development consists of. I got some more good resources to check out:
Rachel Andrew and Grid By Example were suggested again for really learning the basics. The paid tutorial is reportedly a great way to jump in.
Jen Simmons’ Grid Labs is a fun way to do a few experiments and really get more comfortable with Grid after you know some basics.
Also since so much of Grid parallels the layout fundamentals of working in print, for a little bit of an adjacent study the book Elements of Typographic Style by Robert Bringhurst was recommended.
90s Web Design !?
Also had an interesting chat given I just came across one of my very first websites (circa 1999) on Angelfire using the Wayback machine! Apparently 90-style web design is making a comeback!? I guess I shouldn’t be surprised, if that’s how trends work in fashion why not in web. But apparently some agencies are tired of creating super slick single-column sites that look like everybody else’s (fair point!) so they’re going back to the animated gifs and harsh lines and whacked out 16-bit color palates. And it’s called “brutalist web design.” My Angelfire site fits right in!
Up Next
I realized that the eligibility on my CS50 certificate runs out at the end of the year, and if I’m going to get through all the lectures and homework and build an app from scratch for the final product I’ve really got to ramp it up. So full court press this weekend.
]]><p>Picked up <a href="/tags/cs50/">CS50</a> again today…I don’t really look forward to it and have been having motivation issues when itCSS Grid Intro & AWS Confighttps://www.niamurrell.com/code/2017-08-22-css-grid-aws-config/2017-08-22T11:00:00.000Z2020-06-27T13:20:09.713ZBack home now after a few days out of town. Unfortunately I didn’t have time to work on any of the projects or courses while I was away. But now back to studying. I’m finding getting motivation to work on CS50 a little bit difficult–still working on it but it’s way less fun than other things I’d been doing in the past. Picking up a second thing to work on to have something to switch back and forth with really seemed to help a lot with Coding for Product so I am going to start doing that.
Portfolio Site & CSS Grid
Since it’s been in the ‘up next’ pile for a while, I jumped back into creating my dev portfolio website. Rather than relying on Bootstrap I’m going to learn CSS Grid for this site, and spent some time today getting introduced via a few YouTube videos:
Build a Mosaic Portolio Layout with CSS Grid by Kevin Powell shows an interesting way to lay out a portfolio (what I need to do!) but again, stays fairly demo. Interestingly, he puts a grid inside of a flexbox layout…isn’t grid meant to take the need for flexbox away?
After watching these demos I thought it may be helpful to just read the documentation to try and get a bit more familiar and came across a few helpful sites:
Grid By Example which shows a lot of examples of different layouts you can do with CSS grid. Written by Rachel Andrew who apparently is the CSS Grid evangelist & contributor. She gave a great talk I watched a few weeks back.
MDN docs haven’t dived into this yet but no doubt a key source
While this is a lot to take in and I’m still not 100% sure where to start, it’s worth mentioning the video I watched a few weeks back which peaked my interest in the first place: CSS Grid Changes EVERYTHING, a talk by Morten Rand-Hendriksen from WordCamp Europe 2017.
Looking forward to learning this!
AWS Setup
Another big thing on the to-do list was finally setting up a working subdomain on my website, where I plan to host my portfolio once I build it: dev.niamurrell.com. I have been learning Amazon Web Services for hosting my personal site but I’m realizing that every time I want to implement something new, there is a steep learning curve to get even the simplest-seeming things working.
Case in point: about 2 months ago I figured out how to add an SSL certificate so that my site is on https rather than http. Since AWS offers free certificates for their hosted domains it should be simple, right? Not exactly. The certificates can only be linked with certain services, not including S3 web hosting for static sites which was how my site was working up until then. So I had to create a CloudFront distribution, point the S3 bucket to that, and then set up a DNS nameserver alias linking to CloudFront for the SSL certificate to work. That took quite a bit of time and configuring to make it work, but it got there in the end.
Next I created dev.niamurrell.com as a subdomain of my main site and copied all the settings, so it should have worked in the same way, right? Nope! I kept getting an error page which had no helpful information on it, and then Coding For Product and the online bootcamp took priority, so I just let it be.
Well today I picked it back up and it took a couple of hours to realize there was one simple setting that needed adjusting–of course! When you set up an S3 bucket for website hosting, it prompts you to elect a root file and an error file as defaults for when people visit the site, which I had done. Today I learned that you must also make the election (again) in CloudFront, even though this field is marked ‘optional’ in the settings. Otherwise it will just route to a server document instead of the desired content. More about this in the AWS docs.
So now I got it working and have a pretty good understanding of how the whole system works for static sites. Next up will be setting up an app with a server, which will probably come pretty soon in order to include the more advanced projects in my portfolio.
Up Next
I want to keep the momentum up on CS50 even though it’s getting harder! And keep working on my dev site.
]]><p>Back home now after a few days out of town. Unfortunately I didn’t have time to work on any of the projects or courses while I was away.Cryptography & Machine Learning With Pythonhttps://www.niamurrell.com/code/2017-08-15-cryptography-machine-learning-python/2017-08-15T11:00:00.000Z2020-06-20T20:12:47.876ZTonight there was a Machine Learning/Python meetup I went to. It was a talk about using the Metropolis-Hastings algorithm to decode text that’s been scrambled beyond recognition. A lot of the mathematics were beyond what I’ve learned so far (I justfigured out how to write a Caesar cipher for goodness sakes!) but it was cool to see what can be done with the very-advanced version of these concepts. Let’s see if I can explain what was happening…
First we used the novel War & Peace (in English) to train the program with the patterns & the probability of letters appearing next to each other in the English language. It made all of the text uniform and also looked at when non-letters appear in text (i.e. spaces, periods, etc.). With over 3.1 million characters to analyze, it’s some robust source material. It took about 7 minutes to go through this process for War & Peace, and in the end generated transition probability matrix (26x26 grid showing how likely each (non-)letter is to follow another (non-)letter) which can be used to decode any scrambled text.
To decode text, a random mapping for each letter is set (so g maps to a, o > b, v > c, and so on, for example),and the Metropolis algorithm is used to apply this mapping to the encoded text, and then determine the log-likelihood that the mapping should be accepted, based on the probability matrix created from War & Peace. This algorithm is run repeatedly, changing the random letter mapping each time, and checking against the probability matrix to see if the current attempt makes sense in the English language. With each pass, it determines with increasing certainty what the correct mapping should be. We were able to feed it completely random scrambled passages of text, and it figured it out within a few minutes each time. It was pretty cool to see! For future reference here is the repo for the tutorial we did.
This was also my first real introduction to Python code–pretty cool to see it being used in such a cool way. I’m looking forward to that coming up more and learning more about it.
Up Next
No more after-work distractions this week…should be able to get back into the CS50 assignments, and hopefully finish the current section before the week is up!
]]><p>Tonight there was a Machine Learning/Python meetup I went to. It was a talk about using the Metropolis-Hastings algorithm to decode textSorting Follow Uphttps://www.niamurrell.com/code/2017-08-14-slow-day/2017-08-14T11:00:00.000Z2020-06-20T20:12:47.733ZSlow day today as I got home pretty late from a project I was working on. I was able to watch this talk by Justin Abrahms though from PyCon 2014, which helped reinforce/clarify what I learned yesterday about big O notation, i.e. when a sort method runs “on the order of” some n function. It’s encouraging to see other people who have picked up topics like this without a full & proper CS degree.
Other Stuff
I’ve been devouring the CodeNewbie podcast for the past few months and today got to episode 100 where the host Saron was interviewed about her experiences becoming a developer, learning to code, and starting CodeNewbie. There were a lot of good gems in there (ahem!) but one thing she said really resonated with me: she was talking about how when she was going through the job search process, she did a lot of preparing and bucking up for dealing with people who are hostile to women and people of color in tech. With all of the craziness going on these days with the now-infamous Google diversity memo (and countless rebuttals & color commentary) not to mention events and discussions going on at a national level in both of the countries I call home, this topic has been on my mind quite a bit recently. But it was very encouraging to hear and be reminded that despite all of this, she still had a great experience and met lots of people who don’t perpetuate the stereotypes at all! Not only that, there is a whole community of Code Newbies who get involved for learning, support, and encouragement. I’m really glad to be involved with groups like this one (and others) to keep the positive vibes going strong :D
Up Next
Keep working on CS50.
]]><p>Slow day today as I got home pretty late from a project I was working on. I was able to watch <aCaesar + Vigenère Ciphers & Sorting Introhttps://www.niamurrell.com/code/reference/2017-08-13-caesar-cipher/2017-08-13T11:00:00.000Z2021-06-19T22:25:32.488ZCaesar Cipher
Over the past couple of days I have been working on coding the Caesar cipher in C for CS50. While it seems pretty straightforward in theory, actually coding it was more complicated than I anticipated. The program takes any integer provided by the user as the key, and shifts the letters in the alphabet by that number to provide a coded message:
~/ $ ./caesar 45 plaintext: Hello, world! My name is Nia Murrell :) ciphertext: Axeeh, phkew! Fr gtfx bl Gbt Fnkkxee :)
It sounded relatively easy at first since letters hold a numerical value (see ASCII values), so it should be as simple as adding the key value to the ASCII value and there’s the code, right? Wrong. I won’t post the code here (academic integrity policy) but basically, it was necessary to first convert the letter to its alphabetical index (a=0, b=1, etc.) and then shift by the key value, using the modulo % operator to make sure to keep looping through the alphabet (XYZABC rather than XYZ[\]). The assignment gave us the formula for the Caesar cipher (cipherLetter = (plainLetter + userKey) % 26) but without that alphabetic index conversion. Tricksy!
Vigenère Cipher
The last problem for this week’s assignments was to code the Vigenère cipher which is slightly more complex than the Caesar cipher. Instead of shifting each letter by the same numerical key, there is a keyword and you shift each letter by the corresponding rotating key value. So the for loop required two variables–one for the key and one for the plaintext. Thankfully this one didn’t take so long after understanding the basics from the Caesar cipher.
~/ $ ./vigenere candyfloss plaintext: Hello, world! My name is Nia Murrell :) ciphertext: Jeyom, kgjnd! Kd bseg vv Sto Ewrehjq :)
Sorting Intro
In the next lecture we learned about different ways to sort data.
Bubble Sort:
repeat until no swaps for i from 0 to n-2 if i'th and i+1'th elements are out of order swap them
Selection Sort:
for i from 0 to n-1 find smallest element between i'th and n-1'th swap smallest with i'th element
Insertion Sort:
for i from 1 to n-1 call 0'th through n-1'th elements the "sorted side" remove i'th element insert it into sorted side in order
All three of these methods run on the order of n-squared, so not very fast. This comparison animation shows how they each work.
Merge Sort:
on input of n elements if n < 2 return else sort left half of elements sort right half of elements merge sorted halves
Merge sort runs on the order of n log n so is faster than the other methods above.
Up Next
I took a quick glance at this week’s homework assignments and surprise! Will be sorting lots of numbers.
]]><h3 id="Caesar-Cipher"><a href="#Caesar-Cipher" class="headerlink" title="Caesar Cipher"></a>Caesar Cipher</h3><p>Over the past couple ofCS50 Re-Starthttps://www.niamurrell.com/code/2017-08-09-CS50-Re-Kickoff/2017-08-09T11:00:00.000Z2020-06-20T20:12:47.876ZAfter a couple days’ delay & tv-binge procrastinating I have officially jumped back into CS50. This is an Intro to Computer Science course from Harvard University which I’m taking online via EdX. I started the course in May, but took a little break because I was finding it difficult to switch back & forth between learning C and doing all the JavaScript projects I was doing at the time.
Turns out I forgot a lot! I wanted to jump straight back into the problem set (aka homework) I left off with, but I couldn’t even remember how to compile and run my code (make <programName>, ./<programName>), so back to basics. So I re-watched the lectures for weeks 2 & 3 (2 hours each!!) and read through all the homework exercises I did before to reacquaint myself with C.
For future reference it will be handy to have the character types and their placeholders noted:
Data Type
Reference
Placeholder
boolean
bool
?
character
char
%c
string
string
%s
16-bit integer
int
%i
64-bit integer
long long
%lli / %lld
decimal number
float
%f
longer decimal number
double
?
There are more types than this in C (and I’m pretty sure the string type is specific to CS50) but these are the ones introduced so far. Maybe I’ll add to this as we go along.
Up Next
Now that I’m caught up I can jump into the Caesar’s Cipher and other cryptography assignments I left off with.
]]><p>After a couple days’ delay & tv-binge procrastinating I have officially jumped back into <aBoot Camp Wrap-Uphttps://www.niamurrell.com/code/2017-08-06-bootcamp-wrapup/2017-08-06T11:00:00.000Z2020-06-27T08:47:05.081ZOfficially finished with the online bootcamp…that’s 43 hours of videos + all the time working! Lots of work went into it and I really enjoyed it and learned a lot. Including today, when I went back to the frontend part of the class to do the two projects I skipped during Coding For Product. It was just building a simple JS to do app (no data persistence) and then a really cool Patatap clone using a couple of libraries: Paper JS for the animations and Howler JS for the sounds.
Since the Patatap clone was a whole new concept and built on a library, it was a lot of reading the docs and copy/pasting, or just following along with the videos. The Paper JS library is really cool though, I’d like to get more practice building things with it from scratch.
The To Do app was mostly review of jQuery so I was able to write that on my own before watching the code along, for the most part. I did learn one clarification about using the on event handler which I wasn’t aware of before…
jQuery Event Handler on
I was aware of the difference between using $(selector).click() and $(selector).on("click"): the former listens for clicks on existing page elements only while the latter can also listen for events on elements created after the page has loaded (i.e. created as a result of something the user has done). What I didn’t realize before is that .on("click") still needs its selector to be an existing page element in order to work; then the hypothetical elements can be added in as an argument of on. Here’s an example of how you would listen for events on list items created by the user:
This will work for any lis that are on the page when it loads, but nothing will happen to any new list items created by the user. Good to know!
Up Next
It’s weird being done with all of the big projects I was working on! Next to tackle are CS50 and my portfolio page.
]]><p>Officially finished with the <a href="https://www.udemy.com/the-web-developer-bootcamp/">online bootcamp</a>…that’s 43 hours of videos +Heroku Workflow & Intro to Advanced JS Topicshttps://www.niamurrell.com/code/reference/2017-08-05-heroku-workflow-advanced-js/2017-08-05T11:00:00.000Z2021-06-19T22:25:32.380ZToday I quasi-finished the online bootcamp course. Quasi- because I still have to go back and do two sections I skipped, but I completed the big app project and the “advanced topics” section. Annnd to be honest “completed” might be a bit strong too–while I got a LOT out of doing the bootcamp, it kind of seems like they never finished making the course? It just kind of stops midway through the project so I’ll have a lot of refining to do on my own. Not that that’s a bad thing!
Heroku Deployment
I deployed the bootcamp project we’ve been working on to Heroku (link) which was pretty straightforward after doing the previous apps. Good to know I’m comfortable with that! For future reference here is the typical order of commands:
Add to package.JSON:
"scripts": { "start": "node app.js" }
heroku login
git init then add & commit all if not already a git repo
heroku create
git push heroku master + during this process production environment variables are created:
Check for errors to debug ‘Application Error’ with heroku logs
Rename the app with heroku apps:rename newName
Destroy an app with heroku apps:destroy -a app-name-12345 --confirm
Set environment variables with heroku config:set KEY=VALUE
Use the heroku CLI with heroku run… (ls, cd, mkdir, etc.)
The Keyword This
One of the advanced topics in the last section of the course was about using the keyword this in JavaScript. Some things to remember:
The value of this is determined by the execution context, i.e. how the function was called.
When this is used outside of a declared object, it refers to the window, i.e. has a global context.
When this is inside a declared object, it refers to the closest parent object. It’s important to remember closest when dealing with nested functions.
You can set the value of this using call, apply, or bind.
Object Oriented Programming
We also covered the basics of OOP, and how to use classes as blueprints to create new objects. Coincidentally the keyword new comes up a lot! Some basics…
Constructor functions are abstract and modular so that they can be shared and reused within an application. By convention, a constructor function will be Capitalized. The keyword new is used to create a new object from the constructor; it automatically does four things:
Creates an empty object
Attaches the keyword this
Implies return this has been added at the end of the object
Adds the “dunder proto” (__proto__) property which links the new object to the constructor function’s prototype property
Multiple constructor functions can be nested with call and apply to make code more DRY:
Prototypes help make code even DRYer still since __proto__ is accessible by all objects made from the constructor. Rather than calling a function inside of a constructor, it’s better to call it using a prototype, so that the function doesn’t have to be repeatedly defined:
Finally, we were introduced to closures: functions that make use of previously returned variables defined from outer functions:
functionouter() { var data = "closures are "; returnfunctioninner() { var innerData = "awesome" return data + innerData } }
outer() //function inner() { // var innerData = "awesome" // return data + innerData // }
outer()() // "closures are awesome"
From the little I’ve learned about ES6 it seems to me that the new let and const variables might accomplish the same thing as closures? I need to look into that more.
Other Stuff
I came across this developer roadmap again today…the first time I saw it was maybe a month or two ago. It was nice to recognize that in that short time, I already recognize more things on this map than I did the last time I looked at it!
Up Next
I don’t know how realistic it is to finish up the bootcamp completely this weekend but I really want to. I also want to get my personal portfolio up and running so I have somewhere to put all this stuff. Maybe I will prioritize the portfolio–it’s a lot easier to do tutorials after work than build something from scratch!
]]><p>Today I quasi-finished the online bootcamp course. Quasi- because I still have to go back and do two sections I skipped, but I completedBack To Normalhttps://www.niamurrell.com/code/2017-08-02-back-to-normal/2017-08-02T11:00:00.000Z2020-06-27T08:46:28.340ZNow that Coding For Product has ended I have a lot more time but 100% less deadlines to work towards! It shows just how much I enjoyed working with a team towards a goal. Without something like this on the horizon it’s less of a given to spend 2-3 hours/night working on a project, but glad to say I am still sticking with it–the code must go on!
Refactoring
I’m carrying on with the bootcamp and today we learned about refactoring routes and functions to add a bit of structure to the app we’re building. For example the app.js file had 160 lines of code to start, including all of the package requirements, authentication setup, and navigation routes. Some of these pieces were moved into separate files, and after refactoring the file went down to 49 lines of code. It makes it a lot easier to move around inside the files when the file structure is broken out like this, although I’m still getting used to figuring out where everything is. It’s also confusing that the naming convention is for files to have the same or similar names in different folders! But I guess I’ll get used to it.
To break the code out it’s a matter of creating a new .js file and cutting and pasting the code into it. Any packages or models that are referenced in the code need to be included as variables var at the top of the new file. In this process we also use the Express router to run each route, rather than calling app as before. Then the router needs to be exported at the bottom of each file: module.exports = router;. This is probably better explained by looking through the code…this git commit demonstrates the changes.
Similar to the routes, we also refactored the middleware, and in doing so set up a structure to be able to easily add new middleware functions into the app in a centralized location. We saved all of the functions in a middlewareObject which was then required on all of the route documents.
Other Stuff
I got my passport-sequelize-demo mini-app deployed to Heroku today. I had tried it as a test when we were figuring out deployment for our group project, but we got that sorted before I was able to get the demo app working. Now that I’ve gone through the process again on my own and got it working, I think I’ve got a good handle on deploying to Heroku. Sweet!
Up Next
I think I can finish out the big app project in my bootcamp by the end of this week. Then I’ll have to go back and do the 2 frontend projects I skipped when I needed to get prepped for Coding For Product. But planning to keep the momentum up so that I can move onto something new!
]]><p>Now that <a href="/tags/coding-for-product/">Coding For Product</a> has ended I have a lot more time but 100% less deadlines to workCoding For Product - That's A Wrap!https://www.niamurrell.com/code/2017-07-31-coding-for-product-wrap-up/2017-07-31T11:00:00.000Z2020-06-27T13:20:09.356ZAnd that’s a wrap! Yesterday we (quasi-) finished and (actually) presented our Rides For Rewards app (demo / code / presentation) for Coding For Product. In the end I’d say we got 92% of the way to where we set out to go in the beginning when we came up with the idea, and for never having built an app from scratch before, and completing the project in 5 weeks, I think that’s pretty good!
We spent most of Saturday trying to get the project over the line. The main tasks were getting our points deduction function to work, and deploying. Both turned out to be more difficult than I think any of us expected.
JavaScript & AJAX
The big lesson here was that client-side JavaScript and server-side JS can’t communicate with each other by default. This was news to us as I had been trying to validate usernames in the database as unique from the front end, and one of my teammates was trying to update the user’s points balance from the front end…both of which we learned is not so simple! In the end, because we were using jQuery in some of the front-end code, we figured out at the last minute how to use AJAX to send this information to the server in our front end code:
Then in the app.js file we added a route to accept the information and update the user’s details in the database, and then send a success message back to the front end for AJAX to redirect to a new page which would show the points deduction went through successfully:
While this may not have been the most efficient way to make this work, it was good to get a crash course on AJAX and to know what’s possible/necessary if it comes up again. I think next time this would ideally be posted to the server to process the points redemption and then redirect to a new page…or better yet have the whole thing be a single page app that’s all rendered client-side and avoid page refreshing all together. So, more to learn about later!
Deployment
This was also the first time anyone on my team deployed an app with a database attached and the environment file and variables we were using in development brought up unknown issues once we tried to get things working in a production environment. Although it turned out to be a simple solution (add an if statement around the dotenv package to make sure it’s ignored in production, and identify the correct .env variables for Heroku), being the first time it took a while to figure out. Glad to know what to do next time though.
Workshop Wrap-Up
In the end I am so happy I took part in Coding For Product, and I’m still amazed that a program like this exists for free to the participants, and all built around volunteered time from the lead instructor & organizer Wai-Yin Kwan and the program mentors. Since I never really explained what it is in earlier posts it’s worth a quick recap:
20ish students put into small groups on day 1 to come up with an idea for a web app and build it from scratch in 5 weeks. We were all skill levels from beginner to employed developers, and apps were built in JavaScript, Python, and Ruby.
Weekly workshops where we heard presentations from a great host of people from many different tech backgrounds about a wide variety of topics applicable to working as a developer including:
Design frameworks like Bootstrap & Foundation, Sass
Intro to working with databases, SQL, and data modeling
Authentication & Authorization
Deployment
Presenting A Product & Communicating with Non-Devs
Professional development & discussion about entering the workplace
12+ hours/week to actually build our app, have group meetings, study, etc.
Community support from companies like GitHub, O’Reilly, Rosenfeld Media, and Frontend Masters who donated learning resources and discounts and the like to everyone who completed the workshop
And all hosted at the lovely offices of Philosophie, where they shared not only the physical space but also the expertise we gained from several of the workshops listed above. Plus they had free parking, great wifi, and snacks! 💃🏽 💃🏽
Written out like this it’s pretty cool to see just how much information we got and how much work went into this from so many people! It was a lot of work on our end too, and well worth it–I don’t think it’s a stretch at all to say I learned more in these 5 weeks than I had in the 5 months prior learning on my own. So on the off chance any of the volunteers, mentors, presenters, hosts, or swag donors ever read this, a huge and eternal thanks for supporting the workshop and making all of this possible!!
Up Next
We’ve decided to keep working on our app as a group to finish out some of the functionality that we didn’t quite get to in time, and to make improvements as we get more skills. I really enjoyed working with my teammates so glad we’ll keep in touch and keep working together in some form or another. Some other workshoppers also mentioned the possibility of collaborating on new projects to keep building expertise which I think would be great!
More immediately I’ll be getting back into the computer science class I put on hold when CFP started. And of course some last things to wrap up with the online bootcamp. So on we go!
]]><p>And that’s a wrap! Yesterday we (quasi-) finished and (actually) presented our Rides For Rewards app (<aThe Final Stretchhttps://www.niamurrell.com/code/2017-07-28-final-stretch/2017-07-28T11:00:00.000Z2020-06-20T20:12:47.728ZWow!–I can’t believe it’s been 5 days since my last “daily” update. I guess that login thing really took a lot out of me! Not to say I haven’t been coding though…we’re in the last stretch for our group project, presenting in two days, so have been working away at trying to get it ready for deployment.
Learning More About Authentication
Once I got the login functionality working on our group project, I went back to the bootcamp to keep learning–I still didn’t know how to use the user’s details within the site once they are logged in.
For example in our app, the user earns points by riding public transport, and then uses their points to “buy” rewards from local businesses. So obviously once they log in, they are going to want to see how many points they have!
This turned out to be relatively straightforward, thanks to Passport. As part of the authentication process, Passport creates a user value in the req (request) JSON object, which means you can call req.user to pull in the logged in user’s details. This can be applied to all routes within the local responses by using this function at the top of the app.js file:
So now as long as the user has logged in, they can see their name, their points, and whatever other information we want to pull from the database about them. Sweet!
We can also use this to display different navigation items depending on whether the user is logged in or not…for example if they are already logged in they don’t need to see the ‘Login’ or ‘Sign Up’ buttons. So just throw a bit of ejs into the nav bar and bob’s your uncle:
Figured out how to validate a form using jQuery. Doing so reinforced some JavaScript basics–I prefer to avoid nesting functions and “callback hell,” but I’m learning that it’s pretty much not avoidable. I had listed each of the functions in a js file expecting it to execute from top to bottom, but some code at the bottom broke the whole thing. It was necessary to put all of the functions into one function and then execute them all at the same time to get it to work. I would like to understand this better–I get why it worked but I don’t fully get why the first way couldn’t work.
Up Next
Tomorrow we finish and deploy our group app!
I’m also 4ish modules away from finishing my bootcamp completely.
I don’t know what I’ll do with myself with so much extra time on my hands!
]]><p>Wow!–I can’t believe it’s been 5 days since my last “daily” update. I guess that login thing really took a lot out of me! Not to say ISweet Relief!https://www.niamurrell.com/code/2017-07-23-sweet-relief/2017-07-23T11:00:00.000Z2020-06-20T20:12:47.876ZIt’s working! Words can’t event describe the sweet relief of getting our login function working. Well, they probably can, but I don’t have the words, because my brain is mush.
Slow & Steady Wins The Race
This week I skimmed the book Think Like A Programmer by V. Anton Spraul and it was a big catalyst for solving alloftheloginissues of this week. For troublesome problems he advised writing test programs only for the feature you’re trying to implement…once you can do it on its own, it will probably be easier to make it work in the bigger project. I had been pecking around with aimless trial & error for hours over days so literally had nothing left to lose.
Passport / Mongoose Demo App
As luck would have it, the online bootcamp I’m doing alongside the group project has a module on creating a test login app, so I started with this. That class is using MongoDB so it’s not exactly like-for-like but I got it working. Working with MongoDB and Mongoose was easy compared to PostgreSQL/Sequelize, and made even easier by the passport-local-mongoose package which handled the password hashing and some of the authentication methods. My repo of the demo is here.
Passport / Sequelize Demo App
Next I attempted to translate the mongoose demo to work with Sequelize. It became clear pretty quickly why our app has been so difficult to work with! By comparison Postgres/Sequelize needs a lot more code and attention than MongoDB/Mongoose…comparing the models/user.js files in the two demos shows just how much. Not to mention futzing around Terminal in the postgres CLI.
The ease of the passport-local-mongoose package made me look for a Sequelize equivalent and I soon came across passport-local-sequelize which is meant to have the same functionality. The documentation wasn’t as robust and the adoption was significantly lower, but I figured I’d just need to figure it out. The implementation was a bit different but in the end I got this demo working as well (see repo).
Integration With Our App
With a working example to compare against I got working on our app. There was a lot of messy code to clear out following all of the trial & error that went on earlier. But a quick clean out, destroying then rebuilding the user database from scratch, and then re-applying what I picked up in the demos, and SUCCESS! Now we can create a new user with the sign up form, log them in and out, and protect the inner pages from unauthenticated users.
Resources
I came across several good references from other people working through the same issues. These will probably come in handy for the next steps in the process:
toon.io’s overview of authentication flow for the bigger picture, to keep things on track
Chris Courses YouTube series (video 1) on implementing authentication with Passport, very well taught (but with MySQL and MAMP)
Wai-Yin’s start-to-finish overview for Coding For Product (demo and code), again for bigger picture (but with Lowdb)
Other Stuff
After going through the demos I put together a table of the RESTful routes and how to call user data for each route, whether you’re using Mongoose or Sequelize. The gist is here and I’ll probably update this if/when I need to use yet another ORM in a future project.
Up Next
While the login feature is working (huzzah!) I still need to add in session handling so that the login state persists. It also still needs error handling so that the user is told what went wrong if an error happens. Fingers crossed these are easier to figure out!
]]><p>It’s working! Words can’t event describe the sweet relief of getting our login function working. Well, they probably can, but I don’tSlowly Making Progresshttps://www.niamurrell.com/code/2017-07-22-slowly-making-progress/2017-07-22T11:00:00.000Z2020-06-20T20:12:47.732ZToday our group met to attack this login/authentication problem and we made some progress!! It really helps to talk through a problem with other people. The whole login/authentication thing is just as new to my teammates as it is to me so we’re all kind of in the dark, but even so putting three heads together got us farther along than I probably would have gotten carrying on as I had been.
Login Progress
So the main development was that we have been able to query our Postgres database (via sequelize) to compare the ‘username’ entered by the user on the login page with existing users.
I should back up–the progress over the past week, once my teammate got our app connected with the database (a huge feat, seriously!), was configuring the ‘signup’ form to successfully post the new user’s account details to the database. Also included in that was hashing the password for security, and putting validation against the form (unique email address, password with security criteria, etc.).
So now that users can successfully and securely sign up for the site, we need to allow them to log in and use the app from their own account. And this is where it got difficult. Configuring the passport module and all of its dependencies has proven to be incredibly tough. But today we at least got it to check for an existing user given the email address entered in the login form.
Next we tried to pull that user’s hashed password from their record, convert it to plaintext, and compare it against the password they entered on the login form. For so many reasons, we couldn’t get this working. So we reached out to some of the mentors in our project and were advised to check the password outside-in rather than inside-out…that is, hash the password they enter on the form and see if that hash matches the hash stored in the database. So that is the next step to try and get it working…fingers crossed!
Alexa Skills Workshop
I also went to an Alexa Skills workshop hosted by the Coding Dojo bootcamp. Amazon is clearly in growth and outreach mode when it comes to Alexa, and I have to hand it to them for the way they’ve gone about things. Basically they need to crowdsource “skills” for Alexa (commands/programs that can happen when you interact with the Alexa products), so they’re recruiting companies like Coding Dojo to run developer workshops in the hopes that more people will code some skills and submit them to the Skills Library. They’re actually taking it further than that–if you register as having attended an event and then submit 3 skills to their library, they automatically send you a free Alexa device! Considering they retail for $50+ and basic skills are pretty easy to code if you’re comfortable with JavaScript and JSON objects, it’s not a bad deal at all for someone who likes gadgets. I might give it a try when we finish our project…although I don’t really want a device constantly listening in my home but I guess that’s another story!
Up Next
We’re down to the wire on our group project now–presenting a week from tomorrow–so that will be the main focus. Not sure there will be much time for anything else!
]]><p>Today our group met to attack this login/authentication problem and we made some progress!! It really helps to talk through a problemLearning Painshttps://www.niamurrell.com/code/2017-07-20-daily-review/2017-07-20T11:00:00.000Z2020-06-20T20:12:47.730ZStill no success on finishing this login feature. I keep breaking things and then spending ages fixing them; unfortunately none are resulting in a working login! Here’s a great example:
Session Secret
To initialize an Express session (this is how Passport knows who is using the site, and decides which pages they are allowed to view during the session), you tell the app to use the session with defined options: app.use(session(sessionOptions));. To set the options I created a sessionOptions variable copied directly from the express-session docs:
Well, that’s what I wish I had done! I instead wrote process.env.SESSION_SECRET (without the single quotes) and it immediately broke the app as soon as I tried to load a page. At one point I changed it back to the default settings, which worked, but surely using exactly ‘keyboard cat’ couldn’t be the only way to make the function work!? This took quite a few attempts with different combinations before it became clear that it just needs to have quotes around the secret value, even if it’s referencing the environment file.
And this barely got me slightly closer to a working login!
Up Next
I must get this working. That’s all!
]]><p>Still no success on finishing this login feature. I keep breaking things and then spending ages fixing them; unfortunately none areSloggin' Through The Loginhttps://www.niamurrell.com/code/2017-07-19-sloggin-login/2017-07-19T11:00:00.000Z2020-06-20T20:12:47.876ZEnvironment Files
Got my .env files setup for our system. First added the node package yarn add --dev dotenv, added .env in the .gitignore file, and required the package in the app.js file: require('dotenv').config(). Then created a .env file with a list of variables we don’t want to store on GitHub:
To use the variables I just enter process.env.DB_NAME where I would want the database name to show up, and so on. For collaboration with the group, I also created a .env.default file which is not included in .gitignore and shared with my team. They just see the variable names without the secret information, and can use this to create their own .env file with the same details I have.
This was especially helpful because one of my teammates’ Postgres database is set up on a different port so we were always switching back and forth as we worked. Now we won’t need to do that, and can just keep different port numbers in our own .env files.
Validating Form Inputs
I’m using the node package express-validator to make sure the form data is clean: ‘email’ is actually an email address, the two password fields match each other, password is a certain number of characters, that sort of thing. It was fairly straightforward to implement, but I expect there are a lot more validators I’m not aware of so plan to dive deeper into this at some point.
And while I did figure out how to reject invalid entries from the database, I still have to figure out how to get the errors to generate for the user (not just in the console.)
Hashing Passwords
I also implemented the node package bcrypt to secure user passwords as they are saved in the database. Again, I was surprised at how straightforward this implementation was: just needed to wrap my Sequelize ‘create user’ command within the bcrypt function:
bcrypt.hash(password, saltRounds, function(err, hash) { var newUser = {first: first, last: last, email: email, password: hash}; User.create(newUser); });
Other Stuff
Added another Terminal shortcut to be able to open files or folders in Sublime: alias subl="open -a /Applications/Sublime\ Text.app". Always love a good shortcut.
Up Next
More sloggin’.
]]><h3 id="Environment-Files"><a href="#Environment-Files" class="headerlink" title="Environment Files"></a>Environment Files</h3><p>Got myLogin Delayshttps://www.niamurrell.com/code/2017-07-18-login-delays/2017-07-18T11:00:00.000Z2020-06-20T20:12:47.876ZStill trying to figure out how to implement the login feature in our Metro app. Every time I think I’ve got everything I need set up, I learn there is another dependency package that I haven’t installed, and then that one needs another package, etc. etc. Today it was express-session which I’m pretty sure also requires connect-session-sequelize but still figuring it out. I’ll be glad when it all makes sense and I can write a good round-up for reference later. I did find this post which has provided a bit of context: How do Express.js Sessions Work?. Now I just need to read it a few more times!
Other Stuff
I came across this course which teaches advanced HTML and CSS. I only skimmed it briefly (see above) but looks like I great way to get beyond the basics I always see in other tutorials.
Up Next
It’s all about the login at the minute. Bootcamp is on hold until this is done!
]]><p>Still trying to figure out how to implement the login feature in our <a href="https://github.com/CodingForProduct/metro_reward">MetroWorkshop Day & Major App Work To Dohttps://www.niamurrell.com/code/2017-07-16-workshop-day/2017-07-16T11:00:00.000Z2020-06-20T20:12:47.728ZQuick recap today as lots of new information has come in, and there’s lots of work yet to do!
Workshop Day
Yesterday was workshop day for Coding For Product so we had several talks:
Intro to UI/UX
Got some good detail about how much more there is to UI/UX than just the appearance of things. It has a much broader scope with a thorough process:
Declare assumptions about your users to give the team a common starting point.
Create problem statements to work on solving ((This user) needs a way to (do this thing) because (why they need to do it).).
Create hypothesis statements to test your assumptions.
Develop personas to better understand your target user.
Analyze competition to see what other companies are doing to solve the problem, and think about how you can improve or innovate to differentiate your product.
Conduct qualitative & quantitative research to test your hypotheses.
Then we talked about some ways to actually go about creating a product with all of this in mind (from sketches and wireframes to fully coded prototypes). And finally we went through the many different job roles that all fall under “UX/UI.” Lots of interesting stuff!
Presenting A Product
We got another presentation about preparing for and presenting our product. In (now, less than) 2 weeks we not only need to have finished out app (!!) but we will also be presenting it to the workshop so lots to work on.
Intro To Sass
This was really great to see because I’d heard of sass (and less) before but didn’t really know how to use them or how to even get started. We got a demo and saw that it’s basically a separate file that you write with all of your styling, only you can nest elements so that there’s a lot less writing to do in the actual css file. Then the .scss file is compiled (translated) into a normal .css file saving you a lot of time!
Sass requires Ruby to be compiled…that’s where Less comes in if you’d rather not use Ruby just for this one function. Less is a node package that (with a few syntactic differences) pretty much does the same thing. I’m definitely looking forward to trying these out in the future!
Testing
We also got a very interesting talk on code testing, and how you can become a better programmer by testing your code throughout the process. This is something I have been really curious about–how can you write tests for code if you can’t even figure out how to write the code that needs to be written!? Well turns out there are test runners with methods for each language which can be employed to help you write tests. While we didn’t get many details on this aspect, it’s defintiely something I will look into further–seems like a skill that’s really necessary in the real world.
We also got a broader look at the Agile testing quadrants to see how testing and its many different facets come into play in a production environment:
Group Project
The countdown is on–no more workshops until the day we present and there is still quite a bit of work to do on our app:
Configure PostgresQL database for our app (pretty much done)
Write JS function allowing users to choose a reward and then have their points balance deducted & updated in the database
Deploy (!!!!) to Heroku
Put together a quality presentation to demo the app
So I’m working on adding Passport and bcrypt at the minute and let’s just say there is a lot to figure out. 😅
Other Stuff
I will go more in depth about working with Postgres (now that I have it working!!) in a future post but definitely want to shout out this PostgreSQL Command Line Cheat Sheet which was a huge help in understanding what I was doing.
Up Next
If I can get our login and encryption working in the next 48 hours I will be so happy. 🤓🤓
]]><p>Quick recap today as lots of new information has come in, and there’s lots of work yet to do!</p>
<h3 id="Workshop-Day"><aRESTful Routinghttps://www.niamurrell.com/code/2017-07-15-restful/2017-07-15T11:00:00.000Z2020-06-20T20:12:47.728ZRESTful Routing
Learned the basics of the RESTFUL routing convention. I can already see how this should be updated & applied to our group project–nice to be able to put it into practice so quickly! Here are the basics for reference:
Name
Path
Request
Description
INDEX
/users
GET
Display list of all users
NEW
/users/new
GET
Display form to create new user
CREATE
/users
POST
Add new user to database
SHOW
/users/:id
GET
Show info about 1 specific user
EDIT
/users/:id/edit
GET
Show edit form for 1 specific user
UPDATE
/users/:id
PUT
Update specific user details
DESTROY
/users/:id
DELETE
Delete specific user
I also built more routes and functionality in my bootcamp project. It’s nice to see it coming together.
Other Stuff
I went to the AT&T Shape Conference today. They had some cool demos of the VR, AR, and other tech products that are new to (or soon coming to) market. It seemed like they were more focused on the consumer side of things rather than the tech or development but it was interesting to see–I am glad I went.
Also my teammate on the group project successfully linked Postgres to our app UI, which was a big step! I played around with it a bit today but hoping to pick up some more information in tomorrow’s workshops before starting on the login feature.
Two days in a row! I got my Postgres server running after several hours troubleshooting. This tutorial proved to be the winner despite things not matching up entirely on my system. I had already installed both Postgres and pgAdmin 4 but couldn’t run commands in the former and therefore had no idea where to start in the latter.
The issue turned out to be that whatever users are meant to be created in the “standard” installation process weren’t created during my install. So following all of the other tutorials didn’t work because I couldn’t originally figure out how to see which users were in place. Once I figured out how to view, add, and edit users, and set their roles, I was able to get my setup to match the “standard” and next thing you know, postgres success!!!:
Mongoose
Got an intro to Mongoose in my bootcamp. Mongoose is an ORM (object relational mapping library) that turns JavaScript into MongoDB’s query language. Similar to Sequelize, which is what we’ll be using in the group project with Postgres. Here is the basic setup for using it in an app and setting up a schema:
// require Mongoose to be able to interact with db via JS
var mongoose = require("mongoose");
// connect to mongodb server. 27017 is default, can be checked in mongod terminal session
Started reading Think Like A Programmer by V. Anton Spraul. Actually it was a free ebook library rental which I didn’t know I could do! Rented from the library and downloaded from Amazon’s Kindle store. Awesome. I’ll let you know how it is.
Up Next
Continuing work on the group project and bootcamp.
I’m also attending the AT&T Shape Conference tomorrow which is all about technology and entertainment converging…should be good!
]]><h3 id="PostgreSQL-Setup-Success"><a href="#PostgreSQL-Setup-Success" class="headerlink" title="PostgreSQL Setup Success"></a>PostgreSQLInstalling MongoDB - Database Running!https://www.niamurrell.com/code/tutorials/2017-07-13-installing-mongodb/2017-07-13T11:00:00.000Z2020-06-20T20:19:34.635ZDatabase is up and running!!!! Wow that took some doing.
MongoDB Install
I installed MongoDB and extracted the files at least 2 weeks ago but couldn’t get it running. I tried so many tutorials and instructional videos but couldn’t get passed the errors it was throwing…errors which of course weren’t in the tutorials or videos!
In the end I got it to work by moving the folder containing the /bin directory (with all the binaries in it) to my root directory, although I still don’t know if that was necessary. This tutorial was a big help in the end, with a few parts I still had to figure out:
One of its first instructions is to create the directory where the data files will live: mkdir -p /data/db. Apparently I don’t have permissions to do this on my laptop and the request was denied. A comic I saw once came to mind, and sudo !! got it to work!:
I also ran this command to make sure I have read/write access to the newly created directory: sudo chown -R id -un /data/db
UPDATE: Nearly a year later this command didn’t work for me, but following the slight tweak here did get it to work.
Then I tried to run mongod to start the Mongo demon but the command was not found. I checked mongo --version to see if that was working (it had been working before, but with errors), and again the command was not found. Argh!
So back to the MongoDB docs where they say to ensure the MongoDB binaries folder is in your PATH by modifying the .bashrc file (and luckily I know what that is from a few days ago: export PATH=path/to/mongodb/bin:$PATH.
Rather than restarting all my Terminal windows, I ran this command in my open Terminal window (and saved it to .bashrc for the next time). Then I ran mongod and lo and behold a server started running!
Next opened a new Terminal tab to run mongo and got the lovely message:
Welcome to the MongoDB shell.
Hooray!!
A couple things to remember for future:
To quit Mongo shell run quit()
To stop the mongod server it’s ctrl + c
Other Stuff
Watched afewvideos about pair programming and learned that it’s a bit different to what I had imagined: two people working on the same code on one computer, with one person “driving” (writing the code) and the other “navigating” (figuring out what’s next or what’s needed), and switching off periodically. We tried this yesterday in a way in our group, but I guess it’s a hard thing to do when no one knows even where to start! Will be interesting to give this a go on something I’m more comfortable with in the future.
Up Next
Now that I got MongoDB running I can get going again on my bootcamp. Next steps are creating a simple database and then we learn about RESTful routing.
Still yet to get Postgres working on my machine for the group project so need to tackle that as well.
]]><p>Database is up and running!!!! Wow that took some doing. <imgDatabase Issueshttps://www.niamurrell.com/code/2017-07-12-database-issues/2017-07-12T11:00:00.000Z2020-06-20T20:12:47.875ZStill really struggling with getting a database working. It feels like I’ve been through dozens of tutorials–both video and text–and I’m still in the same place I started in…nowhere!
For my group project we are trying to use PostgreSQL together with Sequelize and Passport. For my bootcamp I’m trying to get MongoDB running. In both cases, although I have installed each program, getting the respective servers up and running is proving impossible so far. We even tried doing a group coding session today (3 heads are better than 1!) and got stuck pretty early on. On the one hand I’m glad it’s not just me, but I literally don’t know what else to try and I want to be making some progress!
Anyway I found what seem to be some pretty good tutorials on both Postgres and MongoDB which will be great when I can finally get it working. I’ll share the links and info then.
Up Next
Hoping for a database breakthrough tomorrow!
]]><p>Still really struggling with getting a database working. It feels like I’ve been through dozens of tutorials–both video and text–and I’mUI Completedhttps://www.niamurrell.com/code/2017-07-11-prepping-for-login/2017-07-11T11:00:00.000Z2020-06-20T20:12:47.876ZIt really makes a difference, working a full day at work vs. having time to work on projects. Duh, I guess!? But didn’t do much actual coding today.
Wrapping Up UI Build
Yesterday I finished (and forgot to write about) the remaining UI pieces for our Metro App for Coding For Product. I wrapped up the navigation styling, linked all the buttons, wrote some copy for the static page, and built some modals, on which we will build the main functionality of our app: allowing the user to choose which reward they want to “buy” with their points, and then deducting those points from their account. I’d never worked with modals before but with Bootstrap and jQuery it was pretty easy (HTML and JavaScript).
Other Stuff
Did some research today on using the passport npm package for user login and authentication. We will need our database set up to get it working properly.
Hoping to get stuck in setting up the login for our project site.
I also need to figure out how to install MongoDB–previous attempts have failed–and I want to keep things moving in my online bootcamp.
]]><p>It really makes a difference, working a full day at work vs. having time to work on projects. Duh, I guess!? But didn’t do much actualAuthentication & Deployment & Data Models & More!https://www.niamurrell.com/code/2017-07-09-day-of-workshops/2017-07-09T11:00:00.000Z2020-06-20T20:12:47.876ZWorkshop day for Coding For Product so picked up lots of new information in today’s talks:
APIs, Authentication, & Authorization
Learned that browsers have a single origin policy meaning it will only process information from items on the same or a similar domain. This makes things tricky when working with APIs from different sources, and explains why you need a server to process them. It also can explain why you need to host your own fonts (except for Google fonts somehow?). Also picked up some new terms to be aware of on this topic: JWT (JSON web tokens), CORS (cross origin resource sharing…helps resolve single origin issues), and curl, a way to imitate a browser from the command line.
Deployment
We’re getting close to when we’ll need to make our app public(ish) so was helpful to get more info about deployment options. Definitely handy to get a list of cloud server options: Rackspace, AWS, Microsoft Azure, Openstack, Google Cloud Platform, and Digital Ocean to start. We also picked up some deployment best practices to keep in mind:
TEST TEST TEST before deployment!!
Always keep backups
Know how to roll back to a backup before deployment
Keep an audit trail of deployments as well as log statements in the code to make it easier to track down when/where things break
Always test after deployment! ‘Deployment’ isn’t finished until you’ve deployed and tested!
Data Modeling
This was a key piece of information I didn’t really have a grasp on before, and it was really helpful to learn as we’re in the process of modeling and creating our database structure for the app we’re building.
An ERD (entities relational diagram) is a standardized illustration of how the tables in a database will relate to each other and it’s drawn with specific symbols and meaning. Entities (“tables,” “collections,” etc.) have different relationships to each other, described by cardinality: one-to-one, one-to-many, or many-to-many (which requires a join table). Here is an example of an ERD in the context of a debate on Stack Overflow. Also good to know: LucidChart is a good tool for building these diagrams.
Other Stuff
Also learned about some additional tools which will probably be helpful for building our app:
express-ejs-layouts (npm package) lets you set a standardized layout for all the pages on your site, so that you don’t have to repeat include statements in each page file.
.env files are how you keep sensitive information out of public repositories and can still collaborate with other people on the project.
passport is another npm package which handles user login with Node and Express.
Got stuck on another layout issue which was solved again with a CSS float. Reminder to self: always try a float!!
Up Next
This week I’m tasked with finishing up the UI on our app and setting up the user login feature. UI should be alright except that I’m so nitpicky about the aesthetics! Login is totally new so excited to learn how to do that.
]]><p>Workshop day for Coding For Product so picked up <strong><em>lots</em></strong> of new information in today’s talks:</p>
<h3Project Collaborationhttps://www.niamurrell.com/code/2017-07-08-project-collaboration/2017-07-08T11:00:00.000Z2020-06-20T20:12:47.868ZToday some of the groups in the Coding For Product workshop got together to spend some time working on our projects. It was a long day (especially since I skipped eating lunch!) but we got a lot done! It was great to get some experience working with GitHub and another person on the same project. Up until now I’ve only had my own projects to very little (if any) branching and definitely no conflicts to merge.
Splitting The Work
After we got a few things sorted out about our plan, we basically had carte blanche to work on whatever we wanted for the rest of the day. So between one of my teammates and me, we decided to split up different features to work on–she would create the sign up page for our app and I would work on styling the redeem page. It definitely made sense to work on parts of the app that were very separate…divide and conquer and all that. But at the end of the day we still had some merge conflicts to resolve!
Merging Different WIP Branches
This took some talking through because both branches we were working on were very much works-in-progress so we were hesitant to merge into the master branch. But we each had made changes to important parts of the repo so ultimately had to merge our work into master to share our work. It was a bit nerve-wracking to fiddle with the master but it worked in the end. Here’s the basic workflow of how we had success:
After all of these steps, we both had each other’s code and the app was up to date. We haven’t deleted the branches as there’s still work to do on them, but eventually will get to that point. Also I included pull requests in the steps above (for my own future reference) but since we were sitting next to each other going through the code together as it was written, we actually skipped this step.
Other Stuff
Also worked a bit more on styling our app. It’s fun but frustrating! I was trying to get 3 divs aligned next to each other within a container div for the longest time and could not get it!!! The solution was floating the first child div to the left (it’s always a float!! 😩):
.parent-div > div { float: left; }
So really grateful for the mentors who volunteer their time to hang out and help with all of these kinds of questions. It makes such a difference!
One of them also told us about Gitkraken, a GUI for git to facilitate workflows like the one above, and also as a way to visualize branches and the commit history. I will be trying this!
Up Next
Back to the workshop tomorrow. So much to work on but brain is tired!
]]><p>Today some of the groups in the Coding For Product workshop got together to spend some time working on our projects. It was a long dayCommand Line Shortcutshttps://www.niamurrell.com/code/tutorials/2017-07-06-terminal-shortcuts/2017-07-06T11:00:00.000Z2020-06-20T20:19:34.783ZToday I figured out how to implement some shortcuts to use in Terminal. I’ve always found it annoying to move among directories from the command line, and especially getting to my projects folder which is nested pretty deeply. I’ve also seen other people type shorter commands than I was using, and I wanted to do it to! Lots of googling and I came up with a result.
Show Hidden Files
The first step is to make it so that Finder displays hidden files with these two lines in Terminal:
defaults write com.apple.Finder AppleShowAllFiles true killall Finder
Then open a Finder window and navigate to the root user folder (for me it’s what shows up on the command line before $). There are three files to open: .gitconfig, .bash_profile, and .bashrc.
Add git shortcuts to .gitignore
I started here from some bad googling–the steps below can make this redundant–but here it is anyway. I added the following lines into .gitignore to simplify my git commands:
[alias] a = add . c = commit -am p = push s = status cob = checkout -b
So now instead of typing git checkout -b branchName I can just type git cob branchName. Better!
But there is a better way yet…
First Direct .bash_profile to .bashrc
When a Terminal window opens it uses one of two settings, and the two settings are managed by these two files (explained better in this YouTube video). To make sure the shell sees the shortcuts no matter which way Terminal opens, direct .bash_profile to .bashrc by adding this line to the file:
if [ -f ~/.bashrc ]; then source ~/.bashrc fi
Then add shortcuts to .bashrc
First I added a function to change a 2-step process into 1: making a new directory and then changing into it:
# mkdir, cd into it mkcd () { mkdir -p "$*" cd "$*" }
Then I went a step further and made a specific function to open my dev projects folder from root:
# Go to dev folder & list function dev { cd ~/really/long-And-cOmpliCated/path/to/my/dev-projects/ ls }
I also want to be able to see all of the folders and files in a directory as soon as I cd into it:
# cd, then ls directory function cdl { cd $1 ls }
And finally a bunch of shortcuts to make life easier:
# Aliases alias ..="cd .." alias gaa="git add ." alias gb="git branch" alias gcm="git commit -m" alias gcob="git checkout -b" alias gl="git log" alias gp="git push" alias gs="git status" alias lsa="ls -a" alias t="touch"
So I one-upped my .gitignore shortcut and now type gcob branchName in the example above. Win!
Hide Hidden Files
Most of the time I’d rather not see all of the hidden files in Finder so to wrap up, undo the first step by entering the below in Terminal:
defaults write com.apple.Finder AppleShowAllFiles false killall Finder
Shell Errors
This is the final output, but initially I got some errors from copying other people’s suggestions. Still a lot to learn about shell scripting but I can say for sure that it prefers double quotes " " to single ' '! Also there is this great tool which will tell you what the errors are and how to fix them: ShellCheck.
Other Stuff
Got started on the big capstone project for my bootcamp class, a Yelp clone showing campgrounds. I’m calling mine FireCamp. Should be fun!
Up Next
Still pausing on the group Metro project until we figure out our framework so for now working on the bootcamp. Next section is about databases so should be getting into MongoDB.
]]><p>Today I figured out how to implement some shortcuts to use in Terminal. I’ve always found it annoying to move among directories from theBackend Frameworks & Research Research Researchhttps://www.niamurrell.com/code/2017-07-05-backend-frameworks-beaucoup-research/2017-07-05T11:00:00.000Z2020-06-20T20:12:47.876ZBack to work today so not much time to code, but still learned some bits and pieces!
Choosing A Framework
I am on a team building an app from scratch (product idea, design, build, ship!) in 4 weeks as part of Coding For Product. We have a pretty cool idea for an app and now need to decide how to build it.
The backend is pretty new to me so did a lot of research today on Vue, Angular, Firebase, Single Page Apps, server-rendered apps, and how all of these things fit together (and what would be best for our app!). Given the short timeframe to learn & build on whatever we end up going with, we decided to get some help from the workshop mentors so looking forward to getting some advice on this.
Yarn
Learned about a different way to install Node packages instead of npm. The Yarn setup is a little bit different in that you don’t have to --save flag your package.JSON init (it does it automatically), and it also creates a lock file to keep track of the exact version of packages used in a project.
Other Stuff
Read up a bit on git & GitHub workflows as we’ll be working more & more with branches, pull requests, etc. in building our app. Made my first pull request and it’s not as scary as it once seemed!
Up Next
Pausing on our app build until we decide about the backend frameworks.
Instead building the UI for the big app I’ve got to build for my bootcamp.
Also feeling motivated to get working on my portfolio again…I will need somewhere to put all of these projects once they’re done!
]]><p>Back to work today so not much time to code, but still learned some bits and pieces!</p>
<h3 id="Choosing-A-Framework"><aNode API Requests & UI Mockuphttps://www.niamurrell.com/code/reference/2017-07-04-node-api-requests-ui-mockup/2017-07-04T11:00:00.000Z2021-06-19T22:25:32.380ZHappy 4th of July! To be honest it’s not a holiday I really celebrated living in the UK the last 5 years but I’m happy for the day off–more study time!
API Requests Using Node
Finished this topic in my bootcamp course which I started yesterday. Here are the main bits to remember:
Request is a node package which makes http requests, and can be used to call APIs:
npm install request --save
In the app.js file it needs to be required at the top, and then you can use a request function to call the API. This function returns a string (rather than the JSON or XML needed) so you also have to use the JavaScript built-in parse() function to get the right output. Then you can access the data you want by following the JSON object nesting pattern:
var request = require("request");
request("http://formatted.api.url", function(error, response, body) { if (!error && response.statusCode == 200) { var parsedData = JSON.parse(body); console.log(parsedData["level1"]["level2"]["level3"]["dataIwant"]); } });
You can also send the data to a page instead of just logging it to the console. To do that replace the console.log() function with:
res.render("results", {data: data});
To pull in search terms from the user and plug these into the API’s request URL, you can use req.query.search where search is the name of the form element the user saw:
Then include this term in the GET route that calls the API. The final route would then be:
app.get("/results", function(req, res) { var searchTerm = req.query.search; var concatUrl = "http://www.apiSource.com/?search=" + searchTerm; request(concatUrl, function(error, response, body) { if (!error && response.statusCode == 200) { var data = JSON.parse(body); res.render("results", { data: data }); } }); });
Whew! Took a lot to get to this one after what I’m sure were some tiny typos which broke everything. Eventually got it running though!
Coding For Product, Coding Begins!
I am doing a workshop where I’m in a group of 3, building a fully-functional app from scratch in 5 weeks. Today I spent a lot of time doing an initial mockup of our UI. Lots of work on that and now I’m exhausted so will write more about the project another day!
Other Stuff
Awesome thing I learned: how to install multiple node packages at once from Terminal:
Another awesome package I discovered (by necessity!!) is nodemon which keeps the server running and watches for changes. Saves a lot of quitting and restarting the server, especially when building a UI! It’s a global package (so only install once with npm install -g nodemon) and then in the terminal you can run nodemon app.js instead of node app.js to start it.
I will be using both of these a lot!!
Up Next
I still have several pages to mock up for our group project’s UI and that will be the priority since we present our progress every week.
In the bootcamp I briefly started databases but need to figure out the MongoDB local installation before I can go much further.
And still need to sort out my AWS mess.
]]><p>Happy 4th of July! To be honest it’s not a holiday I really celebrated living in the UK the last 5 years but I’m happy for the dayJekyll Blog Success & More Expresshttps://www.niamurrell.com/code/2017-07-03-jekyll-blog-success-more-express/2017-07-03T11:00:00.000Z2020-06-20T20:12:47.728ZJekyll
Today I got my Jekyll blog up and running on GitHub Pages (this!!!). Thanks to what I learned yesterday about Node and Express, I was able to figure out what was going on in the template I used (Project Pages) without too much issue. Basically it builds the site based on includes, layouts, and a minimal amount of html & markdown files. It uses special brackets similar to what Express looks for in ejs files <% %>, only with curly braces. Probably wouldn’t have been able to get this up and running in just a few hours without understanding what those brackets do! Now all I have to do is write posts using markdown…it literally couldn’t be easier.
I also had fun getting it to look pretty cool. I’m not a Photoshop expert by any means but I think it came out alright! Next I might add pagination and eventually would like to move it from GitHub Pages to my own website; there is a good tutorial on how to do all of these things to review later.
More Express
First I learned a way to make it so that you don’t need to write .ejs every time you reference an ejs file: app.set("view engine", "ejs");. This goes in the main app.js file.
Stylesheets and script documents need to be stored in a /public directory in the root folder. In order for Express to look from them, you need to include the following in app.js: app.use(express.static("public"));. Note: it’s very important to pay attention to the path names here, being sure to include slashes / where needed.
I also learned the Express way of doing Jekyll’s includes & layouts. In Express they’re stored in /views/partials in the root directory. Files like head.ejs and footer.ejs would go in this directory with all of the html needed for these sections. Likewise for Google anayltics, sidebars, etc. To include it on the page add <% include partials/head %> where you’d want the head section to go.
I’m guessing there is a way to make templates (like in Jekyll) so that you don’t have to type the include statement into each and every page (hope so!), but we haven’t learned that yet.
Also learned about Post Routes which are used to take data from the site user and add it to the site contents. This requires a new node package npm install body-parser --save which processes the user data on the server. It needs to be required and used in the main app.js file:
var bodyParser = require("body-parser"); app.use(bodyParser.urlencoded({extended: true}));
Then it can be used to add user inputs to the site output using a new command res.redirect and a POST route:
I have gone back and forth between Atom and Sublime Text 3 as my text editor. Today I finally cracked how to install packages in Sublime–necessitated by working on .ejs files which have no syntax highlighting by default–and I think now I will stick with Sublime going forward…that was the one thing I could do better in Atom. In case I forget:
Cmd + Shift + P type: install Package Control: Install Package then type the package to install
Other Stuff
I can never remember what API stands for; today I was reminded it’s Application Program(ming) Interface!!
Up Next
Tomorrow is the 4th of July so not sure how much I’ll get done. But I’d like to finish the APIs section of my bootcamp course and then dive into databases. I’ve also got a pile of problems to figure out with my AWS hosting so if there’s time will work on that tomorrrow.
]]><h3 id="Jekyll"><a href="#Jekyll" class="headerlink" title="Jekyll"></a>Jekyll</h3><p>Today I got my Jekyll blog up and running on GitHubGit 101 - The Basic Workflowhttps://www.niamurrell.com/code/reference/2017-07-02-git-101-the-basic-workflow/2017-07-02T18:15:17.000Z2022-05-02T18:21:57.692Z
This post is being added retrospectively in order to consolidate all of my learning info in one searchable place. Comments are new (May 2022) but the code is old…use at your own risk!
These are the notes I made when I first learned how to work with git and GitHub.
This is not the only way and it might not be the best way but it is the way I’ve been working with Git:
Type the following on the command line:
git status git add -A (while on your branch) git commit -m (while on branch) "enter informative commit message" <BUT DO NOT PUSH YET!> git checkout master git pull origin master git checkout <your branch> git merge master <resolve conflicts manually> git push origin <your branch>
(Then, go on Github and generate a pull request)
(And always triple check you’re on your branch to start with!)
]]>These are the notes I made when I first learned how to work with git and GitHub.Jumping Into The Backendhttps://www.niamurrell.com/code/tutorials/2017-07-02-jumping-into-the-backend/2017-07-02T11:00:00.000Z2020-06-20T20:19:34.628ZI have been working on a Udemy web development bootcamp for about a month now. It started with front-end development: HTML, CSS, Javascript, and jQuery. Yesterday and today has been jumping into the backend, first getting set up with Node and then the Express framework.
Node.js
A few weeks ago I went to an “intro” event where I was hoping to get a basic understanding of Node.js but at that time I barely understood how the backend even works so it mostly went over my head. Now it’s been explained really well in my bootcamp so I actually understand what it’s for and how to use it!
The first Node exercises were similar to the first exercises that we did in the JavaScript modules, only run on the server instead of the browser.
We also used a few npm packages to see their usefulness and how to install them. A good one for generating fake data was faker ⭐️; it can generate a lot of real-looking information like names, product names, addresses, databases, images, etc. That will be really useful in the future when mocking up sites and apps.
Express
Express is a popular web app framework written with JavaScript. They chose Express for the course because a) it’s popular (and therefore lots of tutorials, community, etc. to learn from or get help from) and b) because it’s considered a ‘lightweight framework,’ meaning you really have to understand how it works in order to get it to do things. This is in contrast to a ‘heavyweight framework’ which does a lot of the work for you…good because it’s easier, but you might not understand as much about how things work.
To create an app using Express we:
Open Terminal and go to cd (or make mkdir) the directory where we’ll build the app
Make an app file: touch app.js
npm init to create the package.json file. It will go through a few steps…make sure the entry point is app.js.
Require Express in the app.js file at the top:
var express = require("express"); var app = express();
Include routes to tell the app what to do (more below).
Tell the server to listen for routes at the bottom of the app.js file (the function is optional but helpful):
app.listen(3000, function() { console.log("Server has started on Port 3000."); });
Routes
This is like the big cahuna of getting it all to work. Routes are what tells the app what to do when each page is called, what dynamic information to change on the rendered site, and I have a feeling a lot more that I’ll learn in the future! These are the main bits of code I want to remember:
Conventionally request and response are often shortened to req and res. Both are very important: req is an object that contains all of the information about what triggered the route and res is everything you’ll send back to be processed or rendered by the server.
You can use a catch-all route to control the message for pages that don’t exist. This must be below all of the other routes to work properly (otherwise all pages will get this response).
app.get("/blog/:month", function(req, res) { var month = req.params.month; res.send("The month is " + month + "!!"); });
Route parameters are identified using the colon :. This tells Express to look for a pattern instead of a specific path. You have to include the full path in your route, for example if the path in your route is /blog/:month/:day and you instead go to /blog/january/1/title-of-my-post it will not be found since there is no ‘title’ to look for in the pattern.
params is one of the many key-value pairs in the req object, this is how you create a variable from the path name.
And important to note: res.send will only send once so you need to include everything to be sent in a single command. If looping through information, you would first need to collect everything into a variable, and then res.send the variable; you can’t include res.send within a for loop as it will just stop!
Express + ejs
You can tell the app to render a page using res.render(), but rather than rendering .html files, Express uses Embedded JavaScript (ejs). Ejs is an npm package which must be installed to the app directory from Terminal using npm install ejs --save. Then Express will be able to look for your html (ejs) files in the /views directory, which is created during the install. Here are the bits of code I want to remember for using ejs:
This will render the user’s name in the H1 on their client.
Use conditional rendering in an ejs file:
<h1> Welcome, <%= name %> </h1> <% if(name.toLowerCase() === "nia") { %> <h2>This is your website!</h2> <% } else { %> <h2>Thanks for visiting!</h2> <% } %>
These special brackets <%= %> and <% %> must surround every line of embedded JavaScript in the code. If you use the equals = sign it will evaluate the js within the brackets, so when using conditional statements you have to use the brackets without the equals = sign.
Using a loop to render multiple objects in an ejs file:
Also at the end of the class one of my teammates told me about these easy, awesome Jekyll blogs, so I created this! It’s built on Ruby so I guess I’ll be learning a bit of that.
Up Next
Tomorrow I’ll keep going with the bootcamp and will go a bit deeper into databases. Looks like we’ll be using MongoDB so totally different to the workshop today.
I also have to research sign-in and authentication for our Coding For Product app. No idea where to start there so it will be interesting!
]]><p>I have been working on a <a href="https://www.udemy.com/the-web-developer-bootcamp/">Udemy web development bootcamp</a> for about aAnd So It Beginshttps://www.niamurrell.com/code/2017-07-01-dev-blog-begins/2017-07-01T11:00:00.000Z2020-06-20T20:12:47.730ZWelcome!
This is my blog to keep track of what I’m working on as I teach myself to code.
I will…
Post (nearly) daily standups to keep track of what I’m working on.
Collect cool things I come across in the dev community for inspiration.
Recap talks & events I go to for the key takeaways.
Learn a lot from having this record!
The Focus Will Be…
At the time I am starting this blog I am focusing on full-stack JavaScript programming. I also want to improve my design capabilities using CSS. I want to build a few apps to see how it goes, and then maybe start thinking about other areas/languages I might be interested in.
]]><h1 id="Welcome"><a href="#Welcome" class="headerlink" title="Welcome!"></a>Welcome!</h1><p>This is my blog to keep track of what I’mIntro to NodeJS with learnyounodehttps://www.niamurrell.com/code/2017-06-03-intro-to-nodejs-with-learnyounode/2017-06-03T17:50:58.000Z2022-05-02T18:04:36.585Z
This post is being added retrospectively in order to consolidate all of my learning info in one searchable place. Comments are new (May 2022) but the code is old…use at your own risk!
In June 2017 I attended a NodeSchool workshop which was intended to be an introduction to NodeJS. I arrived knowing nothing and left feeling like I knew even less 😂 Anyway here’s the code from the learnyounode workshopper…
Exercise 1
console.log("HELLO WORLD");
Exercise 2
// console.log(process.argv); var sum = 0;
for (var i = 2; i < process.argv.length; i++) { sum += Number(process.argv[i]); }
console.log(sum);
Exercise 3
var fs = require('fs'); var contents = fs.readFileSync(process.argv[2]); var split = contents.toString().split('\n');
var sum = split.length - 1;;
console.log(sum);
Exercise 4
var fs = require('fs'); var contents = fs.readFile(process.argv[2]); var split = contents.toString().split('\n').length - 1;
console.log(split);
]]>In June 2017 I attended a NodeSchool workshop which was intended to be an introduction to NodeJS. I arrived knowing nothing and left feeling like I knew even less lol.Christmas In Berlinhttps://www.niamurrell.com/travel/2016-12-31-christmas-in-berlin/2016-12-31T12:00:00.000Z2020-06-21T10:30:11.019ZWhat to do when you live in London and have no plans for Christmas? Go to Berlin! For all the things I love about living in London, the fact that it completely shuts down on Christmas day certainly isn’t one of them. There is no way to go anywhere, save spending lots of cash on a minicab or lots of energy on a Boris bike. And while cycling might be a good idea given my normal December diet, since everything is closed, there’s nowhere to go anyway!
This year my Christmas plans fell through at the last minute but I was determined not to let it scupper my Christmas spirit. And so how lucky to find a last-minute holiday package for flights & hotel through British Airways, on exactly the days I had off work! Even better, Berlin is a city that allows its residents and visitors to make the most of the festive period by keeping its transport running, and many of its shops and attractions open.
I arrived in Berlin on Christmas Eve, the day Germans celebrate Christmas, and when everything closes early. But the transport links were running, and several tour companies still gave their free walking tours—the perfect way to get my bearings and see several major sites on day one. The walk by Original Berlin Tours conveniently started just 90 minutes after my flight landed, and I reached the meeting point by an easy bus ride straight from the airport to the city square Alexanderplatz.
Fernsehturm (Television Tower)
Getting off of the bus at Alexanderplatz brought me up close and personal with the television tower (Fernsehturm) which dominates Berlin’s skyline—the tallest structure in all of Germany.
The tour meeting point was just a couple blocks further by foot which gave me the first real impression of post-war East Berlin architecture. Combined with the rain, I can’t say it was the most inspiring of journeys! But soon our tour began and the city’s rich history began to come to life.
MarienkircheBerlin Cathedral on Museum IslandNeue WacheHumboldt University Library where book burnings took place.GendarmenmarktCheckpoint CharlieWilhelmstraßeBrandenburg Gate
Once the tour was finished I made my way back to the hotel, and on the way passed Marienkirche, one of the churches we had walked by earlier on the tour. People were streaming in—it turned out that the Heiligabend (Christmas Eve) service would begin soon, so I stuck around to kick off the Christmas festivities in local fashion.
Heiligabend at Marienkirche
The church was packed by the time the service started, with people standing behind and around the pews. It was really special to celebrate with lots of people and sing hymns and Christmas songs in German!
The next day—Christmas Day—the festive fun continued. But first, I went to visit the Reichstag building, where the German parliament sits.
Reichstag Building
The Reichstag building is one of Berlin’s landmarks that was restored after World War II, and in the restoration a huge glass dome was added to the top. The dome is open to the public and gives visitors a chance to get an aerial view of the city and learn about the history of the building and German parliament.
Rain put a damper on my visit (pun intended)—what could have been a sunset view of the Berlin skyline turned out to be a cold and windy squinting session, trying to make out the city’s landmarks through the overcast skies. The free audio guide provided excellent context and historical information, but with the glass covered in raindrops unfortunately there wasn’t much to see. But it wasn’t a complete wash (the puns continue)—the dome itself is a beautiful piece of architecture and with sparse crowds, I was able to make the most of the visit.
Reichstag Building Dome
Next I visited the Gendarmenmarkt WeinachtsZauber Christmas market, which many websites and news articles named one of the most picturesque in Berlin. And they were right!
Gendarmenmarkt Christmas Market
It was a beautiful site, and more Christmassy than any Christmas market I’d visited before. The glüwein (mulled wine) was extra delicious (throw a bit of kirsch in there—yum!), the market stalls had unique, festive items, and there was even live entertainment in the form of a crooner band and a Christmas panto with juggling and acrobatics.
Gendarmenmarkt Christmas Market
I could have stayed for hours, but I had to make my way across town for the one thing I did book in advance: a chance to watch the world-famous Berlin Philharmonic perform their annual Christmas concert.
The Berlin Philharmonic Hall
It was a beautiful performance and I got to hear some of my favorite pieces performed live for the first time: Tchaikovsky’s Romeo & Juliet, and Rachmaninov’s Piano Concerto No. 2 in C-minor, Op. 18. They also played some selections from Mendelsohn’s Midsummer Night’s Dream (including the famous post-wedding song made popular in every movie with a wedding in it, ever) and finished with an encore of Tchaikovsky’s Waltz of the Flowers from the Nutcracker.
It was a unique experience sitting behind the orchestra—not something I would recommend to be honest, as the percussion was much more prominent than it should have been, and the piano was almost completely missing during much of the piano concerto. But for a last-minute ticket for what turned out to be a sold-out performance, I couldn’t complain. Plus it made for some great pictures!
The Berlin Philharmonic Hall from behind the orchestra
On my last full day to explore I started at one of the city’s most famous landmarks. The East Side Gallery is a long stretch of the Berlin Wall that has been decorated with murals full of striking images, peace messages, and political commentary.
The Berlin Wall
I walked a long section of the wall and then doubled back, thankful that on the way back it had stopped raining. Although the lack of rain seemed to bring in busloads of other tourists, so in hindsight maybe the rain wasn’t so bad!
The Berlin Wall
After visiting the wall I took a train over to the other side of town to Breitscheidplatz to visit another Christmas market, which surrounds the Kaiser Wilhelm Memorial Church.
The Kaiser Wilhelm Memorial Church was bombed in World War II and left standing as a memorial.
A week earlier someone had committed a terrible attack, stealing a truck and driving through the market, killing and wounding many visitors. But people were determined to carry on with the Christmas spirit, and the market was reopened with the addition of several memorials and extra security. It was a tragic event and the tributes and memorials around the site were touching.
And I was really glad for the visit, because it was at this market that I discovered one of the best Christmas traditions: Schokoküssen! A Schokoküsse, or “chocolate kiss,” is a beautiful feat of German sweets-making: a chocolate covered cloud of frothier-than-marshmallow puff sitting on a wafer cookie which comes in many flavors from plain white chocolate to whiskey. I tried the mulled wine flavor, which was almost better than mulled wine itself!
Mulled Wine Flavored Schokoküsse
After leaving Breitscheidplatz I made a stop at the Topography of Terrors, a free exhibition built on the site of former Nazi administration buildings, which shares an in-depth history of Hitler’s Third Reich from beginning to end. While the legacy of the Third Reich is very well known, it was interesting to read about how they came to power in the first place, and how millions of normal people went along with its propaganda for all sorts of reasons. Although the subject matter isn’t pleasing, the exhibition does a great job in documenting what happened so that history isn’t forgotten, and hopefully isn’t repeated.
One of the only remaining government buildings of the Third Reich, next to the Topography of Terrors. The building is used today as the German Finance Ministry.
Later on in the evening, I visited my final Christmas market of the trip, Berliner Weinachtszeit near Alexanderplatz. After visits to the other markets most of what was on offer here wasn’t anything new, but I was glad to have another chance to try some more Schokoküssen (After Eight Mint and champagne flavors—both delicious!) and to compare the glüwein (the Gendarmenmarkt glüwein was more delicious and €0.50 cheaper!). But it wasn’t all repeats—the Berliner Weinachtszeit holds its own with a beautiful free ice skating rink, and Santa Claus flying overhead in his sleigh with the reindeer! You can’t get more Christmas than that.
Berliner Weinachtszeit near Alexanderplatz]]>A travel essay about a solo 3-day trip to Berlin, Germany at Christmastime.8 Days In Madagascarhttps://www.niamurrell.com/travel/2016-11-13-madagascar-series/2016-11-13T12:00:00.000Z2020-07-03T19:59:40.342ZMy holiday in Madagascar was an amazing visit to one of the world’s most unique and exciting places. This series describes my Malagasy holiday from beginning to end.Day 8 – Ambohimanga And A Hectic Farewellhttps://www.niamurrell.com/travel/2016-11-12-madagascar-8-ambohimanga-hectic-farewell/2016-11-12T12:00:00.000Z2020-06-22T22:24:21.909ZBeing back in the capital city was drastically different to the smaller, less-populated parts of the country I’d been in for the previous few days. So many people everywhere! I arrived late in the afternoon and went straight to my hotel, Au Bois Vert, which was a peaceful oasis, not too far from the airport, set in an otherwise busy neighborhood. By this point I was pretty sick of being gated off inside a westernized bubble (in this case, a very French colonial bubble) when I could hear the music of normal Malagasy life going on within earshot. But at the same time I was pretty exhausted so after a massively disappointing dinner , I just went to bed.
The next morning my guide Hery picked me up and we drove to Ambohimanga, another sacred royal site in Antananarivo, which I could actually see from the Queen’s Palace during the first part of my trip. Ambohimanga is a tall hill where royals of the Merina tribe and Malagasy people have lived dating back to the 18th century, and when the country was united under one ruler, it became a sacred spiritual site. Several kings and queens are buried here, and local animists still make pilgrimages to bathe in the sacred water and make offerings to the ancestral spirits.
Entrance to the royal fortress at Ambohimanga
I had an excellent guide (Sebastian) who showed me around the compound, which is now open to tourists and occasionally used for traditional celebrations like the new year festival. It was amazing that these simple, wooden structures were still in place as they had been for hundreds of years, and to see local people trekking up the hill to offer their coins, candles, honey, candies, and blood to the sacred grounds. There is a great reverence to the ancestor spirits adhered to throughout the site, and it’s fady (taboo) to enter the royal palace using your left foot, or to exit with your back to the interior. Newer, 19th century meeting rooms and bedrooms still contain the queens’ personal belongings and gifts from foreign dignitaries such as England’s Queen Victoria.
After leaving Ambohimanga we started heading towards the airport, making a few stops along the way to pick up some souvenirs. Talk about traffic! When I arrived into Tana a week earlier, all of the traffic was leaving the city and we basically coasted into town unhindered. Now, going the opposite direction, it was slow going. With only one lane going in each direction it took nearly 2 hours to drive about 10 km! But thankfully I still had time to pick up some local spices and teas before reaching the airport.
And if arriving into the airport was harrowing, leaving was even more so! The lines kept changing, touts offering to take my bags and help me skip the line (for some cash of course), papers to fill out which I only found out about after getting in the line where I needed to hand in the paper. One airport worker (I think?) helped by filling out the form for me before I could even get two words out, and then condescendingly told me it was “a gift” when I didn’t give him any money! Other tourists were clearly frustrated when they arrived at the security line and were told that certain souvenirs must be stored in checked baggage (which, of course, was about 3 lines prior to this one!). And to top it off, just when I was about to make it through security, some VIP lady was whisked in front of me, had privacy curtains drawn for her search, and delayed the whole process even further. By the time I got on the plane I was relieved and a bit shocked I had actually made it through!
But this last taste of organized chaos was the perfect way to leave Madagascar, a place whose beauty, uniqueness, and culture hugely outshine what are really small inconveniences to a western visitor. I hope to make it back some day!
Madagascar, I will return!
]]>My holiday in Madagascar was an amazing visit to one of the world’s most unique and exciting places. This series describes my Malagasy holiday from beginning to end.Day 7 – Betania Villagehttps://www.niamurrell.com/travel/2016-11-11-madagascar-7-betania-village/2016-11-11T12:00:00.000Z2020-06-22T22:23:46.062ZLast real day in Madagascar! This morning we went to Betania, a fishermen village south of Morondava, accessible only by boat. We met our boat just a short walk away from the hotel, and although the beach was filled with trash and decaying, formerly-alive things, once we were out on the water it was a beautiful scene.
We drifted by the mangroves — evergreen sea trees which grow along the coasts. Then we got out and walked around the village, which is entirely closed off from the modern world. Here I got a very close look at how villagers live throughout the country, and the level of poverty that exists here. To put it simply, if someone has a chair in their home to sit on, they are probably rich by local standards. Forget about electricity or running water.
As a fishing village, the families in Betania put all of their efforts into the trade. When we arrived at the village beach, many boats had just come in with the day’s catch, and women and children were helping the fishermen pull the fish off the nets before they would take the catch to the market back in Morondava. Hopefully the earnings would be enough to keep their families fed.
Betania village beach, boats fresh in from the morning catch
On the beach we also came across several huge boats in different states of construction . Rivo explained that the fishermen will sometimes put their extra earnings into building really big boats that can carry up to 40 tons of fish in order to increase their earnings potential. But because they earn so little it can take 3 years or more to buy the supplies bit by bit and construct each boat. We saw one in progress that looked like it had been abandoned for maybe just as much time .
We also met a woman working with palm leaves to make woven & braided mats. One floor mat will take her four days to make—they were beautifully crafted and back home would probably fetch 10 times as much as she was selling them for.
Our last stop was the local public school where several classes were in session. The teachers I met were very friendly and welcomed me to have a look at what the students were learning. Although the setup was the same as any other classroom (teacher, chalkboard, students), it was impossible not to notice the lack of basic supplies and even clothing.
The whole walk through Betania was an excellent way to spend my last morning on the west coast, and I’m glad to have had a firsthand experience with the daily life of Malagasy people during my trip.
Afterwards we headed back to the airport, and soon took off towards Antananarivo. I got one last glimpse at Boabab Alley from the air, and this time couldn’t help but see it as a sad scene. What should have been a lush forest teeming with wildlife was now barren land with baobab matchsticks dotting the surface . I hope the education efforts in Kirindy and other reserves will encourage the local people appreciate its value without destruction. In the meantime I hope this land will stay protected, so that visitors can continue to be drawn into the area and appreciate its remaining beauty while they can. I’m so glad I did!
Coastal Morondava mangroves from above
]]>My holiday in Madagascar was an amazing visit to one of the world’s most unique and exciting places. This series describes my Malagasy holiday from beginning to end.Day 6 – Lemurs and Fossas and Skinks, Oh My!https://www.niamurrell.com/travel/2016-11-10-madagascar-6-lemurs-fossas-skinks-oh-my/2016-11-10T12:00:00.000Z2020-06-22T22:32:12.934ZI made it—I survived my night in the forest! It was actually the best night’s sleep I’ve had all week, go figure—after all that fear! I woke up early to the sounds of lemurs jumping through the trees, and had some more time to sit in my “living room,” aka the porch outside my tent in the middle of the forest. A big gray bird with a blue head ambled by and didn’t even notice me. Then a Madagascar Paradise Fly Catcher kept darting all around, then stopped for a tiny poop hahaha. I guess this is what goes for entertainment without modern distractions! Meanwhile the flies buzzed away, ants kept carting food back and forth, and birds I didn’t know the names of kept darting around. This place was actually pretty great!
One minute on the porch at Camp Amoureux, Kirindy Reserve
The rest of the day’s visit kept being spectacular. We drove from Camp Amoureux to the Kirindy Forest and met a terrific guide called Christian for a daytime walk through the forest. Christian and the other guides lead researchers, students, and tourists through the forest to study and view the local flora and fauna. They also work with local villagers and schoolchildren to show them the value of protecting the forest and its unique treasures—at the same time employing them and providing an alternative income source to destroying the land to raise cattle.
Once we started walking, we saw a group of sportive lemurs up in the trees almost immediately. Christian started rubbing bits of banana onto the tree branches around us which, based on the night before, I thought was wishful thinking. But then they started coming down! It was a mom carrying the baby on her back and another one on its own. Next thing I know, more lemurs I hadn’t even noticed before started coming out of the woodwork—literally! Five or six from the group soon surrounded us, and they weren’t at all shy about coming close to get the fruit. It was pretty awesome!
Sportive lemurs jonesing for some banana
Then we carried on to look for some more animals. I really wanted to see fossa and more lemurs and Christian was on it. Unfortunately (or very, very fortunately!) the giant jumping rats only come out at night, so I wouldn’t be able to see any. We walked and walked and walked through the forest—I don’t know how Christian wasn’t lost. Soon it grew very dense, going up and down inclines, with branches and such going every which way across the paths. We saw several lizards and endemic birds, and a skink, which looked like a cross between a snake and a lizard. But alas no further mammals and we were soon back at the main camp. I was a bit disappointed not to see more, but hey, that’s nature, right?
Well next thing I knew Christian had noticed some fossa hiding under one of the resident buildings and we ran over to have a look. Those are some creepy looking things! Kind of a cat’s face and body but from behind they look like dogs. Fierce, and ALL MUSCLE. The pair of them kept trying to escape us but we followed closely for some pictures and videos. It was so fun being on the chase!
Chasing fossas in the forest
Christian also learned some Sifaka lemurs (the white ones — Zoboomafoo!!) were in the forest about 2km away. So we got in the car for a bit more hunting, and found them pretty quickly. They were wearing scientific collars undoubtedly with some sort of tracker in I’d guess. But it was still really cool, and they were really cute, but much more shy and less inclined to come down from the trees and say hi. But overall I got so lucky with all of the things I got to see!
3 white Sifaka lemurs hiding up in the trees
After that we drove back to Morondava and back to the Hotel Palissandre Côte Ouest. And I have to say, after the last few nights this place is absolutely palatial. Tiny lizard in the bathroom? No problem! Not anymore at least. My how I’ve grown.
]]>My holiday in Madagascar was an amazing visit to one of the world’s most unique and exciting places. This series describes my Malagasy holiday from beginning to end.Day 5 – The Malagasy Foresthttps://www.niamurrell.com/travel/2016-11-09-madagascar-5-malagasy-forest/2016-11-09T12:00:00.000Z2020-06-21T10:31:15.792ZToday we spent most of the day in the car again, driving back towards Morondava. The journey was just as long, but since we had taken the same roads a few days before it was admittedly much less interesting. One thing that really stuck out on the drive was just how much the natural habitats are being destroyed throughout the region.
Most of the country was covered in thick, lush forest not too long ago, filled with countless species of trees and wildlife. The richness of the forest still exists in Madagascar’s national parks and reserves, and I saw this firsthand surrounding the Tsingys. Now, much of the unprotected land has become barren and empty. The local population uses the land for survival, but unfortunately not in a very sustainable way. Forests are cut and burned to make charcoal and to create grazing grounds for zebus (cattle). Then the land is burned again and again to encourage grass to grow each year for grazing. When the land inevitably becomes inhospitable, people move on to a new area and start the cycle again.
Forest lands are burned & destroyed throughout western Madagascar for the livelihood of hte local populations.
This cycle was clearly visible on our journey. The smell of smoke always hung in the air or was visible in the distance, and at one point a fire was being burned right at the side of the road we drove on. Forests of tree stumps went on for miles with nothing else able to grow or live. Baobab trees which looked hundred of years old stood by themselves amongst the ruins, all black and charred at the bottoms. Rivo said that he had driven the same road not even a month before and could notice the difference by how much had been cut and burned in a short time. Even though this is being carried out by people who do what they must to survive, it’s very sad to think about how many trees, birds, lemurs, lizards, etc. etc. have lost their habitat or even lives for this purpose, and the fast pace of the devastation is alarming.
Having seen so much destruction along the way, I was glad to arrive in the Kirindy Reserve in the late afternoon. This reserve protects a dry deciduous forest for the purposes of sustainable logging, scientific research, education, and tourism. It’s also home to some popular endemic species including several lemurs, the giant jumping rat, and the fossa, Madagascar’s largest carnivorous mammal. My hotel for the night, Camp Amoureux, is in the same forest.
Camp Amoureux is named after the intertwined baobab trees which the campgrounds were built around.
Once I got out of the car and saw my room, I again really started to wish I hadn’t come on this trip alone. I found myself in the middle of the forest facing a dome tent on a raised platform with an outdoor toilet and a barrel of water for a shower 😅 . The camp’s tents were really spread out from each other so it really felt like I was completely alone. With images of lemur-eating fossa and jumping rats in my mind, and the thought of sleeping on the floor of the tent, I was definitely freaking out!
I had a few hours to kill before the evening’s night walk, and it actually helped settle my nerves. Sitting alone in the forest outside my tent doing nothing but watching and listening to my surroundings helped me appreciate that it’s actually quite beautiful. Knowing that this goes on like this whether I’m here or not was very peaceful. Two little birds taking a dust bath next to my tent and then waddling along all the way around. An iguana taking its place back at the bottom of the tree (it had scurried up when I arrived earlier). And the sound—not crickets exactly but a constant chirp-whirring of some insect is the constant background. The wind rustling the tree leaves and the thatched roof of my tent cover. I felt much better and got excited to go exploring with a guide.
My covered tent in the forest.
Turns out there are no fossa or jumping rats in this part of the forest—thank goodness! Instead we saw a bunch of tiny cute things 😄. There were little itty bitty lizards maybe 3-4 inches long—striped with orangey-brown and yellow and funny knobby heads. There were also tiny nocturnal lemurs which were so cute! We saw the mouse lemur, which looked just like a mouse except for its tail and little lemur ears. We also saw the Madame Berthe, which was auburn and more lemur looking. It’s also the smallest primate in the whole world!
Scouting these animals in the pitch black night was really difficult—I wouldn’t have seen anything if it weren’t for the local guide and Rivo. We used headlamps to scan the trees, looking for the mirror-like reflection of eyes in the branches. But since light attracts bugs and I’m not a big fan of having things fly into my face (!), I kept the light off and left the searching to the guides.
At one point there was a third lemur whose name I can’t remember, but the guide picked up a cicada that flew into my hair (awesome) to get its attention. By holding its wing, the cicada made a real racket trying to escape. The guide held it up to a tree to try to entice the lemur to come eat it and it almost worked! That cute little thing was jumping from tree to tree trying to figure out how to get the food without coming too close to the giant humans. In the end I guess we were just too big and scary for it to make a move, but it was fun to see it try.
Madame Berthe hiding in her tree. This lemur could literally be the smallest mammal on the entire planet.
The night walk turned out to be really exciting and much less scary than I was anticipating. With another forest visit planned for the next day, it was a huge relief!
]]>My holiday in Madagascar was an amazing visit to one of the world’s most unique and exciting places. This series describes my Malagasy holiday from beginning to end.Day 4 – The Grand Tsingyhttps://www.niamurrell.com/travel/2016-11-08-madagascar-4-grand-tsingy/2016-11-08T12:00:00.000Z2020-06-22T22:31:34.178Z7 am departure today. We left so early to avoid the heat and to get to the Grand Tsingy by 8 am. So glad too—because it was 28° C (82.4° F) when we arrived! We stopped along the way to pick up Brown, our local guide for the Big Tsingy trail. He is one of 42 local people hired as official guides at the park—a must-have for entry by all tourists.
After collecting Brown we drove another 40 minutes or so to get to the park entrance on the worst road yet. The jostling was so bad that at one point we had to hard brake to make sure we didn’t tip over, but there were also some fun muddy bits and driving through low rivers.
Trail map for our hike...glad to have Brown along as our guide!
Tsingy de Bemaraha National Park has a spectacular landscape which I couldn’t wait to see. The limestone plateau was once completely under the ocean, and emerged with the shift of tectonic plates thousands of years ago. Over time, the rain and groundwater eroded the limestone, leaving a forest of stone needles which are now a UNESCO World Heritage site. The trail I’d be hiking took 9 years to be planned and installed, and opened to the public only in 1997, a full 70 years after the stone forest was first discovered by western explorers. I definitely thought we’d see more of the Tsingy rock formations driving up but it was completely hidden by the bushes and trees.
Once out of the car, we walked through quite a bit of dry brush before the rocks started to appear. Brown pointed out some interesting carvings on the rocks—they turned out to be fossils! Even though thousands of years have passed with the rock being exposed to the elements, fossilized coral and sea plants are still visible to the naked eye. He also showed me how very thin protrusions of limestone could be plucked to make music.
Exposed fossil on the rocks of Tsingy de Bemaraha National Park
A bit farther down the trail we got really lucky and saw lemurs! It was a whole family of them up in a tree, grunting like pigs. After spotting us they made a run for it and took off, jumping from branch to branch. The momma was even carrying a baby on her back. It was a surprising and exciting introduction to Madagascar’s most famous endemic species.
We carried on walking and then the real climbing started. Up steep crevices, through narrow openings, at one point even through a cave where we needed head lamps. We could see the actual color of the limestone in the cave—everywhere outside is dark gray from oxidation but its natural color is bright white . Soon we arrived at a more intense section—the harnesses came on and it was time to climb!
The trail had a mix of ladders, strategically-placed nailed-in rocks, metal rope hand rails, and of course, some wood plank one-person-at-a-time rope bridges over deep crevasses (don’t look down!). There were also a couple of stunning viewing platforms that we climbed up to be on top of it all. The view was incredible. A bit scary too and my legs were legitimately shaking at times—even though the platforms were solid, I always felt like I needed to crouch for each step to have a firm grip. I’m so glad to have faced the fear and done it though.
Brown, me, and Rivo on top of Tsingy de Bemaraha National Park
Of course after reaching the top, it was time to come down—something I forgot until I was looking down the business end of a series of steep, long ladders! It was an adrenaline rush at times but actually not as scary as I first thought it would be—being hooked on to the wall certainly helped. We went through a couple more cave-like underpasses, one was narrow but tall and the other was broad but low where we were pretty much sumo walking through most of it.
At the end of the climbing trail. I made it!
Eventually the rocks began to peter out again and we were back in the normal forest. By this point it was sweltering, and we passed a group going to do the climb on our way out…I was really grateful for our early start as it was 40° (104° F) by this point! On the way back to Bekopaka the road was just as bumpy but now I really didn’t mind—it was all worth it!
Later in the afternoon we went to climb the Small Tsingy, about an hour away and closer to the river. No harnesses this time, but there just as well could have been! The Small Tsingy is part of the same rock system, just not pushed up from the ground as much as the Big Tsingy. I was feeling just as challenged and just as shaky on the platforms despite the further ease its name might imply.
On top of the Small Tsingys
We had to cut it a bit short with thunder bellowing and rain on the way, but after the morning’s hike, and without the safety of harnesses, I didn’t mind! The day was a huge success and I was thrilled to be able to experience this rather untouched, beautiful part of Madagascar.
Hiking the Grand Tsingy!
Tsingy de Bemaraha National Park: add it to your list!
]]>My holiday in Madagascar was an amazing visit to one of the world’s most unique and exciting places. This series describes my Malagasy holiday from beginning to end.Day 3 – Long Drive to Bekopakahttps://www.niamurrell.com/travel/2016-11-07-madagascar-3-long-drive-to-bekopaka/2016-11-07T12:00:00.000Z2020-06-22T22:31:18.239ZToday we set off driving at 8am and arrived in Bekopaka just after 5pm. Needless to say, drive was loooooooong. The road was paved for about 15 minutes and then the rest was all dirt road, all in various states of repair. But then, I guess that’s pretty obvious when it takes a nearly 8-hour journey to travel 150 kilometers (93 miles)!Rivo's road fighter, ready for a long journey.
We started by driving through Baobab Alley again and then carried on farther down the same road, passing through many small villages along the way. We crossed the Tsiribihia River on a “ferry” (wooden planks across two motor boats ), and just driving onto it was an adventure! You have to be pretty steady and fearless to board using two metal bridges—one for each side of wheels—and Rivo was a pro. The ferry trip lasted about 40 minutes heading up river to Belo Sur Tsiribihina, where we stopped for lunch. I would have been happy to stop there but we had another few hours’ drive to go!
Spending 8 hours on the road can be rough, but I actually really enjoyed the journey. I tried to gather clues about the geology and topography of the areas we drove through—more interesting than it may sound, as the road would quickly change from brown to red for seemingly no reason. Rivo pointed out a lot of the flora and fauna along the way too. The road was lined with mango trees, tamarind trees, several species of baobab, eucalyptus, and more. We also saw beautiful birds—some of them endemic to Madagascar—like the giant coua, crested drongo, Malagasy kingfisher, and blue vanga. 8 out of 10 plants & wildlife that you come across in Madagascar aren’t found anywhere else in the world, and I was seeing these unique species just driving in a 4x4!
Even so, it was hard to ignore the bumpy road. Up & down, side to side, diagonals…we were being tossed around every which way. There was no right-side or left-side driving here—the only rule of thumb was to drive where the road would let us. In some places it was like tractors drove through when it was really muddy and then it dried leaving the tire tracks, leaving us to rattle rattle rattle through—it honestly made my back hurt. The absolute fastest we ever went was 60 km/h (37 mph). No wonder it took so long!
Manambolo River
In the late afternoon we made it to the Manambolo River for another ferry crossing, this time just to the other side to Bekopaka. Bekopaka is a small village which serves as the entryway to the Tsingy de Bemaraha National Park. And after one final stretch of driving, I checked into my hotel, the Olympe du Bemaraha, at last. It was here that I started to notice a trend: this trip was certainly testing my threshold for accommodations, as each hotel seemed to get more basic than the last. I found myself in another solo hut joined by lizards, spiders, and beetles, warned about big animals and scorpions, and this time with no electricity until just before dinnertime! I really wished I weren’t on my own for this particular part of the trip. Time to buck up and be brave. After all, I needed to rest up for a big day ahead, hiking the Grand Tsingy!
The 8-hour drive from Morondava to Bekopaka in 3 minutes!
Sunset over Bekopaka from the Olympe du Bemaraha Hotel
]]>My holiday in Madagascar was an amazing visit to one of the world’s most unique and exciting places. This series describes my Malagasy holiday from beginning to end.Day 2 – Morondava & Baobab Alley Sunsethttps://www.niamurrell.com/travel/2016-11-06-madagascar-2-morondava-baobab-alley-sunset/2016-11-06T12:00:00.000Z2020-06-22T22:30:39.878ZToday, it’s off to the west coast! The main part of my trip would be spent in the west, taking in the world-famous baobab trees and hiking the Grand Tsingy stone forest. Outside of Tana, very few Malagasy roads are paved, making any trip across country slow and arduous. So the fastest way to explore other parts of the country is to fly as far as possible before braving the roads—back to the airport I went!
The flight wasn’t until the afternoon so in the morning, I got to see a bit more of Antananarivo. We went on a drive to the queen’s palace (Rova) at the very top of the city where an older gentleman named Vernon gave me the history on a tour. It was really interesting and I was impressed with his English (with a history of French colonization, speaking English is not common throughout Madagascar), and how much he wanted to share the history with me.
The shell of the Queen's Palace, burned by fire in 1995.
The Rova compound was home to the royalty of the Imerina tribe dating back to the 1600s, and became the seat of power for the kings & queens of Madagascar after the tribes were unified as one nation. A huge fire destroyed many of the buildings in 1995, so now it’s only possible to walk around the grounds and imagine what would have been, save for a few reconstructions. But Vernon knew a lot about the history and was able to bring it to life even so. On top of that, the 360° view from here was priceless!
A view of Antananarivo from the Queen's Palace.
We took a purposely circuitous route back to the airport, and I got to see more of the city. We passed the unused Antananarivo train station — a beautiful façade but not a stretch to call the area sketch town. Being Sunday, everyone was dressed in their Sunday best (going to church is a given for Malagasy people!), which was an interesting contrast to the goats, plucked chickens, and zebus walking through the same unpaved streets. When we reached the airport I said goodbye to Rado and started the next part of the adventure.
After hearing countless horror stories of the only local carrier Air Madagascar (cancelled flights, hours late departures, early departures!?), I was glad the flight to Morondava was uneventful. Morondava airport is ti-i-iny and I quickly found my new guide Rivo, and we drove to the hotel.
I thought Tana was rustic but wow was I wrong. Morondava is even more basic with thatched huts, babes slung on backs, baskets on heads, and practically everyone barefoot. Hut/stalls and crouched vendors lined both sides of the road from the airport all the way to “Morondava center,” and so many people were out walking and shopping. Soon we reached the road to Nosy Kely—the “little island”—a part of Morondava that sits between the sea on one side and a small channel on the other. This road led to my new hotel, Palissandre Côte Ouest, which was like an oasis unto itself with thatched individual huts right next to the sea.
Hotel Palissandre Côte Ouest, a paradise by the sea.
The room had me duly impressed , and then realized, I’m in the elements! A friendly lizard made itself at home on the bathroom sink and then proceeded to follow me into the toilet room then into the bedroom, where I noticed another one chilling on the slatted window covers. The thought of one crawling into bed with me made the room a lot less appealing! That and the slatted floorboards which let me see to the sand below—goodness only knows what else may be waiting down there!
But I only had a bit of time until it was time to go to Baobab Alley. And what an amazing place! Most of the road to get there was unpaved and bumpy with thatched huts and crowds flanking both sides. When we reached the condensed stretch of majestic baobab trees, they really were magnificent. The pictures can barely do it justice and I fear my words definitely can’t. Suffice to say, I’m so glad I went there and all of the discomfort and newness of this whole place were worth it.
The kids play soccer and the tourists fly their drones during sunset at baobab alley. Except for the drones, it was a great atmosphere!
Sunset at Baobab Alley: a dream come true!
]]>My holiday in Madagascar was an amazing visit to one of the world’s most unique and exciting places. This series describes my Malagasy holiday from beginning to end.Day 1 – Arrival Into Antananarivohttps://www.niamurrell.com/travel/2016-11-05-madagascar-1-arrival-into-antananarivo/2016-11-05T12:00:00.000Z2020-06-22T22:29:24.638ZFirst impressions of Madagascar from the air.
Wow! What a place. This is unlike anywhere I’ve ever been before. The airport was madness! They just let people in through the passport control area and cut everyone in line, sweet talk the control agents. It was a madhouse!
The landscape from the air is crazy, and looks completely inhospitable. It changes colors quickly: red land like Mars all of a sudden becomes flat brown, then a plateau and everything is bright green. The rivers were pale silty brown and looked like the color of earth, but the winding shape with offshoots and tributaries coming in and out were the only clue that they must have been water.
This was my first impression on arrival into Antananarivo (Tana for short), Madagascar’s capital city. I was traveling on my own, and booked the trip fairly last minute to follow a work trip in Johannesburg. I had found a local Malagasy tour company, Asisten Travel, to take me around and make sure I could make the most of my short time, and was glad to meet the first driver Rado as soon as I escaped the airport terminal.
The drive from the airport to the city center took about 45 minutes. At times we were flanked by rice paddies and other times ENDLESS market stalls with so many people shopping and walking around. Rado told me that Saturday is the main shopping day since things are closed Sundays. People come in from all the suburbs to Tana to shop hence the massive amounts of people and cars queuing to leave the city. And it was allsorts—babies on backs, men running carts stacked to the brim, taxi-brousses (taxi vans) with people jumping on and off the moving vehicles, barefoot people, kids playing soccer, zebus , people peeing off the sides of their bicycles…I mean all sorts!
There were so many new things to take in on the drive that by the time I got to the hotel, I was feeling overwhelmed to be on my own in a place so different to anywhere I’d ever traveled before. But with only one free night in the city center for the whole trip, I had to make the most of it. Armed with some directions from the hotel receptionist and as much of the map memorized as possible, I headed out into the city.
I had been warned several times not to draw attention to myself, and definitely not to take my phone out while walking around in Tana. Madagascar is a very poor country and foreigners by their very definition stand out as being rich in comparison. Even locals carry a cheap phone to use in public, saving their smartphone usage (if they have one) for home. So while the white, Asian, and Hispanic tourists I came across stuck out like sore thumbs, I was glad to blend in—even if it meant I couldn’t take any pictures!
I soon made it to the Antaninarenina square, a pretty park covered in jacaranda trees which overlooks some lower parts of the city. In the middle of the park was a long descending staircase which took me down to the Analakely market. The market was amazing! Endless tents, huts, and people parked along the road selling EVERYTHING. Socks, underwear, selfie sticks, grains, fruit, strange-looking meats, woven baskets, furniture…everything.
At one point people started whistling and everything went crazy. The sales people gathered up their wares inside the blankets they were selling from and BOOKED IT! The looks on some of their faces—it was like they were running for their lives. Then a few minutes later a worn out van with blown out glass and rusting metal carrying 8 singing police officers drove through slowly, followed by a bigger police truck for carrying people in the back. As soon as they passed, everyone was laughing and the sales pedestals were in their places again.
It started to rain and feel too dark for my tastes so I turned back, glad to have already learned a lesson: don’t think about the overwhelm or scariness—go out and experience!
Antananarivo's Lake Anosy
]]>My holiday in Madagascar was an amazing visit to one of the world’s most unique and exciting places. This series describes my Malagasy holiday from beginning to end.Reykjavik Midnight Sunsethttps://www.niamurrell.com/travel/2016-06-30-reykjavik-midnight-sunset/2016-06-30T11:00:00.000Z2020-06-21T10:29:36.224ZI’ve always had a fascination with the northerly regions’ ability to have 24 hours or daylight or darkness-something I’d never seen in any of the cities I’ve lived in or visited. When a work trip brought me to Reykjavik, Iceland on the summer solstice, I couldn’t resist a midnight walk to see it for myself.
On landing at Keflavík airport and driving into Reykjavik, I was struck once again by the beauty of the place that captivated me on my first visit. In what some might find to be barren and empty I saw a vast, raw, and overwhelming display of pure nature. In stark contrast to my previous winter trip, the lava fields were covered in a purple carpet of lupine flowers and the harbor view was clear out to the mountains.
A fraction of the lupine flowers on the road to ReykjavikHarbor view from the Harpa Concert HallLooking across the sea from the Sculpture & Shore Walk, around 8pm
Closing in on midnight, I walked back down to the shore to watch the sun meet the horizon. The rest of the sky was bright enough that it felt like walking around in the middle of the afternoon.
Midnight Reykjavik SunsetPhotos barely do it justice...unreal!Sólfarið statue by the sea
The next evening I couldn’t resist going for another walk. Whether it was the excitement of the endless sun or its effect on my body clock, there was no question between going to bed or catching another sunset! This time it was a bit earlier, and I was armed with snacks.
Hallgrimskírkja Church at 10.30 pmMy favorite Icelandic cookies and breadLate night before an early morning meeting? Worth it.]]>A collection of photos from experiencing the midnight sun in Reykjavik, Iceland.Day Trip to Keukenhof!https://www.niamurrell.com/travel/2016-04-30-day-trip-to-keukenhof/2016-04-30T11:00:00.000Z2020-06-21T10:29:09.741ZFor as long as I can remember, two famous flower fests have been held in the back of my mind as must-visit destinations. Although the Japanese cherry blossom festival remains on the to-do list, living in London gave the perfect opportunity for a day trip to Holland’s tulip festival. Not exactly the reason most young people (or young-ish, if I’m being honest!) travel to Amsterdam, but I was going to Keukenhof!
Keuken-what?
Keukenhof (closest to American English pronunciation: Coke-en-hoff) is the name of this wonderful park where the tulips are on show. Originally forest land, from the 1600s it was part of the estate of a nearby castle and it was where they sourced herbs, fruit, and vegetables for the kitchens. This is where the name comes from: in Dutch ‘keuken hof’ translates to ‘kitchen garden.’
During the 17th century, tulips found a home in Holland. First brought there by a biologist named Carolus Clusius, it turned out that the climate, sandy earth, and excess of water (much of the country is below sea level) were perfect for growing tulips. And they quickly became massively popular! At the height of the tulip bubble, one single bulb would cost the equivalent of $90,000 in today’s US dollars.
Fast forward a few hundred years, and you’ve got hundreds of well-established bulb growers in the region. The forest and ‘kitchen gardens’ had been redesigned into an English-style garden in the 1850s, and were less critical to the estate. Bulb growers got together and planned a Spring showcase of their best bulbs, and in 1950 Keukenhof as we know it today opened to the public.
Getting There
Keukenhof gates
As for my trip, I have to say it was surprisingly easy to plan to get there. They sell a combo ticket for park entrance and a bus that takes you to and from Keukenhof from the airport for €24. Since it would only be for one night, I stayed at one of the airport hotels rather than going into the city of Amsterdam (it’s farther from the park and costs more to get there). So it was as simple as getting off a plane, dropping my luggage at the hotel, and hopping on the bus to the park.
Since it’s only open for 8 weeks a year, Keukenhof is an unsurprisingly popular place. But I wasn’t expecting the massively long line when I got to the bus stop! Even though it curved around the corner, it moved pretty quickly; the buses came more often than they say on the website, and I was crammed in like a sardine within 15 minutes. After a 30-minute journey we arrived at the park.
The Arrival!
Tulips tulips tulips!
And what a beautiful park it is! Well I guess that’s what you get if you rip it out and plant it new every year: a perfectly manicured, easy-flowing, beautiful place with lots of different areas to explore. I started off by going towards The Mill where you can catch a boat to look around the flower fields. The walk took me past some fragrant beds of hyacinths in different colors–so pretty! I also walked down the ‘Walk of Fame,’ where they plant all of the tulips that are named after Dutch royalty or celebrities. Most of these weren’t in bloom but in addition to kings and princesses, some names like Madonna, Cristiano Ronaldo, and Vincent Van Gogh stood out.
Along the way I got side-tracked and found myself in the Willem-Alexander building. From the moment I entered, the continuing sentiment was WOW! I walked through rows and rows of perfect tulips in a building that’s probably the length of a football field. On closer inspection I was surprised to see that these perfect flowers were all growing in situ rather than being cut flowers, selected for their perfection. These really were the best in show bulbs from each of the growers being featured. Also, who knew there were so many types of tulips!? Single flower, double flower, late-blooming, early-blooming, fringe, dwarf…the varieties were endless and all on display to see side by side.
Rows upon rows of tulips cross the Willem-Alexander PavilionPerfect spot for lunch
Dotted around the perimeter and amongst the tulip rows were spotlight areas of other sorts of flowers too: cyclamen, lilies, daffodils, hyacinths, lilacs, and more. With so much to see I quickly felt the need for a break and had a seat in one of the glass-covered porticos that runs along both sides of the building. Just outside are canals shaded by cherry blossom trees–it was such a pretty place to sit, have a bite to eat, and inspect the park map to figure out where to go next.
Perfect Timing!
Turns out they give a free daily tour of the park every day at 2pm, so I circled back towards the entrance to join. My tour was led by a Dutchman named Wim who volunteers at Keukenhof every year because he loves the place so much. He told us about the history of Keukenhof (see recap above) and took us on a walk through the park. Wim confirmed my suspicions about the different types of tulips–apparently there are just over 3000 varieties of tulip, and 800 of them are planted throughout Keukenhof. This sounds like a lot (and it is!), but this number was dwarfed by the fact that there are over 13,000 varieties of daffodils!
Me at the Keukenhof windmill
On the walk we passed by rows of sequoia trees (tiny in comparison to the ones in Yosemite); the royal gardens, in place since the 1850s and closest to the English style; the sand dunes, which protected the gardens from the rising canals; a petting zoo and playground; and finally the inspiration gardens, where several designers have created gardens with different themes to give visitors ideas of what can be done with their own gardens at home. The walk was about 40 minutes and we ended by my original destination, the windmill.
Keukenhof’s whisper boats were recommended on several blogs and information pages so I was very excited to go for a ride. The electric boats fit about 50 people and glide amongst the flower fields while sharing information from headphones which you plug into the benches. The key attractions are the fields which are often in bloom with rows and rows of different flowers and colors. Unfortunately a cold winter prevented the bloom from coinciding with my visit, so it turned out to be a bit underwhelming, albeit a very peaceful ride!
Ordinarily a field of rainbows, the view wasn't quite there
So Much To See!
Back on land and with nowhere in particular to go, the time was right for an aimless wander. One of my favorite outdoor spots of the day turned out the be tucked just around the corner from the windmill. Although it’s not specifically highlighted or mentioned on the map, Keukenhof’s Japanese-inspired garden is a spot I would certainly say shouldn’t be missed. While the flowers are more sparse than other areas of the park, the gurgling brooks, narrow, winding pathways, and high bamboo trees give a feeling of calmness that was unique compared to the rest of the grounds.
Not too far from here was the Beatrix pavilion which housed an impressive orchid show. There were shapes and colors I had never seen before and all different sizes from tiny blooms to plate-sized, beautiful monsters. It was a very popular exhibition, seemingly with just as many people taking extreme close-up photos as there were flowers in the building!
Orchids, orchids everywhere!
By contrast, the exhibition in the Oranje-Nassau pavilion was markedly less popular, and in my opinion, with good reason. This building is home to the rotating exhibitions which change on a weekly basis throughout the open season. This week gerber daisies were on display, placed in everything from a mannequin-filled pirate scene to a recreation of Vermeer’s The Milkmaid painting. All of the different scenes felt a bit disjointed, and after the beautiful, lush beds and displays seen in other parts of the park, sadly the daisies felt a bit boring if I’m being honest!
The swan pond
So I quickly took myself back outside to take in the rest of the park. By now the sun was beginning to set, and several of the tour buses must have collected their visiting groups; as a result Keukenhof started to take on a different feel compared to earlier in the day. Several more overflowing tulip beds popped up as I walked through even more undiscovered paths and walkways. There were even some parts where I didn’t see any people at all for a time…imagine having this whole park to yourself!
Eventually aiming towards the exit, I found myself in the postcard garden (my name, not theirs)–the part of Keukenhof that you see on all of the calendars, t-shirts, mouse pads, and of course, the postcards. And with good reason! A small lake dotted with swans at the base of a sloping hill covered in sweeping, criss-cross rainbow rows of tulips? It was the piece de resistance! The one spot where in one eyeful you can take in all of the things that make Keukenhof special. It was the perfect place to end the day and appreciate a long-lived wish existing before my eyes.
]]>A travel essay about my day trip to Keukenhof to see the tulips and flowers in the Netherlands.A Return To Athenshttps://www.niamurrell.com/travel/2015-04-30-a-return-to-athens/2015-04-30T11:00:00.000Z2020-06-30T23:56:30.582ZOver twenty years ago my grandmother and aunt traveled through Europe and Africa on a tour of ancient civilizations. I read about their travels and appreciated learning about the things they saw, and wished to one day see them myself. In April 2015 this wish came true when I visited Athens, Greece for the first time.First Time in Greece!
Planning The Trip
Although I was inspired by my grandmother’s travel essay, the reason I went on this trip was really for one simple reason—a sale! EasyJet, a discount European airline, had a sale slashing their already low prices even lower. I chose Athens because I knew I would be traveling alone and thought it would be a destination where I could enjoy the sites and activities even without a travel companion.
In the weeks leading up to the trip I told people that I would be visiting Athens. The main responses were always somewhere along the lines of ‘Athens!? You should go to the islands instead!’ or ‘4 days is too long, you can see it all in 1’ or simply, ‘that place is a dumphole.’ Not exactly the most inspiring response! But the trip was booked and I planned to make the best of it.
Arrival Into Athens
I arrived into Athens Eleftherios Venizelos International Airport on a Sunny Sunday morning and made my way into the city. There is a metro train stop just across the street from the airport, and Athens offers a 3-day tourist pass with unlimited public transport and a round trip airport journey, so I bought this and boarded the train.
On arriving into the city center, I had to find my way to the apartment I would stay in over the next three nights. While it was only a 10-minute walk from the Acropolis metro station, finding the way for the first time can be difficult as you never know exactly where you are when you come from underground, the center is very loud and busy, and you don’t want to draw attention to yourself as a tourist by holding a map and looking confused. I picked a direction and stuck with it.
This walk was not a pleasant one to say the least: I had to cross giant roads with cars and mopeds speeding by; the crossing lights were short, and the traffic lights only seemed to be a suggestion to the vehicles on the road. After this I walked up a steep hill (thank goodness I only had a backpack!) on a road with broken sidewalks, empty lots, clothing and trash in the street, and not a person in sight. I passed through two more of these frantic roads and one more dubious street before finally arriving at my destination. By this time I was thinking, ‘everyone was right about this place, what have I gotten myself into!’
My lovely Athens apartment
Finally in the comfort of a lovely apartment in the Mets (Μετσ) neighborhood, I met my host Kalliopi, whose spare room would be my home for the next few days. I had booked the room on Airbnb.com and was happy to find that the apartment matched the pictures and description I saw online. Kalliopi gave me some tips about places to go and see, but I was eager to get out for a bit and explore the city.
First Walk Around Athens
During my journey from the airport, I received an email telling me that the Athens walking tour I had booked for the next morning had been cancelled. I had planned this activity for my first morning as an orientation to the city, so this news was disappointing. My main goal on this Sunday afternoon walk was to find something to replace the tour.
I also wanted to find a better route to walk to and from the apartment, and thankfully I found it straight away. The Mets neighborhood is just under the Acropolis, adjacent to a large green space which contains Hadrian’s Arch and the Temple of Olympian Zeus. Walking along this park was a lot less frantic and provided quicker access to the sites.
Circling around through the Plaka Neighborhood and up to Syntagma Square, I was surprised to find there was no tourist information available in these high-traffic hotspots, and the offices that came up in a Google search had all been closed permanently or didn’t seem to exist where they should have been at all. While in other cities it’s often possible to find a central location to find out basic information, in Athens it just didn’t exist! This was another source of stress, and in my mind, it strengthened the opinions everyone had offered before I traveled. Finally I found one open travel agency and booked an all-day tour to visit Delphi the next day.
With this successfully booked, I was free to wander the city. I had read about some of the main parts of the city, Plaka and Syntagma Square being two of them. I had also heard about a small hidden village under the Acropolis called Anafiotika (Αναφοωτικα), where it feels like you’re on a Greek island; Kalliopi had also recommended Psyrri (Ψυρρη) and Exarchia (Εξαρχεια) as really cool neighborhoods worth checking out.
I started my walk through Plaka. This neighborhood is below the Acropolis near Hadrian’s Arch, and it stretches all the way down to Monastiraki Square, another Athens central hub. Along the way the streets are lined with shops of souvenirs, handcrafts, and restaurants, and many of these had people outside asking passersby to come in and have a look. The streets were narrow and seemed pedestrianized, but time after time a moped or even taxi would race through and everyone on foot had to stand (or squeeze) to the side to let them pass.
Not necessarily interested in the touristy shops and in search of Anafiotika, I turned off of a main street to walk up some stairs to a quieter road. While the driving roads seem to run across the hill, the main way up or down is staircases or narrow alleyways. Passing through the streets I found myself directly under the Acropolis on Aeropagus Hill, with a magnificent view of the city. From here one could see just how vast and packed in Athens is, stretching all the way to the base of Pendeli Mountain, and only broken by geological features where it would be impractical to build. Aeropagus Hill also has a great view of the Acropolis from below the site’s main entrance. The hill itself was dotted with tourists, families, and couples all taking in the view and perhaps awaiting a scenic sunset; everyone was relaxed and simply enjoying the place they were in. Finally, a glimpse of the Athens I was hoping to find!
Panoramic view from atop Aeropagus Hill
Heading back down the hill I passed lots of ruins and archeological sites before coming across Adrianou Street (Αδριανου), another pedestrian road with shops and restaurants, although this one seemed to have a lot more Greek people around, mixed in with the tourists. Coming to the end, I found that Ermou Street (Ερμου)—another shopping road I’d read about before arriving—was close by. This end, by Thissio Station (θησειο), is not the main shopping road. Instead the narrow, dirty sidewalks were lined with garage doors, open and overflowing with knickknacks and antiques. Furniture, home decorations, old record players—it looked like you could find some great things in there with a bit of time, luck, and haggling.
From here I reached Monastiraki Square and remembered that the Athens Central Market would be close by, just up Athinas Street (Αθηναζ). Unfortunately the market was closed but I carried on walking up to Kotzia Square (Κοτζια) and found a beautiful open-air daily flower market with pots starting as low as 1 euro.
Athinas Street runs through the Psyrri neighborhood so I backtracked to take more of it in, stopping along the way for a “frappé,” a coffee drink favored by the Greeks which seemed to be in everyone’s hands everywhere I went! It’s sort of like an iced coffee but covered in a creamy coffee/milk foam and with white cream layered on top; the best part is the price—1 euro pretty much anywhere you go!
The thriving hub of Psyrri...before the evening comes to life.
With a frappé in hand I finally wandered through the neighborhood streets of Psyrri. This is definitely a derelict area. Most of the buildings are run down if not literally crumbling, and any businesses that were once here are now long closed. However while most of Athens is covered in graffiti, in Psyrri it personifies the term ‘street art,’ and many of the walls are covered in giant murals of bright colors. Tucked within the neighborhood is a small cluster of streets where restaurants and businesses continue to thrive, and here I had dinner at a wonderful restaurant called Lithos (Λιθοσ). Such an amazing meal after a long day of travel and walking! When it comes to vegetables, bread, and olive oil, the Greeks really have it down. I ended the meal with a Greek orange sponge cake dessert called ravani (ραβανι) which, served with vanilla ice cream, was the perfect way to end the day.
Walking back through Psyrri to go back to the apartment, the streets were teeming with people and the restaurants and nightclubs were just getting started. It was easy to see the vibrancy of this neighborhood as it came to life and I understood its charm. By the end of the evening, Athens had shown me why half of all Greeks living in Greece choose to live in this city, and that despite its outward appearance, Athens is not a ‘dumphole’ after all.
Tour of Delphi
Ancient Delphi
Delphi is an archeological site located about 75 miles outside of Athens with most of its structures dating back to the 6th century BC. In Greek mythology the area was considered to be the center of the universe, and so throughout the centuries it was a place to worship, provide offerings to the gods, and to show off one’s wealth and prosperity by donating elaborate temples and statues. Delphi was also a pilgrimage destination for powerful rulers and citizens to seek answers directly from the god Apollo; a great oracle priestess called a Pythia resided on the mountain and was the single earthly human who could supposedly consult with Apollo directly.
Walking through the ruins of ancient Delphi
Delphi is situated in the cradle of Mount Parnassus, and as the site fell out of use, earthquake and mudslides buried a vast majority of the area. The modern city of Delphi was even built on top of the ancient ruins; in the 1890s archeologists discovered the antiquities beneath the earth, and the modern city of Delphi was moved a few miles away to enable further excavations. Today, evidence of the temples and buildings has been uncovered for us to admire.
Walking around the site during the guided tour was chaotic, with a lot of visitors led by tour guides shouting in many different languages, all trying to get around each other on the somewhat narrow walking paths. But despite the chaos, the visit was still a great one, aided by the bright blue sky and swathes of wild flowers growing throughout the ancient ruins.
There were also several interesting highlights amongst the ruins. One such place was the wall of the ancient stoa; in ancient times if a slave was to be freed, he had to carve the reasoning for his freedom as thanks to Apollo in the walls of the stoa, and many of these carvings can still be viewed here. Another highlight was the ancient stadium, all the way up the hill towards the back of the site. Every 4 years from 586 BC, Delphi was the site of the Pythian Games, a precursor to the modern Olympics, and thousands would travel to Delphi to watch. As a big fan of the Olympics, I found it interesting to see one of the sites where it all got started thousands of years ago.
Ancient carvings around the Delphi stoa.
Next to the ancient site of Delphi sits the archeological museum where many of the more fragile discoveries from the excavations are preserved. Since the statues and offerings brought to Delphi were dedicated to the God Apollo, they were often massive and elaborate, and it’s incredible how some of them have survived over the centuries—in some cases they even still maintain evidence of the original colored paints.
Some of the most impressive items on display included the giant sphinx which sat on top of a column in ancient Delphi, intricately carved columns, and even an musical score for “The Song of Athens,” fully marked with ancient musical notations. The museum’s crowning jewel is a life-size bronze statue of a Pythian games athletic champion, which has been preserved almost perfectly over the years even down to the individual bronze eyelashes. Since bronze was a valuable metal and it was regularly melted down to make weapons in times of battle, the fact that this statue still exists for us to appreciate is a great achievement in history.
The highlight of Arachova, according to my tour guide.
From the ancient site of Delphi we went on to have lunch and had a brief stop in the hillside town of Arachova (Αραχοβα). While I wish I had some interesting things to recount about these places, unfortunately the tour I was on did not make this possible. For lunch we passed through the modern city of Delphi to go to an isolated restaurant with ridiculous prices, and in Arachova we only had a 15-minute stop, conveniently located outside a large rug & souvenir shop and a good distance from the center of the town. Both modern Delphi and Arachova looked like very interesting little villages and I would be happy to return to further explore them in the future.
A Walking Tour of Athens
The next morning I was grateful to be able to go on the free walking tour, rescheduled from Monday’s cancellation. The tour started in Syntagma Square and was led by Trevor, a British expat who has been living in Greece and Athens for around 15 years. It was a small group; I was joined by another solo traveler from France, and a family (mom, dad, and two pre-teen daughters) from India who live in Zurich.
Our walk started walking down a street off the main square where we saw great examples of Athens’ modern architectural evolution. The city used to be filled with rows of neoclassical buildings where extended families of sometimes 4 generations all lived under one roof. In the 1960s, property developers came to many of these homeowners and offered to buy the buildings in exchange for a lot of money and two free apartments—an offer which was difficult to refuse. As a result, many of the neoclassical buildings were torn down to build high-rise residential towers, and now much of the historical center alternates between beautifully restored neoclassical mansions and the imposing concrete towers.
Another thing that is very evident walking around the city is its economic fall. Shop after shop, building after building, you see empty storefronts and condemned or half-built structures. Trevor explained that many of the closures in the center are quite recent—a result of the 2008 economic crash which Greece is just beginning to recover from.
Despite the disrepair and inconsistent architecture, one thing has remained constant—the churches. Every few blocks we came across small local churches which were still in use on the sites they had been on for probably hundreds of years. In one case, a modern office building was even built around the church, so it sits under the eaves of the extended base of the building.
On the tour we also passed by ancient ruins—the Roman agora, Hadrian’s Library, the ancient agora, and of course just below the Acropolis. Athens really is a city with its ancient history on full display, and for some of the sites which require an entry ticket, you can still see the majority of the attraction just walking down the sidewalk.
Winding up through Anafiotika, we came just below the eastern side of the Acropolis, at the base of the cliff side. From here it’s possible to see just how huge the Greek flag that flies here truly is, and we learned about the time during World War II when the Nazi flag flew here in its place. During the German occupation, an Evzone soldier (one of Greece’s most elite forces) was ordered to take down the Greek flag and replace it with the Nazi flag. He took down his flag ceremoniously but then rather than handing it over to the Germans, he wrapped himself in it and jumped off of the cliff to his death. This soldier became a Greek hero, and the site bears special reverence in the city now that the Greek flag has been restored.
From the base of the Acropolis we wound back down to Plaka and over to Hadrian’s Arch, which was once an entry to the planned new city of Athens, and viewed the remnants of the Temple of Olympian Zeus which, if it still stood, would even dwarf the Parthenon in size. Next to these sites lie the National Gardens—great for a sunny stroll through the flowering trees and covered, blooming walkways towards Syntagma Square. Our tour ended just in time to watch the Evzones soldiers complete the ceremonial changing of the guard in front of the Tomb of the Unknown Soldier.
The changing of the guard
The Acropolis and Its Museum
Next on the docket was finally ascending Athens’ crown jewel piece, the Acropolis. The Acropolis is one of the highest hilltops in Athens, and is the mythological center of the genesis of the city. Story goes that the earliest settlers had to choose which of the gods to dedicate their new city to, and the choice was between Poseidon, god of the sea, and Athena, goddess of wisdom. In a contest atop the Acropolis, Poseidon struck the earth with his trident and a natural spring bubbled water from the ground. In turn, Athena struck the earth and an olive tree sprouted to full size. The settlers chose in favor of Athena’s gift, named their city after her, and built a temple in her honor where the olive tree grew. And so Athens and the Acropolis came to be.
The site itself has evidence of humans dating all the way back to the 5th millennium BC, but the ruins we see today date back to the 5th century BC. The Parthenon—a massive temple built to house a decadent statue of Athena—was the main masterpiece atop the Acropolis, and it was surrounded by a number of other temples, theatres, and monuments all built to honor the gods. Over the centuries and throughout different rulers and occupations many of the buildings had different uses or were deconstructed, repurposed, destroyed, or rebuilt. Archeologists have been researching the site for over a hundred years now, and many of their findings are on display in the newly opened Acropolis Museum.
The Acropolis Museum is built on top of ruins of the ancient city, on display under the floors and main entrance.A painted sandal...what we see today vs. how it looked originally.
This was my first stop in taking in the Acropolis, and it is an attraction I would definitely recommend to any visitors of Athens! It’s a modern and incredibly well-developed museum, easy to walk through and learn from as you go. One of my favorite highlights was an area where they show how color was such a big part of the decoration of statues and buildings in ancient times. While now we can only see a faint red or gray shading, ancient Greeks used bright and vivid colors alongside metallic ornamentation to decorate their monuments. This part of the exhibition shows both how they made the colors and also gives great comparisons of how the statues would have looked in their full glory.
The masterpiece of the Acropolis Museum is its top floor life-size installation of the frieze, metopes, and pediments of the Parthenon. The frieze and metopes consist of huge slabs of marble, carved in relief to depict various scenes, which were installed all around the top of the ancient temple; two pediments of even larger marble sculptures were placed above the temple entries at either of the long ends. In the museum in a massive glass space in view of the actual Parthenon, you can walk all the way around as though you were walking around the Parthenon itself, to view what’s left of the original marble carvings. If the original items have been destroyed over the years, that spot is empty, and if only a fraction of the original sculpture still exists, they have done their best to recreate what’s missing to give us an idea of the original work.
Most controversial in this space are the modern recreations of a number of works whose originals are actually housed in the British Museum in London. In the early 1800s when Athens was occupied and controlled by the Ottoman Empire, the Turkish rulers permitted a large number of the best-preserved sculptures and carvings to be taken away by the British, and these were eventually sold to the British Museum. Since the 1980s, the Greek government has made many efforts to have the sculptures returned, and for many years the British argued that there was no adequate place to put them in Greece, and therefore no way to guarantee that they would be preserved while remaining on public display.
Pediment, metopes, and frieze; the brighter white sculptures are recreations of those found in the British Museum.
With the opening of the Acropolis Museum in 2009, this argument lost all of its steam. Now not only do they have an adequate place to put them, but they also have copies installed with note after note showing visitors just how many priceless items the British refuse to give back! While, truth be told, the dispute is a bit more complicated than I’m explaining here and both sides have some pretty valid arguments, walking around this exhibition in the museum I couldn’t help but feel that the originals do belong in this space, within view of the monument they came from.
Time to go!
After taking in the many ornaments which made the Acropolis as magnificent as it was, it was time to go to the site itself. I entered through the South slope entrance, closest to the Acropolis museum, and took in the remnants of the Theatre of Dionysus, a semi-circular stadium built in the hillside which is still partially covered by earth. Continuing on past the ancient stoa and a couple other more temples, you pass the Theatre of Herod Atticus before reaching the base of the Acropolis. The path then leads up the main staircase—a grand entrance which takes you through the Propylaia and into the ancient sacred site.
What stands truly is remarkable, especially thinking of how it has been there for literally thousands of years. Conservationists also continue to rebuild fallen items and to strengthen the ruins so that they will continue to stand for another few thousand years. However as remarkable as it is, in reality many times you’re really just looking at piles of withered rocks. For this reason it definitely helps to have walked through the Acropolis Museum and to read the posted signs to put what you’re looking at into the context of what once stood. I also listened to a free podcast audio guide as I walked around, which further brought the site to life.
On leaving the Acropolis I had a walk down to the ancient agora (or city center) where even more ruins were on display. An ancient stoa has been recreated here to give an idea of what these covered walkways would have looked like before crumbling to the bits we see today in the ancient sites. Inside the stoa they have a great little museum featuring some of the artifacts from the agora including an old kids’ potty and an ancient barbecue—from the looks of these, not much has changed! The ancient agora is also home to the Temple of Hephaestus which was built not long after the Parthenon, and remarkably still retains its ceilings and columns.
While these sites were interesting, walking around for 9 hours straight through the day took its toll, and really it was just time to sit down. So grabbing some Greek street food (ok, it was McDonald’s fries and a McFlurry!) I headed back to Syntagma Square to board the tram which meanders through Athens and down along the coast. My host Kalliopi had mentioned this is a great way to take in a different part of Athens, and said that you can get off at pretty much any stop along the way to enjoy some coastal scenery. Instead, I opted to sit on the tram all the way to the last stop, take in the sun setting over the sea from my seat, and then ride all the way back home. It felt great to sit and take in the views from the tram, and if I ever return to Athens I would like to get off and explore a bit, as there was a great little hub of a town a few stops from the end, and the beaches on the way seemed like great spots to enjoy a sunny afternoon.
Quick Trip to Aegina Island
What is a trip to Greece without some time on the islands! On my last day I was determined to have some time on the sea, and chose Aegina (Αιγινα) as it’s the closest and most accessible island to travel to from Athens. Aegina is well-known for its pistachio farms and ouzo distilleries, and it’s just a quick 40-minute ferry ride on the high-speed catamarans which run regular services each way throughout the day. The ferries depart from Port Piraeus, which was only about a 40-minute journey by metro from my apartment.
Arriving into Aegina was like landing in Athens all over again: where was I supposed to go, what was I supposed to do? There is one highly recommended attraction on the island—the Temple of Aphaia, which dates back to 500 BC. I didn’t plan to go there though as I didn’t really have time to go to the other side of the island and frankly, I had seen enough crumbling temples by this point. With only two hours to spend before my ferry back, I opted to get lunch and just have a nice walk around the marina.
The marina of Aegina is lined with restaurants and cafes that look purpose-built for tourists, complete with the English signs advertising souvlaki and moussaka. Dubious of these, I did a quick search online to find a good place to eat, but found it closed and abandoned—another probable victim of the failing Greek economy. Starving, I settled for some olives, tomatoes, and bread I found in local-looking shops and took a nice, homemade lunch on a bench facing the sea.
Stomach full, I did a bit more aimless wandering and came across another archeological site and museum (great!), home to another ancient temple dedicated to the god Apollo. Although the visit was really just a way to pass the time (with not much else seeming to be going on around the town), I was pleasantly surprised to find a truly different presentation of ancient ruins here. While the museum was unimpressive and the descriptive signs did not offer much clarity, this was the only site where it was possible to walk and climb and jump all around the actual ruins; being the only person on the whole site and museum I found this to be quite fun! The ruins also had a great view overlooking the turquoise and sapphire patterned sea.
Having squeezed as much as possible out of this site visit, I went to walk back through the town again and came across a great shop called Mourtzis (Μουρτζησ) which sells nuts, spices, teas, and desserts, and specializes in their home-grown pistachios. The baklava and kataifi desserts I tasted here were some of the best I’ve ever had, with a perfect balance of nuts, cinnamon, and sugary syrup. Their bergamot-flavored loukoumi (the Greek version of Turkish delight) was also a sweet I had to try more than once. While stocking up with edible souvenirs to take home I got some advice from one of the family members who runs the shop about where I might have a try of the famous Aegina ouzo. He pointed me to a little café/bar just a few steps away.
The little bar sat right on the marina and blended in line with the touristy restaurants; if it hadn’t been pointed out specifically, I might not have even noticed it was different from its neighbor. But once I stepped inside I saw that this truly was as old-school and local as you might find; one of the people in the bar even had to translate for me when I tried to order a quick ouzo to try. Ouzo is a Greek aperitif with an anise flavor and not being a big fan of licorice, to be honest I didn’t think I would like it. My translator friend made sure I tried it the way a Greek person would have it—served on ice with some water and mezedes (small nibbles) on the side. I was surprised to find that it was actually quite enjoyable.
Ouzo & mezedes at Gallery Anastasia.
Sitting on a marina in stodgy old bar sipping ouzo and eating olives watching people walk by—what a way to end my time in Greece! With this moment passed it was time to head back to the dock to catch a ferry back to the mainland, and from there, back to the airport to head home. My quick 4-day visit had come to a close.
Final Impressions of Athens
Planning this trip to Athens, I had hoped to see the great archeological sites from ancient Greece which I had learned about from a young age. In this respect the city did not disappoint, and had I had a refresher in the ancient tales, I can imagine that my appreciation of the antiquities might be even greater. Otherwise I expected very little, and had had plenty of warnings about the worst: crappy architecture, run-down buildings, graffiti, pickpockets, and maybe even a riot thrown in with some political demonstrations. In my opinion, none of these impressions were an accurate representation of the city. Were there disappointments and frustrations? Absolutely. For a country whose economy relies so heavily on tourism, there is a lot to be done to offer visitors an intuitive way to get the best out of their time there. And how a city that has been so advanced for centuries has not figured out a way to implement a sewer system that can accept toilet paper is beyond me; honestly, the airplane I flew on to get there had a more advanced waste system, and this is definitely something they don’t mention in the guidebooks! But despite these hindrances Athens is a lively, eager city with lots more to offer than its ancient ruins and Greek salads. If you come to Athens looking to be impressed by what your eyes can see, you might leave disappointed. But with and open mind and heart to find the beauty of the city, you’ll find it’s all around you in unexpected places.
]]>A travel essay about my April 2015 visit to Athens, Greece.Italy Holiday, March 2008https://www.niamurrell.com/travel/2008-03-31-italy-holiday-video-2008/2008-03-31T11:00:00.000Z2020-06-22T22:28:16.165ZIn 2008 I spent a couple of weeks traveling Italy through Venice, Florence, Chianti Ruffina, Rome, Pompeii, and Sorrento. These are our highlights.
]]>Highlights video from a couple of weeks traveling Italy through Venice, Florence, Chianti Ruffina, Rome, Pompeii, and Sorrento.